Slik tar du et skjermbilde på en Mac-datamaskin og bærbar PC
Et skjermbilde er et bilde av alt på skrivebordet ditt, et aktivt vindu eller en nettside. Det kan lagre viktig informasjon raskt, dele skrivebordet med andre og mer. Mac OS har alltid gjort det enkelt å ta et skjermbilde. Apple gir deg noen alternativer for å ta skjermbilder på Mac, fra snarveier til kommandolinjer. Denne veiledningen viser de velprøvde metodene og demonstrerer arbeidsflytene med detaljer.
SIDEINNHOLD:
- Del 1: En rask måte å ta skjermbilder på Mac
- Del 2: Slik tar du et skjermbilde på Mac med snarveier
- Del 3: Slik tar du et skjermbilde på Mac med Touch Bar
- Del 4: Slik lager du et skjermbilde med Mac Screenshot-appen
- Del 5: Slik tar du skjermbilde på Mac med kommandolinjen
- Del 6: Slik tar du et skjermbilde på Mac via forhåndsvisning
- Del 7: Slik tar du opp et helsides skjermbilde på Mac
- Del 8: Hvor finner du skjermbilder på Mac
Del 1: En rask måte å ta skjermbilder på Mac
Apeaksoft Screen Recorder er et av de beste skjermbildeverktøyene på Mac. Det kan ta skjermbilder av hele skrivebordet eller et hvilket som helst område på skrivebordet med et enkelt klikk. Dessuten kommer det med et bredt spekter av bonusfunksjoner, som tegneverktøy.
En rask måte å ta skjermbilder på Mac
- Ta et skjermbilde på en Mac med ett klikk.
- Tegn linjer og former direkte på skjermbilder.
- Legg til tekst og klistremerker på Mac-skjermbilder.
- Inkluder bonusfunksjoner, som skjermopptak.
- Tilgjengelig på macOS 10.13 og nyere.
Sikker nedlasting
Sikker nedlasting

Slik tar du et skjermbilde på Mac
Trinn 1. Installer skjermbildeverktøyet for Mac
Last ned skjermbildeverktøyet for Mac og følg instruksjonene på skjermen for å installere det på datamaskinen. Når du trenger å ta et skjermbilde av Mac-skrivebordet, starter du det.
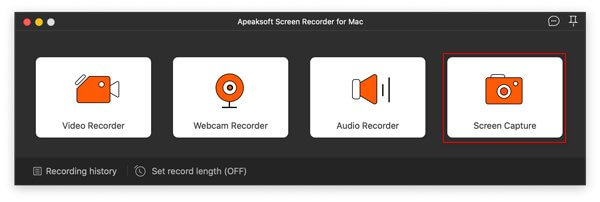
Trinn 2. Ta et skjermbilde
Legg alt du vil ta bilde av på skrivebordet. Klikk på Screen Capture alternativet i startgrensesnittet, og velg ønsket område med musen.

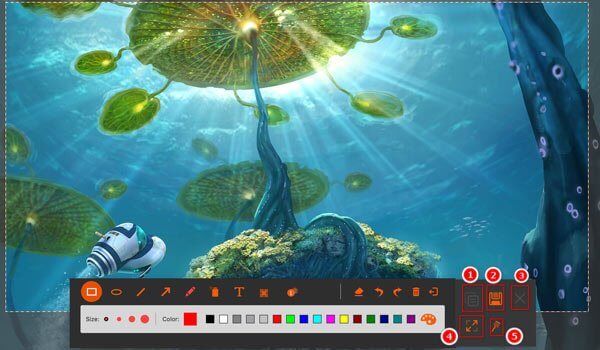
Trinn 3. Rediger og lagre Mac-skjermbildet
Deretter vil verktøyet automatisk fange det. Her kan du tegne kantlinjer, linjer, piler og andre former, eller legge til tekst med verktøylinjen. Når du er ferdig, kan du kopiere skjermbildet til utklippstavlen eller lagre det som et bilde.
Del 2: Slik tar du et skjermbilde på Mac med snarveier
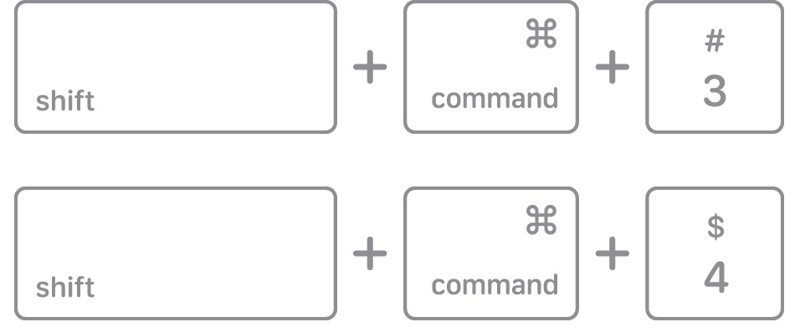
En enkel måte å ta et skjermbilde på en Mac er med tastaturet. Med de riktige snarveiene kan du ta et skjermbilde av hele skrivebordet, et aktivt vindu eller en del av skjermen. Dessuten kan du lagre skjermbilder på Mac-ens utklippstavler eller skrivebord.
| Knappkombinasjon | Skjermbilde |
| Skift + Kommando + 3 | Ta bilde av hele skjermen og lagre det som et bilde på skrivebordet |
| Ctrl + Shift + Kommando + 3 | Ta skjermbilde av hele skrivebordet og lagre det på utklippstavlen |
| Skift + Kommando + 4 | Ta det valgte området på skrivebordet og lagre det som et bilde |
| Ctrl + Shift + Kommando + 4 | Skjermbilde av det valgte området og lagre det på utklippstavlen |
| Skift + Kommando + 4 + Mellomrom | Trykk Shift + Command + 4 samtidig, trykk på mellomromstasten og klikk på et aktivt vindu for å ta et skjermbilde på Mac Hvis du vil ta et skjermbilde av skrivebordsikoner uten bakgrunnsbilde, trykker du på Command + Shift + 4, og deretter på mellomromstasten. Plasser deretter kameramarkøren over filene for å velge dem, og klikk for å ta skjermbildet. |
| Skift + Kommando + 6 | Skjermbilde av Touch Bar-visning og lagring på skrivebordet |
| Ctrl + Shift + Kommando + 6 | Ta skjermbilder av Touch Bar og lagre dem på utklippstavlen |
Trinn 1. Når du trenger å ta et skjermbilde på en Mac med hurtigtaster, trykker du på riktig knappekombinasjon.
Trinn 2. Når du har lykkes, vil du høre en kamerautløserlydeffekt gjennom høyttaleren.
Trinn 3. Som standard lagres skjermbildet på skrivebordet i en PNG-fil. Hvis det er lagret på utklippstavlen, åpner du et bilderedigeringsprogram eller et dokumentverktøy og limer inn Mac-skjermbildet.
Del 3: Slik tar du et skjermbilde på Mac med Touch Bar
Touch Bar er en praktisk måte å ta skjermbilder på Mac. Etter oppsettet kan du ta skjermbilder av hele skjermen, en valgt del, et aktivt vindu eller Touch Bar, og lagre skjermbildet på skrivebordet.
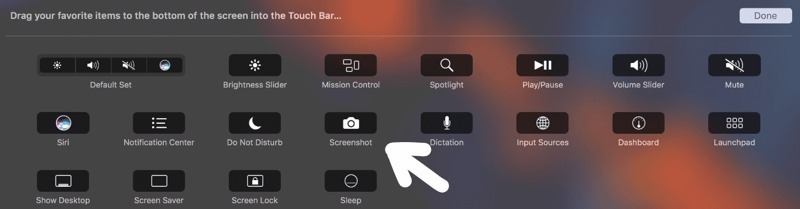
Trinn 1. Klikk på eple menyen og velg Systeminnstillinger.
Trinn 2. Trykk på Tastatur og klikk Innstillinger for berøringsfelt.
Trinn 3. Klikk Tilpass kontrollstripen, og utvide Kontrollstripe i berøringslinjen.
Trinn 4. Legg til snarveien for Skjermbilde på Mac.
Trinn 5. Når du er ferdig, klikk Ferdig for å bekrefte det.
Del 4: Slik lager du et skjermbilde med Mac Screenshot-appen
I nyere versjoner av macOS kan du lage et skjermbilde på Mac med den innebygde Skjermbilde-appen. Før macOS Mojave het appen Grab-appen. Du finner den i Annet- eller Verktøy-mappen eller med snarveien.
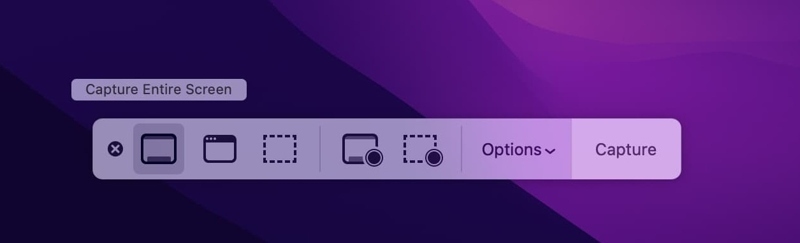
Trinn 1. Naviger til Annet mappen og klikk på Skjermbilde app. Eller trykk Command + Shift + 5 å åpne den.
Trinn 2. Nå vil du se noen knapper på verktøylinjen:
Ta bilde av skjermbildet brukes til å lage et skjermbilde av alt på skjermen din.
Fange valgte Windows brukes til å ta et skjermbilde av en enkelt app eller et enkelt vindu.
Ta den valgte delen brukes til å hente den valgte delen av skjermen.
Spill inn hele skjermen kan lage et videoopptak av skrivebordet ditt.
Spill inn valgt del kan ta opp en video av en bestemt del.
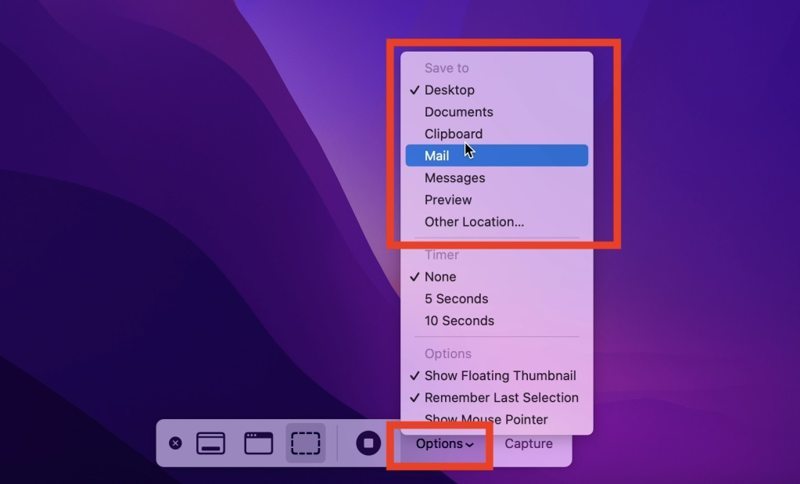
OBS: Hvis du vil tilpasse skjermbildeinnstillingene, klikker du på Alternativer-knappen.
Del 5: Slik tar du skjermbilde på Mac med kommandolinjen
For teknologikyndige brukere er det lurt å ta skjermbilder på en Mac med kommandoer. Denne metoden er også tilgjengelig hvis tastaturet ikke fungerer. Du må selvfølgelig utføre kommandoen nøye. Ellers vil skjermbildet mislykkes.
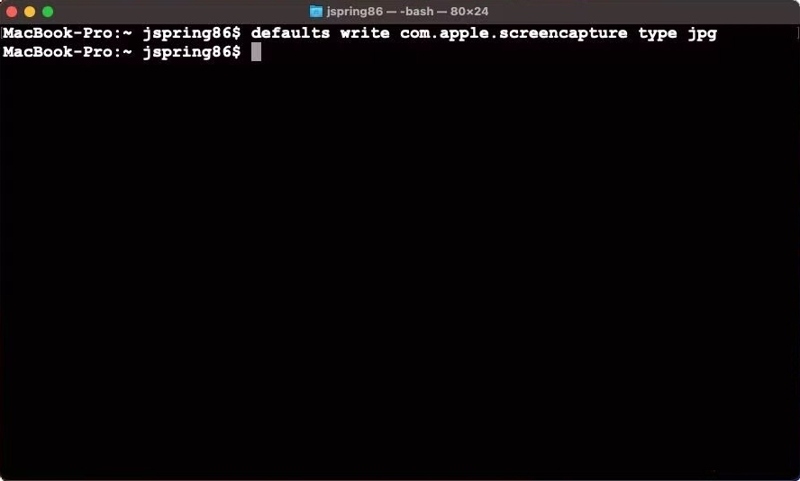
Trinn 1. Kjør terminal app fra dock bar eller Applikasjoner mappe.
Trinn 2. Input skjermbilde skjerm.png og traff Tilbake nøkkel på tastaturet.
Trinn 3. Deretter finner du skjermbildet på skrivebordet med filnavnet skjerm.jpg.
Del 6: Slik tar du et skjermbilde på Mac via forhåndsvisning
Den innebygde forhåndsvisningsappen er standardverktøyet for bilderedigering på Mac. I tillegg til bilderedigering kan du også ta skjermbilder på en Mac for hele skrivebordet, en valgt del eller et aktivt vindu.

Trinn 1. Plasser skjermen eller vinduet du vil ta bilde av.
Trinn 2. Åpne Forhåndsvisning app.
Trinn 3. Gå til filet og klikk Ta skjermbilde.
Trinn 4. Velg et alternativ, som for eksempel Fra utvalg, Fra vindueller Fra hele skjermen, avhengig av ditt behov.
Trinn 5. Følg instruksjonene på skjermen for å lagre et skjermbilde på en Mac.
Trinn 6. Når det er ferdig, kan du også redigere skjermbildet.
Del 7: Slik tar du opp et helsides skjermbilde på Mac
Noen ganger kan det være lurt å ta et helsides skjermbilde på en Mac for å lagre all informasjonen. Hurtigtastene kan selvsagt bare ta opp det som er på skjermen, men ikke et rullende skjermbilde. Heldigvis kan utviklerverktøyene, nettleserutvidelsene og tredjeparts skjermbildeverktøy dekke dine behov.
Slik tar du opp et helsides skjermbilde på Mac med utviklerverktøy
Trinn 1. Kjør din Safari app.
Trinn 2. Gå til Safari meny, velg innstillinger or Preferanser.
Trinn 3. Gå til Avansert kategorien, og merk av i boksen ved siden av Vis Utvikle-menyen i menylinjen.
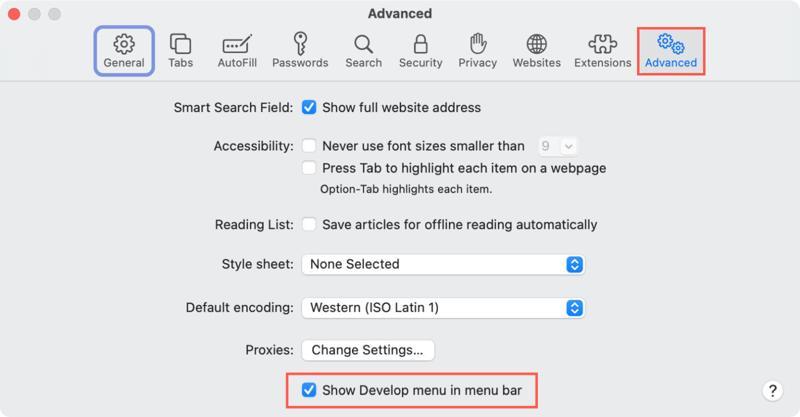
Trinn 4. Gå tilbake til Safari-skjermen og gå til nettsiden du vil lagre.
Trinn 5. Klikk på Utvikle menyen og velg Vis webinspektør fra menylinjen.
Trinn 6. Bytt til Elements fanen på høyre panel.
Trinn 7. Høyreklikk på den første linjen i .
Trinn 8. Velg Skjermbilde for fangst fra hurtigmenyen for å lage et rullende skjermbilde på Mac.
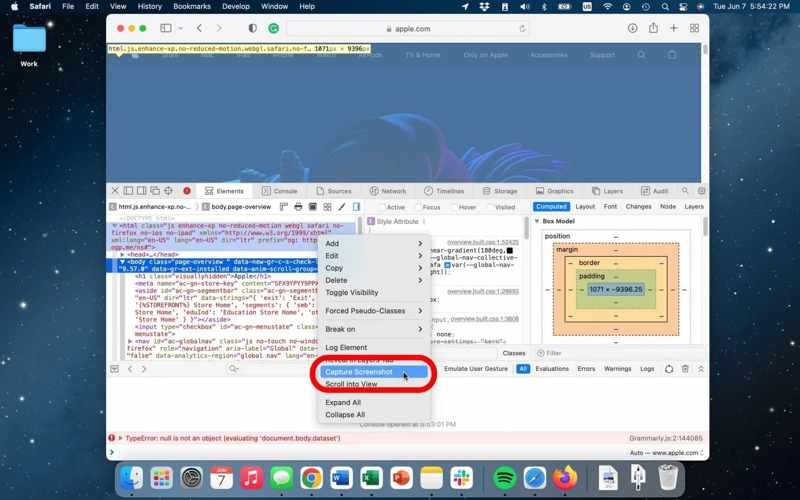
Trinn 9. Når det er ferdig, velg et sted for å lagre skjermbildet på Mac-en og legg igjen et filnavn.
Trinn 10. Til slutt klikker du på Spar knapp.
Trinn 11. Klikk på X -knappen øverst til venstre for å lukke nettinspektøren.
OBS: Du kan også ta en hel side på en Mac ved hjelp av utviklerverktøyene i Google Chrome.
Slik lagrer du et rullende skjermbilde på Mac ved å skrive ut
I tillegg lar Safari deg lagre et rullende skjermbilde på en Mac med en innebygd funksjon for utskrift av siden. Den åpner en virtuell skriver, tar et skjermbilde av hele nettsiden og lagrer det som en PDF-fil.
Trinn 1. Gå til nettsiden du vil ta et skjermbilde av i Safari.

Trinn 2. Høyreklikk på et tomt område på siden og velg Skriv ut siden. Eller gå til filet menyen og velg Skrive ut.
Trinn 3. Velg Lagre som PDF fra rullegardinlisten for formater.
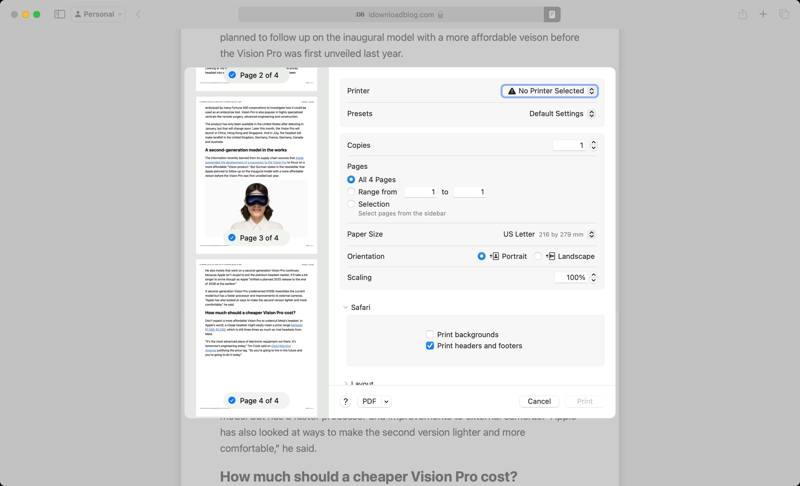
Trinn 4. Klikk på Skrive ut knapp.
Trinn 5. Deretter angir du en utdatamappe, skriver ned et filnavn og klikker på Spar.
Videre Reading
Slik lager du et rullende skjermbilde på en Mac ved hjelp av en utvidelse
En annen måte å lage rullende skjermbilder på Mac er å bruke en utvidelse. FireShot er for eksempel en allsidig utvidelse for å fange nettet uten å utelate detaljer. Den kan lagre hele nettsider i PDF, JPG eller PNG.
Trinn 1. Gå til Mac App Store, søk etter FireShot, og installer det i Safari.
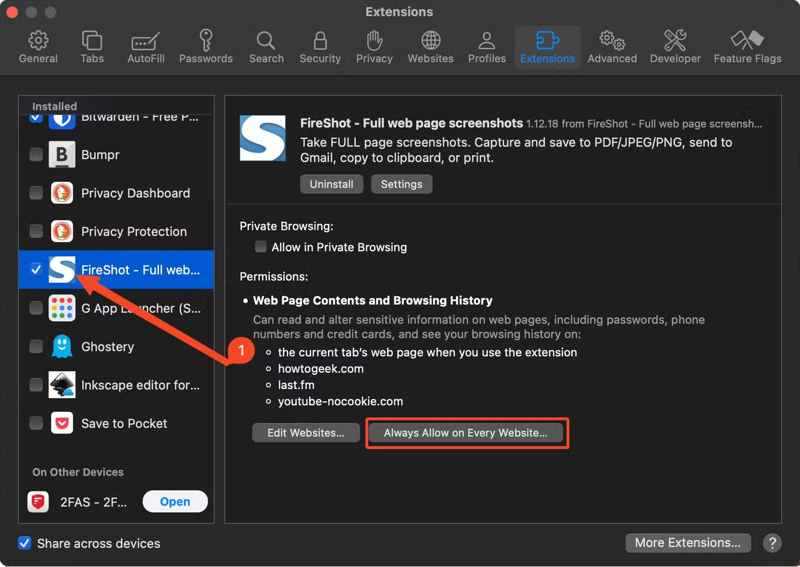
Trinn 2. Gå til Safari meny, velg innstillinger, og bytt til utvidelser.
Trinn 3. Velg Fireshot i Installert-panelet, og klikk på Tillat alltid på alle nettsteder.
Trinn 4. Gå nå til nettsiden i Safari, klikk på Fireshot og velg Tillat én dag å tillate det.
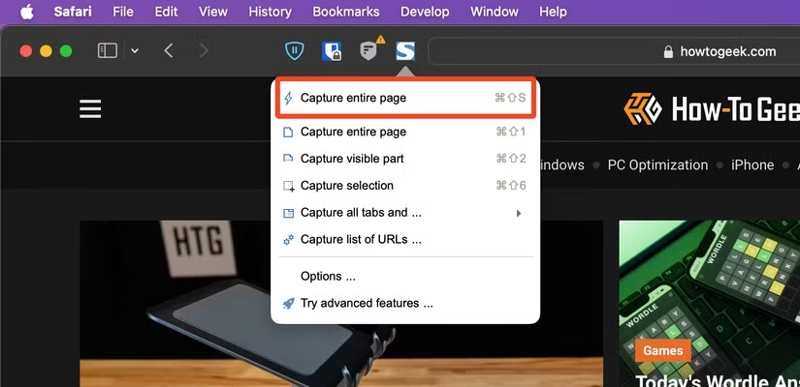
Trinn 5. Deretter klikker du på Fireshot knappen igjen, og velg Ta hele siden or Valg av fangst.
Trinn 6. Lagre deretter skjermbildet på en Mac.
Slik tar du et helsides skjermbilde på Mac via nettbaserte skjermbildeverktøy
Nettbaserte skjermbildeverktøy kan ta et fullstendig skjermbilde på en Mac uten å installere noe. Hvis det er upraktisk i noen tilfeller, kan du raskt ta et skjermbilde av en hel side på Mac ved hjelp av et nettbasert verktøy, for eksempel WebShot.
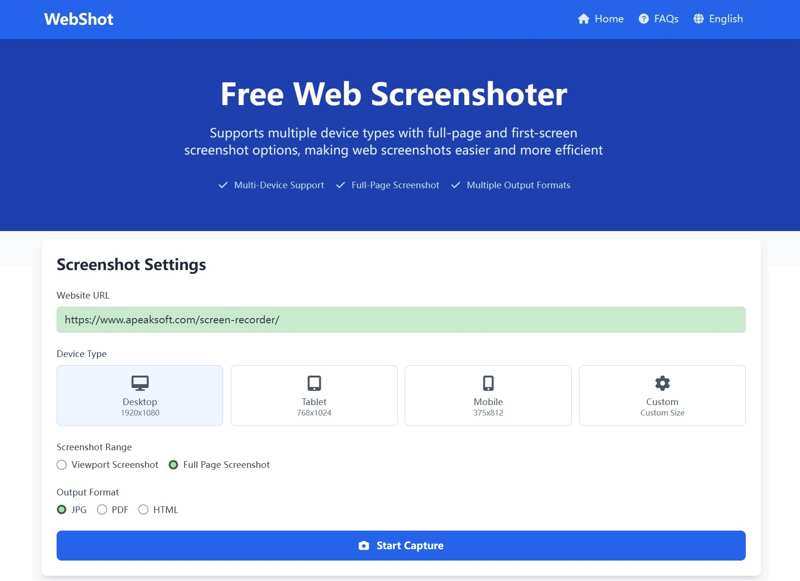
Trinn 1. Når du vil ta et bilde av en hel side på Mac, opprett en ny fane i Safari og gå til https://webshot.cc/.
Trinn 2. Kopier og lim inn URL-en i boksen.
Trinn 3. Velg enhetstype. Her velger vi desktop.
Trinn 4. Velg Full side skjermbilde, og angi et utdataformat.
Trinn 5. Klikk på Start Capture knapp.
Trinn 6. Når det er ferdig, forhåndsvis resultatet.
Trinn 7. Til slutt, klikk på Last ned JPG -knappen for å lagre skjermbildet på Mac.
Del 8: Hvor finner du skjermbilder på Mac
Hvor finner jeg skjermbilder på Mac? Som standard lagres skjermbilder automatisk på skrivebordet i PNG-format. Hvis du ikke finner dem på skrivebordet, kan du endre standardbanen. Du må finne skjermbilder via Finder.
Åpne Finder appen fra Dock-linjen, trykk på Command + F, og skriv inn kMDItemIsScreenCapture:1Deretter vil du se alle skjermbildene på Mac-en din, uansett hvor de er lagret.
Hvis du vil endre standard skjermbildebane, trykker du på Skift + Kommando + 5 for å åpne Skjermbilde-appen. Klikk på alternativer knappen, og angi en ny bane under Lagre.Konklusjon
Konklusjon
Denne veiledningen forklarte hvordan ta et skjermbilde på en MacDu kan bruke hurtigtastene til å ta et bilde av hele skjermen, en del av skjermen eller et vindu. Du kan også prøve Touch Bar, skjermbildeappen, kommandolinjen eller forhåndsvisning. Vi demonstrerte også flere måter å ta et bilde av en hel nettside på en Mac. Apeaksoft Screen Recorder er et fleksibelt alternativ for både nybegynnere og avanserte brukere.
