
Användarhandbok
- Komma igång
- Snabbstart
- Rotera video
- Beskära video
- Lägg till effekt
- Basic Clip
- Avancerad Clip
- Förbättra video
- Gå med i video / ljud
- Lägg till vattenstämpel
Prova det nu!
Komma igång
Installera programvara
Innan du installerar den här programvaran bör du se till att din dator uppfyller följande krav:
För Windows-användare:
Windows OS: Windows 11, Windows 10, Windows 8.1, Windows 8, Windows 7, Windows Vista, Windows XP (SP2 eller senare)
CPU: 1GHz Intel / AMD CPU eller högre
BAGGE: 1G RAM eller mer
För Mac-användare:
Mac OS: macOS 26, 15, 14, 13, 12, 11, 10.15, 10.14, 10.13, 10.12, etc.
CPU: 1.4 GHz dual-core Intel Core i5 eller högre och Apple M1/M2/M3-chip
BAGGE: 1GB-systemminne
Hårddiskutrymme: 2GB-hårddiskutrymme
Hur man installerar Video Editor på din PC
Steg 1. Klicka på Ladda ner knappen på den övre bannern i detta gränssnitt för att komma åt Apeaksoft Video Editor, enligt din datormodell. Dubbelklicka sedan på den nedladdade .exe-filen.
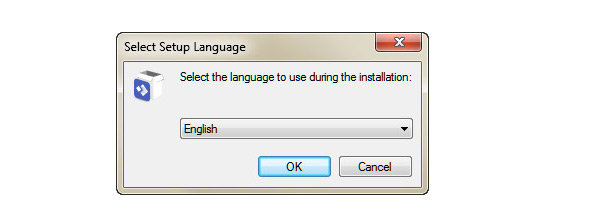
Steg 2. Välj inställningsspråk och klicka på OK knapp. Följ sedan instruktionerna och klicka Nästa för att fortsätta inställningen.
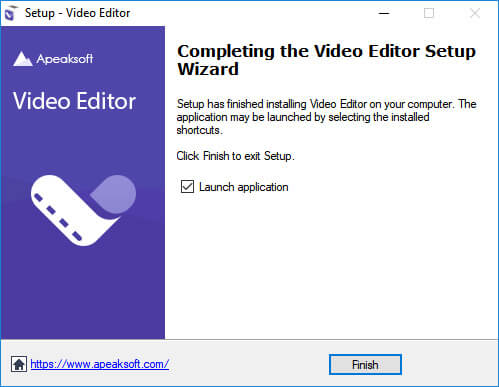
Steg 3. Gå igenom licensavtalet och markera Jag accepterar avtalet alternativ. Klicka sedan på Nästa knappen, välj en mapp för din installation och fortsätt med Nästa och installera knapp. Du kan klicka på Finish för att avsluta installationen efter installationen.
Starta programvara
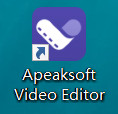
Dubbelklicka på knappen för att nå Apeaksoft Video Editor på skrivbordet.
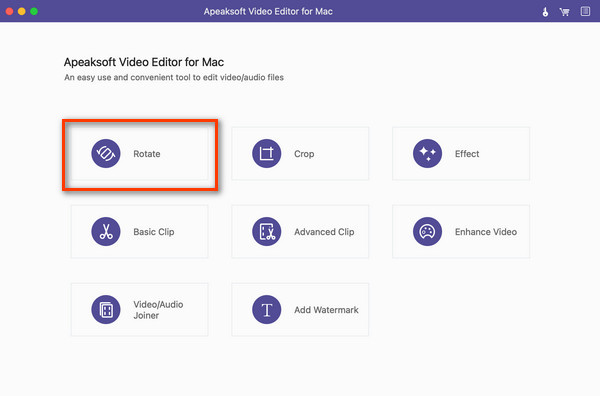
Användargränssnitt
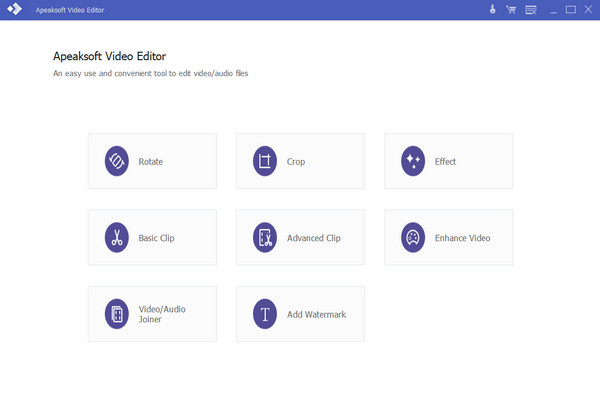
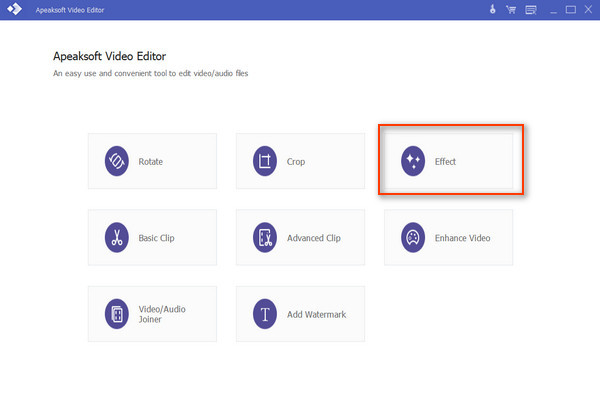
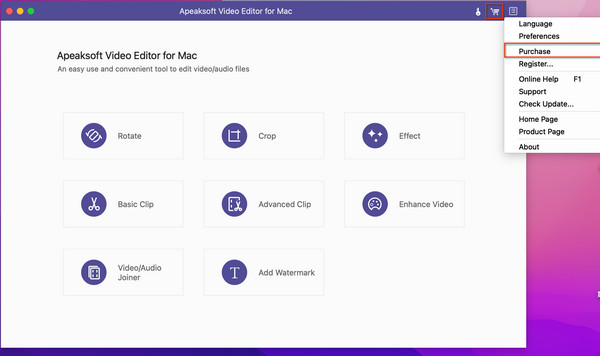
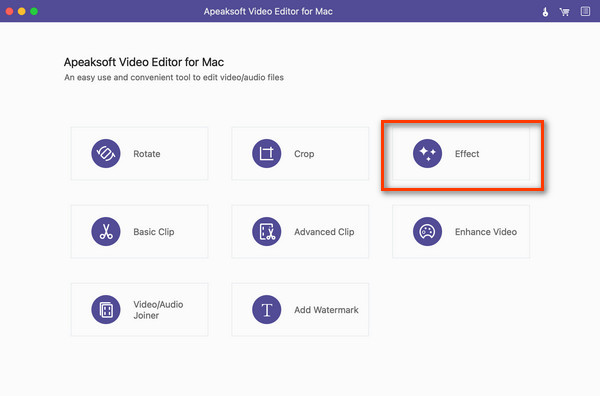
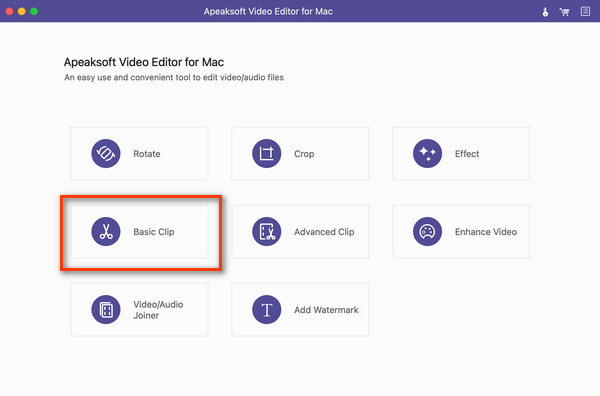
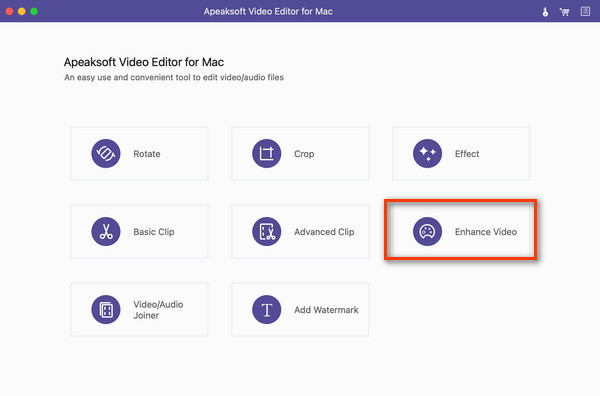
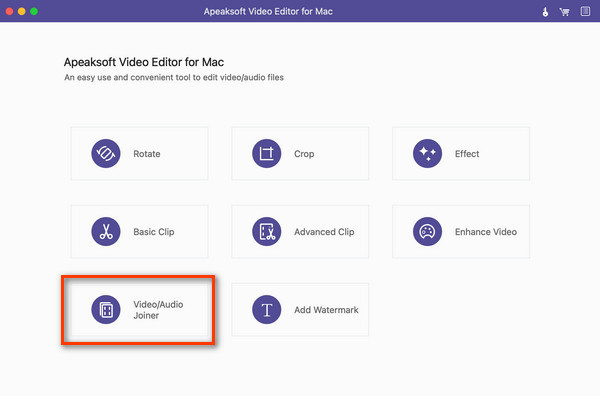
Efter att ha startat Apeaksoft Video Editor kan du njuta av det intuitiva och enkla användargränssnittet. Alla verktyg för videoredigering och förbättring är tillgängliga för användning, inklusive Rotera, Beskär, Effekt, Basic Clip, Avancerad Clip, Förbättra video, Video / Audio Joineroch Lägg till vattenstämpel.
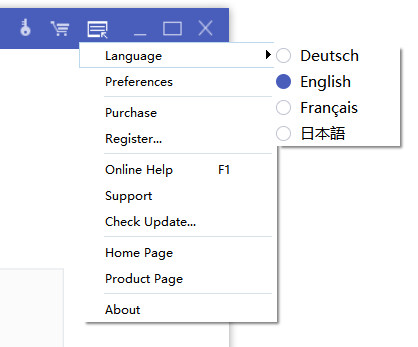
Språk
Du kan ändra standardspråket på Meny och välj bland de fyra alternativen: holländska, engelska, franska och japanska.
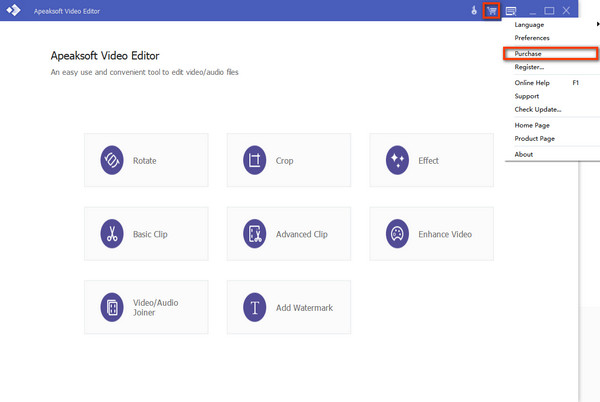
Beställ programvara
Du kan köpa den fullständiga versionen av Apeaksoft Video Editor för att få gratis uppdatering och teknisk support. Du kan öppna Inköp knappen för att visa prenumerationsplanen för din Windows eller öppna Meny -knappen och ange Inköp sektion.
När du har köpt produkten framgångsrikt kan du få registreringskoden i e-postmeddelandet.
Registrera programvara
Du kan njuta av den kostnadsfria testversionen av Apeaksoft Video Editor i upp till 30 dagar. Men för att använda alla funktioner och hög kvalitet, rekommenderas du att köpa denna programvara och registrera dig.
Steg 1. Klicka på Registrera knappen i den översta menyn i huvudgränssnittet.
Steg 2. Ange din e-postadress och registreringskoden du får när du köper den här programvaran (Klicka på Inköp knappen längst ner om du inte har en). Klicka sedan på Registrera knappen för att slutföra registreringen.
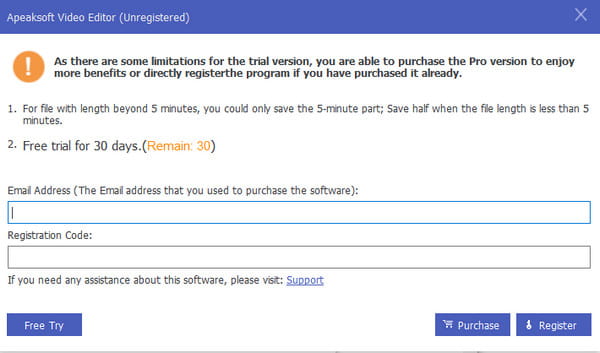
Nu är du garanterad full tillgång till alla funktioner till denna videoredigerare.
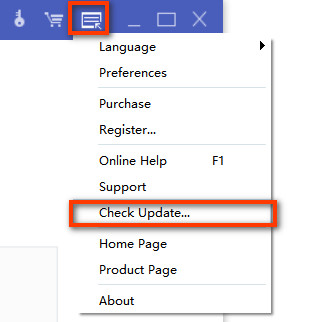
Uppdatera mjukvara
Du kan få den senaste uppdateringen från Meny knappen för att landa på Kolla uppdatering sektion. Se till att din Windows-dator är ansluten till nätverket.
Apeaksoft support
Apeaksoft ger dig professionella lösningar om du stöter på några problem när du använder vår produkt.
Kanal 1. Besök vår Supportcenter och ställ eventuella frågor.
Kanal 2. Klicka på Meny knappen i det övre högra hörnet och nå Support sektion.
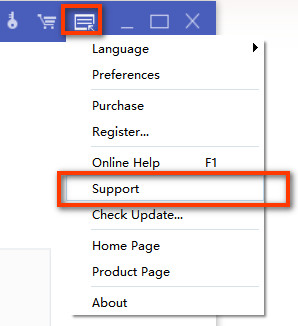
Kanal 3. Maila oss på support@apeaksoft.com.
Snabbstart
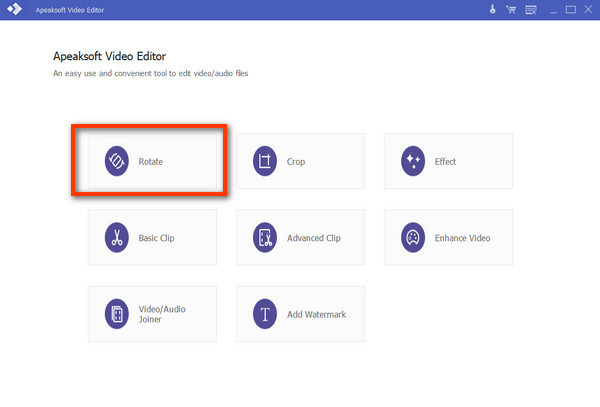
Apeaksoft Video Editor är ett omfattande och kraftfullt videoredigeringsverktyg på PC för att rotera, beskära, klippa, lägga till vattenstämplar och effekter samt konvertera video-/ljudfiler.
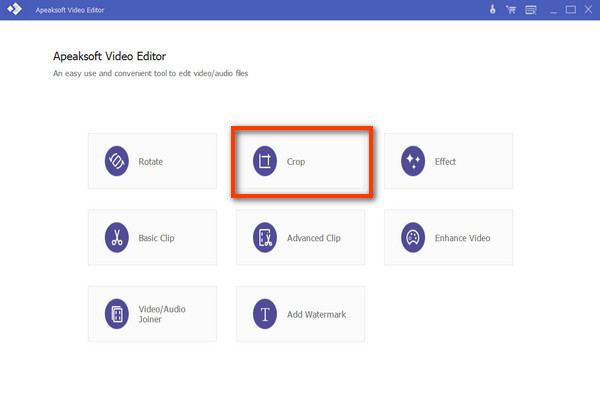
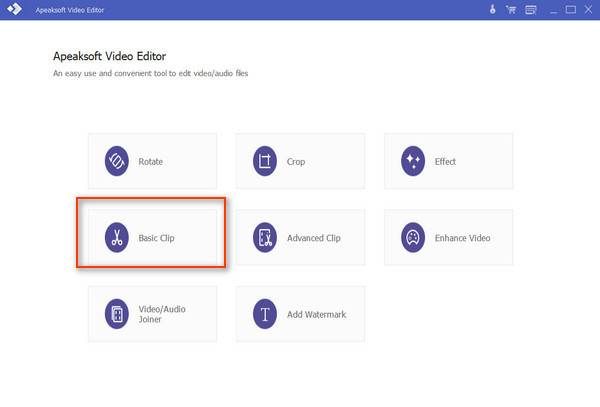
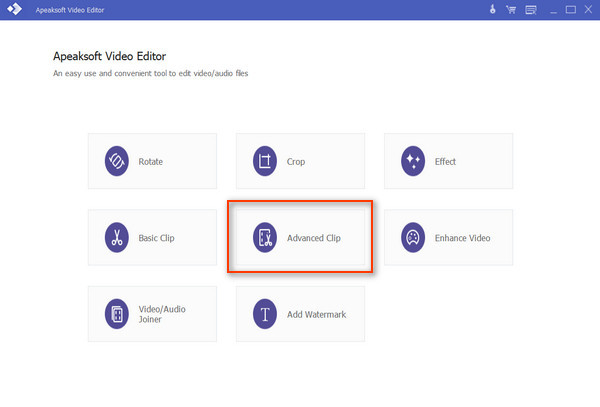
Steg 1. Välj en idealisk redigeringsfunktion
Välj den perfekta funktionen för att redigera eller förbättra din video i huvudgränssnittet. Du kan välja mellan: Rotera, Beskär, Effekt, Basic Clip, Avancerad Clip, Förbättra video, Video/Audio Gå medr och Lägg till vattenstämpel.
Steg 2. Lägg till en fil
Klicka på Lägg till fil knappen för att mata in ditt program. Eller så kan du dra och släppa målvideon eller -ljudet till huvudgränssnittet.

Steg 3. Redigera videon
Redigera och förbättra din videofil baserat på dina behov. Sedan kan du ändra utdataformatet och anpassa inställningarna för video och ljud. Välj destination och klicka på Spara för att starta konverteringen.
Rotera video
Ocuco-landskapet Rotera Funktionen låter dig ändra videoriktningen 90 grader medurs eller 90 grader moturs. Dessutom kan du vända videon horisontellt eller vertikalt.
Steg 1. Aktivera rotationsfunktionen
Starta Apeaksoft Video Editor och välj Rotera i huvudgränssnittet.
Steg 2. Lägg till fil
Klicka Lägg till fil för att lägga till dina video-/ljudfiler till det här programmet. Eller så kan du dra filen direkt till gränssnittet.
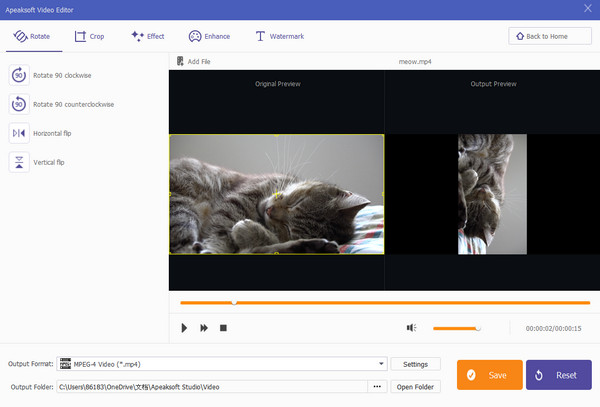
Steg 3. Rotera din video
I Rotera kan du välja att rotera din video 90 medurs, 90 moturs, horisontellt eller vertikalt med alternativen i listan till vänster. Förhandsgranska effekten till höger när du vill.
Steg 4. Spara din video
Ändra format, anpassade inställningar och destination för utdata. Klicka sedan på Spara knappen för att generera verken.
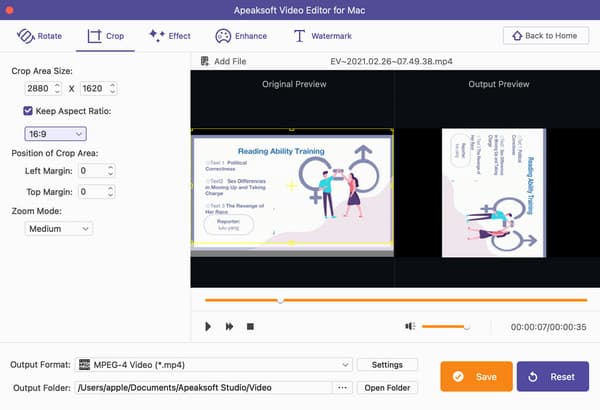
Beskära video
Denna videoredigerare låter dig beskära och ändra storlek på din video. När du vill ta bort brevlådan för din favoritvideo kan du välja detta Beskär särdrag.
Steg 1. Gå in i beskärningsfunktionen
Starta Apeaksoft Video Editor och välj Beskär i huvudgränssnittet.
Steg 2. Lägg till filer
Klicka Lägg till fil för att lägga till dina video-/ljudfiler till det här programmet. Eller så kan du dra filen direkt till gränssnittet.
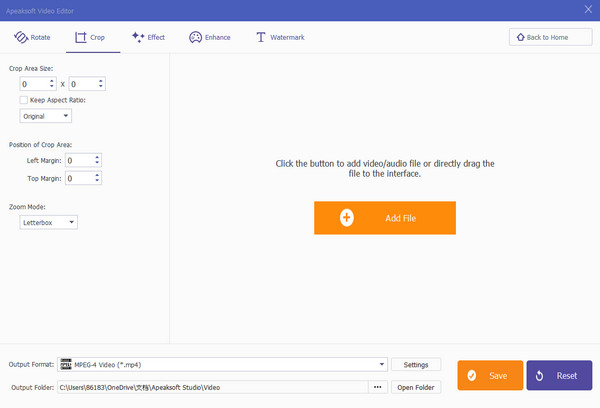
Steg 3. Beskär din video
I Beskär avsnitt, kan du ändra storleken på beskärningsytan och anpassa bildförhållandet med dina behov eller klassisk matchning 16:9 och 4:3. Du är fri att justera positionen för beskärningsområdet exakt och välja zoomläge bland Brevlåda, Medium, Pan& Scan och full.
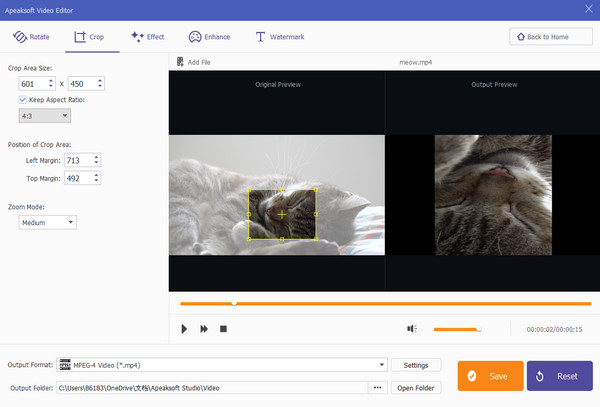
Steg 4. Spara din video
Ändra format, anpassade inställningar och destination för utdata. Klicka sedan på Spara knappen för att generera verken.
Lägg till effekter
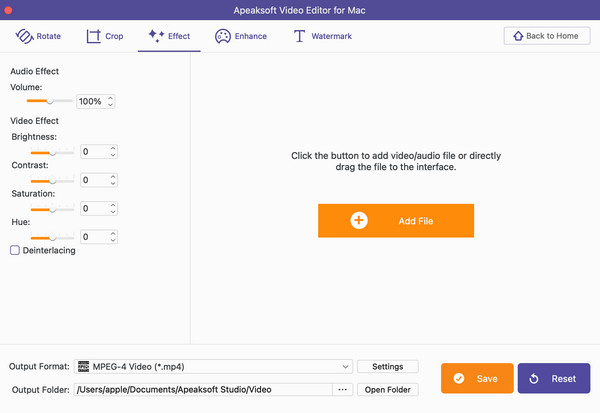
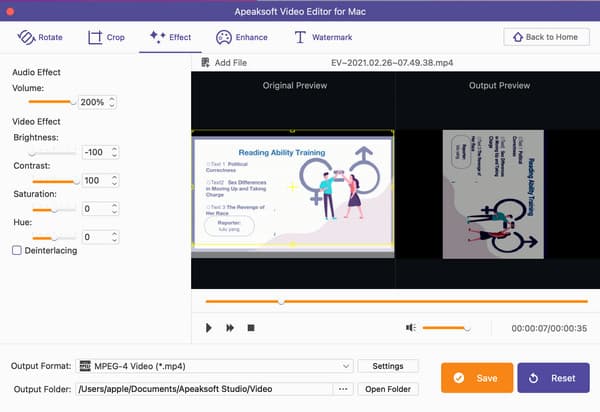
Apeaksoft Video Editor låter dig lägga till video/ljudeffekter för att få en fantastisk video/ljud. Du kan använda Effekt funktion för att nå ditt mål.
Steg 1. Ange effektfunktionen
Starta Apeaksoft Video Editor och välj Effekt i huvudgränssnittet.
Steg 2. Lägg till fil
Klicka Lägg till fil för att lägga till dina video-/ljudfiler till det här programmet. Eller så kan du dra och släppa filen direkt till gränssnittet.
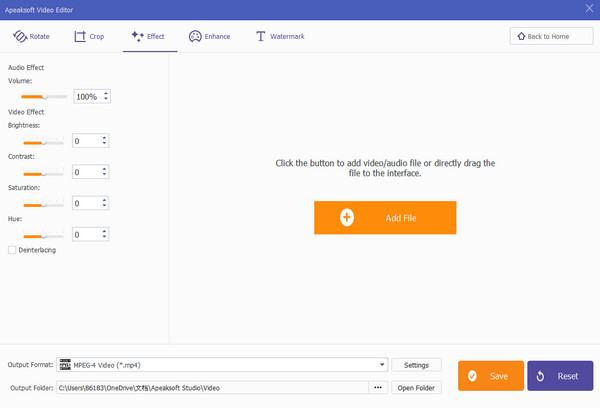
Steg 3. Redigera din video
I Effekt avsnittet kan du justera ljudvolymen genom att flytta reglaget eller klicka på Up or Ner knappen för att ändra figuren från 0% till 200%.
Du har också rätt att justera videoeffekterna på Ljushet, Däremot, Mättnad och Mössor från -100% till 100% på samma sätt.
Om du vill kontrollera effekten och justeringarna kan du klicka Spela knappen för att förhandsgranska.
Markera Deinterlacing box om du vill ha en progressiv video.
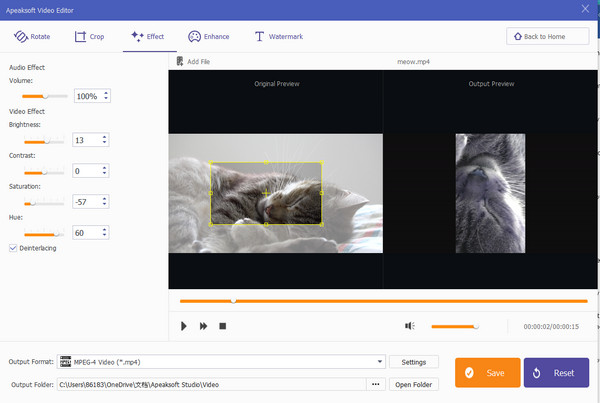
Steg 4. Spara din video
Välj format, anpassade inställningar och destination för utmatning. Klicka sedan på knappen Spara för att skapa verken.
Basic Clip
Basic Clip är den enkla funktionen som låter dig trimma video. Du kan välja att behålla eller ta bort delen med redigeringsklippen.
Steg 1. Ange funktionen Basic Clip
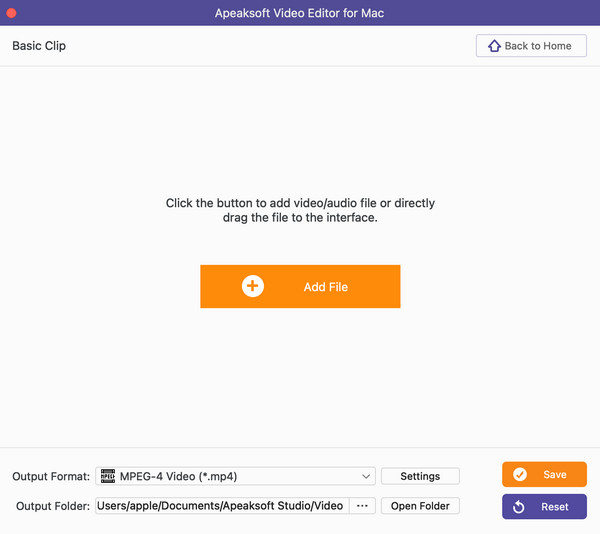
Starta Apeaksoft Video Editor och välj Basic Clip i huvudgränssnittet.
Steg 2. Lägg till filer
Klicka Lägg till fil för att lägga till dina video-/ljudfiler. Eller så kan du dra och släppa filen till gränssnittet.

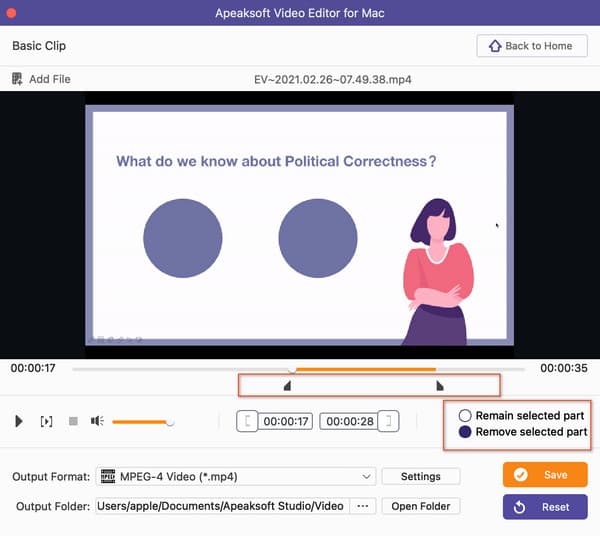
Steg 3. Klipp din video
Du kan flytta skjutreglaget till höger under videon för att ändra startpunkt och slutpunkt selektivt. Efter att ha fått den önskade delen kan du bocka i cirkeln innan Förbli vald del or Ta bort vald del för att spara eller lämna det här klippet.
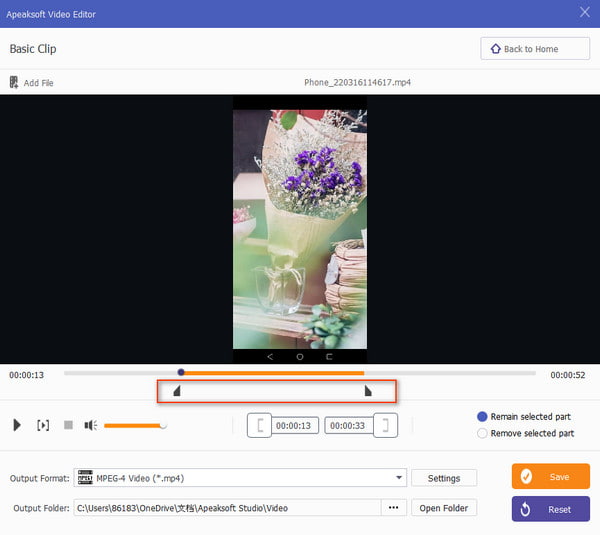
Steg 4. Spara ditt klipp
Välj format, anpassade inställningar och destination för utmatning. Klicka sedan på Spara för att skapa din skapelse.
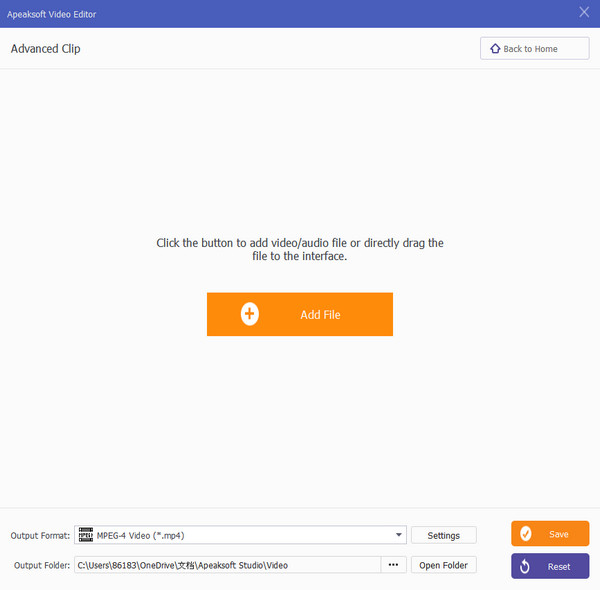
Avancerad Clip
Avancerad Clip är ett kraftfullare avsnitt än Basic Clip. Här kan du klippa mer än en video- eller ljudfil och slå ihop video- eller ljudfilerna till en i olika ordning.
Steg 1. Gå in i funktionen Avancerat klipp
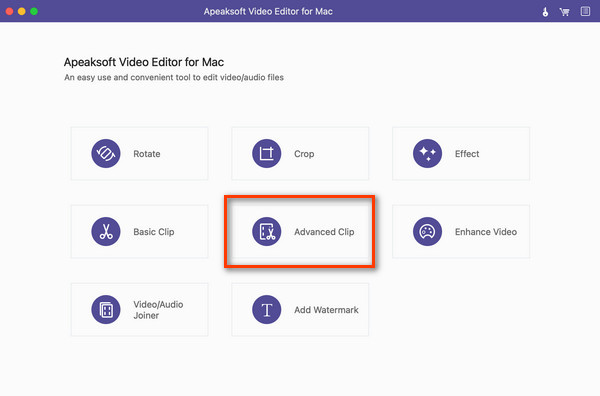
Starta Apeaksoft Video Editor och välj Avancerad Clip i huvudgränssnittet.
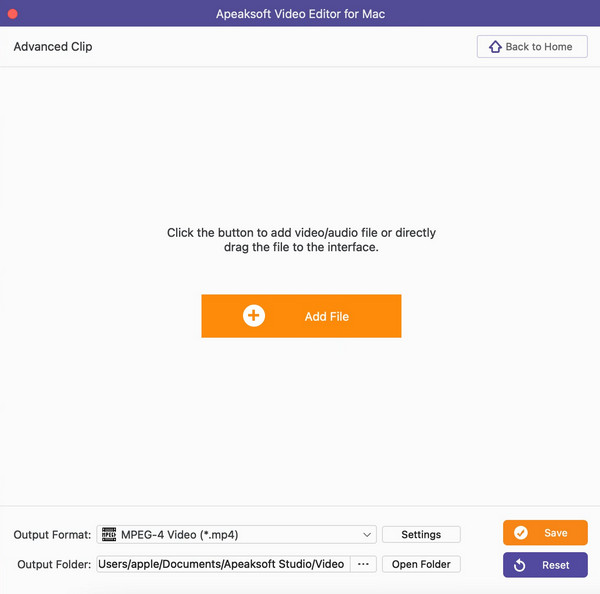
Steg 2. Lägg till filer
Klicka Lägg till fil för att mata in dina video-/ljudfiler. Eller så kan du dra och släppa filen till gränssnittet.
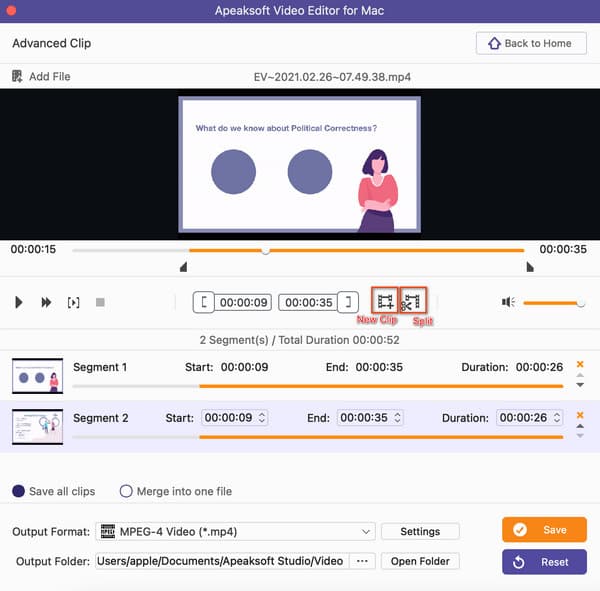
Steg 3. Klipp din video
I följande fönster kan du flytta reglaget under videon för att ändra videons längd. Sedan kan du klicka på Split knappen för att klippa den här videon i olika delar.
För att skapa ett annat videoklipp kan du trycka på Ny Clip knappen för att starta en annan del.
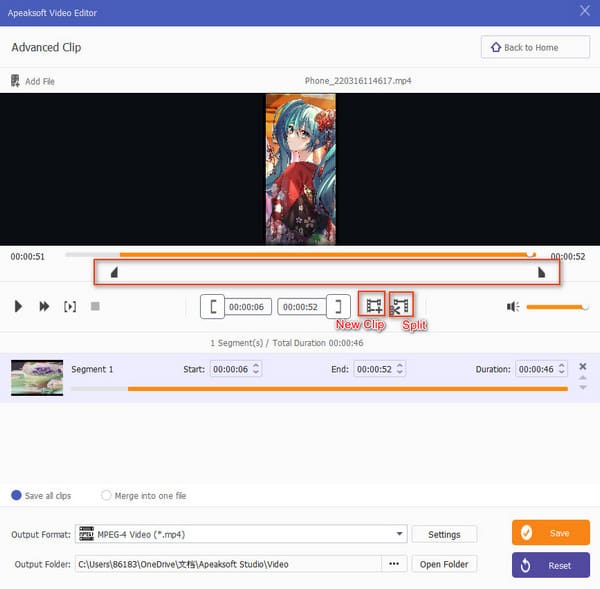
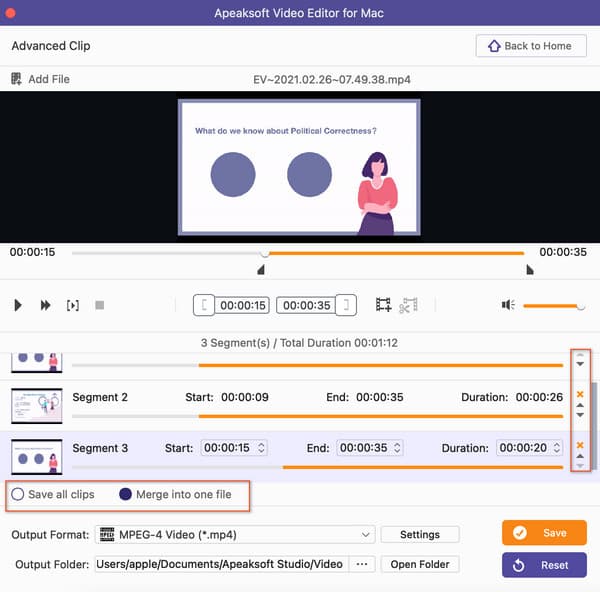
Steg 4. Redigera din video
Därefter kan du klicka på Spara alla klipp växla för att spara skapandet. För att kombinera alla klipp till ett, kan du trycka på Up or Ner pilen efter varje klipp för att ändra ordningen och markera Slå samman i en fil innan du väljer utdataformat och inställningar.
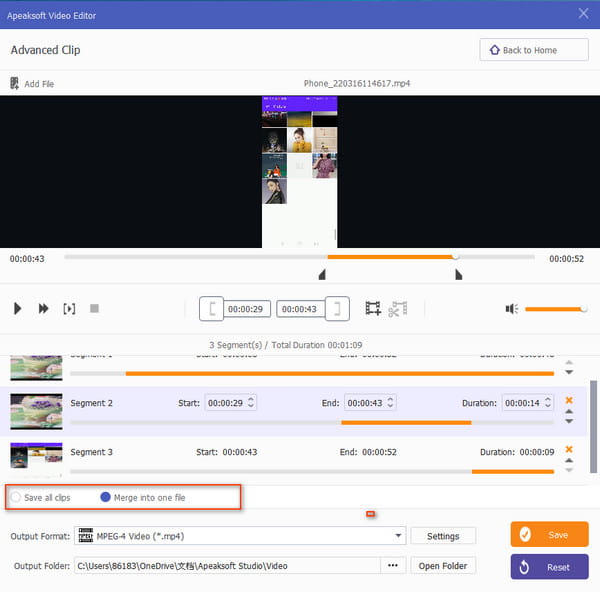
Steg 5. Spara ditt klipp
När allt är klart, klicka på Spara för att skapa din skapelse.
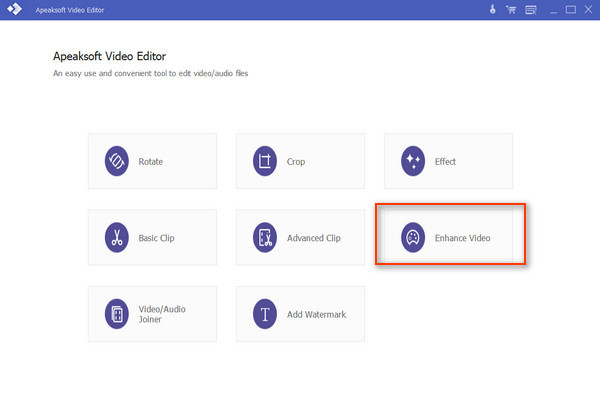
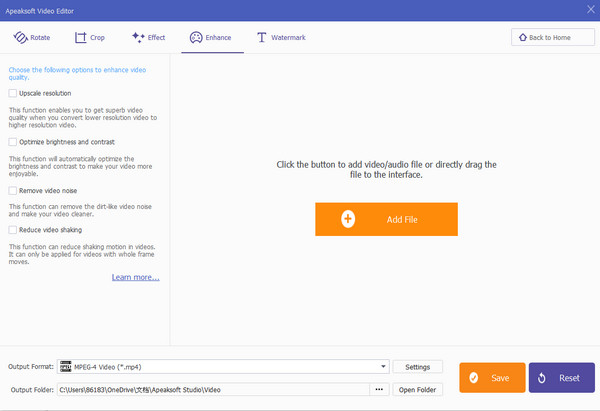
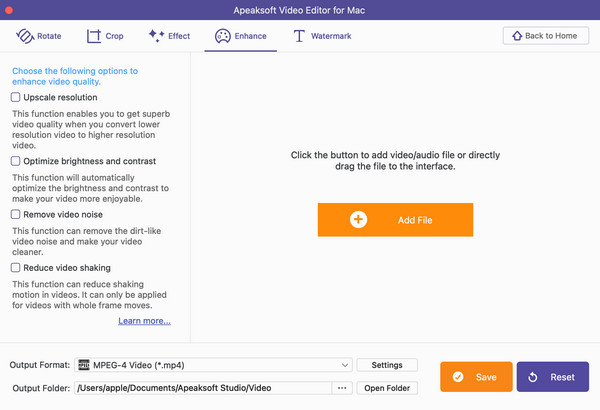
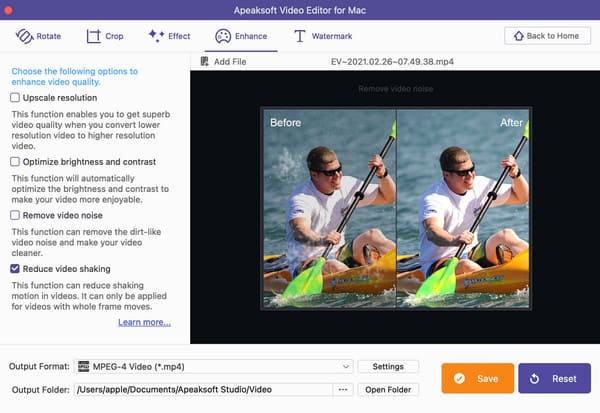
Förbättra video
Förbättra video introduceras i Apeaksoft Video Editor för att du ska kunna få en optimerad video med högre kvalitet. Du kan se före- och eftereffekten i förhandsgranskningsfönstret.
Steg 1. Aktivera funktionen Förbättra video
Starta Apeaksoft Video Editor och välj Förbättra video i huvudgränssnittet.
Steg 2. Lägg till fil
Klicka Lägg till fil för att mata in dina videofiler. Eller så kan du dra och släppa videon till gränssnittet.
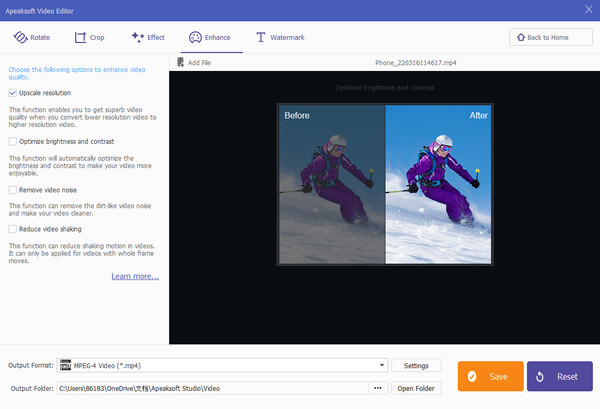
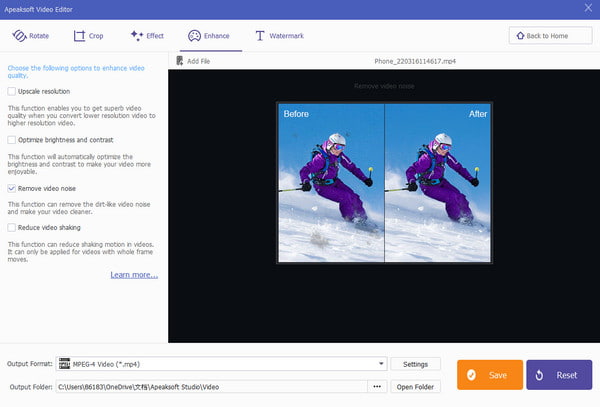
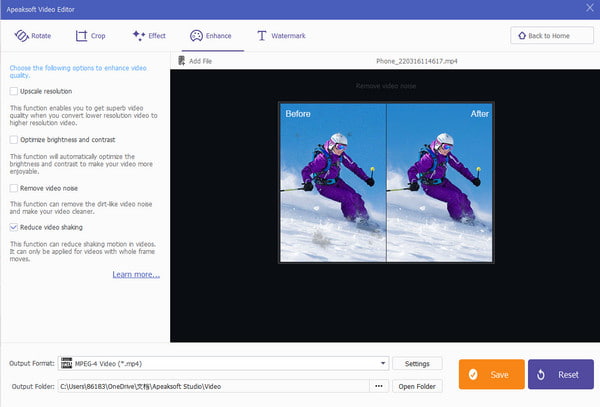
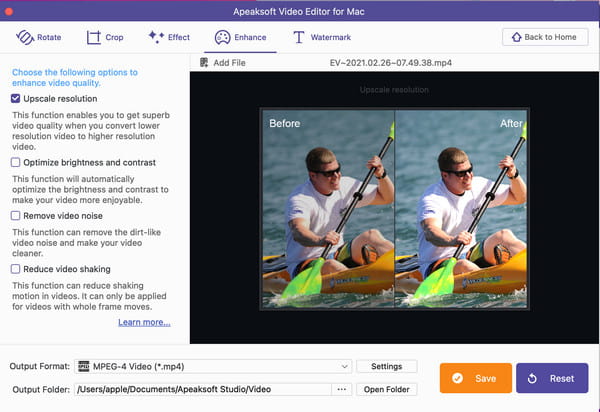
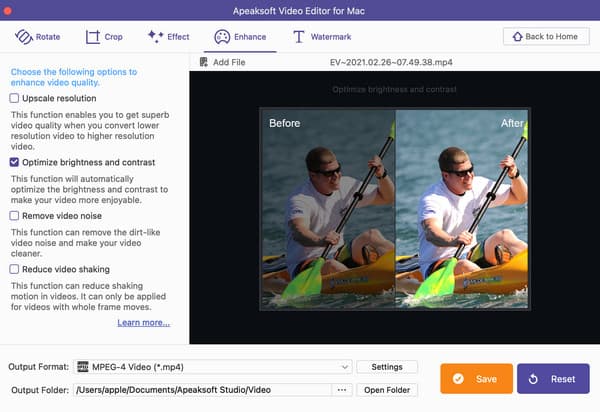
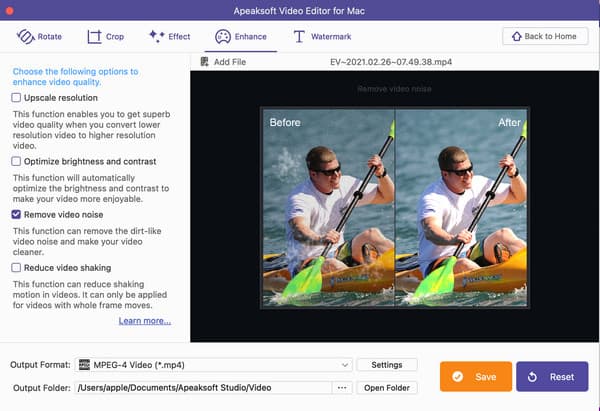
Steg 3. Förbättra din video
I Förbättra kan du förbättra din videokvalitet i olika aspekter. Markera den i listan till vänster och förhandsgranska effekten till höger.
Uppskalad upplösning: Du kan konvertera en video med låg upplösning till en med hög upplösning.
Optimera ljusstyrka och kontrast: Denna funktion gör att du kan få en mer imponerande video med automatiska effekter på videons ljusstyrka och kontrast.

Ta bort videoljud: Du kan få en tydlig video utan smutsliknande brus med den här funktionen.
Minska video skakning: Om du har videor med helbildsrörelser kan du minska skakrörelserna i din video.
Steg 4. Spara din video
När allt är klart, klicka på Spara för att skapa din skapelse
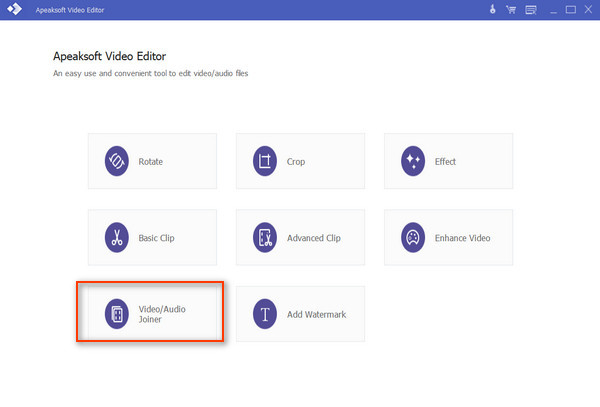
Gå med i video / ljud
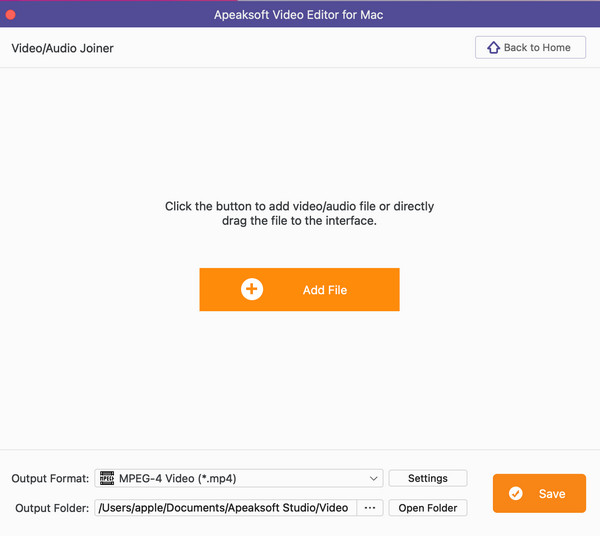
Om du vill kombinera flera videodelar till en fil kan du använda Video / Audio Joiner särdrag.
Steg 1. Aktivera funktionen för video-/ljudkoppling
Starta Apeaksoft Video Editor och välj Video / Audio Joiner i huvudgränssnittet.
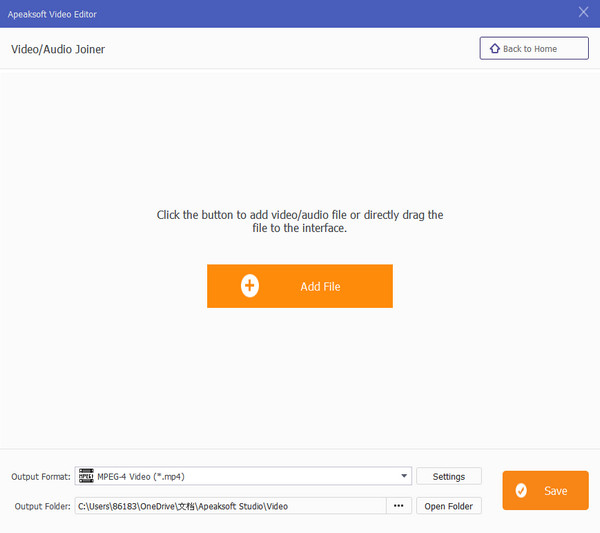
Steg 2. Lägg till filer
Klicka Lägg till fil för att importera dina videofiler. Eller så kan du dra och släppa videon till gränssnittet.
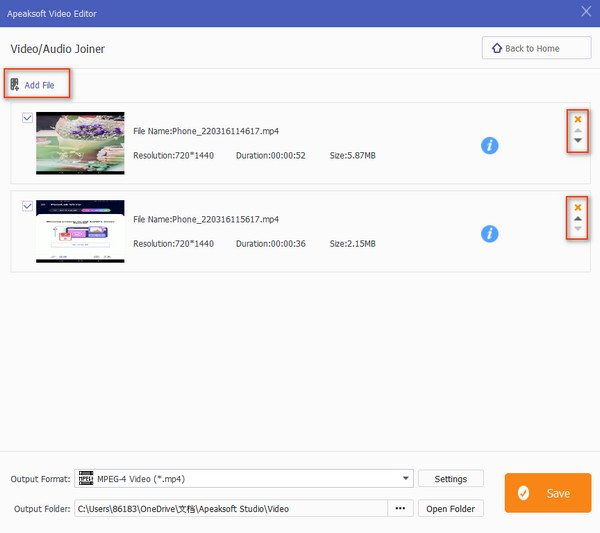
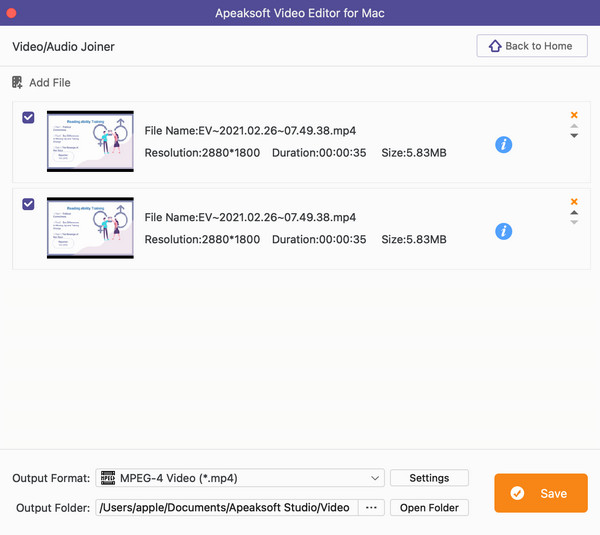
Steg 3. Sammanfoga filer
I nästa fönster kan du klicka på Lägg till fil knappen för att mata in fler videoklipp baserat på dina behov. Sedan kan du ordna om dem med följande arrow knapp.
Markera önskade klipp och välj sedan utdataformat. Anpassa inställningarna och hitta en mapp för att spara din fil.
Steg 4. Spara din video
När allt är klart, klicka på Spara knappen för att starta sammanslagningen och producera resultatet.
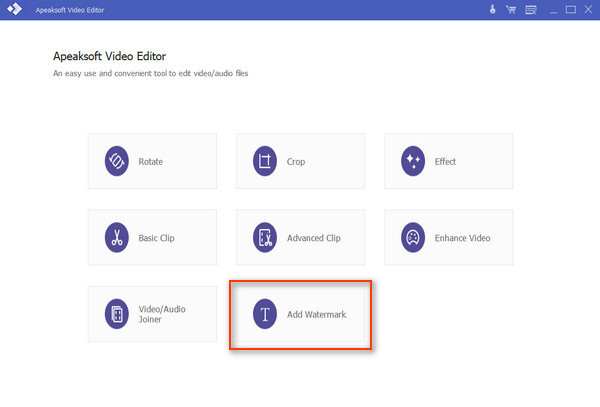
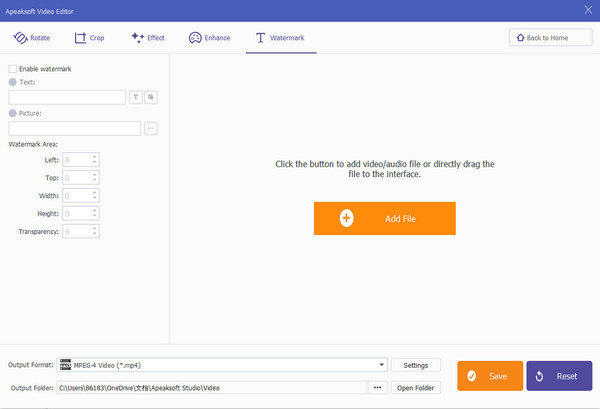
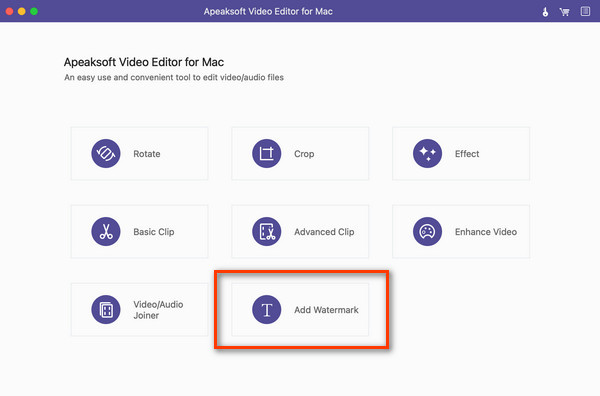
Lägg till vattenstämpel
Vill du lägga till ett speciellt märke till din video? Denna videoredigerare låter dig vattenstämpla din video med Lägg till vattenstämpel särdrag.
Steg 1. Aktivera funktionen Lägg till vattenstämpel
Starta Apeaksoft Video Editor och välj Lägg till vattenstämpel i huvudgränssnittet.
Steg 2. Mata in filer
Klicka Lägg till fil för att lägga till dina videofiler. Eller så kan du dra och släppa videon till gränssnittet. Sedan kan du välja att lägga till text eller bildvattenstämpel med följande instruktioner.
Lägg till text vattenstämpel
Steg 1. Markera Aktivera vattenstämpel låda. Sedan kan du välja text växla och mata in innehållet i rutan nedan.
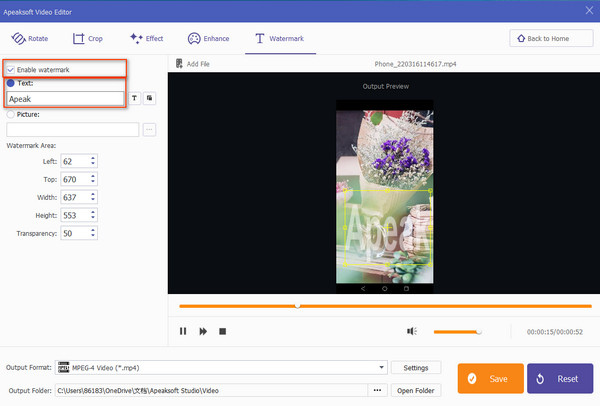
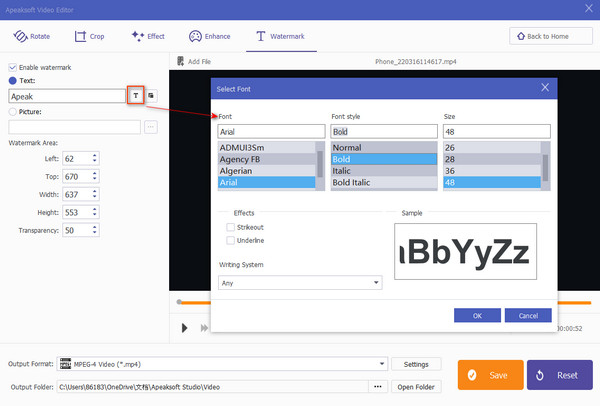
Steg 2. Klicka på Välj Font knappen och du kan visa och ändra textens teckensnitt, stil, storlek, effekt och skrivsystem medan du förhandsgranskar exemplet. Välj sedan OK knappen för att spara ändringarna.
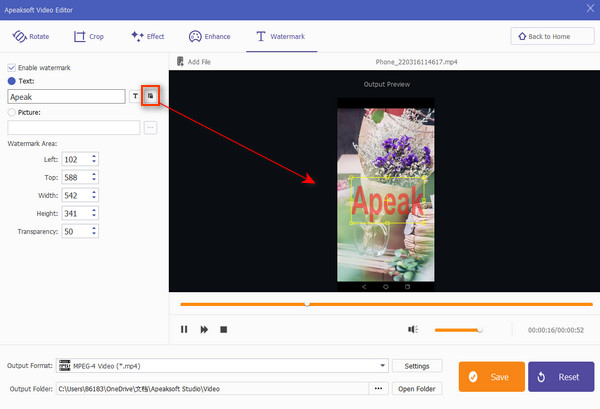
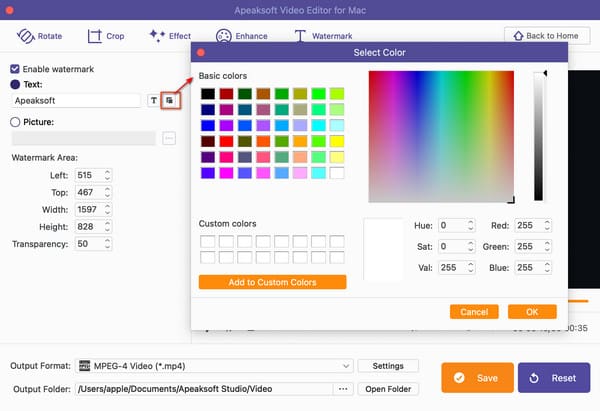
Om du vill ändra textfärgen, klicka på Välj färg knappen och välj önskad färg. Klicka på OK knappen för att fortsätta.
Steg 3. Flytta textens vattenstämpel till din idealiska plats i videon direkt. Slutför sedan inställningarna längst ner och klicka på Spara knappen för att slutföra processen.
Lägg till bildvattenstämpel
Steg 1. Markera Aktivera vattenstämpel låda. Sedan kan du välja Bild växla och öppna Välja knappen för att mata in önskad bild.
Steg 2. Sedan kan du justera vattenstämpelområdet på dess plats, bredd, höjd och genomskinlighet genom att ändra figuren eller klicka på arrow knapp. Du kan också dra bildens vattenstämpel direkt på videon för att ändra dess plats.
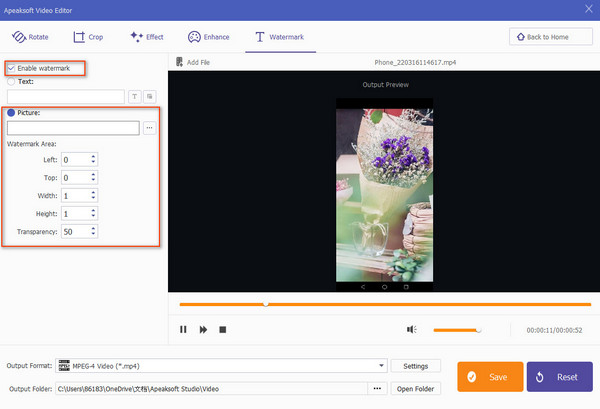
Steg 3. Välj utdataformat och slutför inställningarna för din video. Hitta en sökväg för att spara den och klicka på Spara knappen för att skapa skapandet.
Användarhandbok
- Komma igång
- Snabbstart
- Rotera video
- Beskära video
- Lägg till effekt
- Basic Clip
- Avancerad Clip
- Förbättra video
- Gå med i video / ljud
- Lägg till vattenstämpel
Prova det nu!
Komma igång
Installera programvara
Innan du installerar den här programvaran bör du se till att din dator uppfyller följande krav:
För Windows-användare:
Windows OS: Windows 11, Windows 10, Windows 8.1, Windows 8, Windows 7, Windows Vista, Windows XP (SP2 eller senare)
CPU: 1GHz Intel / AMD CPU eller högre
BAGGE: 1G RAM eller mer
För Mac-användare:
Mac OS: macOS 14, 13, 12, 11, 10.15, 10.14, 10.13, 10.12, etc.
CPU: 1.4 GHz dual-core Intel Core i5 eller högre och Apple M1/M2/M3-chip
BAGGE: 1GB-systemminne
Hårddiskutrymme: 2GB-hårddiskutrymme
Hur man installerar Video Editor på din Mac:
Steg 1. Klicka på Ladda ner knappen på den övre bannern i detta gränssnitt för att komma åt Apeaksoft Video Editor, enligt din datormodell. Dubbelklicka sedan på den nedladdade .dmg-filen.
Steg 2. Dra knappen till programmappen. Följ instruktionerna på skärmen och klicka på Öppet knapp. Sedan kan du starta det här programmet.
Starta programvara
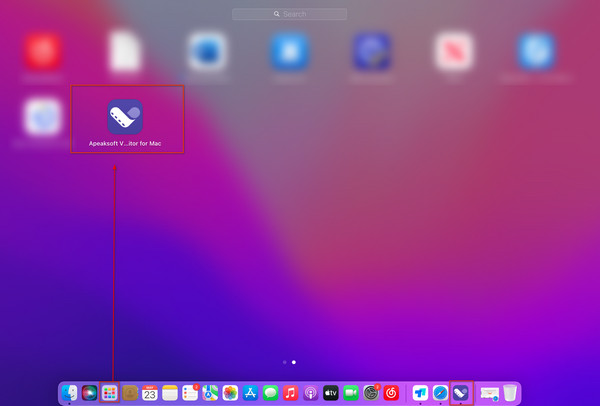
Nå Apeaksoft Video Editor på skrivbordet genom att dubbelklicka på knappen på startplattan eller dockan.
Användargränssnitt
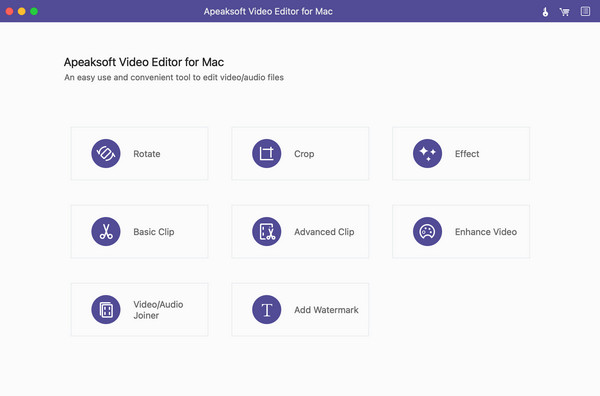
Efter att ha startat Apeaksoft Video Editor kan du njuta av det intuitiva och enkla användargränssnittet. Alla verktyg för videoredigering och förbättring är tillgängliga för användning, inklusive Rotera, Beskär, Effekt, Basic Clip, Avancerad Clip, Förbättra video, Video / Audio Joineroch Lägg till vattenstämpel.
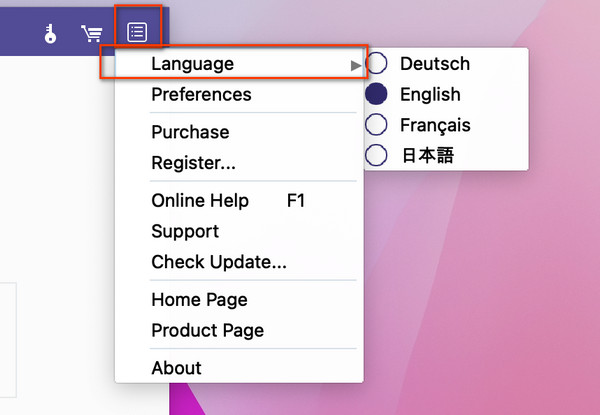
Språk
Du kan ändra standardspråket på Meny och välj bland de fyra alternativen: holländska, engelska, franska och japanska.
Beställ programvara
Du kan köpa den fullständiga versionen av Apeaksoft Video Editor för att få gratis uppdatering och teknisk support. Du kan öppna Inköp knappen för att visa prenumerationsplanen för din Windows eller öppna Meny -knappen och ange Inköp sektion.
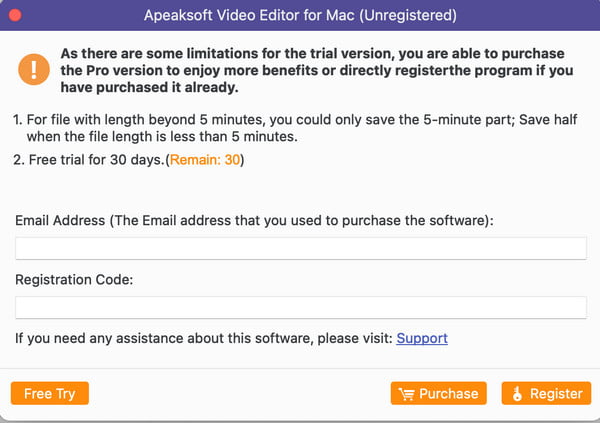
När du har köpt produkten framgångsrikt kan du få registreringskoden i e-postmeddelandet.
Registrera programvara
Du kan njuta av den kostnadsfria testversionen av Apeaksoft Video Editor upp till 30 dagar. Men för att använda alla funktioner och hög kvalitet, rekommenderas du att köpa denna programvara och registrera dig.
Steg 1. Klicka på Registrera knappen i den översta menyn i huvudgränssnittet.
Steg 2. Ange din e-postadress och registreringskoden du får när du köper den här programvaran (Klicka på Inköp knappen längst ner om du inte har en). Klicka sedan på Registrera knappen för att slutföra registreringen.
Nu är du garanterad full tillgång till alla funktioner till denna videoredigerare.
Uppdatera mjukvara
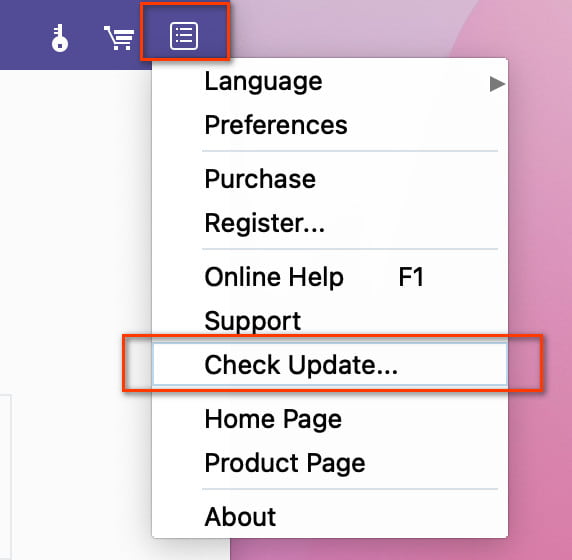
Du kan få den senaste uppdateringen från Meny knappen för att landa på Kolla uppdatering sektion. Se till att din Windows-dator är ansluten till nätverket.
Apeaksoft support
Apeaksoft ger dig professionella lösningar om du stöter på problem när du använder vår produkt.
Kanal 1. Besök vår Supportcenter och ställ eventuella frågor.
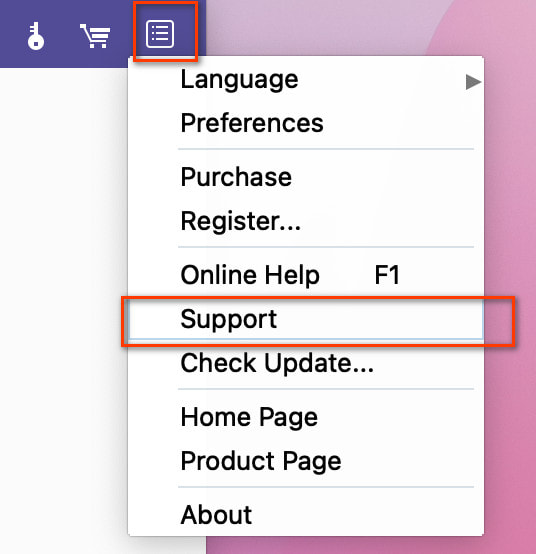
Kanal 2. Klicka på Meny knappen i det övre högra hörnet och nå Support sektion.
Kanal 3. Maila oss på support@apeaksoft.com.
Snabbstart
Apeaksoft Video Editor är ett omfattande och kraftfullt videoredigeringsverktyg på din Mac för att rotera, beskära, klippa, lägga till vattenstämplar och effekter samt konvertera video-/ljudfiler.
Steg 1. Välj en idealisk redigeringsfunktion
Välj den perfekta funktionen för att redigera eller förbättra din video i huvudgränssnittet. Du kan välja mellan: Rotera, Beskär, Effekt, Basic Clip, Avancerad Clip, Förbättra video, Video / Audio Joiner och Lägg till vattenstämpel.
Steg 2. Lägg till fil
Klicka på Lägg till fil knappen för att mata in ditt program. Eller så kan du dra och släppa målvideon eller -ljudet till huvudgränssnittet.
Steg 3. Redigera videon
Redigera och förbättra din videofil baserat på dina behov. Sedan kan du ändra utdataformatet och anpassa inställningarna för video och ljud. Välj destination och klicka på Spara för att starta konverteringen.
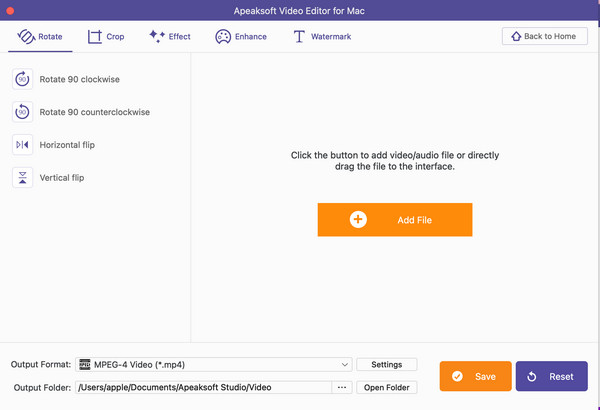
Rotera video
Ocuco-landskapet Rotera funktionen gör att du kan ändra videoriktningen 90 medurs eller 90 moturs. Dessutom kan du vända videon horisontellt eller vertikalt.
Steg 1. Aktivera rotationsfunktionen
Starta Apeaksoft Video Editor och välj Rotera i huvudgränssnittet.
Steg 2. Lägg till fil
Klicka Lägg till fil för att lägga till dina video-/ljudfiler till det här programmet. Eller så kan du dra filen direkt till gränssnittet.
Steg 3. Rotera din video
I Rotera kan du välja att rotera din video 90 medurs, 90 moturs, horisontellt eller vertikalt med alternativen i listan till vänster. Förhandsgranska effekten till höger när du vill.
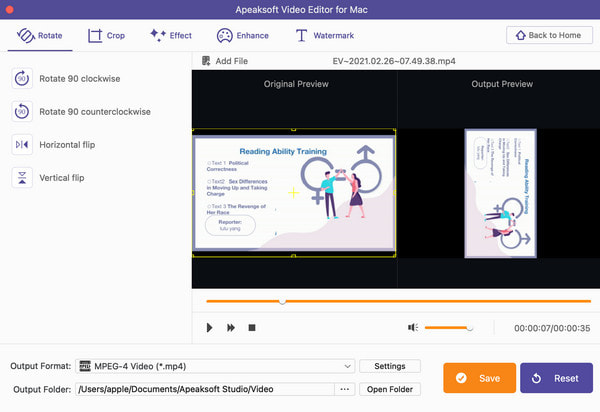
Steg 4. Spara din video
Ändra format, anpassade inställningar och destination för utdata. Klicka sedan på Spara knappen för att generera verken.
Beskära video
Denna videoredigerare låter dig beskära och ändra storlek på din video. När du vill ta bort brevlådan för din favoritvideo kan du välja den här beskärningsfunktionen.
Steg 1. Gå in i beskärningsfunktionen
Starta Apeaksoft Video Editor och välj Beskär i huvudgränssnittet.
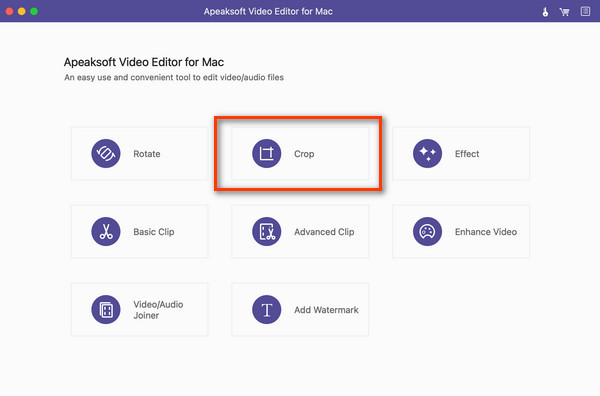
Steg 2. Lägg till fil
Klicka Lägg till fil för att lägga till dina video-/ljudfiler till det här programmet. Eller så kan du dra filen direkt till gränssnittet.

Steg 3. Beskär din video
I Beskär avsnitt, kan du ändra storleken på beskärningsytan och anpassa bildförhållandet med dina behov eller klassisk matchning 16:9 och 4:3. Du är fri att justera positionen för beskärningsområdet exakt och välja zoomläge bland Brevlåda, Medium, Pan& Scan och full.
Steg 4. Spara din video
Ändra format, anpassade inställningar och destination för utdata. Klicka sedan på Spara knappen för att generera verken.
Lägg till effekter
Apeaksoft Video Editor låter dig lägga till video/ljudeffekter för att få en fantastisk video/ljud. Du kan använda Effekt funktion för att nå ditt mål.
Steg 1. Ange effektfunktionen
Starta Apeaksoft Video Editor och välj Effekt i huvudgränssnittet.
Steg 2. Lägg till fil
Klicka Lägg till fil för att lägga till dina video-/ljudfiler till det här programmet. Eller så kan du dra och släppa filen direkt till gränssnittet.
Steg 3. Redigera din video
I Effekt avsnittet kan du justera ljudvolymen genom att flytta reglaget eller klicka på Up or Ner knappen för att ändra figuren från 0% till 200%.
Du har också rätt att justera videoeffekterna på Ljushet, Däremot, Mättnad och Mössor från -100% till 100% på samma sätt.
Markera Deinterlacing box om du vill ha en progressiv video.
Steg 4. Spara din video
Välj format, anpassade inställningar och destination för utmatning. Klicka sedan på Spara knappen för att generera verken.
Basic Clip
Basic Clip är den enkla funktionen som låter dig trimma video. Du kan välja att behålla eller ta bort delen med redigeringsklippen.
Steg 1. Ange funktionen Basic Clip
Starta Apeaksoft Video Editor och välj Basic Clip i huvudgränssnittet.
Steg 2. Lägg till fil
Klicka Lägg till fil för att lägga till dina video-/ljudfiler. Eller så kan du dra och släppa filen till gränssnittet.
Steg 3. Klipp din video
Du kan flytta skjutreglaget till höger under videon för att ändra startpunkt och slutpunkt selektivt. Efter att ha fått den önskade delen kan du bocka i cirkeln innan Förbli vald del or Ta bort vald del för att spara eller lämna det här klippet.
Steg 4. Spara ditt klipp
Välj format, anpassade inställningar och destination för utmatning. Klicka sedan på Spara för att skapa din skapelse.
Avancerad Clip
Avancerad Clip är ett kraftfullare avsnitt än Basic Clip. Här kan du klippa mer än en video- eller ljudfil och slå ihop video- eller ljudfilerna till en i olika ordning.
Steg 1. Gå in i funktionen Avancerat klipp
Starta Apeaksoft Video Editor och välj Avancerad Clip i huvudgränssnittet.
Steg 2. Lägg till filer
Klicka Lägg till fil för att mata in dina video-/ljudfiler. Eller så kan du dra och släppa filen till gränssnittet.
Steg 3. Klipp din video
I följande fönster kan du flytta reglaget under videon för att ändra videons längd. Sedan kan du klicka på Split knappen för att klippa den här videon i olika delar.
För att skapa ett annat videoklipp kan du trycka på Ny Clip knappen för att starta en annan del.
Steg 4. Redigera din video
Därefter kan du klicka på Spara alla klipp växla för att spara skapandet. För att kombinera alla klipp till ett, kan du trycka på Up or Ner pilen efter varje klipp för att ändra ordningen och markera Slå samman i en fil innan du väljer utdataformat och inställningar.
Steg 5. Spara ditt klipp
När allt är klart, klicka på Spara för att skapa din skapelse.
Förbättra video
Förbättra video introduceras i Apeaksoft Video Editor för att du ska kunna få en optimerad video med högre kvalitet. Du kan se före- och eftereffekten i förhandsgranskningsfönstret.
Steg 1. Aktivera funktionen Förbättra video
Starta Apeaksoft Video Editor och välj Förbättra video i huvudgränssnittet.
Steg 2. Lägg till fil
Klicka Lägg till fil för att mata in dina videofiler. Eller så kan du dra och släppa videon till gränssnittet.
Steg 3. Förbättra din video
I Förbättra kan du förbättra din videokvalitet i olika aspekter. Markera den i listan till vänster och förhandsgranska effekten till höger.
Uppskalad upplösning: Du kan konvertera en video med låg upplösning till en med hög upplösning.
Optimera ljusstyrka och kontrast: Denna funktion gör att du kan få en mer imponerande video med automatiska effekter på videons ljusstyrka och kontrast.
Ta bort videoljud: Du kan få en tydlig video utan smutsliknande brus med den här funktionen.
Minska video skakning: Om du har videor med helbildsrörelser kan du minska skakrörelserna i din video.
Steg 4. Spara din video
När allt är klart, klicka på Spara för att skapa din skapelse.
Gå med i video / ljud
Om du vill kombinera flera videodelar till en fil kan du använda funktionen Video/Audio Joiner.
Steg 1. Aktivera funktionen för video-/ljudkoppling
Starta Apeaksoft Video Editor och välj Video / Audio Joiner i huvudgränssnittet.
Steg 2. Lägg till fil
Klicka Lägg till fil för att importera dina videofiler. Eller så kan du dra och släppa videon till gränssnittet.
Steg 3. Sammanfoga filer
I nästa fönster kan du klicka på Lägg till fil knappen för att mata in fler videoklipp baserat på dina behov. Sedan kan du ordna om dem med följande arrow knapp.
Markera önskade klipp och välj sedan utdataformat. Anpassa inställningarna och hitta en mapp för att spara din fil.
Steg 4. Spara din video
När allt är klart, klicka på Spara knappen för att starta sammanslagningen och producera resultatet.
Lägg till vattenstämpel
Vill du lägga till ett speciellt märke på din video? Med den här videoredigeraren kan du vattenstämpla din video med funktionen Lägg till vattenstämpel.
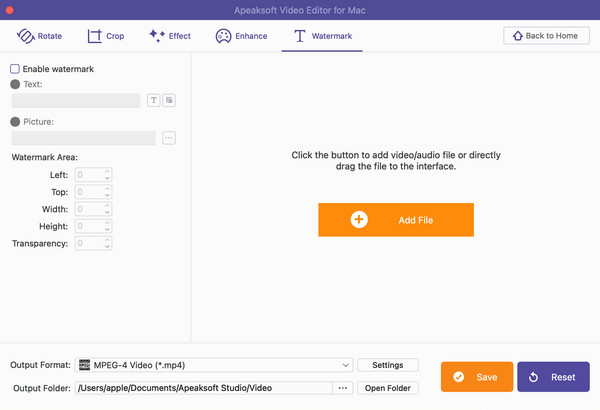
Steg 1. Aktivera funktionen Lägg till vattenstämpel
Starta Apeaksoft Video Editor och välj Lägg till vattenstämpel i huvudgränssnittet.
Steg 2. Mata in filer
Klicka Lägg till fil för att lägga till dina videofiler. Eller så kan du dra och släppa videon till gränssnittet. Sedan kan du välja att lägga till text eller bildvattenstämpel med följande instruktioner.
Lägg till text vattenstämpel
Steg 3. Markera Aktivera vattenstämpel låda. Sedan kan du välja text växla och mata in innehållet i rutan nedan.
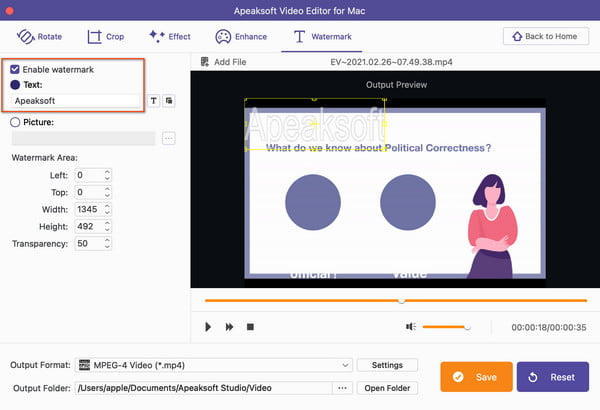
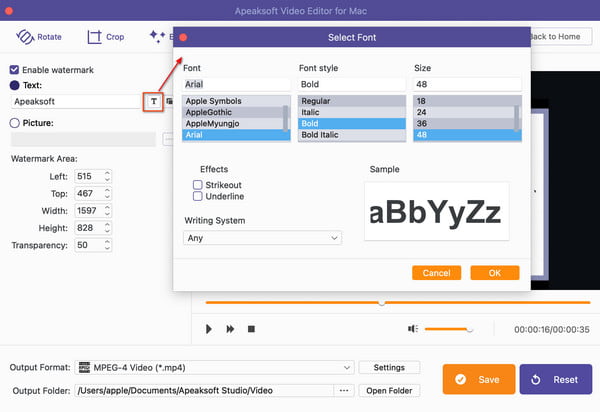
Steg 4. Klicka på Välj Font knappen och du kan visa och ändra textens teckensnitt, stil, storlek, effekt och skrivsystem medan du förhandsgranskar exemplet. Välj sedan OK-knappen för att spara ändringarna.
Om du vill ändra textfärgen, klicka på Välj färg knappen och välj önskad färg. Klicka på OK knappen för att fortsätta.
Steg 5. Flytta textens vattenstämpel till din idealiska plats i videon direkt. Slutför sedan inställningarna längst ner och klicka på Spara knappen för att slutföra processen.
Lägg till bild
Steg 3. Markera Aktivera vattenstämpel låda. Sedan kan du välja Bild växla och öppna Välja knappen för att mata in önskad bild.
Steg 4. Sedan kan du justera vattenstämpelområdet på dess plats, bredd, höjd och genomskinlighet genom att ändra figuren eller klicka på arrow knapp. Du kan också dra bildens vattenstämpel direkt på videon för att ändra dess plats.
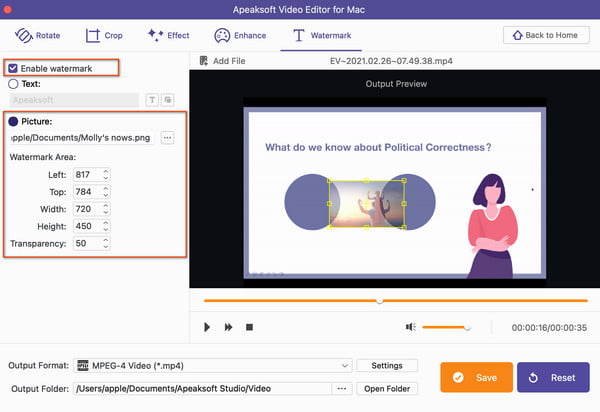
Steg 5. Välj utdataformat och slutför inställningarna för din video. Hitta en sökväg för att spara den och klicka på Spara knappen för att skapa skapandet.
