Kuinka palauttaa MacBook Pro nopeasti tehdasasetuksiin
MacBook Pron palauttaminen tehdasasetuksiin tarkoittaa kannettavan tietokoneen palauttamista alkuperäiseen tilaan. Laitteen tehdasasetusten palautukseen on muutamia syitä. Esimerkiksi ennen MacBook Pron myymistä sinun on palautettava tehdasasetukset ja poistettava kaikki tiedot tietojesi suojaamiseksi. Tämä on myös tärkeä vianmääritysvaihe, kun olet lukittunut ulos kannettavasta tietokoneestasi, näyttö jumiutuu tai ei reagoi ja muissa vastaavissa tilanteissa.
SIVUN SISÄLTÖ:
Osa 1: Ennen kuin aloitat MacBook Pron palauttamisen
Koska MacBook Pron tehdasasetusten palauttaminen poistaa kaikki kannettavan tietokoneen tiedot, kannattaa varmuuskopioida laite Time Machinen avulla. Lisäksi sinun on kirjauduttava ulos palveluista ja tileiltä laitteellasi.
Varmuuskopioi MacBook Pro Time Machinella
Vaihe 1. Aseta varmuuskopiointilaite kannettavaan tietokoneeseen.
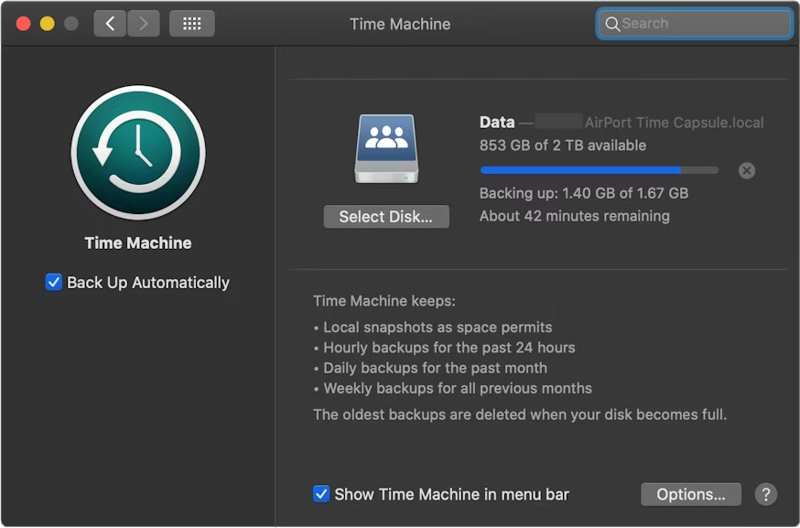
Vaihe 2. Valitse omena valikosta ja valitse Järjestelmäasetukset or Järjestelmäasetukset.
Vaihe 3. Napauta general sivupalkissa ja valitse aikakone.
Vaihe 4. Osuma Lisää varmuuskopiolevy tai paina Lisää painiketta.
Vaihe 5. Valitse seuraavaksi varmuuskopiointilaite ja napsauta Aseta levy.
Vaihe 6. Määritä varmuuskopiointilaite noudattamalla näytön ohjeita.
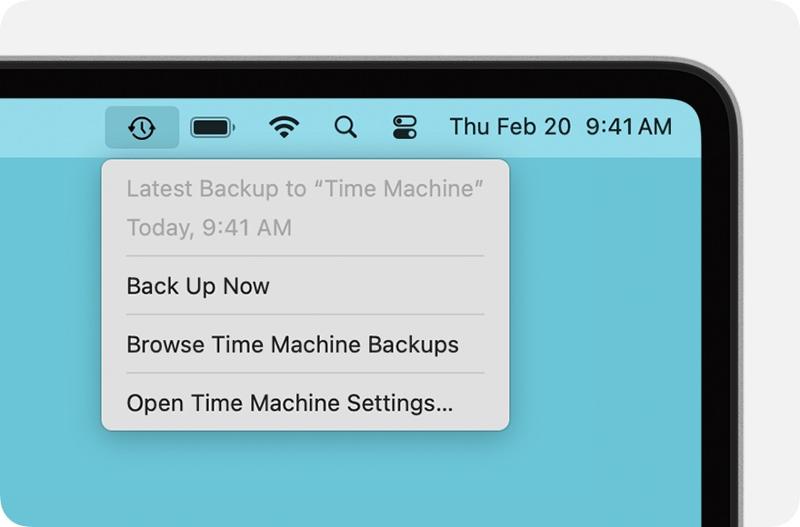
Vaihe 7. Asennuksen jälkeen napsauta aikakone valikosta yläreunasta ja valitse Varmuuskopioi nyt varmuuskopioida MacBook Pron ennen tehdasasetusten palauttamista.
Kirjaudu ulos tileiltä
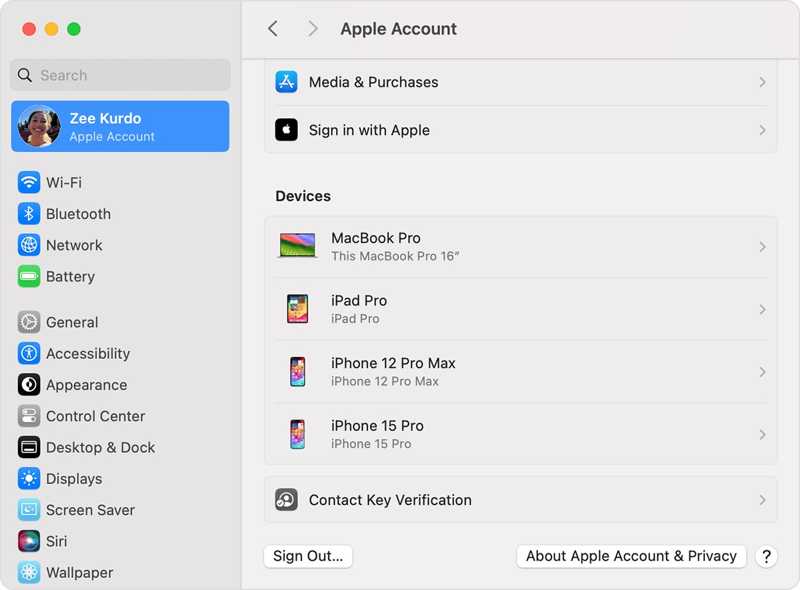
MacBook Pron tehdasasetusten palauttamiseksi sinun on kirjauduttava ulos kaikista koneeseesi lisätyistä tileistä.
macOS Catalinassa tai uudemmassa versiossa valitse Järjestelmäasetukset or Järjestelmäasetukset oman omena valikko. Poista käytöstä Find My Mac. Napsauta sitten Apple-tili, vieritä alas ja paina Ilmoittaa lähtevänsä.
macOS Mojavessa tai aiemmassa versiossa valitse Järjestelmäasetukset vuonna omena valikko. Klikkaus iCloud, ja osuma Ilmoittaa lähtevänsä.
Lisäksi sinun on parempi kirjautua ulos iMessagesta, FaceTimesta ja muista palveluista.
Osa 2: MacBook Pron palauttaminen asetuksista
Jos koneesi on päivitetty macOS Venturaan tai uudempaan, helpoin tapa palauttaa tehdasasetukset MacBook Prossa on järjestelmäasetusten sisäänrakennettu ominaisuus. Tämä menetelmä voi suorittaa työn normaalitilassa.
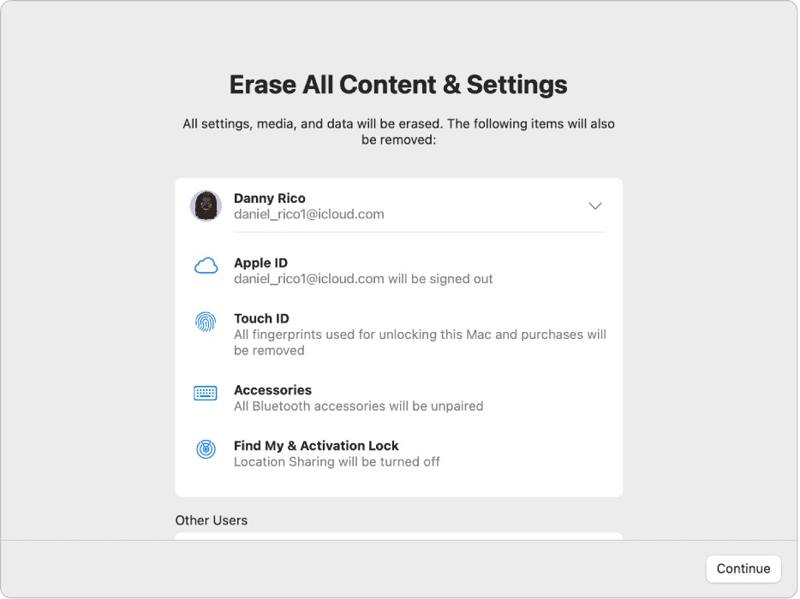
Vaihe 1. Valitse omena valikko millä tahansa näytöllä.
Vaihe 2. Mene Järjestelmäasetukset, valitse general, ja napsauta Siirrä tai nollaa.
Vaihe 3. Valitse Poista kaikki sisältö ja asetukset vaihtoehto.
Vaihe 4. Anna pyydettäessä Apple ID -salasanasi tai järjestelmänvalvojan salasanasi.
Vaihe 5. Lue varoitus ja napsauta jatkaa aloittaaksesi MacBook Pron palauttamisen.
Osa 3: MacBook Pron palauttaminen tehdasasetuksiin Levytyökalulla
Jos et voi palauttaa MacBook Pron tehdasasetuksia Järjestelmäasetuksista tai käytät macOS Montereyä tai aiempaa, sinun on asetettava kannettava tietokone palautustilaan ja nollattava se Levytyökalulla.
Huomautus: Sinun on parempi varmistaa, että sinulla on varmuuskopioi MacBookin iCloudiin tai muuhun säilytystilaan etukäteen.
Vaihe 1. Siirry omena valikosta ja valitse Sulkea sammuttaaksesi kannettavan tietokoneen. Jos näyttö ei reagoi, paina pitkään teho painiketta, kunnes se muuttuu mustaksi.
Vaihe 2. Pidä teho -painiketta käynnistääksesi Macin ja paina heti Komento-R -näppäintä, kunnes Apple-logo tulee näkyviin.
Vinkki: Jos MacBook Prossasi on Apple Silicon- tai Apple T2 Security -siru, pidä pohjassa teho -painiketta kannettavan tietokoneen käynnistymisen jälkeen.
Vaihe 3. Anna pyydettäessä järjestelmänvalvojan salasanasi. Sitten sinulla on kaksi vaihtoehtoa:
Vaihtoehto 1:
Vaihe 4. Valitse levy Utility vaihtoehto, kun macOS Utilities ikkuna ponnahtaa esiin.

Vaihe 5. Valitse jatkaa painiketta jatkaaksesi.
Vaihe 6. Nyt sinun pitäisi nähdä käynnistyslevysi. Jos sinulla on datalevy, valitse se ja napsauta muokata, valitse Poista APFS-tilavuus, ja osuma Poista.
Vaihe 7. Valitse seuraavaksi käynnistyslevysi. Oletusarvoisesti se on Macintosh HD.
Vaihe 8. Valitse pyyhkiä painiketta.
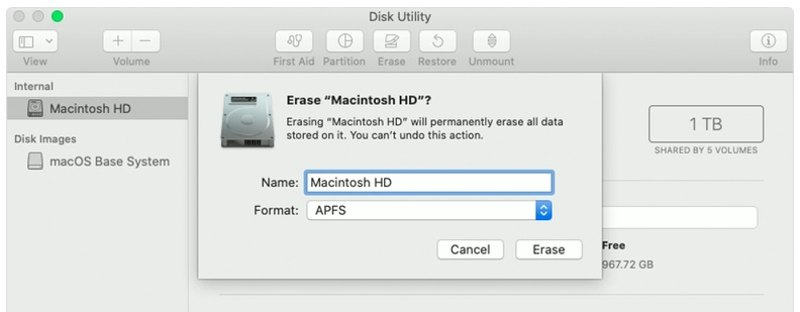
Vaihe 9. Tyyppi Macintosh HD nimeksi ja valitse muoto.
Vaihe 10. Valitse pyyhkiä painiketta uudelleen.
Vaihe 11. Anna pyydettäessä Apple ID -salasanasi tai järjestelmänvalvojan salasanasi.
Vaihe 12. Odota, että MacBook Pron tehdasasetusten palautus on valmis.
Vaihe 13. Kun se on tehty, sinut viedään kohteeseen macOS Utilities -näyttöön.
Vaihe 14. Valita Asenna MacOS uudelleen ja asenna kannettava tietokone noudattamalla näytön ohjeita.
Vaihtoehto 2:
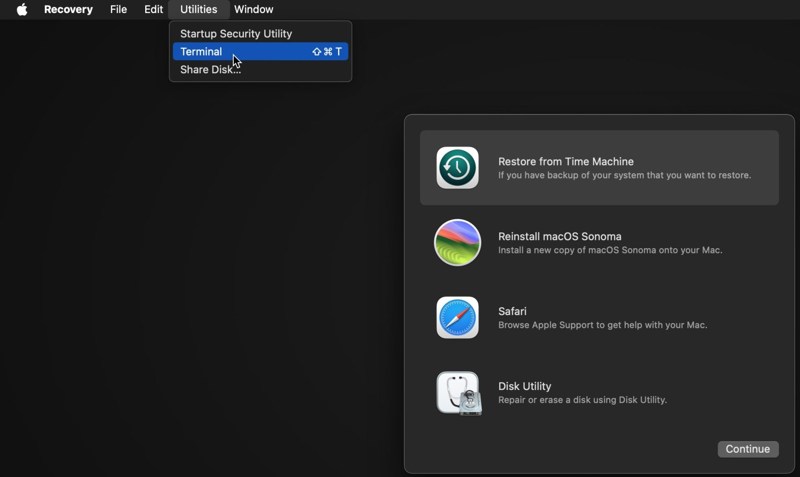
Vaihe 4. Valitse Utilities valikosta ja valitse terminaali.
Vaihe 5. Tyyppi keskustelulista ja paina Palata -näppäintä näppäimistölläsi käynnistyslevyn tunnistamiseksi.
Vaihe 6. Suorita seuraavaksi komento:
diskutil eraseDisk APFS "Macintosh HD" disk0
Vinkki: Jos Macissasi on kiintolevy SSD-levyn sijaan, suorita komento: diskutil eraseDisk HFS+J "Macintosh HD" disk0.
diskutil eraseDisk HFS+J "Macintosh HD" disk0.
Vaihe 7. Lataa sitten uusin macOS alla olevalla komennolla:
ohjelmistopäivitys --fetch-full-installer --full-installer-versio [numero].
Vaihe 8. panos sudo /Ohjelmat/Asenna macOS Sequoia.app/Contents/Resources/startosinstall --eraseinstall --newvolumename "Macintosh HD", ja osuma Palata asenna macOS uudelleen.
Vaihe 9. Kun MacBook Pro käynnistyy uudelleen, ota se käyttöön.
Osa 4: Tietojen palauttaminen MacBook Pron palauttamisen jälkeen
MacBook Pron palauttamisen jälkeen kaikki tietosi poistetaan. Onneksi Apeaksoft Data Recovery voi auttaa sinua ratkaisemaan tämän ongelman. Se voi skannata kiintolevysi ja palauttaa kadonneet tiedot ilman varmuuskopiointia.
Yhdellä napsautuksella pääset poistetuille YouTube-videoille
- Palauta kadonneet tiedot MacBook Prosta yhdellä napsautuksella.
- Saatavilla useissa tilanteissa, kuten tehdasasetusten palautuksen, vahingossa tapahtuvan poistamisen ja muiden tilanteissa.
- Tuki monenlaisia tietotyyppejä.
- Esikatsele kadonneita tiedostoja valikoivaa palautusta varten.
- Yhteensopiva macOS 10.7:n ja uudempien kanssa.
Suojattu lataus
Suojattu lataus

Kuinka palauttaa tiedot MacBook Prosta palautuksen jälkeen
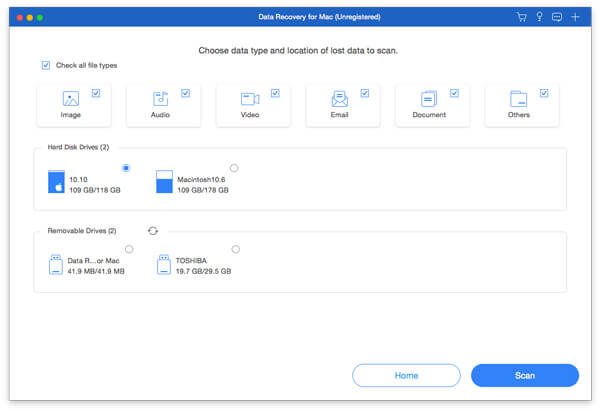
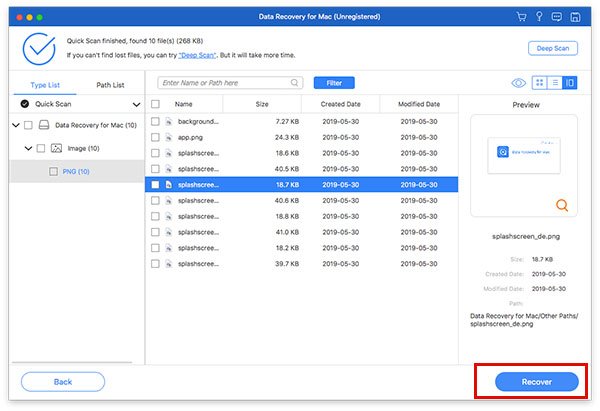
Vaihe 1. Valitse tietotyypit
Käynnistä paras tietojen palautusohjelma Macille asennettuasi sen MacBook Prohon. Valitse palautettavat tietotyypit, kuten Kuva, ääni, videoja paljon muuta. Valitse sitten levy, jolla kadonneet tiedostot sijaitsevat. Napsauta Skannata -painiketta aloittaaksesi Macin skannauksen.
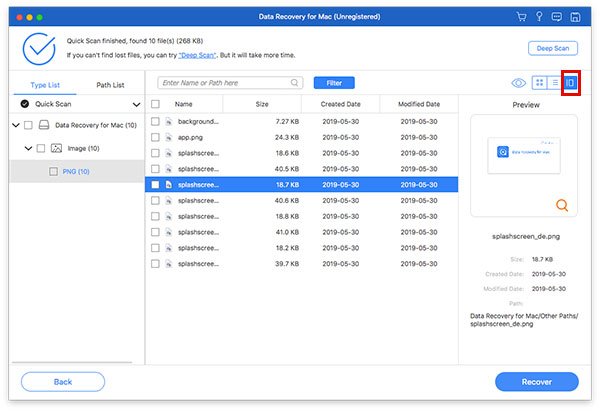
Vaihe 2. Esikatsele kadonneet tiedostot
Kun skannaus on valmis, siirry kohtaan Tyyppiluettelo välilehti ja esikatsele kadonneita tietoja tyypin mukaan. Voit myös löytää tietyn sijainnin Reittiluettelo välilehti. Jos et löydä haluamiasi tiedostoja, napsauta Deep Scan -painike suorittaaksesi syvän skannauksen.
Vaihe 3. Palauta tiedostot MacBook Prossa
Varmista, että valitset kaikki palautettavat tiedostot ja kohteet ja napsauta toipua -painiketta. Aseta tulostuskansio ja paina Palauta-painiketta uudelleen. Tämä ohjelma voi jopa palauttaa poistetut viestit Macilla.
Yhteenveto
Nyt sinun pitäisi ymmärtää kuinka palauttaa MacBook Pron tehdasasetuksetUudemmissa versioissa voit tehdä tehdasasetusten palautuksen Järjestelmäasetukset-sovelluksessa. Vanhemmissa versioissa voit tehdä tämän palautustilassa. Apeaksoft Data Recovery pystyy palauttamaan kadonneet tiedot tehdasasetusten palauttamisen jälkeen MacBook Prossa. Se ei vaadi varmuuskopiointia.
Aiheeseen liittyvät artikkelit
Poistitko vahingossa haluamasi kuvat Macillasi? Älä huoli. Tämä artikkeli auttaa sinua palauttamaan poistetut kuvat Macilla.
Palautustila Macissa on sisäänrakennettu tila, joka on suunniteltu Macin palauttamiseen ja levyongelmien korjaamiseen. Täältä opit siirtymään palautustilaan ja käyttämään sitä Macissa.
Mikä on paras tietojen palautusohjelmisto Macille? Tässä on kymmenen parhaan lista arvosteluineen, jotka auttavat sinua löytämään parhaan ohjelman tietojen palauttamiseen Macilla turvallisesti ja nopeasti.
Tässä artikkelissa esitetään yksityiskohtaiset tiedot siitä, mitä Internet Recovery on Macissa, miten Mac Internet Recovery -tilaan pääsee ja ratkaisuja ei-ongelmien korjaamiseen.
