Hoe verwijderde foto's van iPad te herstellen met/zonder back-up
Alle foto's en screenshots die je op je iPad maakt, worden opgeslagen in Camera Roll. Je hebt er toegang toe in de ingebouwde Foto's-app. Bovendien organiseert Apple foto's met AI-technologie. Het is echter nog steeds een frustrerende of zelfs hartverscheurende ervaring om foto's te verliezen. Het goede nieuws is dat je meerdere manieren hebt om verwijderde foto's van iPad herstellenIn deze gids worden deze methoden en de concrete werkwijze uitgelegd.
PAGINA-INHOUD:
- Deel 1: Kan ik verwijderde foto's op mijn iPad herstellen?
- Deel 2: Hoe u onlangs verwijderde foto's op de iPad kunt herstellen
- Deel 3: Hoe verwijderde foto's op de iPad herstellen via iCloud
- Deel 4: Hoe u verwijderde foto's op de iPad kunt vinden met iTunes/Finder
- Deel 5: Hoe verwijderde foto's van de iPad te herstellen zonder back-up
Deel 1: Kan ik verwijderde foto's op mijn iPad herstellen?
Heb je per ongeluk belangrijke foto's van je iPad verwijderd? Kunnen verwijderde foto's van je iPad worden hersteld? Hoe krijg je verwijderde foto's van je iPad? Maak je geen zorgen! Je kunt ze zeker herstellen!
Foto's die in minder dan 30 dagen zijn verwijderd, kunt u herstellen via het gedeelte 'Onlangs verwijderd' in Foto's of via iCloud.com.
Als de recent verwijderde foto's van je iPad niet worden weergegeven, komt dat omdat ze in de afgelopen 30 dagen zijn verwijderd, wat ook wel permanent verwijderd wordt genoemd. In dit geval moet je hulp zoeken bij de back-up van officiële tools – iTunes en iCloud.
Raak ook niet gefrustreerd als je geen back-up hebt. Je kunt ook verwijderde foto's op de iPad terughalen, zelfs zonder back-up, met behulp van software van derden.
Blijf kalm en volg de onderstaande gedetailleerde stappen om verwijderde foto's op uw iPad te herstellen!
Deel 2: Hoe u onlangs verwijderde foto's op de iPad kunt herstellen
Apple introduceerde een recent verwijderd album in zowel iPad als iCloud om de verwijderde foto's 30 dagen op te slaan. Voordat ze permanent worden verwijderd, kunt u deze foto's op elk gewenst moment herstellen.
In dit gedeelte leggen we uit hoe u verwijderde foto's uit de map 'Recent verwijderd' van uw iPad kunt terughalen.
Hoe u onlangs verwijderde foto's op de iPad kunt herstellen

Stap 1. Open de Foto's-app op uw startscherm, ga naar de Albums tabblad onderaan en kies het album Onlangs verwijderd.
Stap 2. Hier kunt u alle foto's bekijken die binnen 30 dagen zijn verwijderd. Tik op de kies knop en kies de gewenste foto's.
Stap 3. Druk op Herstellen knop rechtsonder en druk op Herstel foto. Vervolgens worden de verwijderde foto's teruggezet in het oorspronkelijke album.
Hoe u onlangs verwijderde iPad-foto's van iCloud.com kunt ophalen
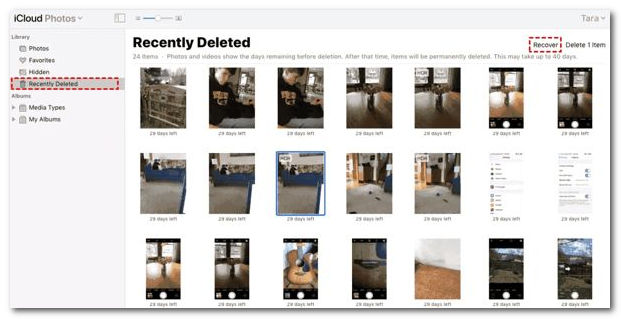
Stap 1. Ga naar icloud.com in uw browser en meld u aan bij uw account met uw Apple ID en wachtwoord.
Stap 2. Kies Foto's om de iCloud-foto'spagina te openen. Ga vervolgens naar de Onlangs verwijderd album vanaf de linkerkant.
Stap 3. Selecteer vervolgens de gewenste foto's en klik op de Herstellen knop. Dan gaan deze foto's terug naar iCloud Photos en kun je ze direct downloaden.
Tips: U moet iCloud-foto's op uw iPad hebben ingeschakeld voordat u deze methode kunt gebruiken.
Deel 3: Hoe verwijderde foto's op de iPad herstellen via iCloud
Kan ik verwijderde foto's van mijn iPad herstellen? Jazeker! Als bovenstaande methode niet werkt, kun je proberen verwijderde foto's van je iPad te herstellen met iCloud:
Stap 1. Start de Instellingen app, ga naar Algemeen, kies iPad overzetten of resetten or Reseten tik op Wis alle inhoud en instellingen. Zet vervolgens uw iPad terug naar de fabrieksinstellingen.
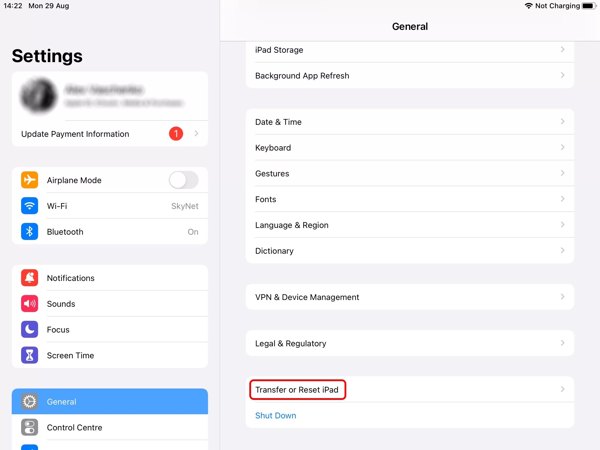
Stap 2. Wacht tot je iPad opnieuw is opgestart en je ziet het volgende: Hallo scherm. Maak bij het instellen verbinding met een Wi-Fi-netwerk.
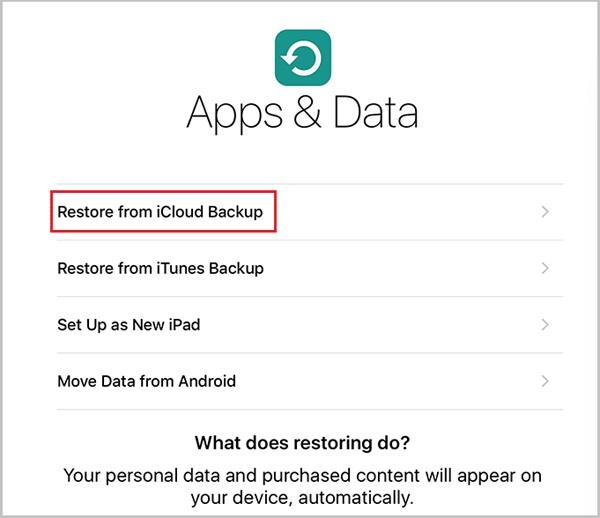
Stap 3. Kies Herstellen van iCloud-back-up aan de Apps & gegevens scherm, meld je aan met je Apple ID en wachtwoord en herstel de juiste back-up. Vervolgens worden de verwijderde foto's hersteld naar je iPad.
Deel 4: Hoe u verwijderde foto's op de iPad kunt vinden met iTunes/Finder
Als u de verwijderde iPad-foto's niet kunt vinden in het album 'Recent verwijderd', zijn back-ups een andere manier om ze terug te halen. Voor iPad-gebruikers is iTunes/Finder beschikbaar om een iOS-apparaat te back-uppen. Volg de onderstaande stappen om verwijderde foto's van de iPad te herstellen met iTunes Back-up:
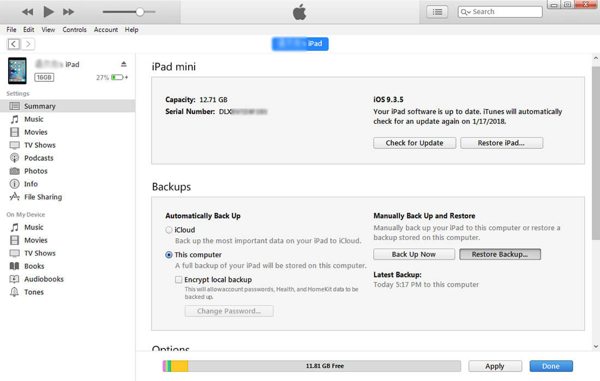
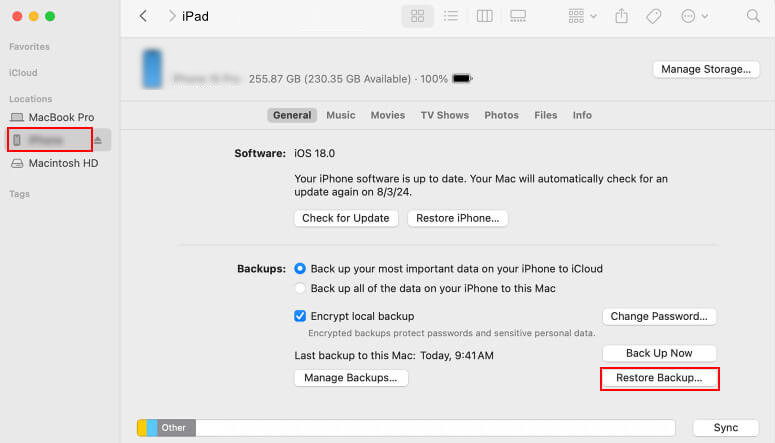
Stap 1. Draai de nieuwste versie van iTunes op je computer. Draai op macOS Catalina de Finder-app. Sluit je iPad aan op je computer met een USB-kabel.
Stap 2. Klik op de Apparaat knop in iTunes en ga naar de Samenvatting tabblad. Of kies de naam van je iPad in Finder en ga naar de Algemeen Tab.
Stap 3. Druk op de Back-up terugzetten knop onder de Backups Selecteer een geschikte back-up en volg de instructies om verwijderde foto's op uw iPad te herstellen.
Deel 5: Hoe verwijderde foto's van de iPad te herstellen zonder back-up
De oorspronkelijke manieren om verwijderde iPad-foto's te herstellen zijn niet perfect. Het album Recent Deleted is niet beschikbaar voor oude verwijderde foto's. Terwijl het herstellen van de back-up alle huidige gegevens op uw iPad zal wissen. Daarom hebt u mogelijk een krachtig hulpmiddel nodig, zoals Apeaksoft iPhone Data Recovery, om verloren foto's zonder back-up terug te krijgen.
Haal eenvoudig verwijderde foto's op de iPad op
- Herstel verwijderde foto's op de iPad zonder back-up.
- Haal foto's uit een iTunes- of iCloud-back-up zonder uw iPad opnieuw in te stellen.
- selectief verwijder verwijderde notities, muziek, video's en nog veel meer.
- Ondersteunt de nieuwste versies van iPadOS.
Veilige download
Veilige download

Hoe verwijderde foto's van de iPad te herstellen zonder back-up
Stap 1. Scan je iPad
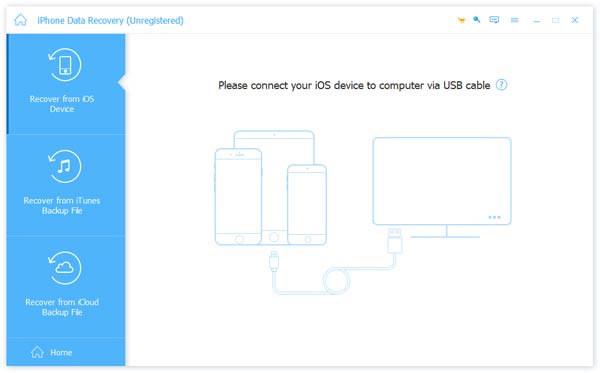
Start de beste fotoherstelsoftware zodra u deze op uw pc hebt geïnstalleerd. Er is een andere versie voor Mac. Sluit uw iPad aan op uw computer met een Lightning-kabel. Kies Herstellen van iOS-apparaat, zorg ervoor dat je op tikt Trust op het scherm van uw iPad als u daarom wordt gevraagd, en klik op de Start scannen om direct te beginnen met zoeken naar verloren gegevens op uw apparaat.
Stap 2. Voorbeeld van verwijderde foto's
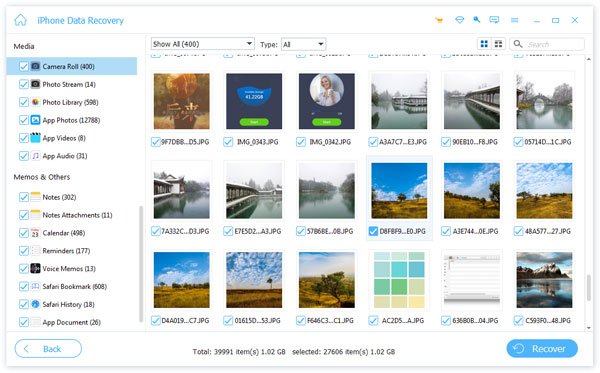
Wanneer de gegevensscan is voltooid, krijgt u het voorbeeldvenster te zien. Kies de gegevenstypen die u wilt herstellen, zoals Filmrol, Photo Library, en meer aan de linkerkant. Hier kunt u een voorbeeld bekijken van de verwijderde iPad-foto's.
Stap 3. Herstel verwijderde iPad-foto's
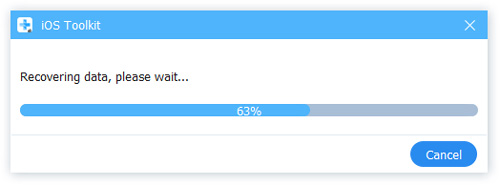
Selecteer ten slotte de gewenste bestanden en klik op de Herstellen knop. Stel vervolgens een uitvoermap in en druk op Herstellen opnieuw. Uw verwijderde foto's worden op de iPad hersteld.
Bonustips: selectief verwijderde foto's uit iTunes/iCloud-back-up ophalen
Met deze software kunt u ook foto's herstellen van een iTunes/iCloud-back-up.
Als u niet weet of de back-up die u kiest de verwijderde foto's bevat die u nodig hebt, of als u het lastig vindt om alle foto's (inclusief de onnodige) in de laatste back-up te herstellen, dan mag u deze functie niet missen!
Het stelt u in staat
• Bekijk een voorbeeld van de foto's in de back-up voordat u deze herstelt.
• Selecteer de foto's die u wilt herstellen.
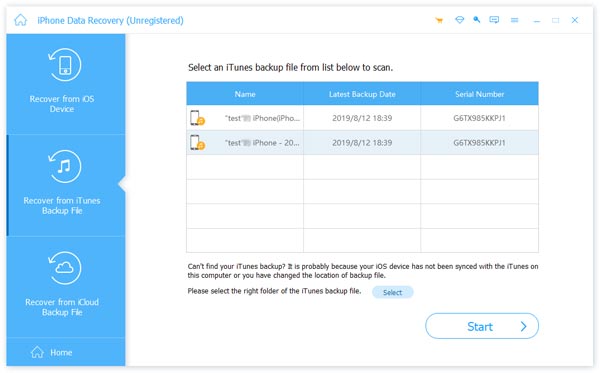
Als u verwijderde foto's op de iPad wilt herstellen via een iTunes-back-up, klikt u gewoon op de knop Herstel van het iTunes-back-upbestand op de hoofdinterface en kies vervolgens de bijbehorende back-up.
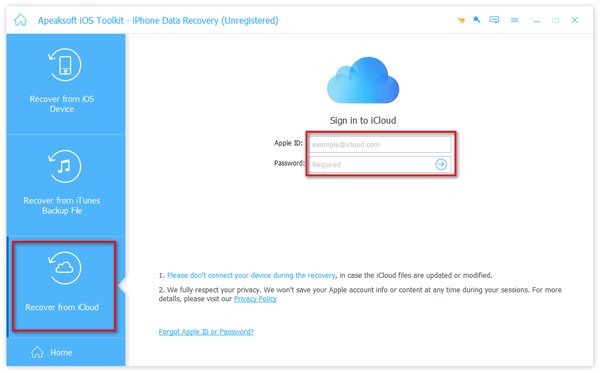
Als u verwijderde foto's op de iPad wilt ophalen van iCloud, kunt u op de optie Herstellen van iCloud-back-upbestand klikken en inloggen op uw iCloud-account. Kies vervolgens de beoogde back-up en start uw bewerkingen.
Conclusie
Hoe haal je verwijderde foto's op je iPad terug? Ik denk dat je het antwoord weet.
Deze gids legt uit: hoe verwijderde foto's van iPad te herstellen. Het album Recent Deleted op iPad of iCloud is de makkelijkste manier om je foto's te vinden. Een iTunes/Finder of iCloud back-upbestand is een andere manier om je foto's terug te krijgen als je een back-up van uw iPad gemaakt regelmatig. Met Apeaksoft iPhone Data Recovery kunt u verwijderde foto's van uw iPad ophalen zonder back-up.
Gerelateerde artikelen
In dit artikel wordt beschreven hoe u het probleem kunt oplossen dat u een iPad niet kunt herstellen vanwege verschillende softwareproblemen.
Het stoort je enorm als je iPad-update vastloopt, want je kunt er niets mee doen zolang het stroomverbruik nog aan staat.
U kunt dit artikel bekijken voor gedetailleerde manieren om de toegangscode voor beperkingen op uw iPad opnieuw in te stellen/herstellen, zelfs als u deze bent vergeten.
Als iCloud-foto's niet worden gesynchroniseerd, lees en volg dan onze probleemoplossing om dit probleem op uw iPhone of iPad efficiënt op te lossen.

