맥북 프로를 공장 초기 설정으로 복원하기 공장 초기화란 노트북을 초기 상태로 되돌리는 것을 의미합니다. 기기를 공장 초기화해야 하는 이유는 여러 가지가 있습니다. 예를 들어, MacBook Pro를 판매하기 전에는 개인 정보를 보호하기 위해 공장 초기화를 통해 모든 데이터를 삭제해야 합니다. 또한 노트북에 접근할 수 없거나, 화면이 멈추거나 응답하지 않는 등의 문제가 발생했을 때 문제 해결에 있어 중요한 단계입니다.
페이지 내용:
파트 1: 맥북 프로 복원을 시작하기 전에
MacBook Pro를 공장 초기 설정으로 복원하면 노트북의 모든 데이터가 삭제되므로 Time Machine을 사용하여 기기를 백업하는 것이 좋습니다. 또한 기기에서 모든 서비스와 계정에서 로그아웃해야 합니다.
Time Machine으로 MacBook Pro 백업하기
1 단계 노트북에 백업 저장 장치를 삽입하세요.
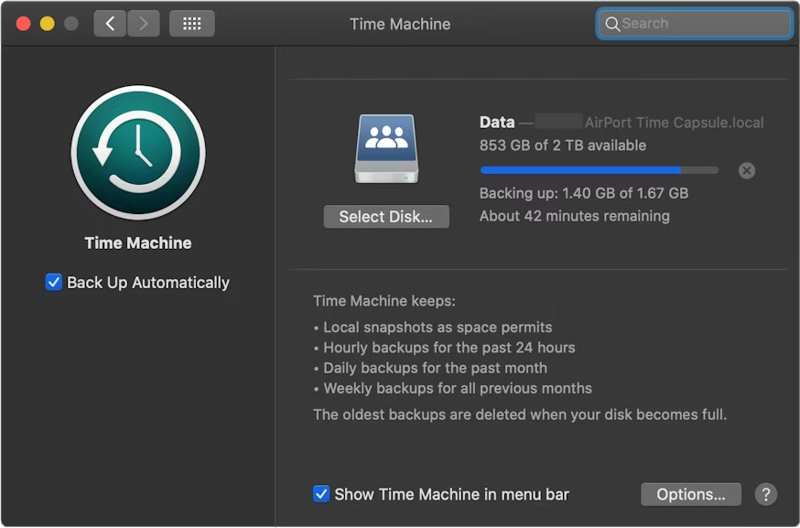
2 단계 클릭 Apple 메뉴를 선택하고 환경 설정 or 시스템 환경 설정.
3 단계 일반 사이드바에서 선택하세요 시간 기계.
4 단계 히트 백업 디스크 추가 또는 추가 버튼을 클릭합니다.
5 단계 다음으로 백업 저장 장치를 선택하고 클릭하세요. 디스크 설정.
6 단계 화면에 나타나는 지시에 따라 백업 저장 장치를 설정하십시오.
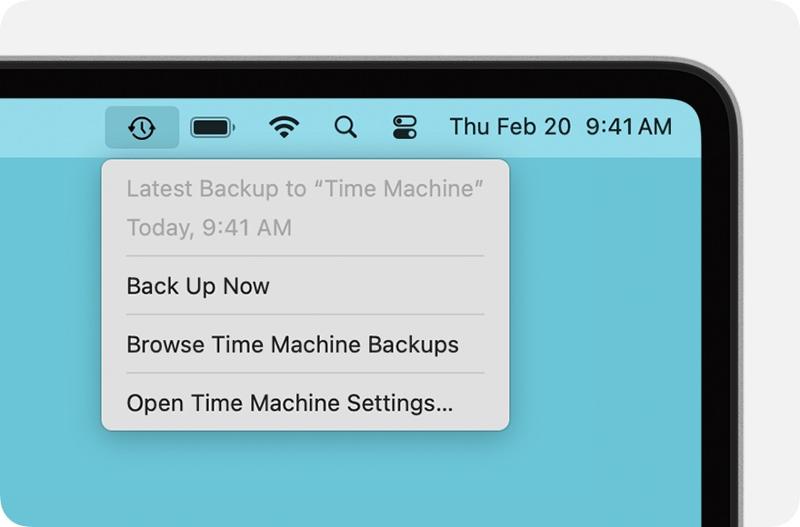
7 단계 설정 후 다음을 클릭합니다. 시간 기계 상단 리본 메뉴에서 백업 지금 맥북 프로를 초기화하기 전에 데이터를 백업하세요.
계정에서 로그아웃
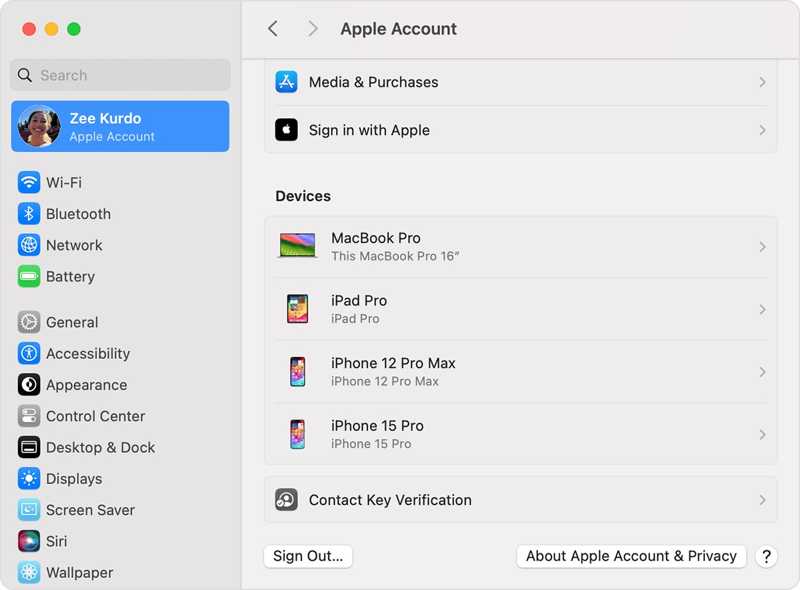
MacBook Pro를 공장 초기 설정으로 완전히 복원하려면 기기에 추가된 모든 계정에서 로그아웃해야 합니다.
macOS Catalina 이상 버전에서는 다음을 선택하세요. 환경 설정 or 시스템 환경 설정 귀하의 Apple 메뉴. 끄기 나의 Mac 찾기. 그런 다음 Apple 계정으로 이동하여 아래로 스크롤한 다음 클릭하세요. 로그아웃.
macOS Mojave 또는 이전 버전을 사용하는 경우 선택하세요. 시스템 환경 설정 인간을 Apple 메뉴. 딸깍 하는 소리 iCloud에, 그리고 명중 로그아웃.
또한, iMessage, FaceTime 및 기타 서비스에서 로그아웃하는 것이 좋습니다.
파트 2: 설정에서 MacBook Pro를 복원하는 방법
macOS Ventura 이상 버전으로 업데이트된 MacBook Pro의 경우, 시스템 설정에 내장된 기능을 사용하여 공장 초기화하는 것이 가장 쉽습니다. 이 방법을 사용하면 일반 모드에서 초기화를 완료할 수 있습니다.
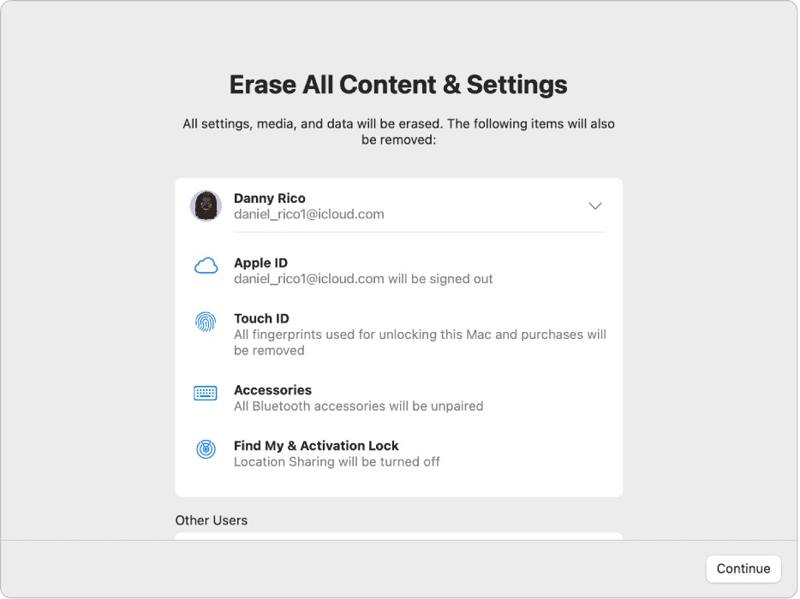
1 단계 클릭 Apple 모든 화면의 메뉴.
2 단계 We Buy Orders 신청서를 클릭하세요. 시스템 설정에서 선택하세요 일반 그리고 클릭 전송 또는 재설정.
3 단계 클릭 모든 콘텐츠 및 설정 지우기 옵션을 선택합니다.
4 단계 메시지가 표시되면 Apple ID 암호 또는 관리자 암호를 입력하십시오.
5 단계 경고를 읽고 클릭하세요 계속 MacBook Pro 복원을 시작하려면 다음 단계를 따르세요.
파트 3: 디스크 유틸리티를 사용하여 MacBook Pro를 공장 초기 설정으로 복원하는 방법
MacBook Pro의 시스템 설정에서 공장 초기화를 할 수 없거나 macOS Monterey 또는 이전 버전을 사용 중인 경우, 노트북을 복구 모드로 전환한 다음 디스크 유틸리티를 사용하여 초기화해야 합니다.
참고 : 당신은 반드시 다음 사항을 확인해야 합니다. 맥북을 아이클라우드에 백업했습니다. 또는 사전에 다른 곳에 보관하십시오.
1 단계 로 이동 Apple 메뉴를 선택하고 종료 노트북 전원을 끄려면 다음 버튼을 누르세요. 화면이 응답하지 않으면 버튼을 길게 누르세요. 출력 버튼이 검게 변할 때까지 기다리세요.
2 단계 를 누르고 출력 맥을 켜려면 버튼을 누르고 즉시 다음 버튼을 누르세요. Command-R Apple 로고가 나타날 때까지 키를 누르십시오.
팁 : MacBook Pro에 Apple Silicon 또는 Apple T2 보안 칩이 장착되어 있는 경우, 잠시 기다리십시오. 출력 노트북 전원이 켜진 후 버튼을 누르세요.
3 단계 메시지가 나타나면 관리자 암호를 입력하십시오. 그러면 두 가지 옵션이 표시됩니다.
옵션
4 단계 선택 디스크 유틸리티 옵션이 한 번 macOS 유틸리티 창이 나타납니다.

5 단계 클릭 계속 버튼을 클릭하십시오.
6 단계 이제 시작 디스크가 표시될 것입니다. 데이터 디스크가 있는 경우 해당 디스크를 선택하고 클릭하십시오. 편집선택한다. APFS 볼륨 삭제, 그리고 명중 ..
7 단계 다음으로 시동 디스크를 선택하십시오. 기본 설정은 다음과 같습니다. Macintosh HD.
8 단계 클릭 삭제 버튼을 클릭합니다.
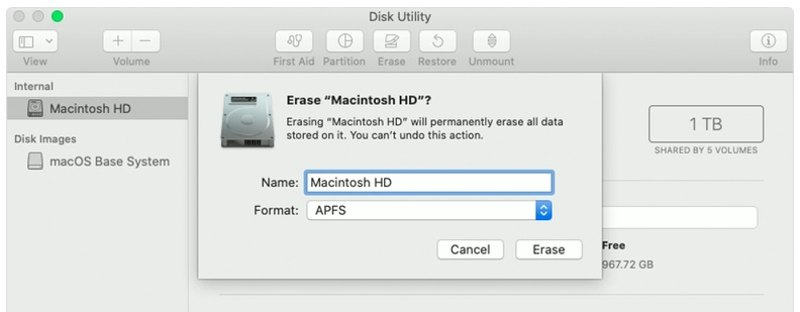
9 단계 타입 Macintosh HD 이름을 입력하고 형식을 선택하세요.
10 단계 클릭 삭제 버튼을 다시 누릅니다.
11 단계 메시지가 표시되면 Apple ID 암호 또는 관리자 암호를 입력하십시오.
12 단계 맥북 프로 공장 초기화가 완료될 때까지 기다리세요.
13 단계 완료되면 해당 페이지로 이동합니다. macOS 유틸리티 화면을 표시합니다.
14 단계 왼쪽 메뉴에서 macOS 다시 설치 화면에 나타나는 지시에 따라 노트북을 설정하십시오.
옵션
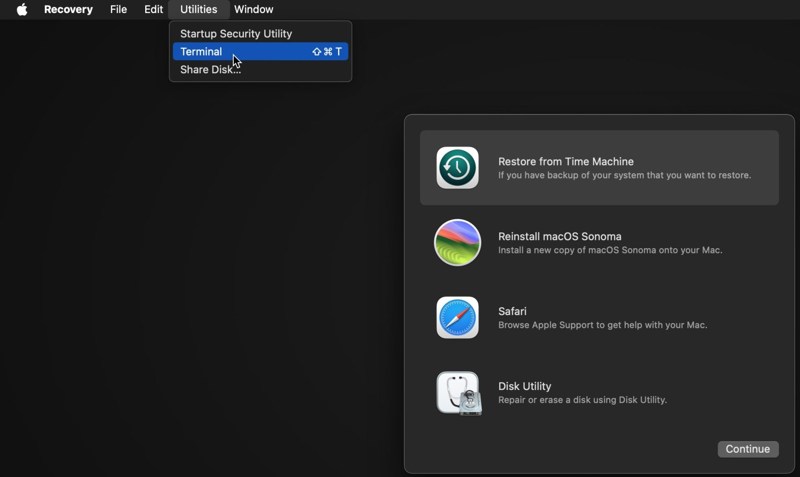
4 단계 클릭 유틸리티 메뉴를 선택하고 단말기.
5 단계 타입 디스크리스트 목록 그리고 반품 키보드의 키를 눌러 시동 디스크를 식별하십시오.
6 단계 다음으로 다음 명령을 실행하십시오.
diskutil eraseDisk APFS "Macintosh HD" disk0
팁 : Mac에 SSD 대신 하드 드라이브가 장착되어 있는 경우 다음 명령을 실행하십시오. diskutil eraseDisk HFS+J "Macintosh HD" disk0.
diskutil eraseDisk HFS+J "Macintosh HD" disk0.
7 단계 다음으로, 아래 명령어를 사용하여 최신 macOS를 다운로드하십시오.
softwareupdate --fetch-full-installer --full-installer-version [숫자].
8 단계 입력 sudo /Applications/Install macOS Sequoia.app/Contents/Resources/startosinstall --eraseinstall --newvolumename "Macintosh HD", 그리고 명중 반품 macOS를 다시 설치하려면.
9 단계 맥북 프로가 재부팅되면 설정을 진행하세요.
파트 4: MacBook Pro 복원 후 데이터 복구 방법
맥북 프로를 복원하면 모든 데이터가 삭제됩니다. 다행히도, Apeaksoft 데이터 복구 이 프로그램은 해당 문제를 해결하는 데 도움을 줄 수 있습니다. 하드 디스크를 스캔하여 백업 없이도 손실된 데이터를 복구할 수 있습니다.
한 번의 클릭으로 삭제된 YouTube 동영상에 액세스하세요
- 맥북 프로에서 손실된 데이터를 단 한 번의 클릭으로 복구하세요.
- 공장 초기화, 실수로 삭제 등 다양한 상황에서 사용할 수 있습니다.
- 다양한 데이터 유형을 지원합니다.
- 손실된 파일을 미리 보고 선택적으로 복구할 수 있습니다.
- macOS 10.7 이상과 호환됩니다.

맥북 프로 복원 후 데이터 복구 방법
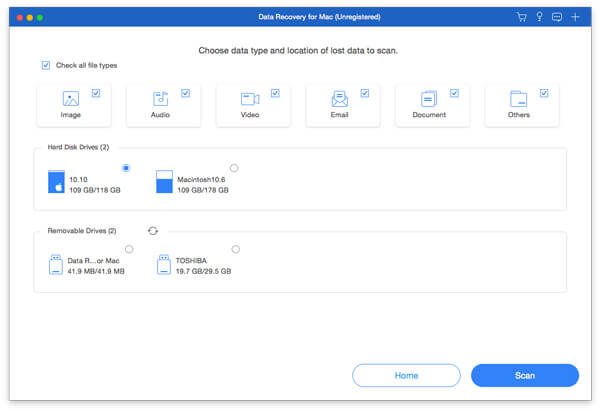
1 단계 데이터 타입 선택
MacBook Pro에 최고의 데이터 복구 프로그램을 설치한 후 실행하세요. 복구할 데이터 유형(예: 파일, 파일 이름 등)을 선택하세요. 이미지, 오디오, 비디오그 외에도 여러 가지 옵션이 있습니다. 그런 다음 손실된 파일이 있는 디스크를 선택합니다. 클릭하세요. 주사 맥 스캔을 시작하려면 버튼을 누르세요.
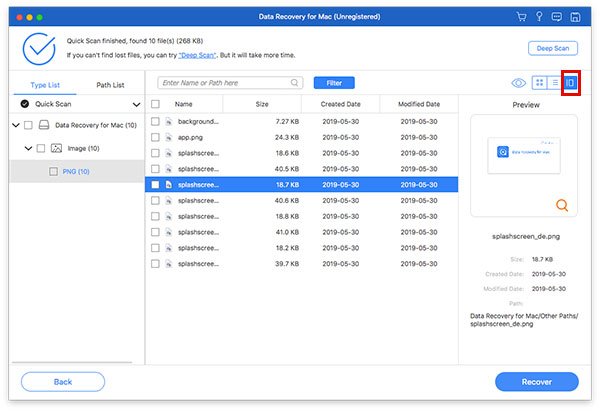
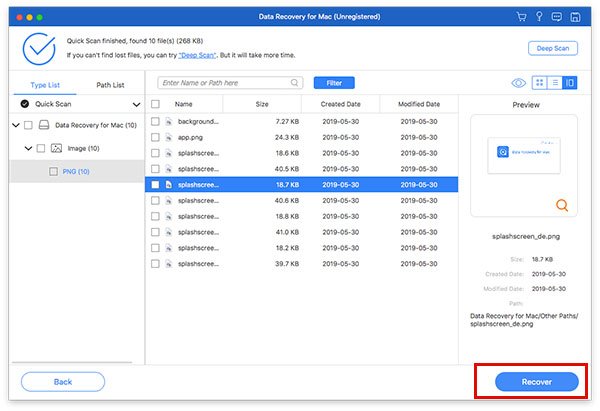
2 단계 손실된 파일 미리보기
스캔이 완료되면 다음으로 이동하세요. 유형 목록 탭에서 유형별로 손실된 데이터를 미리 볼 수 있습니다. 특정 위치도 찾을 수 있습니다. 경로리스트 탭을 클릭하세요. 원하는 파일을 찾을 수 없는 경우, [탭 이름]을 클릭하세요. 면밀히 살펴보다 버튼을 눌러 딥 스캔을 수행합니다.
3 단계 MacBook Pro에서 파일 복구하기
복구하려는 모든 파일과 항목을 선택하고 [복구]를 클릭하세요. 복구 버튼을 누르세요. 출력 폴더를 설정하고 복구 버튼을 다시 누르세요. 이 프로그램은 다음과 같은 작업도 수행할 수 있습니다. Mac에서 삭제된 메시지 복구하기.
맺음말
이제, 당신은 이해해야합니다 MacBook Pro를 공장 설정으로 복원하는 방법최신 버전의 경우 시스템 설정 앱에서 공장 초기화를 수행할 수 있습니다. 이전 버전의 경우 복구 모드에서 초기화를 수행할 수 있습니다. Apeaksoft 데이터 복구 맥북 프로를 공장 초기화한 후 손실된 데이터를 복구할 수 있습니다. 백업은 필요하지 않습니다.
관련 기사
Mac에서 마음에 드는 사진을 실수로 삭제하셨나요? 걱정하지 마세요. 이 글이 Mac에서 삭제된 사진을 복구하는 데 도움이 될 것입니다.
Mac의 복구 모드는 Mac을 복구하고 디스크 문제를 복구하도록 설계된 내장 모드입니다. 여기서는 Mac에서 복구 모드를 시작하고 사용하는 방법을 배웁니다.
Mac에 가장 적합한 데이터 복구 소프트웨어는 무엇일까요? Mac에서 데이터를 안전하고 빠르게 복구할 수 있는 최고의 소프트웨어를 선택하는 데 도움이 되는 리뷰와 함께 상위 10개 목록을 소개합니다.
이 문서에서는 Mac에서 인터넷 복구가 무엇인지, Mac 인터넷 복구 모드로 들어가는 방법 및 작동하지 않는 문제를 해결하기 위한 솔루션에 대한 자세한 정보를 보여줍니다.
