Enkel guide: Så här tar du bort Google Foton från vilken enhet som helst
I takt med att fotografering med smartphones blir allt vanligare har Google Foto blivit det föredragna valet för många för att säkerhetskopiera sina foton automatiskt. Men med tiden ökar antalet lagrade foton, vilket upptar värdefullt molnutrymme och eventuellt inkluderar dubbletter, suddiga bilder eller värdelösa bilder. Har du någonsin upplevt frustrationen att vilja rensa allt med ett klick men inte veta var du ska börja? Den här artikeln ger dig en omfattande guide om hur man tar bort alla foton från Google Foto, som täcker olika metoder för Android, iPhone och webben, och hjälper dig att snabbt frigöra utrymme, organisera ditt galleri och undvika att oavsiktligt radera viktigt innehåll.
SIDINNEHÅLL:
Del 1. Hur foton lagras i Google Foto
Google Foto är en kraftfull molnfototjänst lanserad av Google som automatiskt säkerhetskopierar dina foton och videor och ger dig åtkomst till dina minnen när som helst och var som helst. När foton har laddats upp lagras de på molnservrar, och lokala foton på din telefon kan också synkroniseras med molnet. Det betyder att när du tar bort ett foto från din telefon kan det också påverka innehållet i Google Foto.
Att förstå hur foton lagras i Google Foto hjälper dig att hantera dem bättre. Generellt sett kategoriserar Google Foto uppladdade foton i original kvalitet och lagringsbesparingskvalitet, vilket gör det möjligt för användare att välja olika säkerhetskopieringsstrategier baserat på sina behov.
Om du har aktiverat synkronisering på din telefon kan radering av foton i Google Foto även radera motsvarande bilder i telefonens lokala album. För att undvika oavsiktlig radering kan du Överför foton från iPhone till dator och spara dem. Därför är det ett viktigt steg för att lära sig hur man tar bort Google Foto att korrekt skilja på förhållandet mellan molnfoton och lokala foton.
Del 2. Hur man tar bort Google Foton från en telefon
Om du vill rensa upp Google Foto på din telefon, oavsett om du bara raderar några foton eller vill förstå hur du tar bort alla bilder på Google Foto, kan guiden nedan hjälpa dig.
Steg 1. Öppna Google Foto-appen och se till att du är inloggad på ditt konto.
Steg 2. Markera de foton du vill radera manuellt, du kan också trycka länge för att välja flera.
Steg 3. Klicka på soptunna knappen längst ner och klicka sedan på Radera igen i popup-fönstret för att bekräfta raderingen.
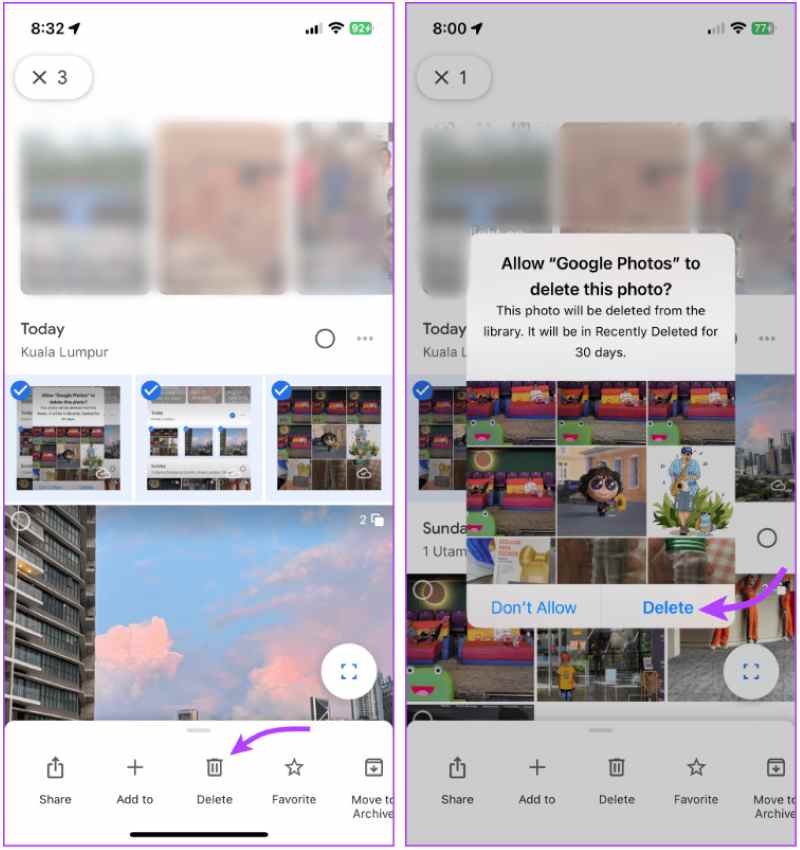
Raderade bilder kommer att gå till trash, och du kan återställa nyligen raderade bilder inom 30 dagar. Om du har aktiverat EnhetssynkroniseringOm du raderar molnbilder tas även motsvarande lokala bilder bort. Den här metoden är särskilt lämplig för användare som bara vill rensa molninnehåll, och det är en viktig färdighet för att bemästra hur man raderar Google Foto utan att påverka telefondata.
Del 3. Hur man tar bort Google Foton utan att ta bort från iPhone
Många användare oroar sig för att det lokala biblioteket på deras iPhone påverkas om man tar bort foton medan man rensar Google Foto. Så länge inställningarna är korrekta kan man faktiskt bara radera innehållet i molnet och behålla fotona på telefonen. För att uppnå detta följer du stegen nedan för att ta bort Google Foto utan att ta bort dem från iPhone.
Metod 1: Konfigurera och radera på iPhone
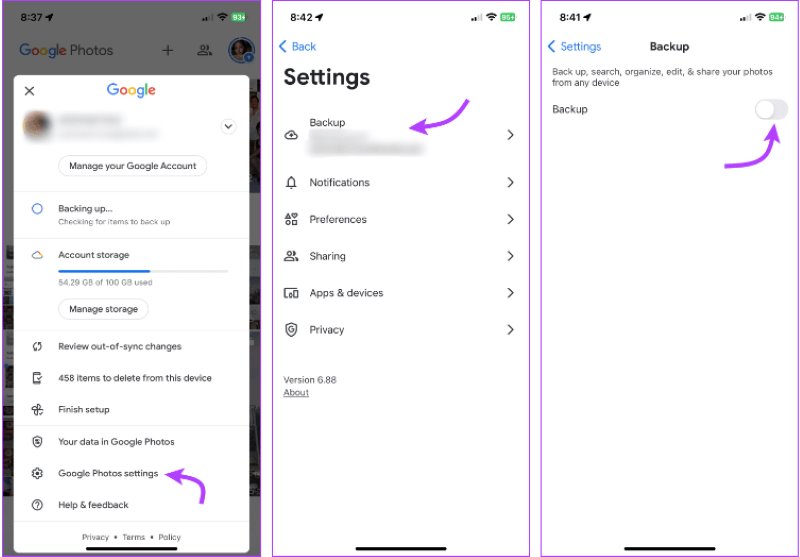
Steg 1. Öppna Google Foto app. Tryck på din profil för att gå in Inställningar.
Steg 2. Välja säkerhetskopiering och stäng av den. Detta förhindrar att foton som är länkade mellan molnet och lokal lagring raderas.
Steg 3. Se till att lokala foton är sparade i iPhone-systemalbumet. Gå sedan till fotosidan, välj de bilder som ska raderas och klicka på soptunna knapp.
Metod 2: Ta bort på datorns webb
Om du vill utföra batchåtgärder eller hitta ett bekvämare sätt kan du radera via Google Fotos webbgränssnitt:
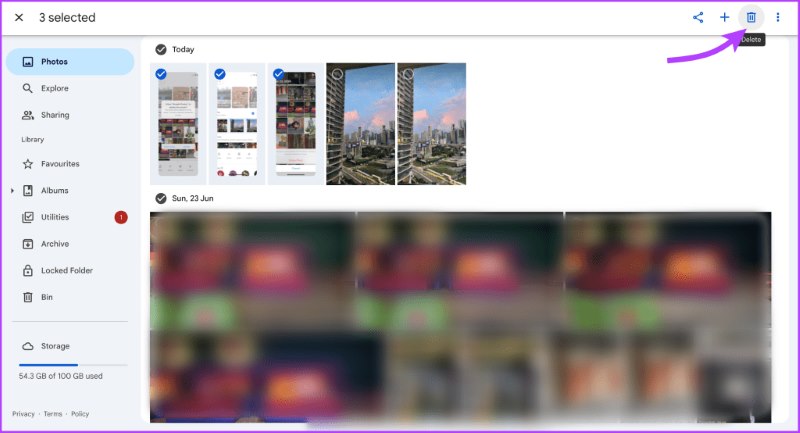
Steg 1. Besök photos.google.com i din webbläsare och logga in på ditt Google-konto.
Steg 2. Håll ner shift tangenten för att välja flera foton samtidigt.
Steg 3. Klicka på soptunna knappen i det övre högra hörnet och bekräfta borttagningen. Borttagna objekt hamnar i trash och rensas automatiskt efter 30 dagar, eller så kan du tömma den manuellt.
Att använda webbversionen påverkar inte din iPhones lokala foton, vilket gör det till en effektiv metod för att radera alla foton från Google Foto utan att av misstag radera mobildata. Med metoden ovan kan du flexibelt rensa endast molninnehållet, vilket frigör lagringsutrymme samtidigt som du skyddar viktiga foton på din telefon.
Del 4. Radera Google Foton och annan data permanent
Efter att ha raderat foton går de till trash i Google Foto, men kan återställas inom 30 dagar. Om du vill radera dessa data och inte lämna någon chans till fullständig återställning måste du tömma papperskorgen manuellt eller använda kraftfullare verktyg för att radera spår.
Töm papperskorgen i Google Foto
Steg 1. Öppna Google Foto app eller webbplats.
Steg 2. Klicka på menyn och välj trash or Bin.

Steg 3. Markera alla och välj RaderaEfter radering kan fotona inte återställas.
Men anta att du också vill radera den lokala cachen, kvarvarande data och tillfälliga filer från din telefon, särskilt om du planerar att sälja din gamla telefon eller avsluta ditt konto. I så fall behövs en högre nivå av databorttagningsmetod.
Kraftfullt tredjepartsverktyg
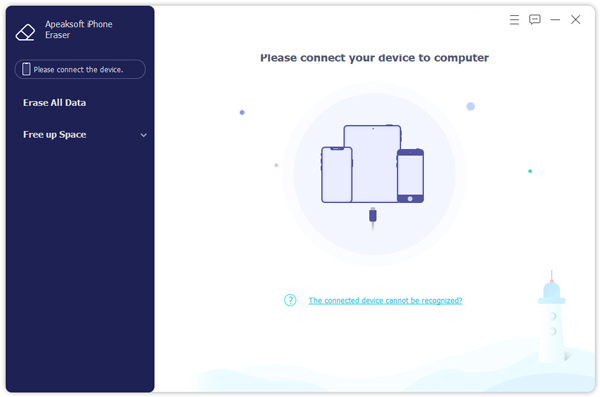
Om du använder en iPhone, Apeaksoft iPhone Eraser är ett professionellt verktyg för datarensning som kan hjälpa dig att radera allt privat innehåll med ett klick, inklusive Google Foto-data.
Kraftfullt verktyg för att permanent radera Google Foto och annan data
- Flernivåläget för dataradering ger ett mer grundligt skydd mot återställning.
- Rensar samtidigt cachade filer, foton, videor och kontodata.
- Enkel användning, lämplig för alla modeller av iPhone och iPad.
- Särskilt lämplig för djuprengöring före begagnad överföring eller återvinning av enheter.

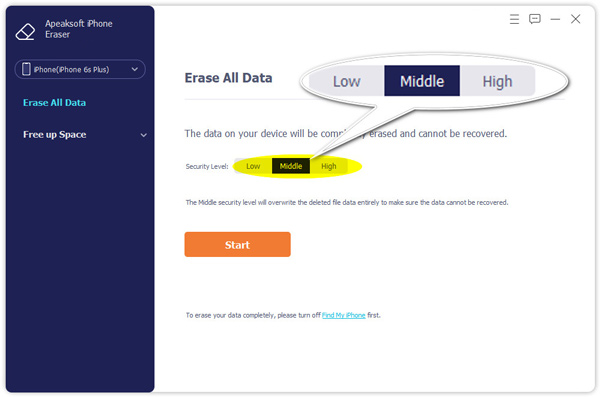
Steg 1. Installera Windows- eller macOS-versionen beroende på systemet. Anslut iPhone till datorn med den ursprungliga datakabeln och välj sedan Radera alla data avsnitt på huvudsidan.
Steg 2. Programgränssnittet presenterar tre alternativ för raderingsnivåer. Välj en nivå baserat på dina behov; det rekommenderas att använda mellannivån för att helt eliminera spår relaterade till Google Foto samtidigt som enhetens grundläggande information bibehålls.
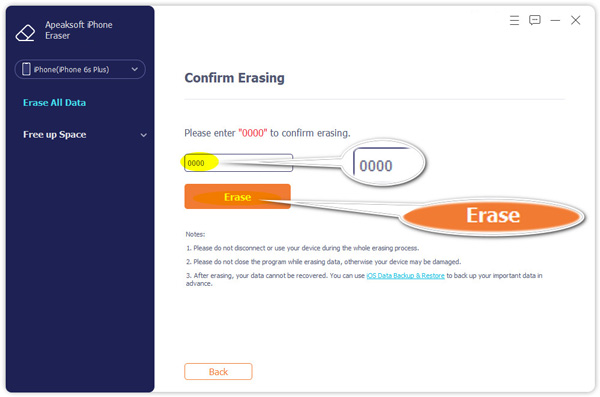
Steg 3. Efter att du har bekräftat raderingsnivån kommer systemet att uppmana dig att ange 0000 för att bekräfta raderingen. Klicka på efter att du har angett den. Radera, och programmet börjar automatiskt utföra dataraderingen.
Slutsats
Oavsett om du vill frigöra molnutrymme eller lära dig hur man tar bort Google-foton För att skydda din integritet ger den här artikeln tydliga metoder. Om du behöver en mer grundlig datarensning, Apeaksoft iPhone Eraser rekommenderas, så att du kan radera alla spår på din telefon med ett klick, vilket sparar tid och ger dig sinnesro.
