Complete Guide on How to Back iPhone Up on iTunes Safely
As the storage capacity of the iPhone continues to increase, the accumulation of photos, contacts, chat records, and app data on our devices has also become more substantial. Once the device experiences a failure, is accidentally lost, or crashes, all data may disappear in an instant. Many users prefer to use iTunes for backing up iPhone instead of relying on cloud services, as it is not subject to network limitations and allows them to control the timing and content of the backup.
But how do you operate correctly? What settings should you pay attention to during the backup process? This article will start from scratch and provide you with a comprehensive understanding of how to use iTunes to back up an iPhone, ensuring that your data is always safe and controllable.
PAGE CONTENT:
Part 1. Why You Should Back Up Your iPhone Regularly
In daily use, the iPhone stores a large amount of personal data, including photos, contacts, text messages, notes, app data, and more. If the device is accidentally damaged, experiences a failed system update, or is lost or stolen, this data could be lost in an instant. Therefore, regularly backing iPhone up to iTunes is not only an important measure to protect privacy but also a key step in preventing data disasters.
Compared to relying solely on iCloud for cloud synchronization, using iTunes for backing up iPhone gives users more control over the entire backup process. You can manually select the time and location for backups, as well as whether to encrypt the backup content, thereby enhancing security and flexibility. Especially when changing devices or performing a system restore, having a local backup means you can restore offline at any time without worrying about network limitations or insufficient iCloud storage.
Part 2. How to Back Up iPhone to iTunes on Computer
Backing up an iPhone to a computer with iTunes is the most common and reliable method. Here is a detailed introduction to this process, helping you easily complete the backup.
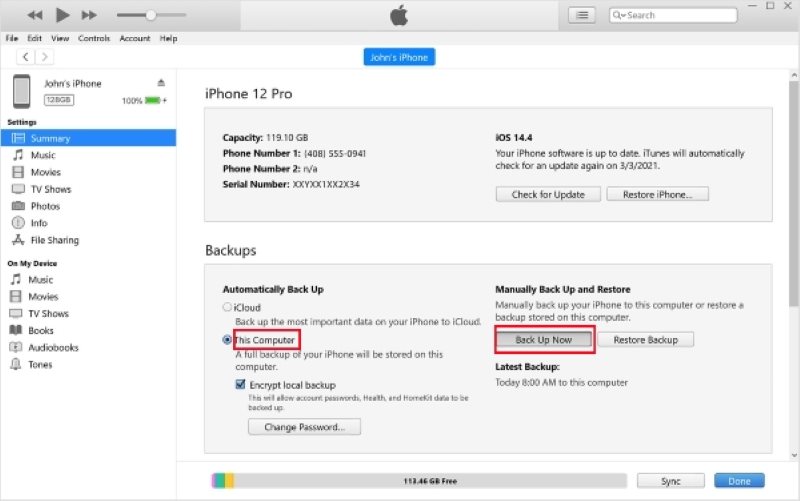
Step 1. Ensure that your computer has the latest version of iTunes installed. After connecting, iTunes will automatically recognize your device. If a prompt to "Trust This Computer" appears, click Trust and enter your iPhone unlock password. If iTunes keeps asking for password, check if you have entered it incorrectly or if there might be another system fault.
Step 2. Click the phone button in the upper left corner of the iTunes window to enter the iPhone Summary interface, where you can see device information and backup options.
Step 3. In the Backup area, select This Computer to back up iPhone to the computer with iTunes. You can check Encrypt local backup, and after setting a password, the backup content will be encrypted to protect sensitive data such as health records and passwords.
Step 4. Click Back Up Now, iTunes will begin backing up your iPhone; the duration of the process depends on the amount of data. Once complete, you can see the most recent backup time under Backups.
Step 5. After the backup is complete, please click the Done button in iTunes to disconnect the iPhone safely.
By following the above steps, you have completed backing up an iPhone to iTunes. This method is suitable for most users, especially those who want a complete backup without relying on the internet.
Part 3. Best Alternative Way to Back Up iPhone Without iTunes
Although iTunes is the official way to back up an iPhone, it is not suitable for everyone. Some users have reported complex operating steps, slow backup speeds, or issues with the device not being recognized. If you are looking for a simpler and more flexible option, Apeaksoft iOS Data Backup & Restore is a trustworthy alternative.
Best Alternative to iTunes
- Supports one-click backup with a simple interface, making it easy for beginners to operate.
- Allows selection of backup content by type to avoid unnecessary data occupying space.
- Supports encrypted backup to protect personal privacy and sensitive data.
- Compatible with the latest iOS devices and systems, with timely updates and high stability.
Secure Download
Secure Download

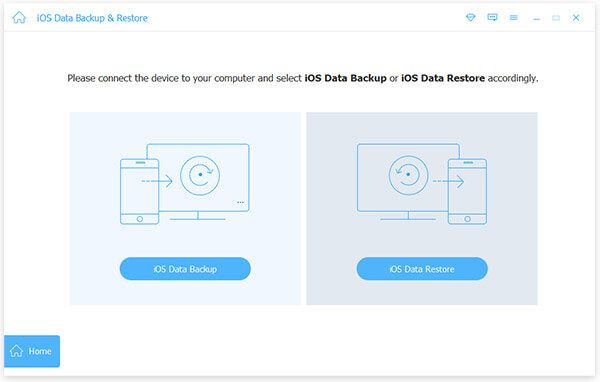
Step 1. After launching the software, select the iOS Data Backup & Restore module on the main interface.

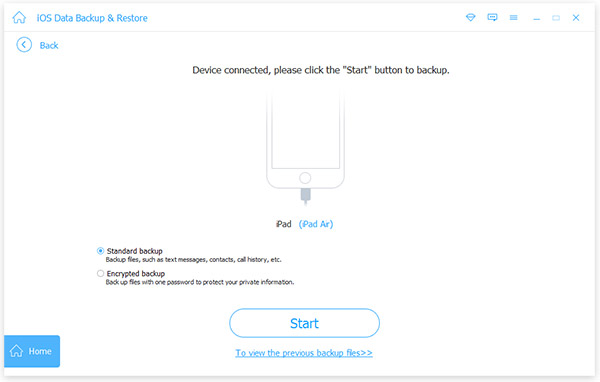
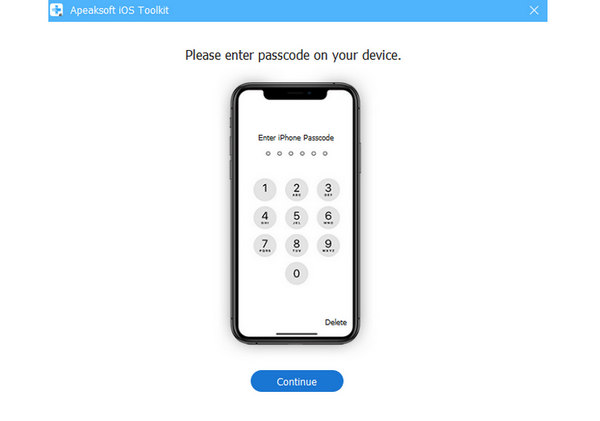
Step 2. Then connect your device to the computer. For the first connection, you need to click Trust on your phone. Then click on iOS Data Backup on the left.
Step 3. You can choose either Standard Backup or Encrypted Backup. If you choose encryption, you need to set a password to protect the data.
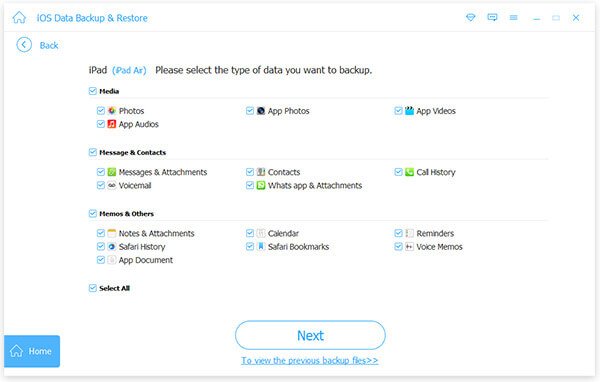
Step 4. The software will list various data types, such as contacts, photos, videos, WhatsApp, etc., allowing you to freely choose the content you want to back up and avoiding unnecessary space waste.
Step 5. After clicking Next, select the backup storage path and enter your phone password. The system will immediately start backing up the iPhone to the computer without iTunes.
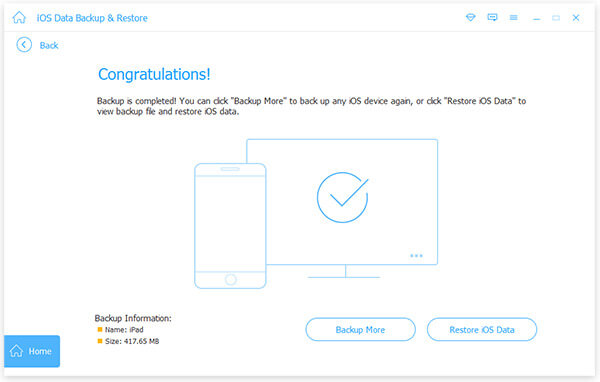
Step 6. After the backup is complete, the software will prompt "Backup successful." You can view the details in Backup History and restore directly later.
For users who are unwilling to use iTunes, this method provides a more flexible and intuitive solution. It not only allows you to back up your iPhone without iTunes easily, but also enhances the overall user experience.
Part 4. How to Restore iPhone from an iTunes Backup
Completing the backup is just the first step; the key is to be able to restore the data to the device when needed smoothly.
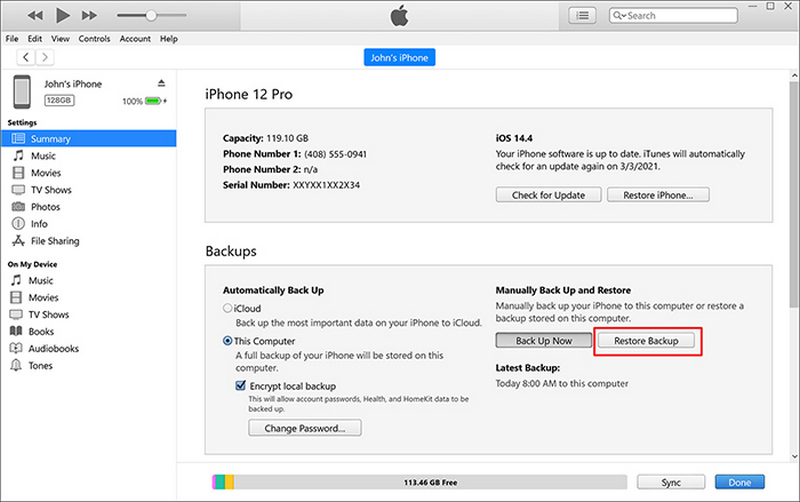
Step 1. Connect the iPhone to the computer using a data cable and open iTunes. If the device is new or has been restored to factory settings, the system will automatically prompt you to restore from a backup.
Step 2. Go to the device summary page. In the Backups area, you can see the Restore Backup option.
Step 3. Click it, and the system will list the available backup records. Choose the one you wish to restore, making sure that the backup is the version created previously through iTunes backup iPhone.
Step 4. Click Restore, and the system will begin restoring data to your iPhone. If you find that your iPhone stuck on the restore screen, don't panic; following the correct steps will ensure that you don't lose any data. Once completed, the iPhone will automatically restart, and the data will be restored to the state it was in at the time of the backup.
This process applies to all local backup files, and it can be completed in just a few steps. If you want to flexibly choose to restore part of the data instead of all of it, you might consider the Apeaksoft tool introduced earlier for selective restoration.
Conclusion
Understanding how to back iPhone up on iTunes is key to ensuring data safety, and tools like Apeaksoft iOS Data Backup & Restore provide a more flexible and efficient option for users who do not want to rely on iTunes. Choose the method that suits your needs to keep your data always in a controllable and recoverable state!
