How to Quickly Back up an iPad to iCloud or Computer
There are many reasons why you should back up your iPad regularly. When you upgrade to a new iPad or an Android tablet, for instance, having a backup allows you to migrate the data during setup. Although the iPad is an advanced mobile device, it can run into problems. Sometimes, the only working solution is to factory reset your device. With a backup, you won’t lose any data. This guide tells you four ways to make a copy of your iPad quickly.
PAGE CONTENT:
Part 1: Ultimate Way to Back up iPad
Today, AI has become a cutting-edge technology that can be seen everywhere. With AI, you can back up and organize data on your iPad easily. From this point, we recommend Apeaksoft iOS Data Backup & Restore. It utilizes AI to back up iPad to computer seamlessly.
The Best iPad Backup Tool
- Back up the iPad to a computer with a single click.
- Back up entire iPad or specific data types.
- Add a password to protect your iPad backup.
- Preview and restore iPad backup without overwriting.
- Support a wide range of iPad models.
Secure Download
Secure Download

How to Back up an iPad to a PC
Step 1. Detect your iPad
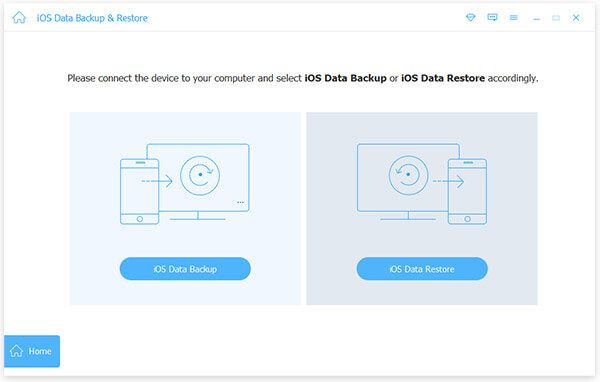
If you want to back up your iPad without iCloud, install the best iPad backup software on your PC. There is another version for Mac users. Launch it, and choose iOS Data Backup & Restore to enter the main interface. Next, connect your iPad to the PC with a Lightning cable. Click the iOS Data Backup button once your device is detected.
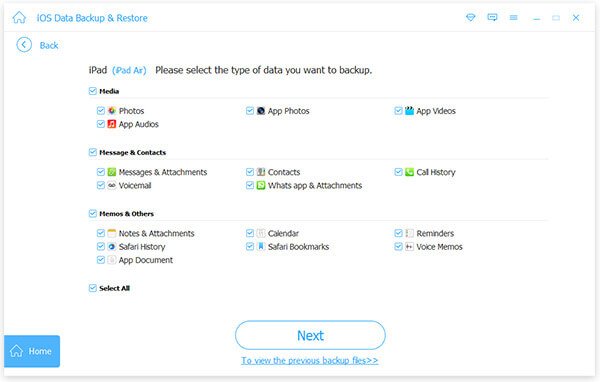
Step 2. Select data types
Now, you will face two options, Standard backup and Encrypted backup. Choose a proper one based on your need, click the Start button, and follow the on-screen instructions to move on. Then select the data types that you want to back up from iPad to computer. To back up the entire device, check Select All.
Step 3. Back up iPad to PC
As long as you are ready, click on the Next button, and set a folder to save iPad backups. During the process, keep your iPad connected to your PC.

Note: For iOS 13 or above, you need to enter your iPad passcode to permit the connection.
Part 2: How to Back up iPad to iCloud
It is well known that iCloud is the cloud storage developed by Apple to expand the internal space of iPad. Every iPad user can get 5GB of free storage. If that is not enough, you can subscribe to iCloud+. Since it is a cloud storage, iCloud lets you back up your iPad without a computer. The downside is the only way to restore from iCloud backups is overwriting your device.
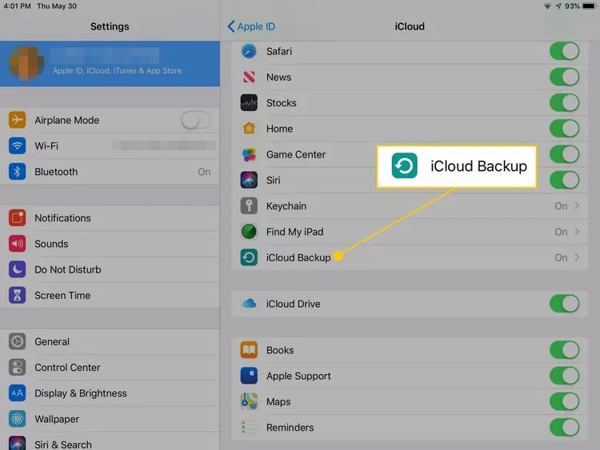
Step 1. Run the Settings app from your home screen, and tap on your profile.
Step 2. Choose iCloud, and press the iCloud Backup option.
Step 3. Now, you have two choices:
If you want to back up your iPad manually, tap the Back Up Now button to initiate a backup immediately.
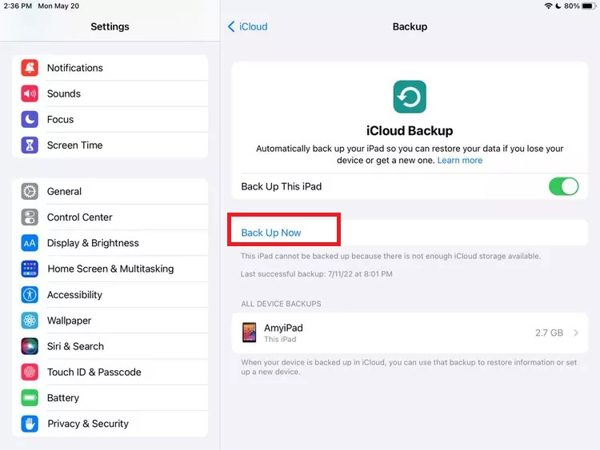
If you hope to back up your iPad to iCloud regularly, toggle on the switch of Back Up This iPad. Then the backup will occur once your iPad connects to a Wi-Fi network.
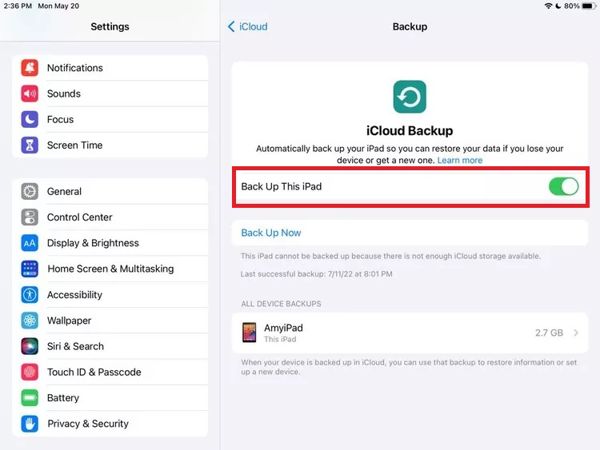
Note: You can check the latest backup under the Back Up Now button or by tapping your device under the ALL DEVICE BACKUPS section. If your iPad cannot be backed up due to insufficient iCloud storage, you have to purchase more storage or free up space.
Part 3: How to Back up iPad to PC with iTunes/Apple Devices
iTunes is still an option to back up an iPad to a PC. It lets you complete the job through a USB cable. Moreover, you can protect your backup with a password. Similar to iCloud, you have to overwrite your device with the backup if you want to recover your iPad or iPhone from iTunes. Apple Devices is a new app to back up iPad on Windows 11. It works much like iTunes.
Step 1. Start the latest version of iTunes or the Apple Devices app. Plug your iPad into your PC with a compatible cable.
Step 2. Click the Phone button at the upper left corner of iTunes, and go to the Summary tab. In the Apple Devices app, choose your iPad name, and go to the General tab.
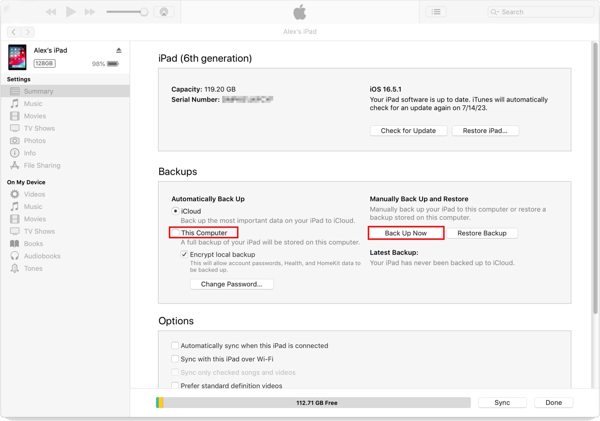
Step 3. Locate the Backups section, and make sure to select This Computer, or Back up all the data on your iPad to this computer.
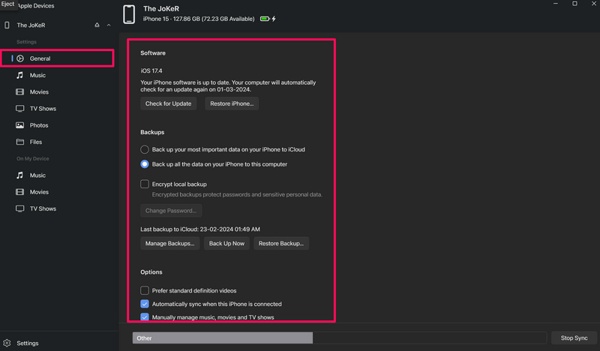
Step 4. If you intend to protect your iPad backups, check the box next to Encrypt local backup and leave a password.
Step 5. At last, click on the Back Up Now button to back up the iPad to your PC. When it is done, you can keep it on your hard drive or transfer the iPad backup to an external hard drive.
Part 4: How to Back up iPad to MacBook Using Finder
Apple has stopped iTunes on macOS Catalina and newer, but you can back up your iPad to MacBook with the Finder app directly. Of course, to open the backup, you have to overwrite your device too.
Step 1. Hook up your iPad to your Mac with a USB cable.
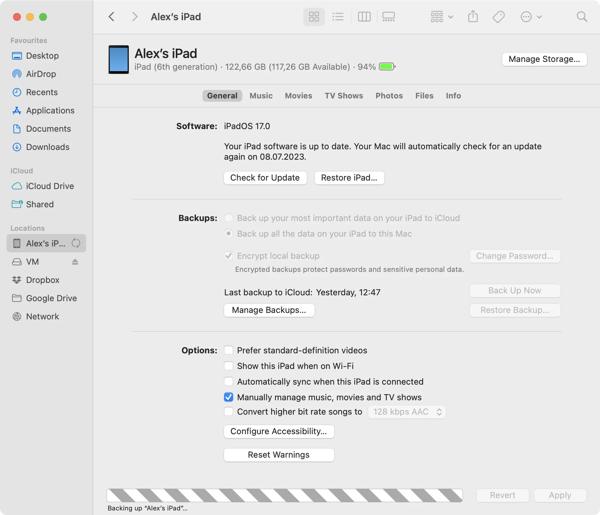
Step 2. Open the Finder app and it should recognize your device. Select your iPad on the left sidebar and go to the General tab.
Step 3. Select Back up all the data on your iPad to this Mac under the Backups section, and click the Back Up Now button.
Note: If you hope to encrypt your iPad backup, tick the checkbox of Encrypt local backup and write down a password.
Conclusion
This guide has demonstrated four ways to back up an iPad to iCloud, PC, or Mac. iCloud is the easiest way to back up your handset through a Wi-Fi network. With a computer, you can use iTunes, Apple Devices, or Finder. Apeaksoft iOS Data Backup & Restore is a good option for average people. If you have other questions about this topic, please feel free to leave a message below this post.
Related Articles
How to wipe an iPad without password? Learn 3 useful ways from this post to erase an iPad and clean all your settings and data on your iPad.
If you cannot unlock your iPhone or iPad due to a series of reasons, try the ultimate four methods to troubleshoot this knotty situation from this post.
If you get an iOS device that is supervised, you can learn how to remove Remote Management from your iPad or iPhone with or without a password from this guide.
Many people may think transferring data from Android to iPhone is difficult as they run different systems. However, it can also be easy after reading this post.
