So stellen Sie Daten von einem Mac mit oder ohne Backup wieder her
Datenverlust auf einem Mac ist eine stressige Angelegenheit. Beispielsweise löscht man versehentlich wichtige Dateien und Ordner, formatiert die Festplatte oder sie ist defekt. Zwar kann kein Computer garantieren, dass man niemals wichtige Dateien verliert, aber es gibt Möglichkeiten, Datenverlust zu vermeiden. Kostenlose Festplattenwiederherstellungssoftware für MacDieser Artikel beschreibt bewährte Methoden, um verlorene Dateien von Ihrer Mac-Festplatte wiederherzustellen.
SEITENINHALT:
- Teil 1: So stellen Sie Daten von einer Mac-Festplatte mithilfe des Papierkorbs wieder her
- Teil 2: So stellen Sie Daten von einer Mac-Festplatte mithilfe des Festplattendienstprogramms wieder her
- Teil 3: So stellen Sie Daten von einer Mac-Festplatte mit Time Machine wieder her
- Teil 4: So stellen Sie Daten von einer Mac-Festplatte aus iCloud wieder her
- Teil 5: So stellen Sie Daten von einer Mac-Festplatte mit TestDisk wieder her
- Teil 6: Die ultimative Methode zur Datenwiederherstellung von der Mac-Festplatte
Teil 1: So stellen Sie Daten von einer Mac-Festplatte mithilfe des Papierkorbs wieder her
Wenn Sie eine Datei auswählen und versehentlich die Entf-Taste drücken, wird diese in den Papierkorb verschoben und dort gespeichert, bis Sie den Papierkorb leeren. Dies bietet eine einfache Möglichkeit, Daten von einer Mac-Festplatte wiederherzustellen.

Schritt 1: Öffnen Sie den Microsoft Store auf Ihrem Windows-PC Müll Ordner aus dem Dock bar.
Schritt 2: Suchen Sie die Daten, die Sie wiederherstellen möchten.
Schritt 3: Klicken Sie mit der rechten Maustaste auf die Datei und wählen Sie Zurück geben.
Schritt 4: Gehen Sie zum ursprünglichen Ordner und prüfen Sie, ob die Datei erfolgreich wiederhergestellt wurde.
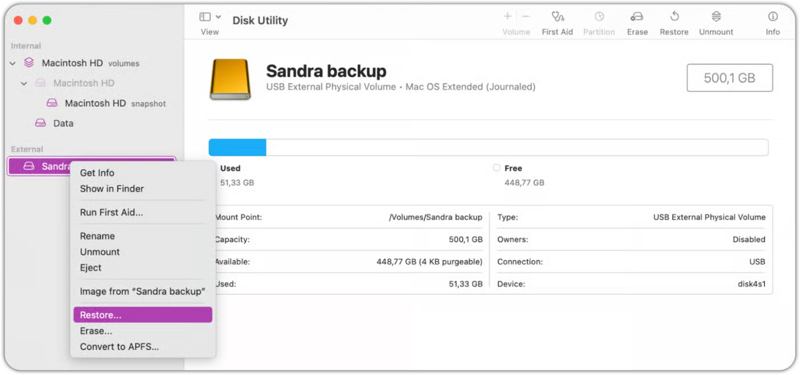
Teil 2: So stellen Sie Daten von einer Mac-Festplatte mithilfe des Festplattendienstprogramms wieder her
Das Festplattendienstprogramm ist die integrierte Funktion zur Verwaltung interner und externer Festplatten auf dem Mac. Es ermöglicht die Datenwiederherstellung von einer formatierten Mac-Festplatte, die Reparatur beschädigter Festplatten, die Erstellung eines Festplattenabbilds und vieles mehr.
Schritt 1: Führen Sie a Finder App.
Schritt 2: Gehen Sie zur Anwendungen -Ordner.
Schritt 3: Öffne Werkzeuge und klicken auf Festplatten-Dienstprogramm.
Schritt 4: Wählen Sie in der Seitenleiste das Volume aus, das Sie wiederherstellen möchten.
Schritt 5: Optional können Sie mit der rechten Maustaste auf das Volume klicken und Folgendes auswählen: Erste-Hilfe-Maßnahmen durchführen um die Festplatte zu reparieren.
Schritt 6: Wenn die Festplattenreparatur abgeschlossen ist, klicken Sie erneut mit der rechten Maustaste auf das Volume und wählen Sie Wiederherstellen.
Schritt 7: Wählen Sie als Nächstes das Volume aus, auf dem die Daten gespeichert werden sollen.
Tipps: Stellen Sie sicher, dass auf dem Zielvolume genügend Speicherplatz vorhanden ist.
Schritt 8: Klicken Sie auf die Wiederherstellen Drücken Sie erneut die Taste und drücken Sie Erledigt um den Wiederherstellungsprozess zu starten.
Teil 3: So stellen Sie Daten von einer Mac-Festplatte mit Time Machine wieder her
Nutze einfach das Stellen Sie Ihren Mac aus Time Machine wieder her Wenn Sie die Sicherung eingeschaltet haben und regelmäßig Backups erstellen, kann Time Machine Ihnen helfen, Daten von einer defekten Festplatte auf einem Mac wiederherzustellen. Legen Sie das Sicherungsmedium in Ihren Computer ein und befolgen Sie die unten stehenden Schritte, um Ihre Daten wiederherzustellen:

Schritt 1: Öffnen Sie den Finder und suchen Sie das Laufwerk, auf dem die verlorenen Daten gespeichert waren.
Schritt 2: Klicken Sie auf die Time Machine Klicken Sie in der oberen Menüleiste auf und wählen Sie Geben Sie Time Machine.
Schritt 3: Als nächstes klicken Sie auf die Nach oben und Nach unten Drücken Sie so lange, bis Sie die verlorenen Daten gefunden haben.
Schritt 4: Klicken Sie auf die Wiederherstellen Schaltfläche zum Wiederherstellen.
Teil 4: So stellen Sie Daten von einer Mac-Festplatte aus iCloud wieder her
Eine weitere Möglichkeit zur Datenwiederherstellung von einer Mac-Festplatte bietet Ihr Cloud-Speicher, beispielsweise iCloud. Nachdem Sie Ihre Daten in iCloud gesichert oder synchronisiert haben, können Sie sie wiederherstellen, selbst wenn Ihre Festplatte formatiert oder defekt ist.
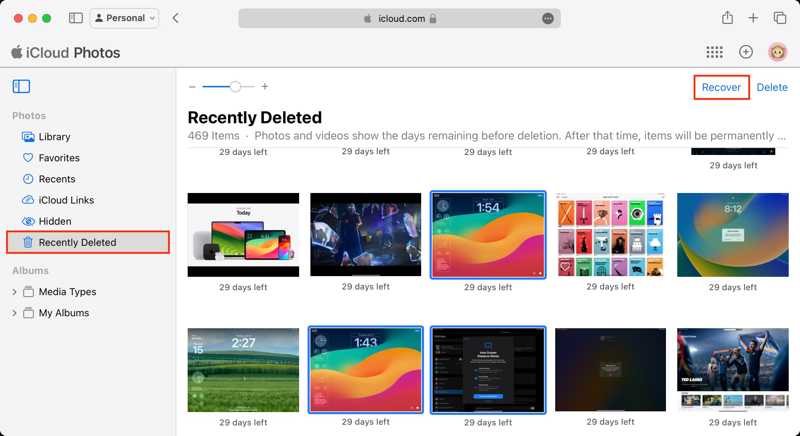
Schritt 1: Öffne www.icloud.com in einem Browser und melde dich mit deiner Apple-ID und deinem Passwort an.
Schritt 2: Um Fotos wiederherzustellen, wählen Sie FotografienWählen Sie die gewünschten Fotos aus und klicken Sie auf Entspannung .
Wenn Sie Kontakte, Kalender, Erinnerungen oder Safari-Lesezeichen wiederherstellen möchten, suchen Sie die Data Recovery Abschnitt. Wählen Sie beispielsweise: Stellen Sie Kalender und Erinnerungen wieder herWählen Sie eine Sicherung aus und klicken Sie auf Wiederherstellen.
Teil 5: So stellen Sie Daten von einer Mac-Festplatte mit TestDisk wieder her
TestDisk ist eine der besten kostenlosen Datenrettungssoftwares für externe Festplatten auf dem Mac, da es sich um ein Open-Source-Projekt handelt. Der Nachteil ist, dass die Software technische Kenntnisse erfordert. Schließen Sie die externe Festplatte an Ihren Mac an und versuchen Sie es mit folgendem Vorgang:
Schritt 1: Laden Sie TestDisk von der offiziellen Website herunter.
Schritt 2: Gehen Sie zur Apple Menü und wählen Sie Systemeinstellungen.
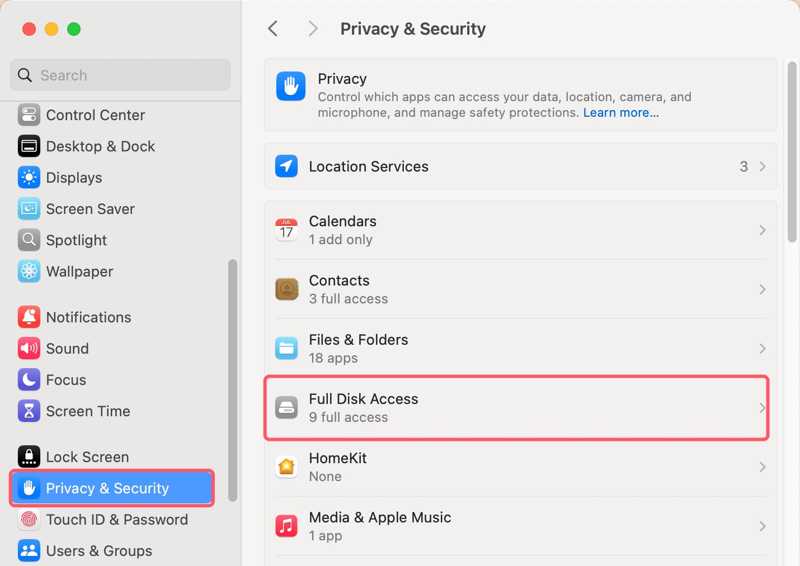
Schritt 3: Wählen Datenschutz & Sicherheit, klicken Voller Festplattenzugriffund schalten Sie TestDisk ein.
Tipps: Falls Sie TestDisk nicht finden können, klicken Sie auf die Schaltfläche „+“ und fügen Sie die Anwendung hinzu.
Schritt 4: Doppelklicken Sie auf das Archiv, um es zu extrahieren und zu öffnen. textdisk.exe Datei.
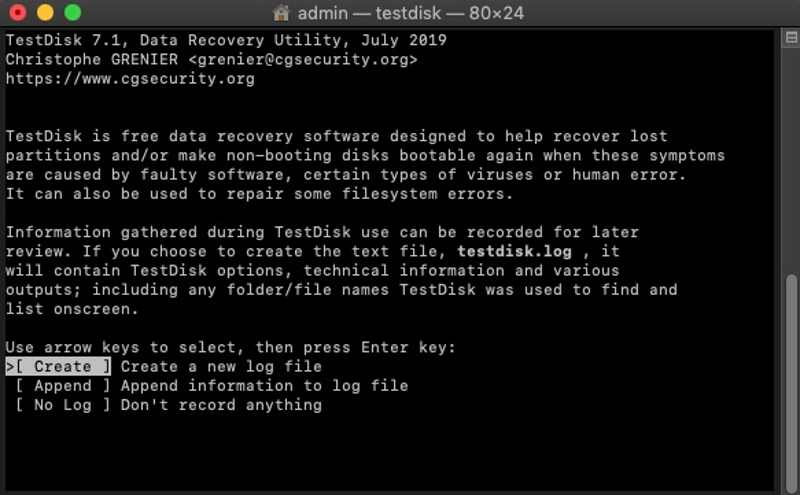
Schritt 5: Auswählen Erschaffung Drücken Sie mit den Pfeiltasten auf Ihrer Tastatur die entsprechende Taste. Return.
Schritt 6: Wählen Sie anschließend die Festplatte aus, auf der die verlorenen Dateien gespeichert sind, und drücken Sie die entsprechende Taste. Return.
Schritt 7: Wählen Sie anschließend den Partitionstabellentyp aus und drücken Sie Return.
Schritt 8: Wählen Analyse und schlagen Return um eine Schnellsuche zu starten.
Schritt 9: Wählen Sie die Partition aus, die Sie wiederherstellen möchten, und drücken Sie die entsprechende Taste. Return.
Schritt 10: Wählen Schreiben um die Partitionsstruktur zu speichern und Daten von der Mac-Festplatte wiederherzustellen.
Teil 6: Die ultimative Methode zur Datenwiederherstellung von der Mac-Festplatte
Apeaksoft Datenwiederherstellung ist die optimale Lösung zur Datenwiederherstellung von einer Mac-Festplatte, selbst wenn diese defekt und nicht zugänglich ist. Das Programm kann Ihre Festplatte scannen und verlorene Daten ohne vorhandene Backups auf einem Mac wiederherstellen.

wurde von über 1,000,000 Nutzer
- Daten von einer Mac-Festplatte ohne Backup wiederherstellen.
- Unterstützt eine Vielzahl von Datentypen.
- Für verschiedene Situationen geeignet.
- Vorschau verlorener Daten zur selektiven Wiederherstellung.
- Kompatibel mit macOS 10.7 und höher.
Sicherer Download
Sicherer Download

Wie man Daten von einer Mac-Festplatte wiederherstellt
Schritt 1: Mac-Wiederherstellung installieren
Starten Sie die Datenwiederherstellungssoftware, nachdem Sie sie auf Ihrem Mac installiert haben. Wählen Sie die Mac Datenwiederherstellung Modus, um fortzufahren.

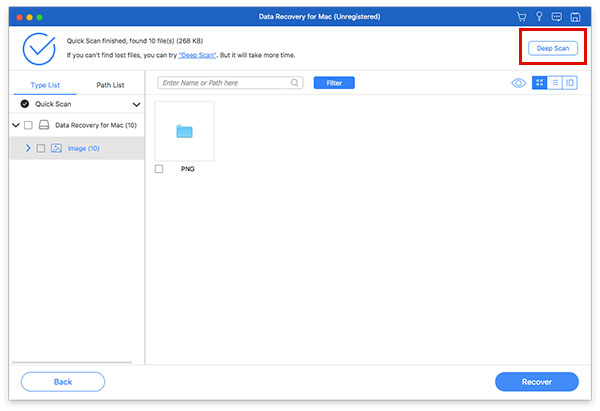
Schritt 2: Festplatte scannen
Wählen Sie die Festplatte aus, von der Sie Daten wiederherstellen möchten, und klicken Sie auf die Schaltfläche. Scannen Klicken Sie auf diese Schaltfläche, um den Scanvorgang Ihres Laufwerks zu starten. Je nach Datenmenge kann dies einige Zeit dauern.
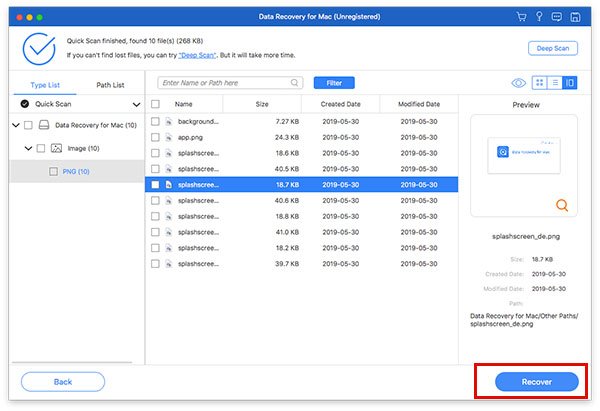
Schritt 3: Stellen Sie Ihre Daten wieder her
Nach dem Scannen der Daten gehen Sie zum Typenliste Klicken Sie auf die Registerkarte und sehen Sie die verlorenen Daten nach Typ an. Mit der Filterfunktion können Sie schnell bestimmte Dateien finden. Wählen Sie die Dateien aus, die Sie wiederherstellen möchten, und klicken Sie auf die Schaltfläche. Entspannung Schaltfläche. Wählen Sie einen anderen Speicherort und bestätigen Sie die Datenwiederherstellung.
Weiterführende Literatur
Fazit
Dieser Leitfaden zeigte sechs Wege auf, Daten von internen und externen Festplatten eines Macs wiederherstellen Schnell. Der Papierkorb speichert temporär gelöschte Dateien auf einem Mac. Mit dem Festplattendienstprogramm können Sie ein Volume reparieren und wiederherstellen. Falls Sie ein Backup haben, können Sie Ihre Daten von Time Machine oder iCloud wiederherstellen. TestDisk ist eine kostenlose Datenrettungssoftware für technisch versierte Benutzer. Apeaksoft Datenwiederherstellung ist eine schnelle Option zur Datenwiederherstellung auf dem Mac für Anfänger.
 Apeaksoft Datenwiederherstellung
 Stellen Sie gelöschte oder verlorene Daten auf Windows- und Mac-Computern wieder her.
Sicherer Download
Sicherer Download
