Default Solutions - How to Delete an Album on iPhone Easily
Deleting photo albums on an iPhone is an effective way to keep your gallery organized, especially as photos accumulate over time. However, many users are unsure which albums can be removed and how deletion affects the photos inside them. This guide explains the default and advanced methods for deleting albums on iPhone, helping you clean up unnecessary albums safely and without losing important images.
PAGE CONTENT:
Part 1: Things You Need to Know Before Deleting Albums on iPhone
Before deleting any album on an iPhone, it is important to understand how Apple’s Photos app manages albums and photos. Deleting an album does not automatically delete the photos inside it; the images will remain in the main Library unless they are manually removed.

Additionally, default albums like Recents, Favorites, etc, cannot be deleted because they are system-generated. If the album is a shared album, deleting it will remove access for all participants. By the way, if you plan to clean up multiple albums at once, it is highly recommended that you back up essential photos beforehand to avoid accidental data loss.
Part 2: How to Delete an Album on iPhone in a Quick Way
Although you’ve created some albums on your iPhone, too many of them can cause your Photo Library to be a mess. For albums that are no longer needed, iOS provides a straightforward way to delete an album on the iPhone directly within the Photos app. This method is suitable for user-created albums and allows you to remove them in seconds without affecting the original photos stored in your library. It is the fastest solution for basic album cleanup.
Step 1. Open Photos on your iPhone. Under the Collections tab, tap Albums to proceed.

Step 2. When you select the album that you have determined to delete, long-press it and tap Delete Album.
Step 3. A window will pop up, asking if you are sure to delete the album. Tap Delete Album to confirm.

Part 3: How to Delete an Album When Checking Its Content
In some cases, reviewing the photos inside an album before deletion is necessary to avoid removing something important by mistake. On an iPhone, deleting an album from within its content view gives you more control and helps confirm that the album is truly unnecessary before taking action.
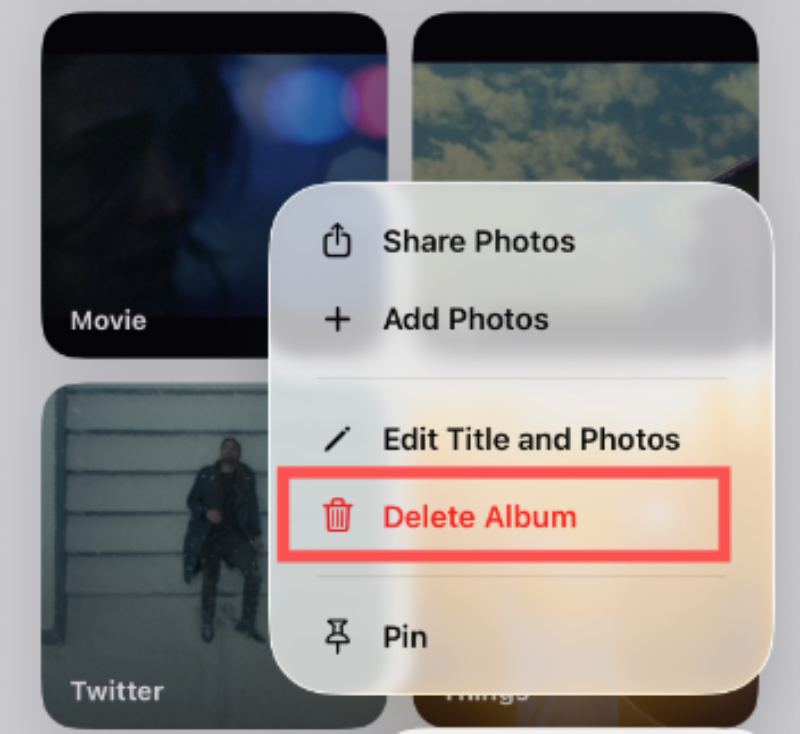
Step 1. When you are browsing the content within an album, tap Options.

Step 2. In the pop-up window, tap Delete Album if you want to delete this album on your iPhone. Notice that a deleted album cannot be recovered normally.
Step 3. There will be a notification asking you if you want to delete the album. Tap Delete Album to finish the task.

Part 4: A Workable Solution to Deleting Any Albums on iPhone
As mentioned before, when you delete an album on your iPhone, the photos within it will not be deleted; instead, they will remain in your Photo Library. This becomes even more complicated for those users who wish to delete the entire album and all its contents. At the same time, selecting and deleting one by one will also take a lot of time on an iPhone. Therefore, a more thorough solution is required. Apeaksoft iPhone Eraser allows you to remove albums and related data more efficiently, offering deeper cleanup options beyond the default iOS limitations.
Step 1. Download and install the Apeaksoft iPhone Eraser package. Launch the tool when it is ready.
Secure Download
Secure Download
Step 2. Connect your iPhone to the computer with a Lightning cable, making sure the connection is stable. If everything goes right, your iPhone will be detected automatically.

Step 3. In the left panel, click Free up Space to expand the options. Click Clean up Photos and then Export & Delete to check all the photos on your iPhone, including the album that you want to delete.

Step 4. If you have not backed up your photos, click to select the desired photos or simply click Select All. Then, click Export, select the destination folder to back up photos on your iPhone. Finally, click the Delete button to permanently remove photos and delete albums on your iPhone.

Conclusion
Deleting an iPhone album can be quick and safe once you know the method. Whether using built-in methods for simple cleanup or a professional erasing tool for deeper control, each approach serves a different need. By choosing Apeaksoft iPhone Eraser, you can keep your photo library organized while avoiding unnecessary data loss.
Secure Download
Secure Download
Related Articles
Come and learn how to delete photos on Mac if you have lots of photos and copies on MacBook, MacBook Pro, iMac, Mac mini, etc.
How do you retrieve deleted photos on iPad? This post will show you how to recover deleted photos on iPad with iCloud backup, without backup, etc.
You can learn five effective methods to transfer photos between your iPad and computer with iTunes, iCloud, a USB, and more.
Here provides you multiple methods on how to delete movies from iCloud or hide movies on iCloud. Follow it to manage and free up storage of iCloud.
