


iOS-asennusapurin käyttö – Ota iPhone käyttöön kuin ammattilainen

Monet iPhonen käyttäjät kohtaavat iOS:n käyttöönottoavustajan aktivoidessaan uutta laitetta, siirtäessään tietoja laitteiden välillä tai korjatessaan järjestelmäongelmia. Useimmat meistä eivät kuitenkaan ole tietoisia sen erityistoiminnoista, siitä, miten se otetaan käyttöön, ja siitä, miten sitä käytetään tiedonsiirtoon.
Tämä artikkeli tarjoaa aloittelijaystävällisen, vaiheittaisen oppaan iOS Setup Assistant, mukaan lukien mikä se on, miten siihen pääsee käsiksi ja miten tietoja siirretään laitteiden välillä.
SIVUN SISÄLTÖ:
Osa 1: Mikä on iOS:n käyttöönottoavustaja
iOS-asetusavustaja on iOS-järjestelmään sisäänrakennettu järjestelmän määritystoiminto. Se on natiivi ominaisuus, joka on saatavilla jokaisessa iPhone- ja iPad-laitteessa. Voit ajatella sitä "oppaana", joka opastaa sinua askel askeleelta tärkeimpien asetusten, kuten kielen, verkon ja Apple ID:n, läpi, kun käynnistät laitteen ensimmäisen kerran tai nollaat sen, varmistaen sujuvan iPhonen käyttökokemuksen.
Sen ydintoiminto on opastaa käyttäjiä laitteen alustusprosessissa ja perusasetusten määrittämisessä. Tarkemmin sanottuna se sisältää kielen ja alueen asettamisen, verkkoyhteyden muodostamisen, kirjautumisen Apple ID:llä, Face ID -salasanan syöttämisen ja tiedonsiirron vanhan ja uuden laitteen välillä.
Osa 2: iOS-asennusapuriin pääseminen
Missä iOS-asennusapuri on? Saatat huomata, ettei siihen ole pääsyä aloitusnäytöltä tai App Storesta. Tämä johtuu siitä, että iOS-asennusapuri ei ole sovellus, jota voi avata suoraan aloitusnäytöltä tai ladata manuaalisesti App Storesta. Siksi et näe sen kuvaketta iPhonen tai iPadin pääkäyttöliittymässä.
Sen sijaan iOS-asennusapuri on järjestelmätason käynnistysprosessi, joka käynnistyy automaattisesti tietyissä olosuhteissa, kuten silloin, kun käynnistät upouuden laitteen ensimmäistä kertaa tai kun olet palauttanut sen tehdasasetuksiin. Kun asennusprosessi on valmis ja pääset aloitusnäyttöön, asennusprosessi päättyy, eikä iOS-asennusapuri tule enää näkyviin, ellei laitetta nollata.
Miten iOS-asennusapuriin pääsee? Uudessa iPhonessa tai iPadissa asennusapuri tulee näkyviin automaattisesti heti, kun käynnistät laitteen. Muissa laitteissa voit käyttää iOS-asennusapuria poistamalla kaiken laitteen sisällön ja asetukset. Noudata seuraavia ohjeita:
Vaihe 1. Mene Asetukset iPhonessa tai iPadissa.
Vaihe 2. Mene general - Siirrä tai nollaa iPhone - Poista kaikki sisältö ja asetukset.
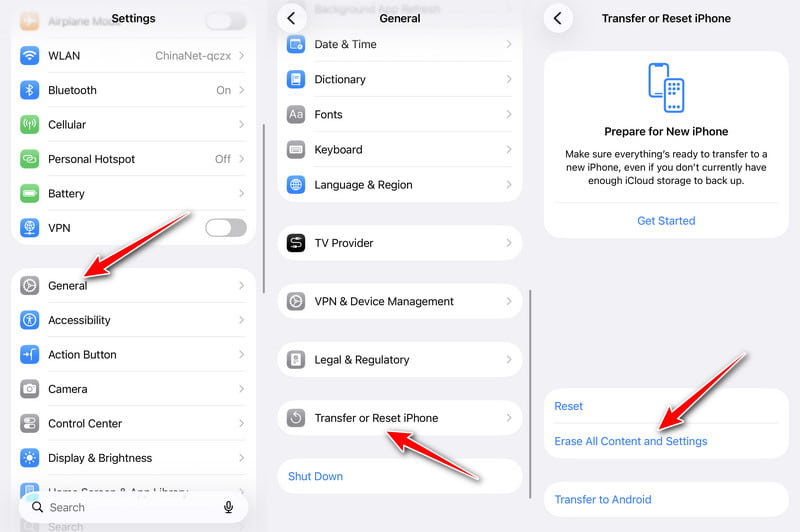
Vaihe 3. Syötä näytön salasana ja vahvista toiminto.
Vaihe 4. Odota, että laite käynnistyy uudelleen. iOS:n käyttöönottoapuri tulee näkyviin automaattisesti.
Vinkki: Muistathan varmuuskopioi iPhone ennen sen pyyhkimistä.
Osa 3: Vaiheittainen opas iOS-asennusavustajan käyttöön
Ennen kuin aloitat
- Lataa molemmat iPhonet yli 50 prosenttiin.
- Hanki vakaa Wi-Fi-verkko aktivointia varten.
- Ota Wi-Fi ja Bluetooth käyttöön vanhassa laitteessasi (jos sinulla on sellainen).
- Valmistele vanha iPhone-salasanasi ja Apple ID -tunnistetietosi (jos sinulla on sellainen).
- Päivitä vanha iPhonesi uusimpaan iOS-versioon (jos sinulla on sellainen).
- Käytä siirtokaapelia, jos siirrettävää dataa on paljon.
Vaiheittaiset käyttöohjeet
Vaihe 1. Valitse kielesi ja alueesi.
Vaihe 2. Valitse laiteasetuksesi.
Vaihe 3. Näet Pikaopas käyttöliittymä avautuu automaattisesti, jos asetat vanhan iPhonen uuden viereen.
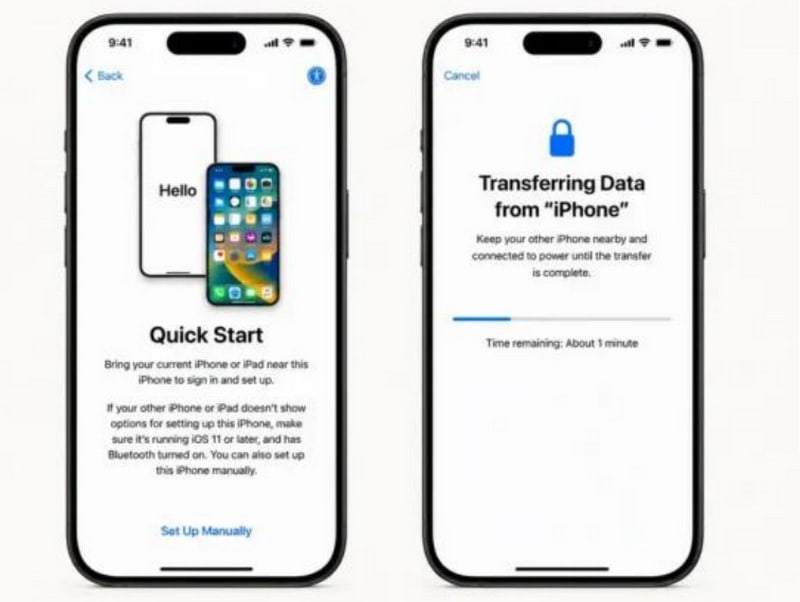
Vinkki: Jos sinulla ei ole toista iPhonea, napsauta vain Asenna manuaalisesti ja siirry kohtaan Vaihe 6.
Vaihe 4. Skannaa uuden laitteen sininen animoitu pallo toisella iPhonellasi pariliitoksen muodostamiseksi.
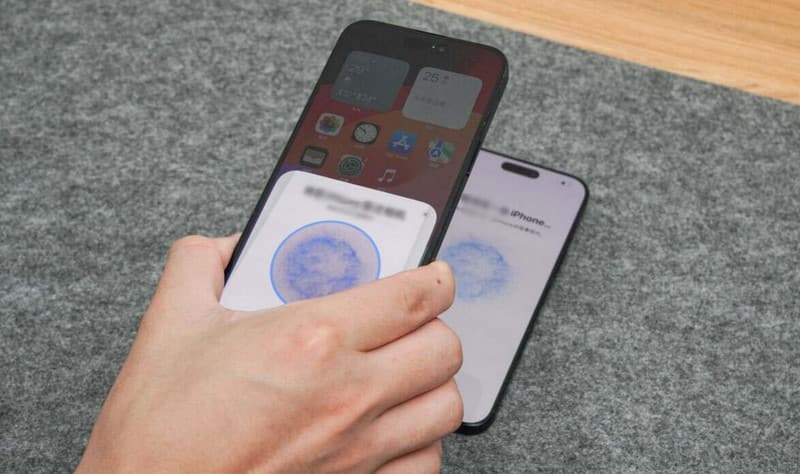
Vaihe 5. Syötä toisen iPhonesi näytön salasana uuteen iPhoneen valtuuttaaksesi tiedonsiirron.
Vaihe 6. Yhdistä Wi-Fi-verkkoon aktivoidaksesi laitteesi.
Vinkki: Laitteen aktivointiin tarvitaan Wi-Fi-yhteys. Tätä vaihetta ei voi ohittaa.
Vaihe 7. Ota käyttöön Face ID tai Touch ID ja luo 6-numeroinen salasana laitteen suojaamiseksi.
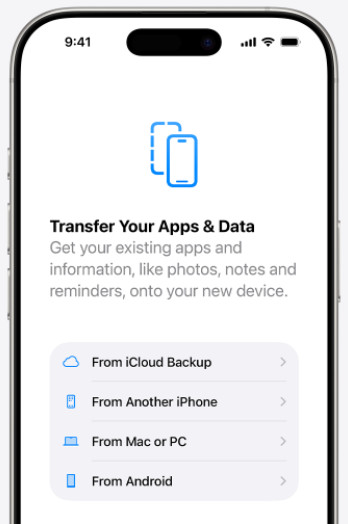
Vaihe 8. Valitse tiedonsiirto iCloudista, toisesta iPhonesta, Macista tai PC:stä tai jopa Androidista. Tarkista yksityiskohtainen opas eri tiedonsiirtovaihtoehdoista kohdasta Osa 4.
Vaihe 9. Kirjaudu sisään Apple ID:lläsi ja hyväksy käyttöehdot jatkaaksesi.
Vaihe 10. Odota, että asennus on valmis, ja siirry sitten aloitusnäyttöön.
Osa 4: iOS-asennusavustajan tiedonsiirtovaihtoehdot selitettynä
Vaihtoehto 1: iCloud-varmuuskopiosta
Jos sinulla ei ole tietokonetta tai toista iPhonea käsillä, mutta olet varmuuskopioinut iPhonesi iCloudiin, voit yrittää siirtää tietoja iCloud-varmuuskopiosta.
Viite: Normaaliolosuhteissa noin 60 Gt:n datan palauttaminen iCloud-varmuuskopiosta kesti noin 1.5–2 tuntia.
Vaihe 1. Valitse iCloud Backupista tilassa.
Vaihe 2. Kirjaudu sisään samalla Apple ID:llä, jota käytit iCloud-varmuuskopion luomiseen, ja suorita kaksivaiheinen todennus.
Vaihe 3. Näet kaikki luomasi iCloud-varmuuskopiot. Valitse uusin. Odota sitten, että laite lataa ja palauttaa vastaavat tiedot.
Vaihtoehto 2: Toisesta iPhonesta
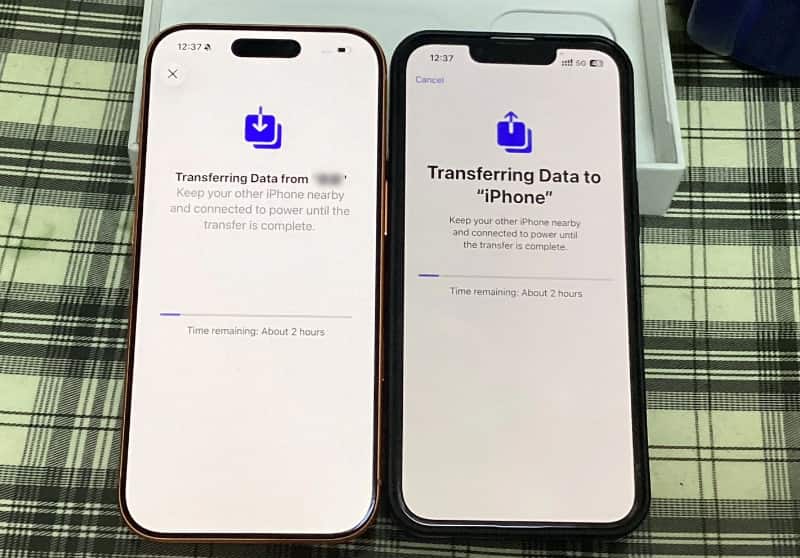
Tiedon siirtäminen toisesta iPhonesta viittaa aiemmin mainittuun pika-aloitusominaisuuteen. Katso lisätietoja Vaiheet 4–5 yllä olevassa osassa on täydelliset yksityiskohtaiset vaiheet.
Viite: Sisäisen testimme perusteella 240 Gt:n datan siirtäminen iPhone 14:stä iPhone 17 Prohon pika-aloituksen avulla kesti noin 2 tuntia.
Vaihtoehto 3: Macilta tai PC:ltä
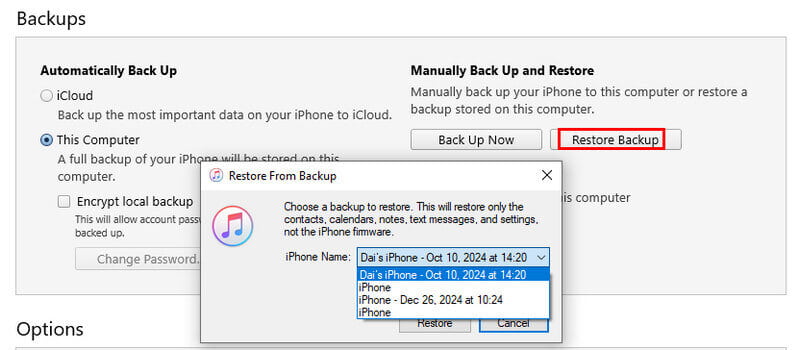
Jos olet luonut täydellisiä paikallisia varmuuskopioita työpöydällesi ja sinun on palautettava suuria tietomääriä kokonaan, valitse vain Macilta tai PC:ltä tilassa.
Viite: Testissämme 60 Gt:n paikallisen varmuuskopion palauttaminen iTunesista kesti noin 1–1.5 tuntia.
Vaihe 1. Liitä iPhone tietokoneeseen alkuperäisellä kaapelilla. Luota tähän tietokoneeseen iPhonessasi.
Vaihe 2. Avaa iTunes (Finder Macilla). Napsauta laitettasi sivupalkissa.
Vaihe 3. Napauta Palauta varmuuskopiointi ja valitse uusin varmuuskopio. Odota, että laite käynnistyy uudelleen automaattisesti ja tietojen palautus on valmis.
Vaihtoehto 4: Androidista
Jos olet aiemmin käyttänyt Android-älypuhelinta ja vaihdat iPhoneen, voit myös käyttää iOS:n käyttöönottoavustinta tietojen siirtämiseen Androidista valitsemalla Androidista.
Viite: Käytimme noin 2.5–3 tuntia noin 200 Gt:n datan siirtämiseen Android-laitteesta iPhoneen normaaleissa olosuhteissa.
Vaihe 1. Lataa ja käynnistä Siirrä iOSiin ensin Android-puhelimellasi.
Vaihe 2. Valitse Androidista vaihtoehto iPhonen APP & Data -näytöltä
Vaihe 3. iPhone luo 6/10-numeroisen vahvistuskoodin. Syötä koodi Android-puhelimeesi.
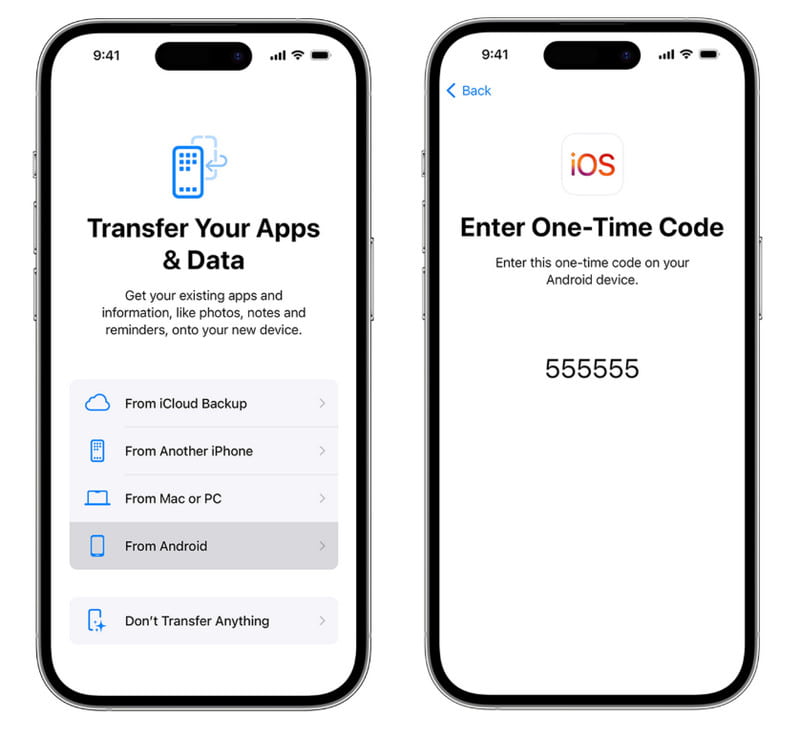
Vaihe 4. Tarkista synkronoitavat tiedot ja aloita tiedonsiirto.

Ladannut yli 1,000,000 Käyttäjät
- Siirrä tietoja nopeasti iOS-laitteiden ja tietokoneiden välillä.
- Valitse siirrettävät tiedostot huolellisesti, jotta voit päättää, mitkä tiedostot siirretään.
- Esikatsele tiedostoja ennen tiedonsiirtoa.
- Tukee valokuvien, videoiden, musiikin, yhteystietojen ja muiden iOS-tietojen joukkosiirtoa yhdellä napsautuksella.
Suojattu lataus
Suojattu lataus
Yhteenveto
Tämä viesti on esitellyt iPhone iOS:n käyttöönottoavustaja yksityiskohtaisesti, mukaan lukien mitä se on, miten asetusnäyttöön pääsee ja miten sitä käytetään tiedon siirtämiseen iPhonesta tai Android-laitteista. Ja jos etsit nopeampaa tapaa siirtää tietoja iPhonen välillä, älä missaa tätä Apeaksoft iPhone Transfer.
 Apeaksoft iPhone Transfer
 Siirrä iOS-tietoja iOS-laitteiden, tietokoneen ja iTunesin välillä.
Suojattu lataus
Suojattu lataus
Aiheeseen liittyvät artikkelit