When you need to have a FaceTime with a group of contacts on your iPhone, you might find group FaceTime not working, especially from iOS 12.1 to iOS 12.1.3. Why? According to Apple, there is a security bug on Apple's servers and the Group FaceTime feature is disabled.
Of course, you should also encounter group FaceTime not working on other iOS versions due to various versions. If the "Add Person" button in FaceTime turns to gray and is not working properly, you should learn more about the 9 simple solutions in this post carefully.

- Part 1: The Ultimate Method to Fix Group FaceTime Not Working
- Part 2: 8 Solutions to Fix Group FaceTime Not Working on iOS
Part 1: The Ultimate Method to Fix Group FaceTime Not Working
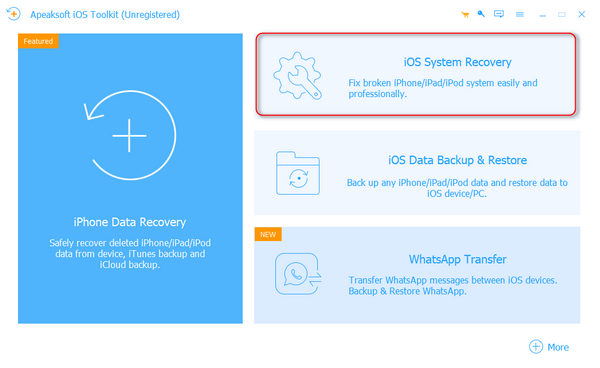
Apeaksoft iOS System Recovery is a one-stop solution to repair and optimize iPhone in different scenarios. It enables you to fix disabled iPhone, charge issue, activation, loop restart, battery drain, no service and more others, including group FaceTime not working. If you cannot locate the software related problems, it is able to diagnose the problem and fix that for you automatically with ease.
- Fix various software issues lead to Group FaceTime not working.
- Update or downgrade to the iOS of Apple devices for troubleshooting.
- Keep your iOS data with the original status while fixing the problems.
- Fully work for all iPhone, iPad and iPod running iOS 26 or earlier.
How to fix Group FaceTime not working
Step 1 Download iOS System Recovery
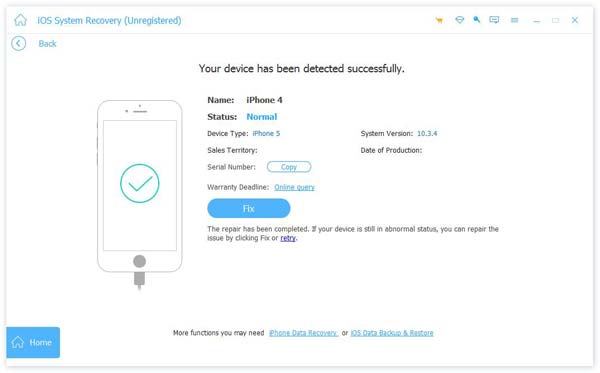
Launch the iPhone system recovery tool once you have installed it on your computer. Then connect your iPhone to the computer with a USB cable. Choose the "iOS System Recovery" option and click "Start" to move on.
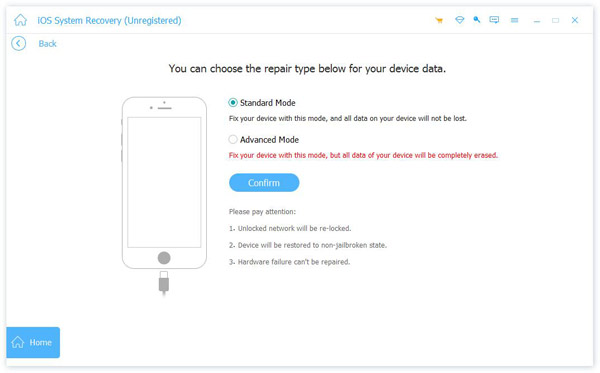
Step 2 Select Fix Mode
You can solve FaceTime not working issue instantly by clicking "Free Quick Fix". If that doesn't work, just click "Fix" button to enter the next window.
Here are two types of fixing modes, "Standard Mode" and "Advanced Mode". You can choose according to your need. Then, click "Confirm" button.
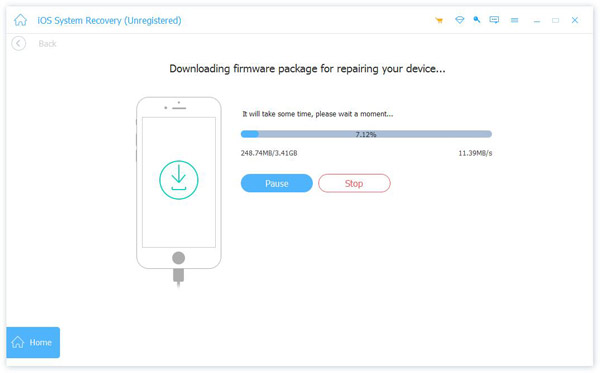
Step 3 Select firmware for fixing
You can choose the category, type and model for your device. Then, click the "Download" button to get the proper firmware. Click "Next" button to start recovering process. Once you have installed the firmware on your computer, the software will fix group FaceTime not working for your iPhone automatically.
Part 2: 8 Solutions to Fix Group FaceTime Not Working on iOS
Besides the ultimate solution to fix the group FaceTime not working easily and automatically, you can also choose the following methods to fix the related problem accordingly.
Solution 1: Update software of iPhone
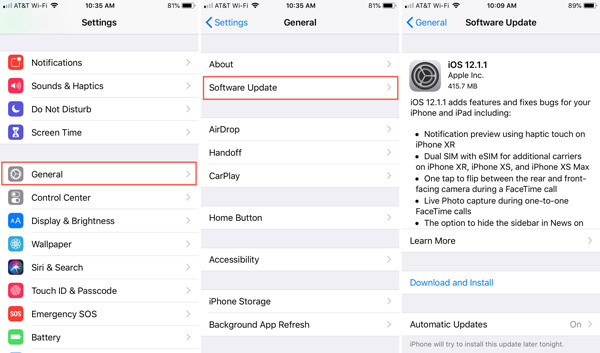
Step 1 Open the "Settings" app on your iPhone and go to "General" > "Software Update".
Step 2 If there is an update available, tap the "Download and Install" button.
Step 3 When prompted, enter your password to update iOS to the latest version.
Step 4 After that, you can try to have FaceTime with a group contacts again to see if it works now.
Solution 2: Turn on and off Airplane Mode
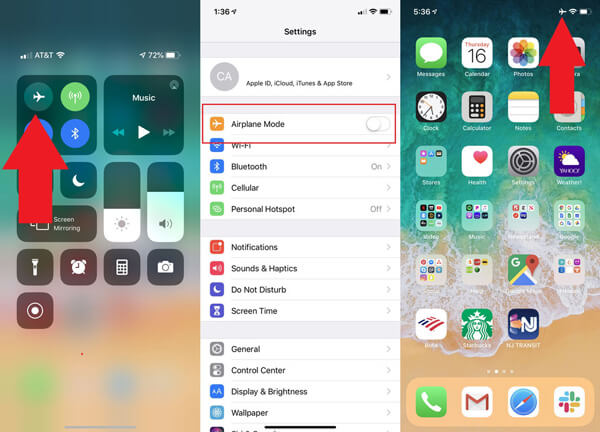
There are two methods to switch Airplane Mode when group FaceTime is not working.
Run the "Settings" app and select "Airplane Mode" under your Apple account, and toggle it on and then turn it off.
Alternatively, open the "Control Center" on your iPhone and enable the Airplane Mode, and tap again to turn it off.
Solution 3: Turn on FaceTime in Settings
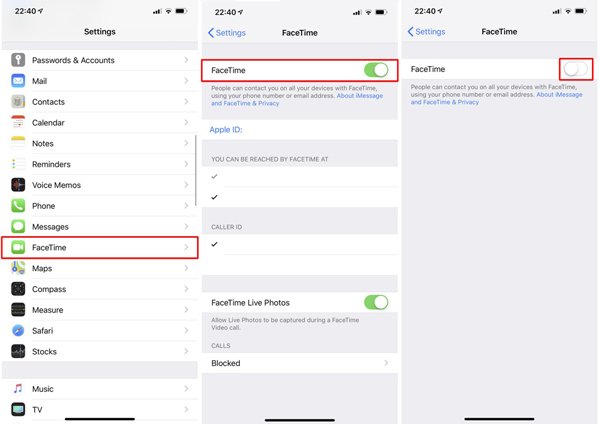
Step 1 When group FaceTime is not working, start the "Settings" app and tap on your Apple account.
Step 2 Scroll down to find the "FaceTime" entity, tap it and then toggle off the switch.
Step 3 Wait for a few seconds and turn on FaceTime in "Settings" app again to check the group FaceTime feature work as usual.
See what to do if Facetime not connecting on iPhone.
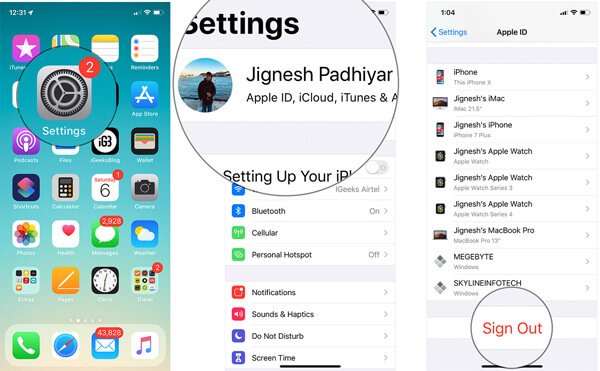
Solution 4: Re-sign in Apple Account
Step 1 Open the "Settings" app, tap on your Apple account, and go to FaceTime.
Step 2 Tap on your Apple ID and choose the "Sign Out" on the popup dialog.
Step 3 Sign in your Apple account and password to activate FaceTime.
Step 4 Open the FaceTime app and try the group FaceTime functionality again.
Solution 5: Reset Network Settings
Step 1 If there were something wrong on your network settings, group FaceTime will not work. In such case, go to Settings -> [your account] -> General -> Reset.
Step 2 Select Reset Network Settings, and enter your passcode when prompted.
Step 3 When it is done, connect your iPhone to a Wi-Fi network and try FaceTime in-group again.

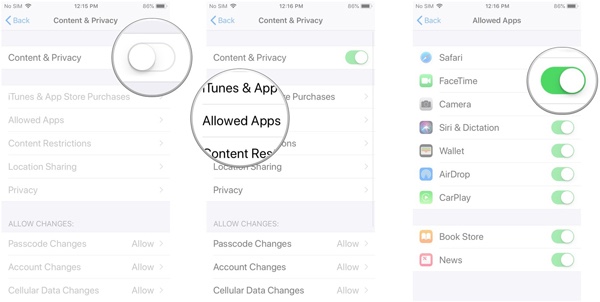
Solution 6: Check Screen Time Apps Limit
Step 1 Check the Screen Time in Settings app is also important to fix group FaceTime not working.
Step 2 Head to "Settings" > "Screen Time" > "Content & Privacy Restrictions".
Step 3 Tap "Allowed apps" to open the next screen, and then toggle off the FaceTime app if it is enabled.
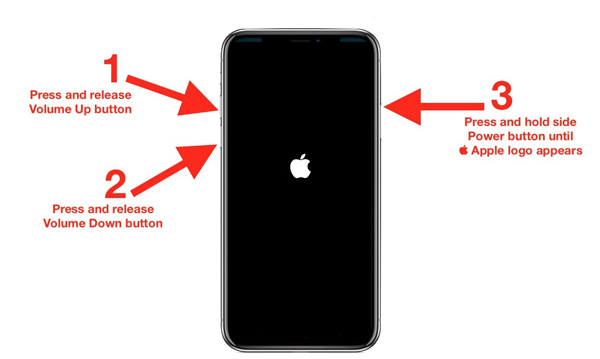
Solution 7: Restart your iPhone
Hard resetting your iPhone is another method to fix the group FaceTime does not work.
On iPhone without Home button: Hold down the "Power" and "Volume Down" buttons at the same time. When the power-off screen pops up, release the buttons.
On iPhone with Home button: Keep pressing the "Power" + "Home" buttons until you see the Apple logo.
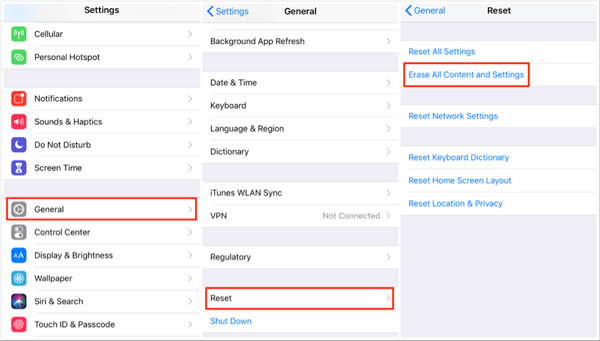
Solution 8: Factory reset your iPhone
Step 1 Make sure you have a backup for the iPhone via iTunes or iCloud beforehand, or else, you might loss the unsaved files.
Step 2 Go to "Settings" > "General" > "Set" > "Erase All Content and Settings". Enter the passcode and tap the "Erase All Content and Settings" to confirm.
Step 3 The iPhone will restart and restore to the default status. Restart the iPhone to find whether group FaceTime works now.
Conclusion
This article introduces methods about how to fix group FaceTime not working on iPhone. If iOS 26/18/17/16/15/14/13/12 group FaceTime not working, you only need to update to the latest version. Of course, you can follow more solutions to get rid of the problem from the article. In order to repair and fix the problem automatically with ease, iOS System Recovery is always a nice option you can take into consideration.