iTunes is already familiar to many Apple users. It provides various common features like backup, restore, purchase, etc., to help users use their devices best. However, there are a lot of problems that happen to it. Among them, cannot connect iPhone to iTunes properly is almost the most common problem. There are multiple reasons for this phenomenon to occur. To help you overcome this issue, we recommend ten easy-to-follow solutions covering several aspects. Hope it will help you!

- Part 1: Why An iPhone Cannot Connect to iTunes
- Part 2: How to Fix iTunes Could Not Connect to iPhone
- Part 3: Best Alternative for iTunes
- Part 4: FAQs of Connecting iPhone to iTunes
Part 1: Why An iPhone Cannot Connect to iTunes
There are various reasons for connection failure, and we will analyze the causes of this problem from three main aspects.
Poor Internet Connection
A poor network connection can be one of the culprits of iPhone to iTunes connection failure. It may be that the signal in your location is not good, or the wireless network speed connected to your device is too low.
Something Went Wrong with the Device
Something may be wrong with your phone or computer that causes them to not support the operation of the connection very well. If your USB cable or the USB port of your device is malfunctioning, it may cause your iPhone to be unable to connect to iTunes.
Version Not Updated
If your phone or computer OS is not updated in time, their use will be affected. In addition, the version of iTunes needs to be updated in time, which can also cause it to be unsuitable for your device.
Part 2: How to Fix iTunes Could Not Connect to iPhone
Since there are various reasons for iTunes can't connect to iPhone, we should also prepare multiple ways to deal with different scenarios. Here we have listed ten common ways to help you solve the problem from multiple angles.
Way 1. Try Another Internet Connection
Sometimes network delays and slow internet speeds can cause the condition of iPhone not to show up in iTunes. So you can first confirm if there is a problem with your network. Or change to another network to ensure good data transfer speed.
Way 2. Use a Different USB Cable
The USB cable is another important factor. Check if the USB cable you use to connect your phone to your computer is broken or has poor contact. If so, get a new one and try again. In addition, you need to pay attention to the model of the USB cable. You should use the OEM USB cable. If you use a 3rd party USB cable, there may be a compatibility problem.
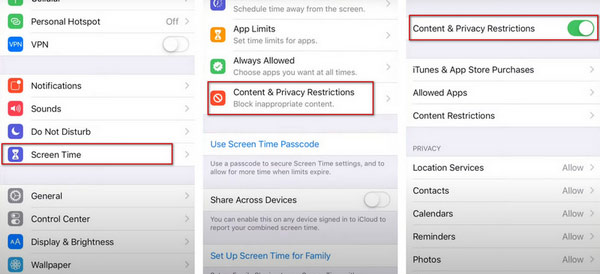
Way 3. Remove the Restrictions on iPhone
Sometimes iTunes not detecting iPhones because of the restrictions on your iPhone. Sometimes this is caused by parental controls. So you need to disable the restriction first and then try to connect your iPhone to iTunes again. All you need to do is open Settings and go to Screen Time. Then find Content & Privacy Restrictions, and remove it.
Way 4. Restart Your Computer or iPhone
Sometimes your system just suddenly appears some inexplicable bugs, then, for the layman, rebooting the device is the fastest and most effective way to solve the problem for unknown reasons. So if your iPhone is not connecting to iTunes, try rebooting your computer or iPhone.
First, disconnect your phone from your computer, then reboot them separately to check if the connection is successful.
Way 5. Update or Reinstall iTunes
If you are using an older version of iTunes, it may also cause the problem of the iPhone not connecting to iTunes. So you need to check your iTunes version first, and if it is not the latest version, please update it first. Then try to connect again. You can reinstall iTunes on your computer if it still doesn't work.
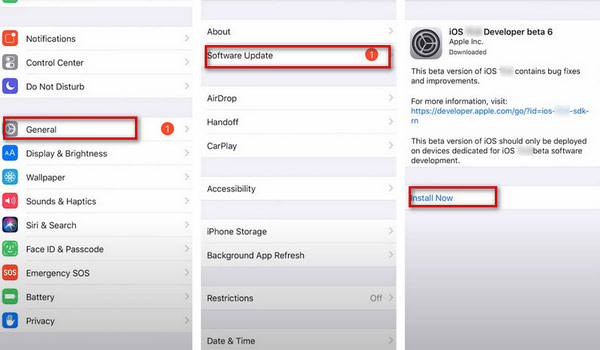
Way 6. Update to the Latest iOS
The outdated phone system may also hinder you from connecting your iPhone or iPad to iTunes. So if your iPhone or iPad is not showing up in iTunes, you can first check whether your device's system has been updated to the latest version.
Just come to Settings, and find General in it. Then tap Software Update to check the version of your iOS. Tap Install Now.
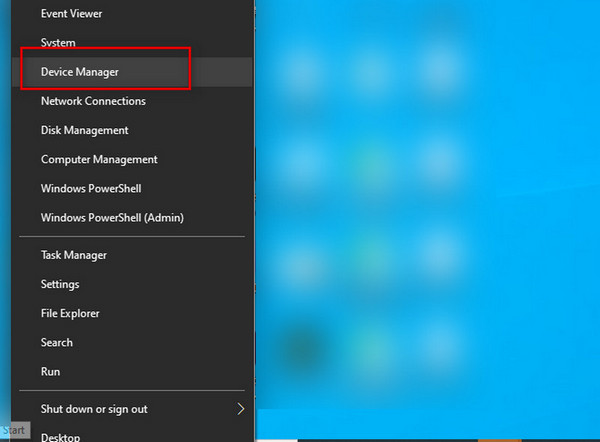
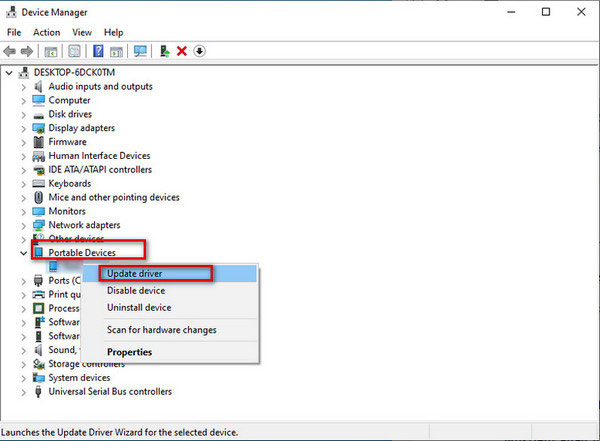
Way 7. Update Apple’s USB Driver
When the Apple USB driver is not installed on your computer or hasn’t been updated to the newest version, your iPhone won’t connect to iTunes fluently.
Step 1 You should disconnect your phone from your PC and reconnect soon. Then close iTunes.
Step 2 Right-click the Start button of your PC, and click Device Manager.
Step 3 Expand the Portable Devices menu. Find your connected phone, and right-click on it. Then choose Update driver.
Way 8. Use OS Compatible with iTunes
System incompatibility may also cause iPhone to iTunes connection failures. So you should make sure your computer system is compatible with iTunes. For Mac, OSX 10.5.8 or later can be compatible with iTunes. Windows 7 or later OS can support the latest iTunes. Besides, you cannot apply iTunes 12 with Windows Vista and XP.
Way 9. Fix the iOS System of Your Device
If you have tried the methods above and still cannot connect your iPhone to iTunes, you can try to fix the iOS system of your device by Apeaksoft iOS System Recovery. This powerful tool can help you fix various software errors without data loss. With his help, your device will return to new in no time to ensure smooth use.
Here are the detailed steps.
Step 1 Download and install iOS System Recovery on your computer. Use the USB cable to link your iPhone to your computer.
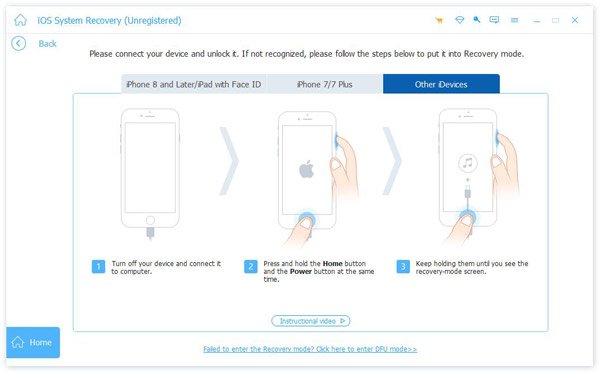
Step 2 Open iOS System Recovery and click Start. Then follow the guide to put your device in DFU mode.
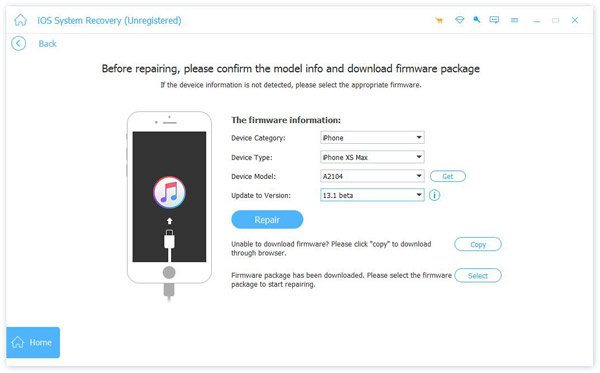
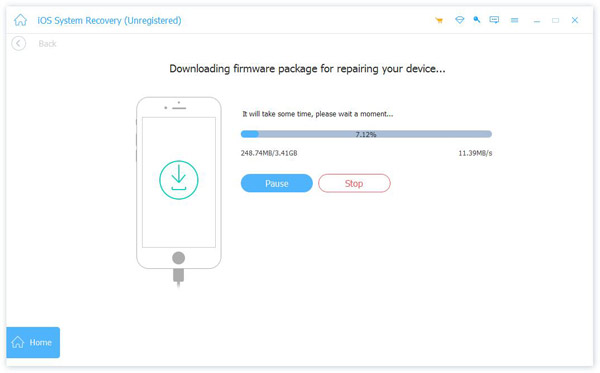
Step 3 Select your iPhone model on the info window, and download the necessary firmware and fix issues automatically.
If your iPad is not showing up in iTunes, you can also use this tool to help you.
Way 10. Reset Your iPhone
If all the above methods don't work, you'll have to try resetting your phone. Please keep all important files with some backup software before resetting to avoid losing important data. This approach is more extreme, so it is best not to use it as a last resort.
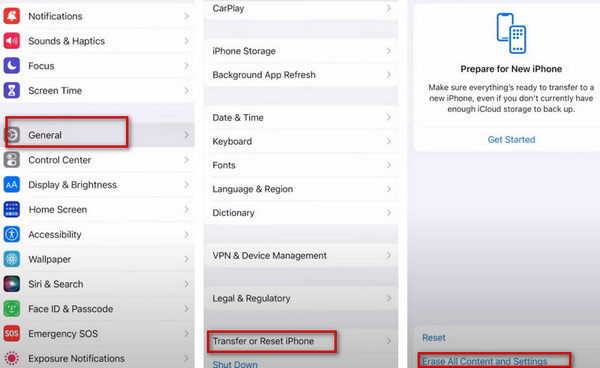
Step 1 Tap Settings > General > Transfer or Reset.
Step 2 Tap Erase All Content and Settings.
Part 3: Best Alternative for iTunes
If you are looking for more transfer tools to help you transfer data between your iPhone and computer, Apeaksoft iPhone Transfer will be your best choice. This tool enables you to transfer files in a wide range between a computer and iPhone. Also, you can save or back up iPhone data to the computer.
Here are the steps you can follow with.
Step 1 Download and install iPhone Transfer on your computer. Then connect your iPhone to your computer via a USB cable.
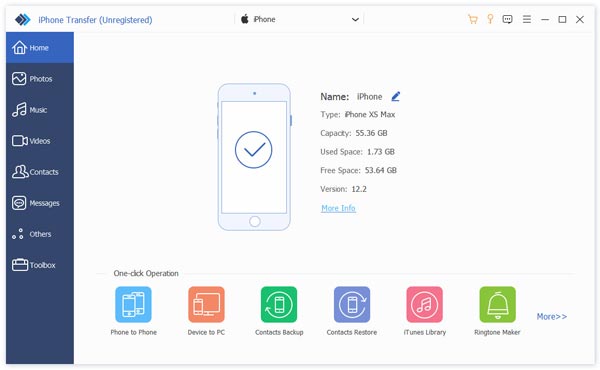
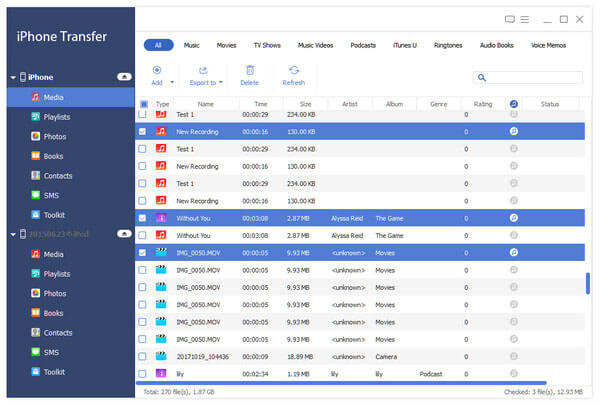
Step 2 Click the name of your device and select data types. Then you can choose specific files on the right panel.
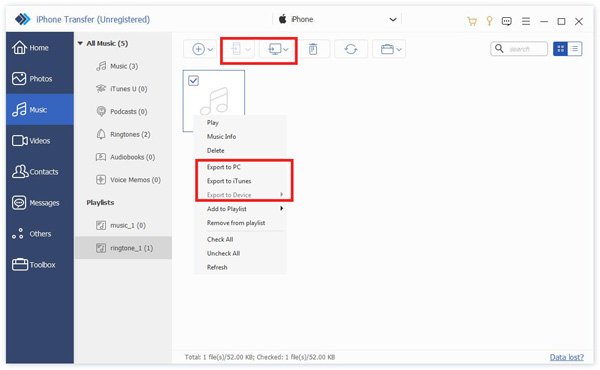
Step 3 Unfold the Export to the menu and choose Export to PC.
Part 4: FAQs of Connecting iPhone to iTunes
Why can't I manually back up my iPhone to iTunes?
If you are a Windows computer user and your backups fail to complete, you may need to update, change, disable, or uninstall your security software. If you have another device, try backing up your files to it. Or you can use iCloud to back up your files.
How do I allow my iPhone to connect to iTunes?
First, you must run the latest iTunes version on your computer. If your iTunes is different from the most recent version, please remember to update it first. If you are using Mac, check update in iTunes, and click Check to Update. If you are using Windows, choose Help and then click Check to Update. The you should connect your iPhone to your computer with the lightning cable. When you see an iPhone button at the upper left corner of your desktop, you have successfully connected.
Will I lose my data when I uninstall and reinstall iTunes?
Generally speaking, the saved data will be recovered during your reinstallation of iTunes. But we can't ignore the possibility that accidents happen. So you'd better backup your files to another device before reinstallation.
Conclusion
Above, we have recommended various actionable ways and the best tools to help you solve the problem of iTunes not connecting to your iPhone properly. We are sure you can find one that applies to your situation. We hope our content is helpful to you!