It is well-known that factory reset is efficient troubleshooting for iOS devices. How about Android phones?
Phone flashing is one of the easiest steps that you can take when troubleshooting an Android phone not working fine. It will correct configuration files and fix a variety of issues.

On the other hand, many Android users complained that their devices become increasingly slow as times goes by. In fact, flashing your phone could improve the performance of Android device as well. But you may be unaware of how to perform phone flashing.
Therefore, we are going to share everything you should know about the process in this post.
- Part 1: Risks for phone flashing
- Part 2: How to flash a CDMA phone
- Part 3: How to flash a dead Samsung phone
- Part 4: How to flash a dead Nokia phone
Part 1: Risks for phone flashing
Phone flashing is not only a technical process, but also brings risks for your device, such as:
1. There are potentials to brick your phone if you use a wrong tool or not follow the guide. Plus, any interruptions may brick your device too.
2. Whether the process voids your warranty depends on your decision. If you flash a custom ROM, your warranty is invalid automatically. But flashing a stock ROM will not impact your warranty.
3. You will not get stock updates anymore after flashing your phone with a custom ROM. For stock ROMs, it does not stop getting updates generally.
4. Moreover, custom ROMs offers features that the original software did not, but not all hardware is supported on specific device.
Considering phone flashing is pretty dangerous, we suggest you to make a full backup for your phone before the process.
Part 2: How to flash a CDMA phone
CDMA stands for Code Division Multiple Access. To check if your phone is CDMA device, remove the rear case and battery. If there is not a removable SIM card, you have a CDMA phone. Bear in mind that GSM phone cannot be flashed.
Step 1: Download your desired CDMA from target carrier website, such as Verizon, Sprint, and more.
Step 2: Get lONElyX from XDA Developer forum, which was developed by Iyapota.
Step 3: Back up current ROM on your phone. If phone flashing process fails, you can restore it from the backup.
Step 4: Connect your phone to your computer and transfer the ROM and KENRNEL to the CDMA phone. Then flash the CDMA ROM.
Step 5: After installed, flash lONElyX_m8_Sense_kernel_033 kernel. When installing the kernel, select International.
Step 6: When asked which way install the kernel, select Default. And when you see repack kernel image, choose repack= repack with RAM disk from current ROM or Universal.
Step 7: Finally, reboot your phone to complete CDMA phone flashing.
This way allows you to change carrier for a CDMA phone as well.
Part 3: How to flash a dead Samsung phone
If you are using a Samsung phone, you may have heard of Odin, which was developed by Samsung for firmware flashing. Now, it is an open source project and available to most Samsung phones and tablets. Odin is also an efficient way to perform phone flashing even the Samsung phone is dead.
Step 1: Go to Samsung website and download drivers according to your device model. If you have the driver on your computer, update it to latest version. Next, download proper firmware from Samsung official website.
Step 2: Access XDA Developers site and download the corresponding Odin package based on your phone model and Build Number, which can be found in Settings -> About Phone.
Step 3: Extract contents from the download package, and then run Odin3.exe file as Administrator.
Step 4: Shut down your dead Samsung phone before phone flashing. Hold Power + Volume Down + Home/Bixby buttons at the same time. When the Warning screen shows up, release Power button and press Volume Up key until your phone boots into Download Mode.
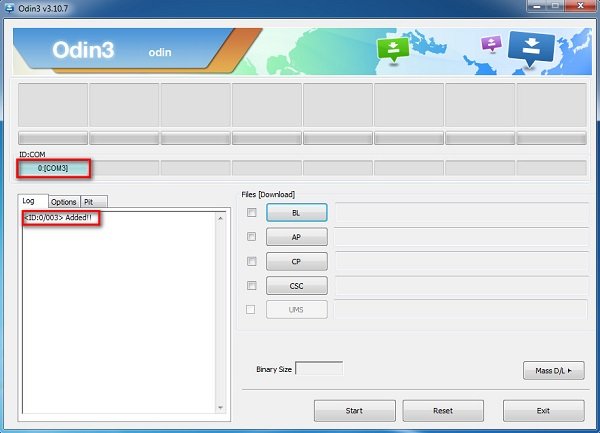
Step 5: Next, hook up your phone to your computer with a USB cable and wait for Odin to recognize your phone.
Step 6: Click on the AP button, navigate to the downloaded firmware file and open it. Finally, click on the Start button to initiate phone flashing.
Step 7: Click on the AP button, navigate to the downloaded firmware file and open it. Finally, click on the Start button to initiate phone flashing.
Part 4: How to flash a dead Nokia phone
For dead Nokia phone, Odin may be not a good option. According to our testing, Phoenix tool is able to perform phone flashing on most Nokia devices. It is a popular Android system manager available to Windows 10/8/8.1/7/XP.
Step 1: Also download and install the drivers for your phone on your computer. Then get PhoenixSuit on the computer and launch it.
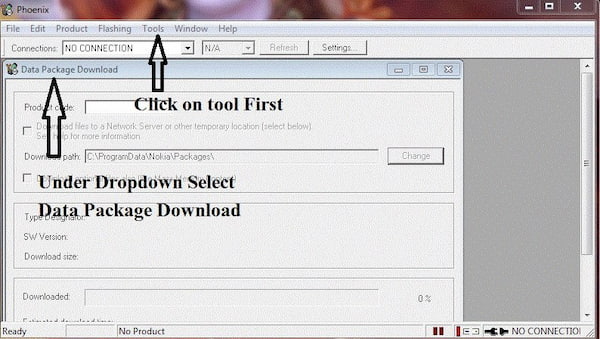
Step 2: Select Data Package Download from the Tools menu on top ribbon. After download the proper firmware, move it to a new folder on your desktop.
Step 3: Next, click on Open Product in the File menu on the Phoenix window. Check the details and then hit OK to continue.
Step 4: Then go to the Flashing menu at the top of the window, choose Firmware update and pick up the proper product code depending on your phone, then click on OK.
Step 5: Tick the checkbox in front of the Dead Phone USB Flashing on the Firmware Update dialog.
Step 6: Connect your dead Nokia phone to the PC with the USB cord came with your device. Finally, click on the Refurbish button to trigger the phone flashing process. Then entire process takes a few minutes to complete. Keep your phone connecting to your PC during the process.
Step 7: When prompted phone flashing is done, disconnect and restart your phone. All troubles will be fixed and your phone becomes accessible as usual.
Conclusion
Based on the share above, you might understand how to do phone flashing on CDMA, Samsung, Nokia and other phones.
First of all, CDMA phone is very special. Since it does not contain removable SIM card, you cannot change carrier without flashing. Besides changing carrier, phone flashing is also an effective way to troubleshoot a variety of issues on Android phone, like black screen, freezing, dead, and more. We use dead Samsung and Nokia ad example to show you how to flash phone quickly and easily.
We wish that our step by step guides are helpful to you.