Summary
When the error message pops up saying that unable to move messages in mail app, do not worry and follow the best 6 quick fixes to move messages to Trash successfully on your iPhone and iPad (iOS 18/26 supported).
It is a habit to move the junk mails into the Trash, after reading it. For some users, erasing email messages to free up more space on iPhone is the regular operation.
However, when trying to move mail messages to Trash on iPhone, some users report a problem that “Unable to Move Message. The message could not be moved to the mailbox Trash.”
That is one of the common iOS problems may appear on iPhone, even iPad, running in iOS 18 or 26.
Below are the best 6 quick solutions to fix the problem, and let’s break down the exact process.

- Part 1. Why You Are Unable to Move Messages to Trash?
- Part 2. How to Fix Messages Unable to Move to Trash on iPhone iPad (6 Fixes)
- Part 3. Pro tip: Optmize iPhone Storage and Protect iPhone Privacy
Part 1. Why You Are Unable to Move Messages to Trash?
The reasons why you cannot move mail messages to Trash vary. Here, we can conclude them mainly as follows:
- 1. Mail app system problem.
- Every app on your iPhone or iPad works hard to update to optimize and deal with some attacks. Mail app may also get the system problem and does not respond to your deletion action.
- 2. Weak Wi-Fi or cellular data signals.
- When your network is weak or problematic, your mail app cannot connect to the email server.
- 3. Mail account gets problematic.
- Your email address may encounter some issues like your failure of logging an account.
- 4. IMAP account is suffering from error.
- IMAP Path Prefix hasn’t been set up correctly, which can lead to messages movement to Trash.
- 5. Deleted messages go to Archive, instead of Trash.
- In your email settings, you could put the message deletion into Archive or Trash. The incorrect setting will also pop up the error notification.
- 6. Unknown errors.
- Some reasons that cannot explain why you are unable to move messages to Trash exactly and we mark them as unknown.
Though the causes of moving messages to Trash unsuccessfully, you could follow the solutions below to troubleshoot it easily.
Part 2. How to Fix Messages Unable to Move to Trash on iPhone iPad (6 Fixes)
Apart from the common operation like restart your iPhone, quit the app and open it again, you should also follow the solutions below to fix the problem.
Fix 1. Move Messages to Junk Directly
Moving messages to Trash icon is the most common operation to delete the emails. Actually, you are allowed to delete the emails by moving to junk.
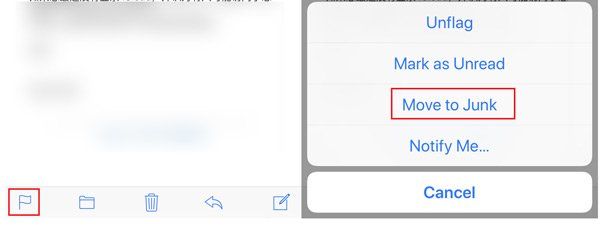
Open your mail app > Find and hit the email message from Inbox > Tap the flag image on the bottom-left corner > Hit “Move to Junk” to delete the email one by one.
The above steps are based on iPhone built-in Mail app. For other mail apps like Google, Exchange, Yahoo, Outlook, etc., the steps are slightly different, and you need to find the “More (Three-dot)” menu and find “Permanently Delete” or “Move to Junk”, etc.
Fix 2. Force Emails Sync with Your Mail Account
Laggy email messages due to the slow sync with your iPhone or iPad may fail to move mail messages to Trash. So just try to a force sync your inbox emails.
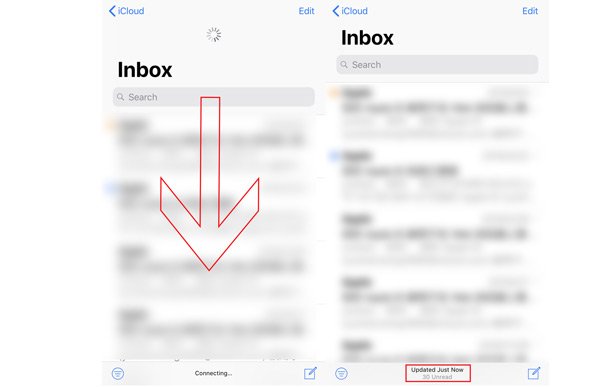
Open your mail app, swipe down from the middle of the screen and you will see a spinning circle, which indicates the mail app is syncing.
After the syncing process is done, the spinning circle will disappear, and a message popping up that says, “Updated Just Now”.
Then you could try to move the messages again to Trash.
Fix 3. Change Network Connection on iPhone iPad
As mentioned above, the poor or unstable Internet connection with your iPhone or iPad may also lead to failure of moving messages to Trash.
Here you could change the network connection as below:
- Move to an area where the network connection is stable and strong.
- Turn off Wi-Fi or cellular connection and turn on it again.
- Change Wi-Fi connection to cellular data and vice versa.
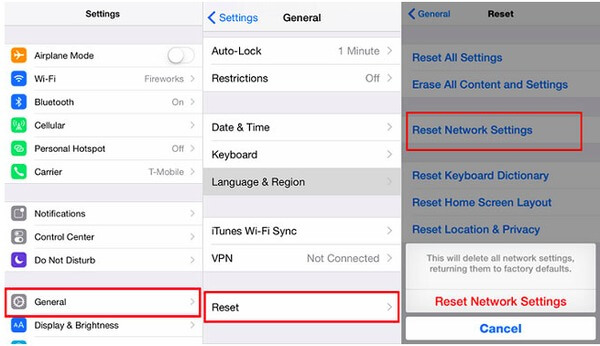
- Reset network settings on iPhone or iPad.
Fix 4. Mail Advanced IMAP Settings
IMAP settings are necessary to help to send and receive emails.
Advanced settings from IMAP should be correct to put the deleted email messages into Trash. Otherwise, you will also get the error message popup.
You should get the settings in 3 points after going to “Advanced” settings:
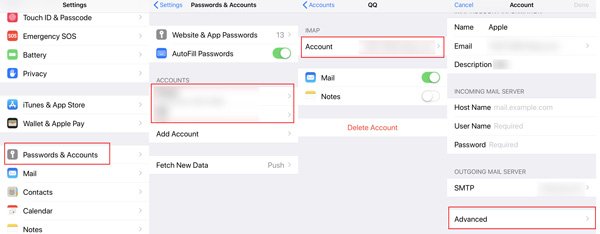
Step 1Go to Advanced settingsOn your iPhone or iPad, go to “Settings” > “Password & Accounts” (iOS device running in iOS 12 and above) or “Mail, Contacts, Calendars” (iOS device running in iOS 11 and before) > Tap the problematic email account > Hit your email address > Scroll down to find “Advanced” settings.
 Step 2Change Advanced settings
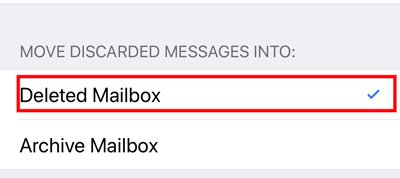
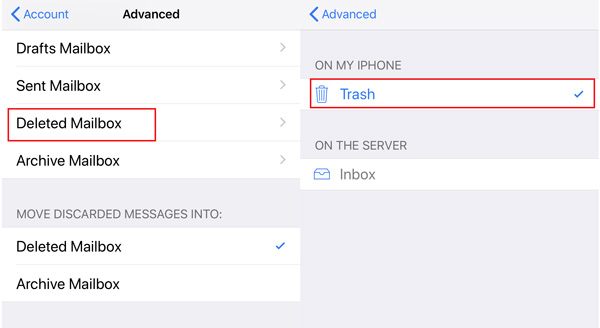
1. Enable you are selecting “Deleted Mailbox” under “MOVE DISCARD MESSAGES INTO:”
2. Enable mailbox behavior is in Trash, not inbox by hitting “Deleted Mailbox” under “AMILBOX BEHAVIORS” > Enable “Trash” under “ON MY IPHONE”, not “Inbox.”
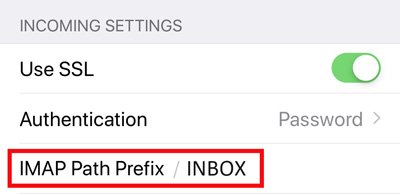
3. Change IMAP path prefix: Find “IMAP Path Prefix” under “INCOMNIG SETTINGS” > Type “INBOX” in capital letter.
After that, you just need to tap “Back to Account” > Select “Done” and come back to your Home screen and restart your mail app to see if the problem is fixed.
Fix 5. Delete and Add the Email Account Again on iPhone/iPad
If the email account is momentarily problematic, then you could try to delete and add the email account gain to fix the issue.
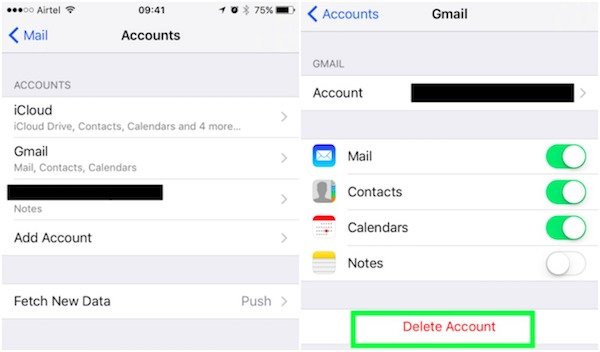
Step 1Delete email accountGo to “Settings” on your iPhone > Select “Password & Accounts” (iOS device running in iOS 12 and above) or “Mail, Contacts, Calendars” (iOS device running in iOS 11 and before) > Tap your problematic email account > “Delete Account”.
Here is the detailed guide to delete email account from iPhone and iPad, including the preparations and result.
 Step 2Add email account
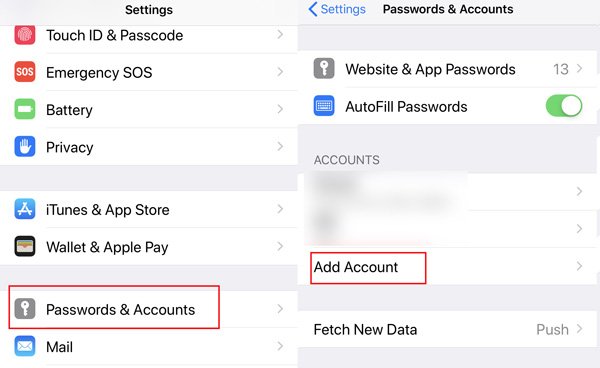
Go to “Settings” on your iPhone > Select “Password & Accounts” (iOS device running in iOS 12 and above) or “Mail, Contacts, Calendars” (iOS device running in iOS 11 and before) > “Add Account”.
Deleting an email account from your device will not delete your emails on your device, because all the emails are stored on the server, unless you have a POP email account. Even if you accidentally deleted emails from server, you could recover them here.
Fix 6. Uninstall Mail App and Reinstall It
Uninstalling an app seems to be a universal solution when you cannot find solutions to fix the problem brought by the app. Here, you could also launch a try.
On your iPhone or iPad, tap and hold the mail app until it jiggles and then tap the cross on the top-left corner of the app image.
More ways of deleting the email app on iPhone, you could visit this page.

For restoring the app installation, you just need to search the name of the email app and install it.
Part 3. Pro tip: Optmize iPhone Storage and Protect iPhone Privacy
The above solutions focus on solving the messages unable to move to Trash. Here is another pro tip you should not miss. When you want to free up space or protect your private information via deleting mail messages, you should use the professional tool to complete the task, iPhone Eraser.
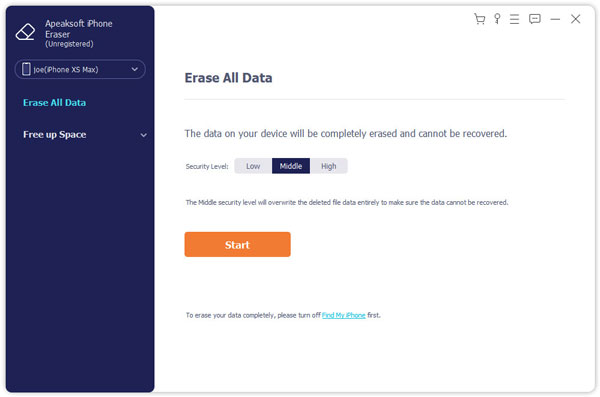
Apeaksoft iPhone Eraser is the simple cleaning software, which helps you to erase all content and settings, including email messages and attachments on iPhone iPad permanently, which helps you get more space on iPhone and wipe your secrets permanently without recovery.
This software is compatible with your Windows computer and iPhone XS/XR/X/8/7/6/5/4, iPad Pro, Air, mini, etc. You just need to free download and run this software on your computer firstly.
Then connect your iPhone and compute with the USB cable, tap “Trust” on your iPhone, and this software will detect your iPhone.
Note: this software will erase all content and settings on iPhone iPad, if you have something important, just backup iPhone firstly.
Step 2Erase iPhone permanentlyAfter successful connection, you need to click "Low" to select the erasing level. Here are 3 erasing levels are left to you. Select what you need exactly and click “OK” to return to the main interface of this software. Click “start” button and this software will start clearing all data and settings on your iPhone.
Conclusion
Here, it comes to the end of this page. We mainly explain the reason for your unable to move mail messages to Trash, and also provide the best 6 solutions to fix the problem. Last tip is help you optimize your iPhone storage and delete email messages permanently without recovery with iPhone Eraser.
Have this post solved your problem? If yes, do not hesitate to share it with more people. If not, just tell your story by leaving your comments.