How to Fix AirDrop Not Working with Effective Solutions
“I need to AirDrop several photos on my iPhone, but the photos didn't transfer at all. How to fix AirDrop not working?” As the wireless connection among the Apple ecosystem, AirDrop is a quick way to send and receive photos, files, and other data between iPhone, iPad, and Mac safely. However, some users reported that AirDrop is not working or works abnormally on their devices. This article helps you fix this problem.
PAGE CONTENT:
Part 1: Why AirDrop is Not Working
When transferring files via AirDrop, you may encounter the AirDrop failed error, nothing happens, files don't move, or the transferred files cannot be opened. There are a few reasons why AirDrop is not working:
1. Compatibility issues. AirDrop is not available on all Apple devices. You need to check the compatible devices before using it.
2. Connectivity problem. While AirDrop doesn't require a real Wi-Fi network, you must turn on Wi-Fi and Bluetooth on your device. Plus, AirDrop cannot work if the two devices are far away from each other.
3. Software glitches. Minor software errors may disrupt AirDrop.
4. Improper settings for the network or AirDrop.
5. Your device is locked, and AirDrop is disrupted.
Part 2: How to Fix AirDrop Not Working on iPhone/iPad
If AirDrop is not working on your iPad or iPhone, you can fix this problem by yourself. This problem is usually due to software glitches. Here are the verified solutions to get rid of the error.
Fix 1: Check Compatibility
As mentioned previously, using AirDrop requires a compatible device and mobile operating system. If the sender or receiver is not compatible, AirDrop is not showing. Here are the supported mobile devices:
iPhone 5 or later
iPad 4 or later
iPad mini
iPad Touch 5th and above
iPhone must run iOS 7 or later
iPad must run iPadOS 13 or later
Note: AirDrop transfers over the internet require iOS 17.1 or iPadOS 17.1 and later.
Fix 2: Turn on Bluetooth and Wi-Fi
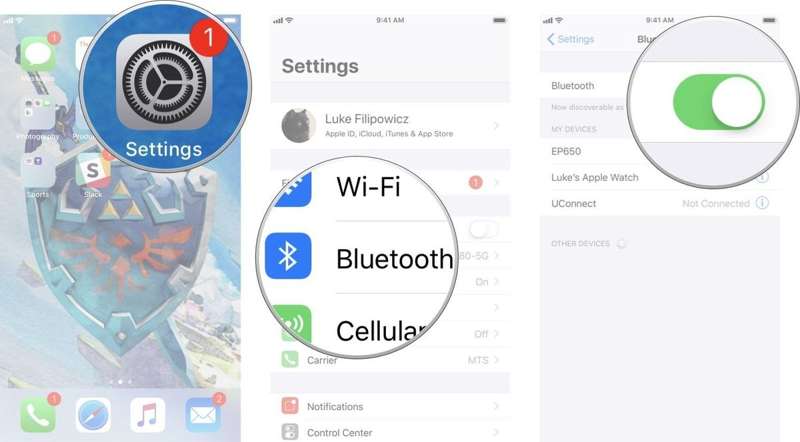
Option 1: Open the Settings app, tap Wi-Fi, and toggle it on. Then, choose Bluetooth, and turn it on.
Option 2: Go to Control Center, and tap Wi-Fi and Bluetooth to enable them.
Then, check if you have fixed AirDrop keeps failing.
Note: Make sure to disable Personal Hotspot.
Fix 3: Check AirDrop Settings

Step 1. Run your Settings app.
Step 2. Go to General, and choose AirDrop.
Step 3. Choose Everyone for 10 Minutes.
Note: If you select Contacts Only, it is complex to verify who knows who. You can also adjust AirDrop settings in Control Center.
Fix 4: Force Restart iPhone
For iPhone 6s and earlier
Hold down the Home + Power button until the Apple logo pops up.
For iPhone 7/7 Plus
Hold down the Side + Volume Down buttons together.
When you see the Apple logo, let the buttons go.
For iPhone 8 and newer
Quickly click and release the Volume Up button.
Do the same thing to the Volume Down button.
Long press the Side button until the Apple logo appears.
Further Reading
Fix 5: Reset Network Settings

Step 1. Go to General in your Settings app.
Step 2. Choose Transfer or Reset iPhone, and tap Reset.
Step 3. Pick Reset Network Settings.
Step 4. Enter your iPhone passcode, and hit Reset Network Settings.
Step 5. When it finishes, AirDrop won't keep failing.
Fix 6: One-stop Solution
Apeaksoft iOS System Recovery is a one-stop solution to fix AirDrop not responding on iPhone and iPad. It can automatically detect software issues on your device and resolve them quickly.
The One-stop Solution to Fix AirDrop Not Working on iPad and iPhone
- Fix software glitches that lead to AirDrop not working.
- Scan your iPhone or iPad and discover software errors.
- Available to a wide range of software glitches.
- 4.Support the latest versions of iOS and iPadOS and help you downgrade iOS.
Secure Download
Secure Download

How to Fix AirDrop Not Working on Your iPhone
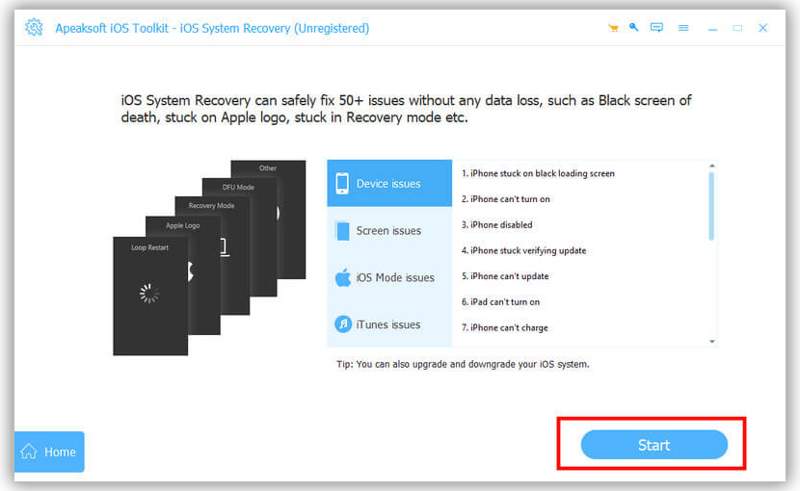
Step 1. Link to your device
Connect your iPhone or iPad to your computer with a Lightning cable. Run the best iOS repairing software after installing it on your computer. Click the Start button once your device is detected.
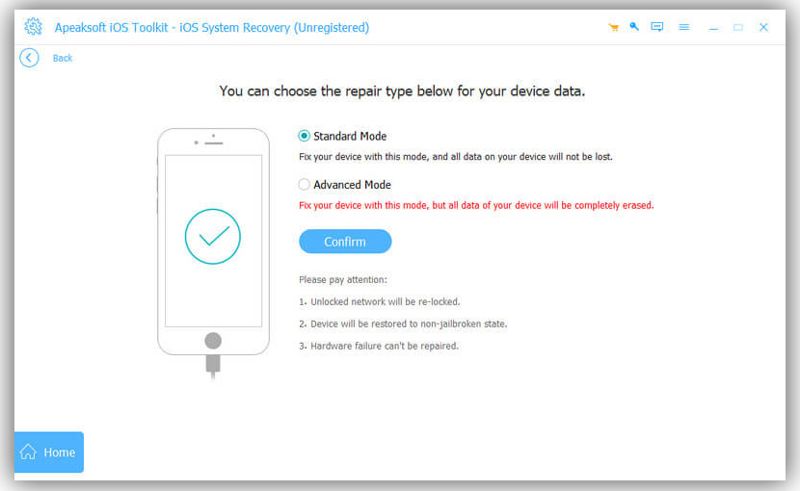
Step 2. Choose a mode
After your iPhone is scanned, click the Free Quick Fix link to try the free mode. If it is unavailable, click the Fix button. Then, select Standard Mode or Advanced Mode, and hit Confirm to proceed.
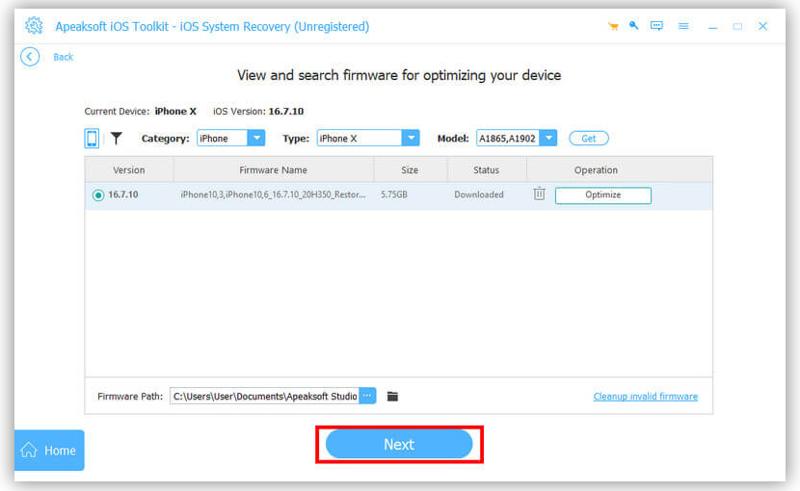
Step 3. Fix AirDrop not responding
Next, check your iPhone information. Find the right version of iOS and click the Download button to download the firmware. If you have a firmware file, import it from your hard drive. When the downloading completes, the software will begin fixing AirDrop not responding.
Part 3: How to Fix AirDrop Not Working on Mac
If AirDrop is not working on a MacBook, you have multiple solutions to get rid of the error. We list the proven solutions below. You can perform them one by one to use AirDrop for sending or receiving data on a Mac.
Fix 1: Check Compatibility
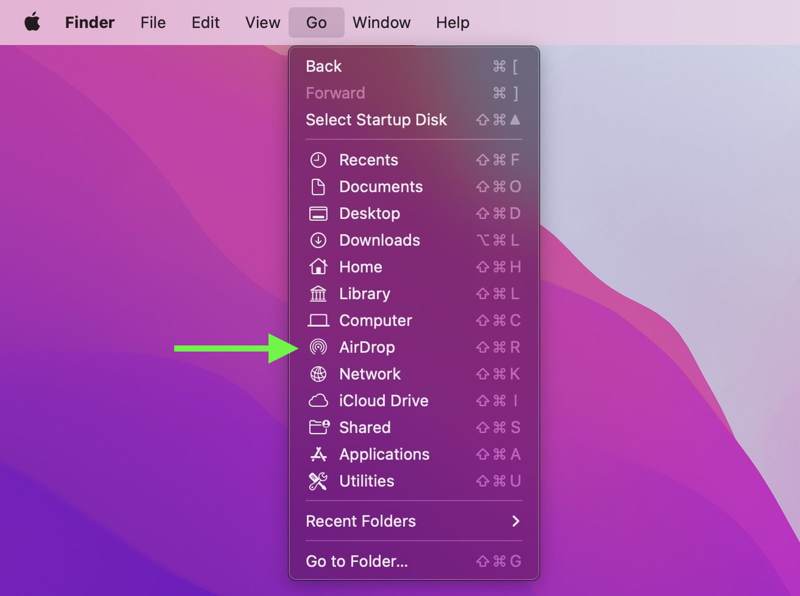
All Mac computers and laptops released in 2012 and later support AirDrop. Plus, your machine must run Mac OS X Yosemite and newer. If you are not sure, run the Finder app from the Dock, and click the Go menu on the top ribbon. If you can find AirDrop on the list, it means your machine is compatible with it.
Fix 2: Enable Bluetooth and Wi-Fi
If AirDrop from iPhone to MacBook is not working, you must check the wireless connections in the Control Center on your machine. Moreover, make sure to place the two devices less than 30 feet.
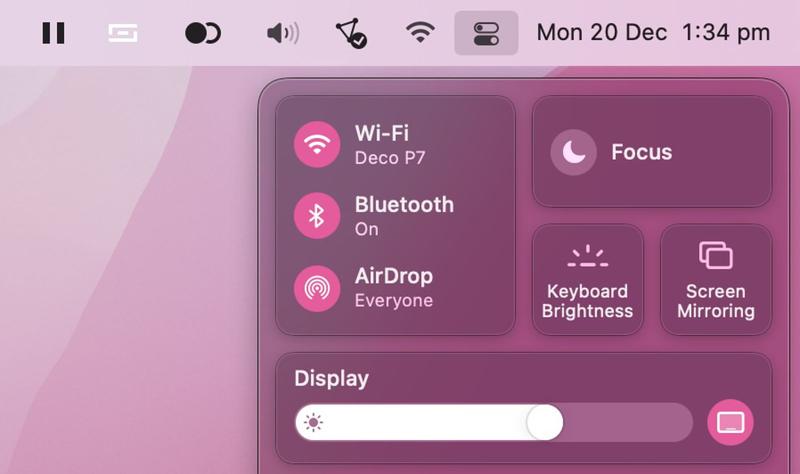
Step 1. Click the Control Center button on the right side of the top menu bar.
Step 2. Then, click through the connection pane.
Step 3. Toggle on the switches of Wi-Fi and Bluetooth.
Note: If Wi-Fi and Bluetooth are enabled, you need to toggle them off and then turn them back on.
Fix 3: Adjust AirDrop Settings
If AirDrop is not finding anyone on your Mac, you can adjust AirDrop settings to get rid of the error. You can access AirDrop settings in the Control Center quickly or adjust them in the Finder app.

Step 1. Open the Finder app from your Dock.
Step 2. Click AirDrop on the sidebar.
Tip: If AirDrop is not on the sidebar, press Command + Shift + R together.
Step 3. Click Allow me to be discovered by and choose Everyone.
Fix 4: Restart Mac
Another solution to fix AirDrop unable to share on Mac is to hard reset your machine. That can remove system caches and junk files, as well as quit all apps in the background. It won't delete your data or files.
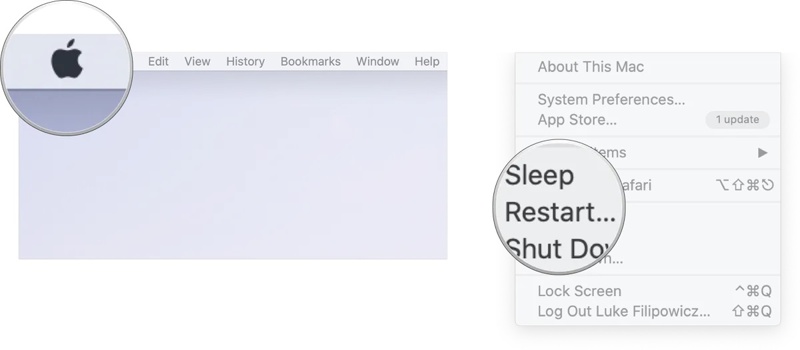
Step 1. Click the Apple menu.
Step 2. Choose Shut Down from the list..
Step 3. A few minutes later, long-press the Power button until your Mac powers on.
Step 4. Then, try AirDrop again.
Conclusion
This article explained what you can do if AirDrop failed on your iPhone, iPad, or Mac. First of all, you can learn why this problem occurs. More importantly, we shared the verified solutions to resolve this problem on either an iOS device or a Mac computer. Apeaksoft iOS System Recovery is the one-stop solution for iPhone and iPad users.
