How to Boot iPhone in Recovery Mode in Various Situations
As a significant feature on iOS and iPadOS devices, Recovery Mode is useful in a wide range of scenarios. If your iPhone failed a software update, you can update iOS in Recovery Mode and regain access to your device. More importantly, it is an essential method of troubleshooting when your device is freezing, unresponsive, or stuck in specific screens. This article explains this feature and demonstrates how to put iPhone 16/15/14/13/12/11/X/8/7 in Recovery Mode.
PAGE CONTENT:
Part 1: What is Recovery Mode?
What is iPhone Recovery Mode? Recovery Mode is a built-in troubleshooting feature. If you experience software glitches, app bugs, update failure, and more, you have to enter Recovery Mode on your iPhone. It allows you to update or restore your device and resolve severe problems. In short, Recovery Mode is able to update iOS without erasing data, restore the iPhone to factory settings, and fix software issues.
When Do You Need to Place an iPhone in Recovery Mode?
1. Your iPhone gets stuck in specific screens, like a restart loop.
2. Software update failure.
3. iTunes or Finder cannot register or detect your iPhone.
4. Your iPhone shows a black screen and won’t turn on.
5. Your iPhone is freezing on the Apple logo for minutes.
6. Your screen displays Connect-to-iTunes or Support.apple.com/iphone/restore.
7. You cannot update or restore your iPhone normally.
8. Your iPhone is disabled after too many incorrect passcode attempts.
What Happens After Booting the iPhone into Recovery Mode?
Update: Install the latest available version of iOS without deleting your data.
Restore: Bring your iPhone to the factory settings and erase everything on your device, as well as install the latest version of iOS.
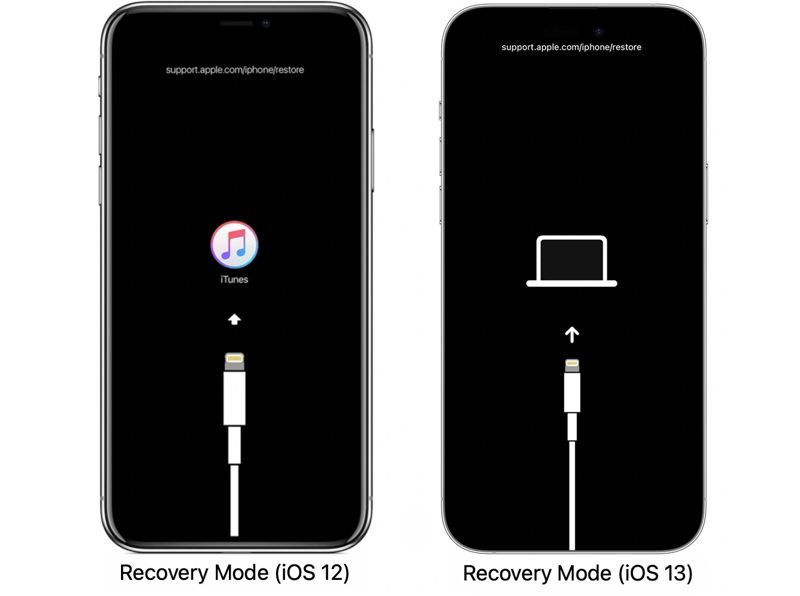
How to Identify If Your iPhone Is in Recovery Mode
On iOS 12 and earlier, you will see the iTunes logo after booting your iPhone in Recovery Mode. For iOS 13 and later, the screen will display Connect to Computer alternatively.
Part 2: How to Put iPhone in Recovery Mode
To put an iPhone in Recovery Mode when disabled or unresponsive, you need a computer, a USB cable, and the latest version of iTunes or Finder, depending on your operating system. Moreover, the button combination is different according to your iPhone model.
Step 1. Open iTunes or Finder:
On Windows, open iTunes.
On macOS Mojave or earlier, open iTunes.
On macOS Catalina or later, open Finder.
Tips: If you are using Windows 11/10, you can also use the Apple Devices application.
Step 2. Connect your iPhone to a computer with a compatible cable.
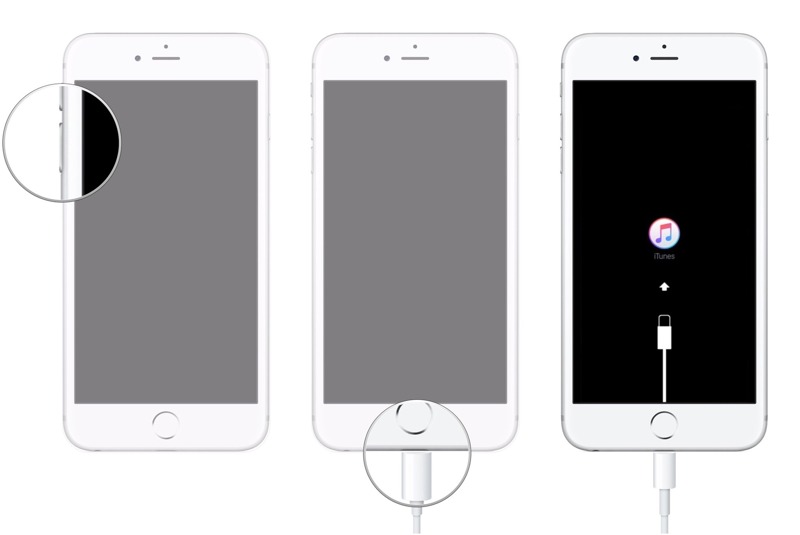
Step 3. Enter your iPhone in Recovery Mode:
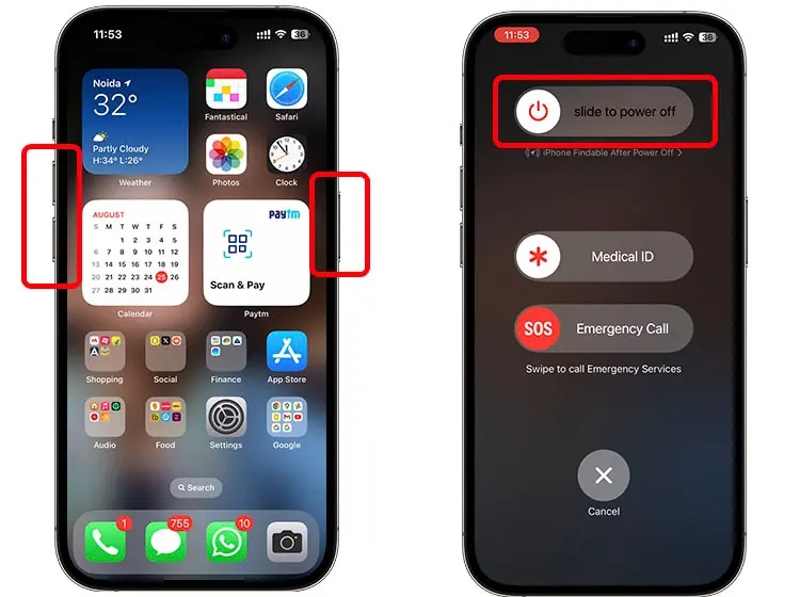
For iPhone 8 and later
Press and quickly release the Volume Up button.
Press and quickly release the Volume Down button.
Long press the Side button.
When you see the Connect-to-iTunes or Connect-to-PC screen, release the Side button.

For iPhone 7/7 Plus
Hold down the Volume Down + Side buttons together.
Release the buttons once you see the Recovery Mode screen.
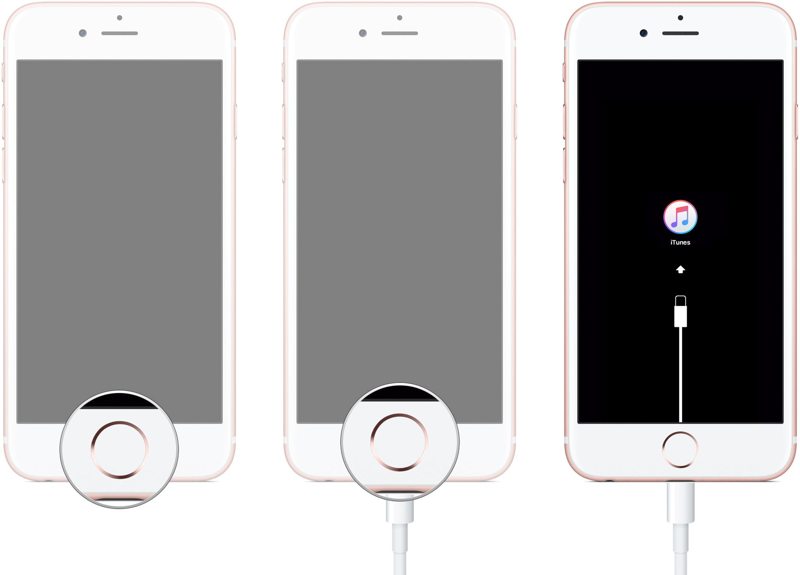
For iPhone 6s and earlier
Hold down the Home + Top or Sleep/Wake buttons at the same time.
Let the buttons go if your iPhone boots into Recovery Mode.
Part 3: How to Use iPhone Recovery Mode
As mentioned previously, you can do two things after your iPhone boots in Recovery Mode. You can either update iOS to the latest version or restore your iPhone to factory settings and erase all your data.
Step 1. Once iTunes or Finder detects your iPhone in Recovery Mode, a dialogue will pop up.
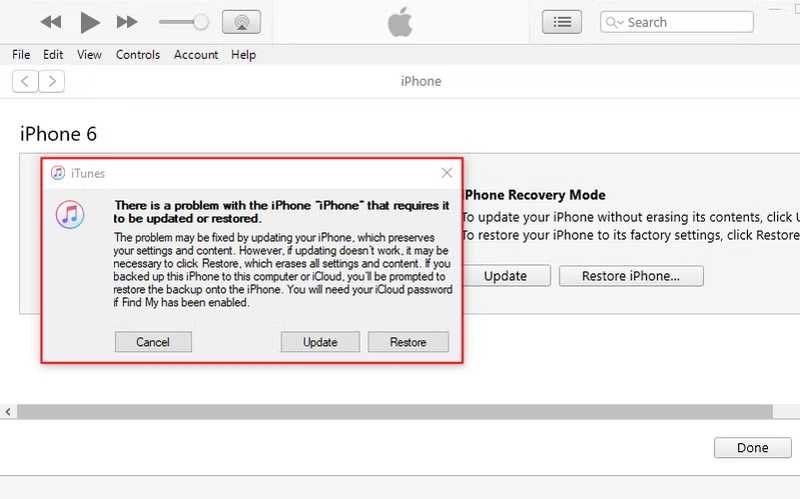
Step 2. If you need to update your iPhone, click the Update button. Then, iTunes or Finder will search for available updates and install it automatically.
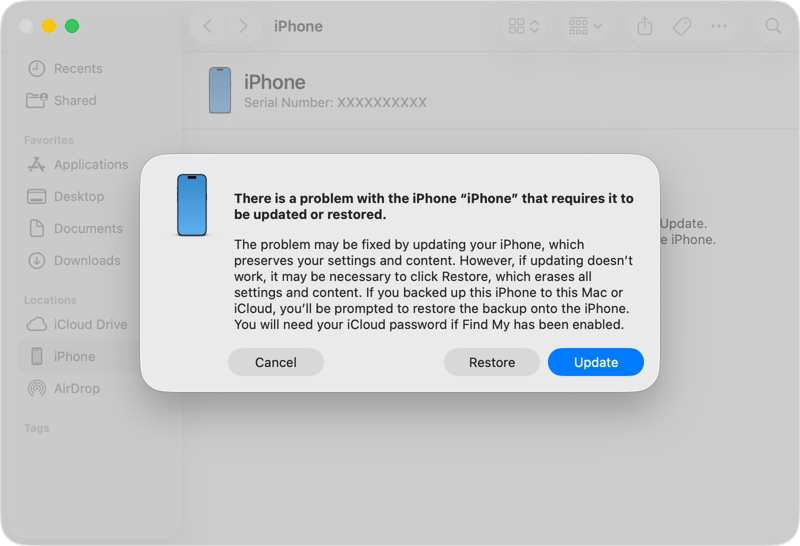
If you want to restore your device, click the Restore button instead. Next, follow the onscreen instructions to factory restore your device.
Step 3. When the process finishes, your iPhone should restart.
Note: It usually takes less than 15 minutes to complete the process. If it takes longer, you’d better disconnect your iPhone and try the steps again.
Part 4: What to Do If iPhone Cannot Boot into Recovery Mode
If you cannot place your iPhone in Recovery Mode, the reasons may be complicated. However, you can perform the solutions below one by one to troubleshoot software glitches and update iOS.
Solution 1: Restart Your iPhone
For iPhones with Face ID, hold down either Volume button and the Side button together. Once you see the power-off screen, release the buttons. Then, move the slider and your screen will turn black. A few minutes later, hold the Side button until you see the Apple logo.
For an iPhone without Face ID, long-press the Side or Sleep/Wake button until the power-off screen appears. Move the slider to shut down your device. Next, turn it back on by hitting the Side or Sleep/Wake button.
Then, connect your iPhone to a computer and put it in Recovery Mode.
Solution 2: Boot into DFU Mode

Step 1. Hook up your iPhone to a computer with a USB cable.
Step 2. Open iTunes or Finder.
Step 3. Put your device in DFU mode:
For iPhone 8 and newer
Quickly press and release the Volume Up button.
Do the same to the Volume Down button.
Hold the Side button until the screen turns black.
Keep holding the Side button and press the Volume Down button for 5 seconds.
Then, release the Side button while keeping holding the Volume Down button for 10 seconds.
For iPhone 7/7 Plus
Hold the Volume Down + Side buttons together for 10 seconds.
Continue pressing the Volume Down button for 5 seconds, but release the Side button.
For iPhone 6s and earlier
Hold the Home + Top or Sleep/Wake buttons for 10 seconds.
Release the Top or Sleep/Wake button, but keep pressing the Home button for 5 seconds.
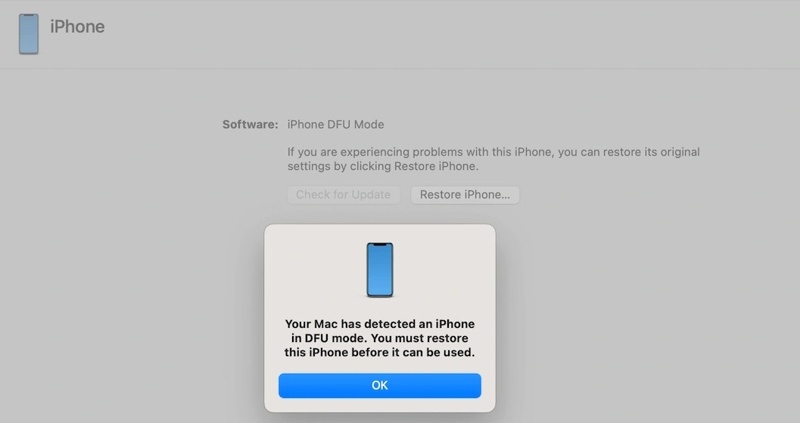
Step 4. Then, restore your iPhone.
Solution 3: Try An Alternative
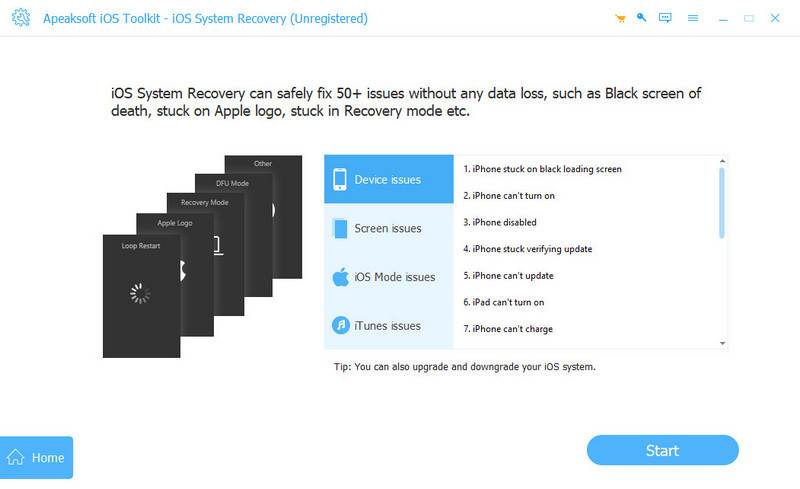
Apeaksoft iOS System Recovery is the best alternative solution to troubleshoot software issues and update your iPhone if Recovery Mode is not working. Plus, the intuitive interface makes the process easy.
The Best Alternative Solution to Update and Restore iPhone
- Fix a wide range of software glitches.
- Work on over 150 errors and bugs.
- Rescue data from frozen devices.
- Support iOS 26/iPadOS 26 and earlier.
Secure Download
Secure Download

Here are the steps to update and restore your iPhone:
Step 1. Scan your iPhone
Run the best iOS repairing tool after installing it on your computer. Connect your iPhone to your computer with a Lightning cable. Click the Start button after your device is detected.
Step 2. Check device information
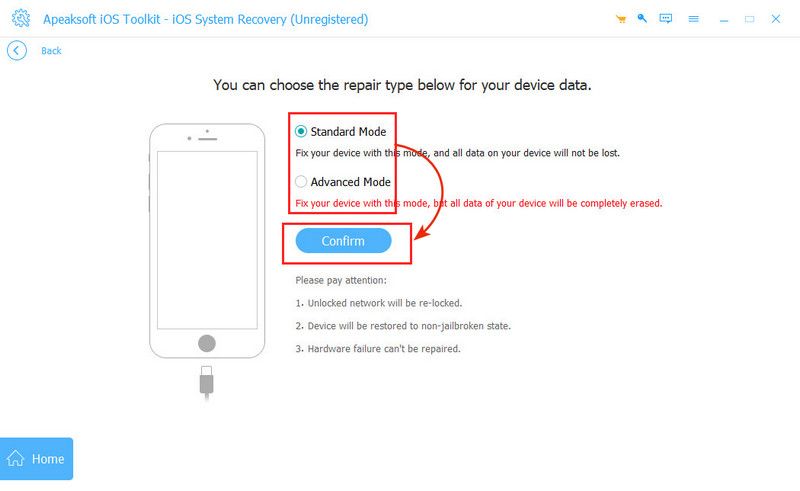
Click the Fix button, select a mode, and hit the Confirm button. Next, select your iPhone information on the form.
Step 3. Repair iPhone
Make sure to set a proper version in Update to Version. Finally, click the Repair button at the bottom to begin fixing software issues on your device.

Conclusion
This guide explains how to put your iPhone 16e in Recovery Mode and how to do it on other models. You can follow our steps to update the software on your device or restore it to the factory settings. If you cannot place your device in Recovery Mode, you can resolve this problem with our solutions. Apeaksoft iOS System Recovery is the best alternative solution for troubleshooting and software updating.
