iTunes File Sharing - How to Use, Find, and Troubleshoot
Many users want to transfer files between their computer and iPhone or iPad. iTunes File Sharing provides a direct way to move documents, videos, and other app files through a USB connection. Read more to understand how it works and figure out where shared files are stored.
In this guide, we’ll also walk you through why it is not showing and its best alternative - Apeaksoft iPhone Transfer. Keep reading.
PAGE CONTENT:
Part 1: What Is iTunes File Sharing
Basic Definition of iTunes File Sharing
As mentioned in the beginning, iTunes File Sharing is a feature to transfer files between iOS devices and computers. With it, you can share files in an easy and fast way without relying on iCloud service. Moreover, there is no data loss or number limits.
What files does iTunes File Sharing Support?
Not all iOS apps support file sharing. To check whether a specific app is supported, you can connect your device to iTunes and open the File Sharing section. If the app appears in the list, it supports file sharing.
Part 2: How to Use iTunes File Sharing to Transfer Files
How do I access iTunes File Sharing? Don't worry. This section will show you a comprehensive how-to guide on how to use iTunes for file sharing step by step.
Here, we take iTunes File Sharing between an iPhone and Windows as an example.
Step 1. Launch iTunes on your Windows computer. Make sure your iTunes is updated to the latest version.
Step 2. Connect your iPhone to the computer. Trust this computer on your iPhone if it is the first connection (bypass Trust this Computer on iPhone).
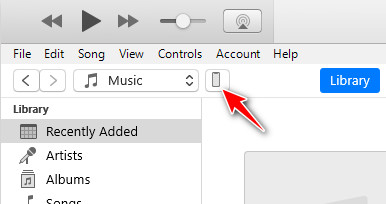
Step 3. Click your device pattern in the top left corner, as shown below.
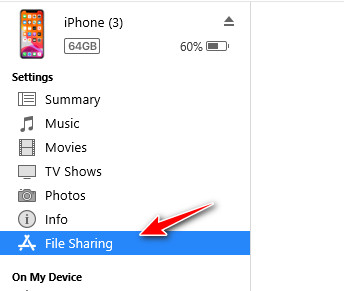
Step 4. Select File Sharing. You will see all the apps on your iPhone that support iTunes File Sharing on the right.
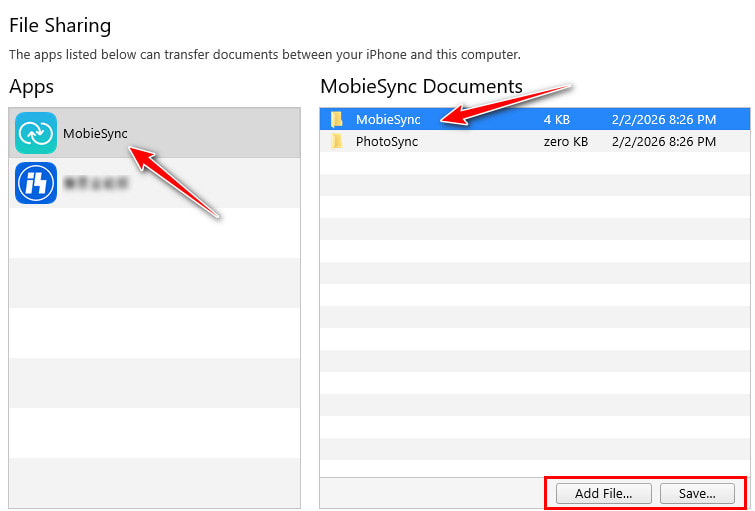
Step 5. Click your desired app and choose the target file on the right.
Step 6. If you want to share a file with an iPhone, choose the Add File option.
If you want to import files to the computer, select Save and choose a saving path.
Part 3: Where to Find iTunes File Sharing Files
Many people successfully transfer files using iTunes File Sharing, but can't find those files afterwards. Don't worry! This section will help you find the iTunes File Sharing folder location with ease.
If you transfer files from your computer to your iPhone/iPad
Where is the iTunes Sharing folder on iPhone? Files transferred with iTunes File Sharing will be stored in the corresponding app. You can open the app you once selected, and enter the Documents/Files/Library page. You will see the transferred files there.
If you export files from an iPhone/iPad to your Windows/Mac
If you export files from your iPhone/iPad to your computer, files transferred from your device will be saved to the location you selected during the export process. If you forget which path you've chosen, you can go to the desktop/download folder to check. Or, you can perform the same steps in Part 2 and check the default path in the last step.
Part 4: Bonus Tip - Why Is File Sharing in iTunes Not Showing
Sometimes, when you connect your iPhone/iPad to the computer, there is no File Sharing option or no desired app. It is mainly caused by the reasons below:
Your device isn't connected properly
- You haven't trusted this computer on your iDevice.
- Change to a new USB cable or the connection port.
- Restart iTunes and reconnect your device.
iTunes Version Issue
Your iTunes version is an older one and cannot show File Sharing properly. You need to update them to the latest version.
The App doesn't support File Sharing
Only apps that support File Sharing will be displayed in iTunes. If apps don’t have File Sharing enabled by the developer, it won’t show up. You can refer to the app's description to check whether it supports File Sharing.
Part 5: Best Alternative to iTunes File Sharing
If iTunes File Sharing is not showing up or cannot transfer files properly, you may consider using a more flexible file transfer. What is the alternative to iTunes file transfer? You cannot miss Apeaksoft iPhone Transfer. This software enables you to transfer files from iPhone to iPhone, iPhone to iPad, iPhone to the computer, and vice versa.
Best Alternative to iTunes File Sharing
- No app sandbox restrictions - you can transfer files between iOS devices and a computer losslessly with one click.
- Support photos, music, videos, contacts, messages, etc.
- Not limited to File Sharing - you can also manage, edit, delete, and organise files easily on a clear interface.
- Compatible with the latest iOS devices and system versions.
Secure Download
Secure Download

If your iTunes won't sync, this all-in-one data transfer software is your best choice.
Conclusion
This article has introduced File Sharing in iTunes in detail, including what it is, how to use it, where to find the transferred files, what to do when File Sharing in iTunes is not showing, and its best alternative. We hope this guide can be useful and make it easier for you to transfer and manage files between your iDevice and computer.
