How to Restore iPhone from iTunes
Help! How do I restore my iPhone through iTunes?
Losing data on an iPhone is very common for various reasons. If you encounter that bad situation and have no way to get lost data back, you can try to restore your iPhone from iTunes backup. It is really easy and quick to recover lost data on an iPhone. Now, let's have a look at how to restore iPhone from iTunes backup in different ways.
PAGE CONTENT:
Part 1. How to Restore iPhone with iTunes [With Pictures]
If you have backed up data on your iPhone via iTunes before, you can choose to restore iPhone data directly from iTunes, the free iPhone data recovery software. With just a few steps only, you can restore all iPhone data to your computer or iPhone. It is really simple and easy to operate. Of course, you can also choose to back up data with iTunes, which supports almost any file format on iPhone, such as contacts, SMS messages, G-mail, videos, music, etc.
Here are detailed steps on how to restore iPhone from iTunes on a laptop:
Step 1. Download and Install iTunes on Your Computer
First, you need to download and install the latest version of iTunes on your computer. When the installation is finished, launch it directly.
Step 2. Connect iPhone with Computer

Now, you need to connect your iPhone to your computer with a USB cable, and your iPhone will appear on the computer automatically. Click the phone-like pattern in the top-left corner.
Tips: If iPhone does not appear on computer, you should check your connection or Apple Drivers on your computer to find solutions.
Step 3. Start to Restore iPhone Data
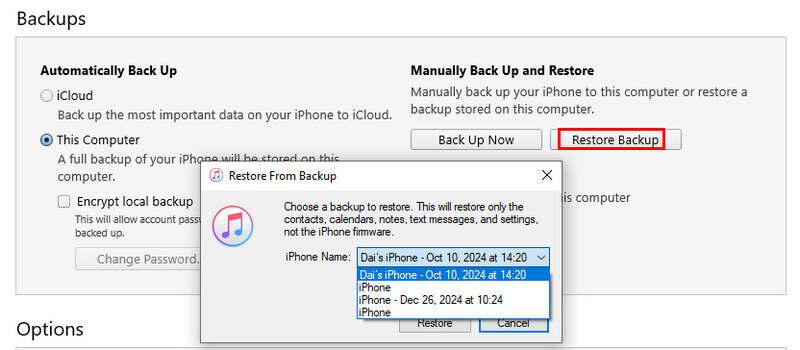
Locate the Backups section on the right page. Click Restore Backup and choose the latest backup. Then press the Restore button.
Tips:
1.Encountered iTunes could not restore the iPhone because an error occurred? Check your backup status to fix the iPhone fails to restore from iTunes.
2.Steps on Mac Finder are similar to iTunes iPhone restore.
Part 2. How to Restore iPhone from iTunes Without Data Overwrite
However, iTunes is not the best application for iPhone users to restore iPhones. If you want to restore your iPhone from iTunes someday when you lose data on your iPhone, you will find that it is not so easy and satisfying to make it.
You cannot recover a single file or a part of an iTunes backup. You can only restore all iTunes backups. Also, you cannot preview backup files either. Moreover, sometimes you have to enter the iTunes backup password.
Therefore, if you want to recover a single file or a part of the whole backup data, you can choose Apeaksoft iPhone Data Recovery to offer you powerful and professional help. Restoring the iPhone from iTunes backup will be much easier.
Restore iPhone from iTunes Backup Freely
- Freely choose which data file to recover from iTunes backup.
- Preview to determine the mere file.
- Compatible with both Windows and Mac.
- Support nearly all iPhone models and versions.
Secure Download
Secure Download

Below are simple steps to restore iPhone from iTunes backup selectively.
Step 1. Download and Install Apeaksoft iPhone Data Recovery
Firstly, you need to download and install iPhone Data Recovery on your computer by clicking the download button above. And then launch it directly.
Step 2. Connect Your iPhone with Computer
Now, choose the Recover from iTunes Backup File option on the interface, and then connect your iPhone to the computer with a USB cable. iPhone Data Recovery will scan your iPhone automatically.
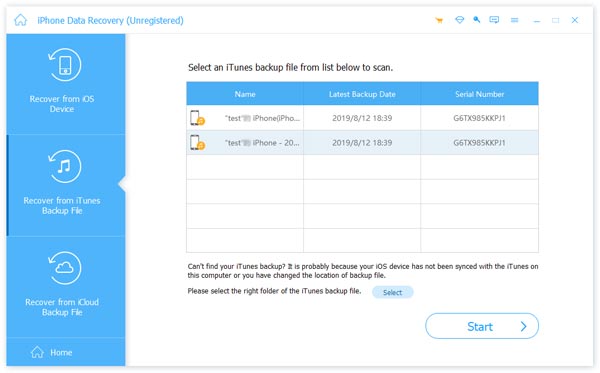
Step 3. Select and Restore iTunes Backup
When scanning is finished, you can see all backup data on the interface. If you want to recover all data, just mark them all. If you just want to recover a part of the backup data, select and mark those files and click the Recover option. A few seconds later, you can see recovered data on your computer.
Tips: You can also try a backup extractor to help you selectively recover data from iTunes backup without overwriting.
Part 3. How to Restore iPhone Without iTunes
If you do not back up your iPhone data on iTunes, you can recover your iPhone data without iTunes. Apeaksoft iPhone Data Recovery allows you to recover lost data directly without a backup on the computer. The steps are listed below:
Secure Download
Secure Download
Step 1. Download and Install iPhone Data Recovery
Follow the same methods as we mentioned in Part 2 to download and install this eminent software.
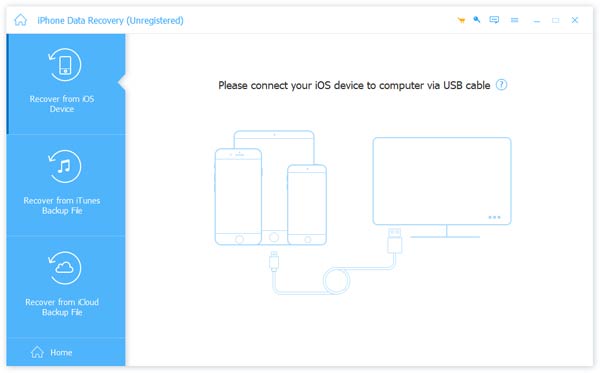
Step 2. Connect Your iPhone with Computer
Now, connect your iPhone to the computer via a USB cable and click the Recover from iOS Device option on the interface. iPhone Data Recovery can scan your iPhone automatically.
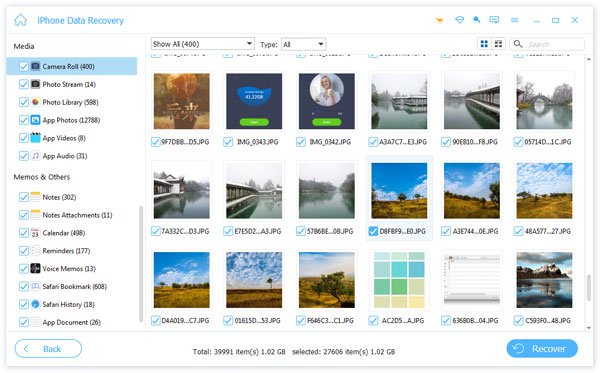
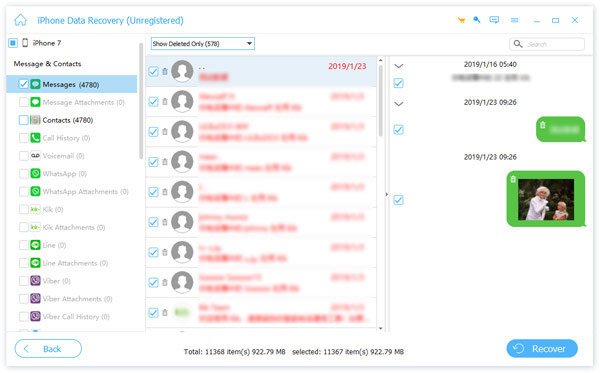
Step 3. Select Data to Recover
Now, you can see all the data on the interface. You can choose a specific data type in the left panel and preview the desired files on the right page. Check the file you want to recover, and then press the Recover button to start recovering.
Conclusion
If you lost data on your iPhone by accident, do not worry or be upset. You can easily restore iPhone data from iTunes using some professional methods. If you have not backed up iPhone data on iTunes or iCloud, you can also use Apeaksoft iPhone Data Recovery to recover your iPhone without iTunes. You can also choose iPhone backup software to back up your personal data and set up a good habit for backup data, which is really important and necessary, which can help you to avoid losing data and make your life better.
Related Articles
Want to restore iPad Pro/Air/mini and reset iPad to factory settings. Learn how to reset iPad in this post.
What are best methods for backing up photos to avoid the loss of the files? The article introduces the way to backup photos using iTunes.
Even though you've unsubscribed, you can still restore purchases on iTunes, such as songs, movies, and many other contents iTunes offers.
Learn how to delete voicemails from iPhone and Android device from Samsung, HTC, Moto, Sony, Google and other manufacturers.
