


完全ガイド:CapCutを使った画面録画の方法と2026年のおすすめ代替ソフト

CapCutは豊富な編集機能で人気の動画編集アプリですが、画面録画にも対応していることをご存知でしたか?この記事ではその方法をご紹介します。 CapCutで画面録画する方法 Windows/Mac版。現在、CapCutにはウェブ版やモバイル版に画面録画機能が内蔵されていないため、必要に応じて使える優れた代替ソフトをいくつかご紹介します。
ページコンテンツ:
パート1:CapCut Desktopを使った画面録画
CapCutで画面録画する方法は?以下の手順に従って、簡単に画面録画を行ってください。
ステップ 1: CapCutデスクトップ版は公式サイトからインストールしてください。
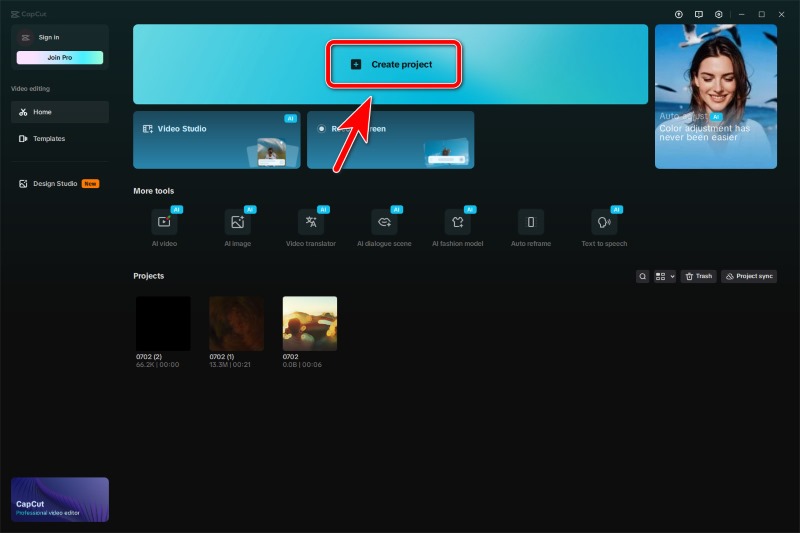
ステップ 2: CapCutを起動して、クリックします プロジェクトを作成します。.
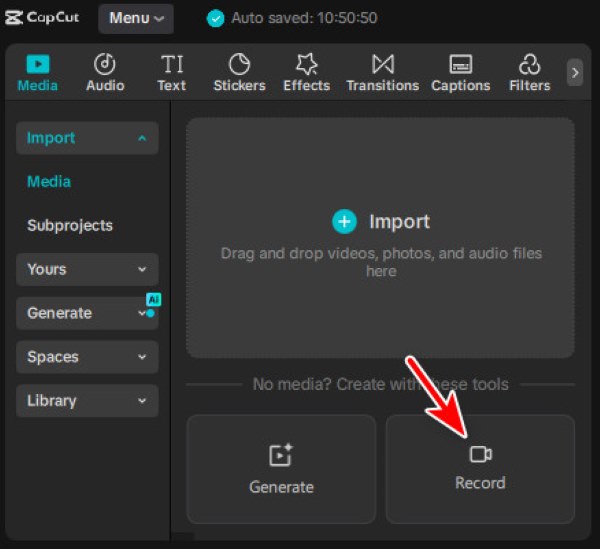
ステップ 3: 真下 インポート エリアでは、 録画 ボタン。クリックすると、CapCutスクリーンレコーダーが起動します。
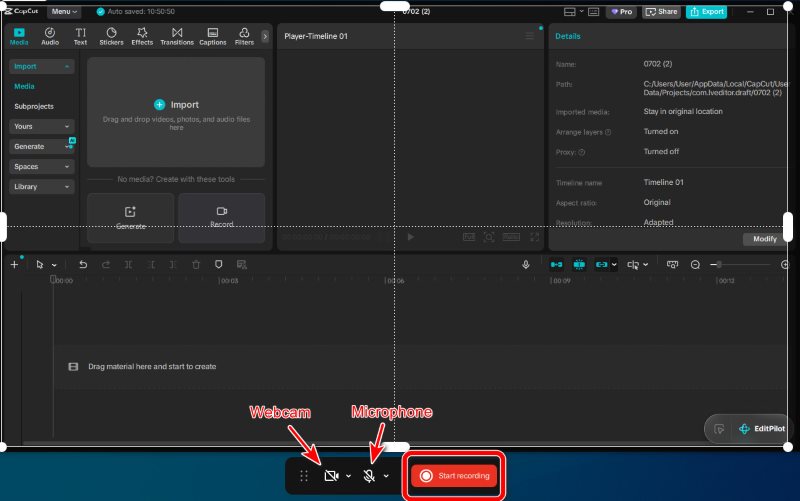
ステップ 4: CapCutは録画範囲のカスタマイズに対応していますが、そのためのグラフィカルボタンはありません。マウスショートカットで操作する必要があります。
- 録音したい場合 フルスクリーン画面上の任意の場所を左クリックするだけで、全画面表示モードになります。
- 録音したいだけ 特定の地域 画面上で録画したい領域をマウスでクリック&ドラッグしてください。
- に ウィンドウを記録するマウスカーソルをそのウィンドウの上に移動させ、ウィンドウの周りに青い枠が表示されたら、ダブルクリックしてください。
領域を選択した後でも、白い枠をドラッグすることで調整できます。
ヒント: 録音モードを終了するには、 右クリックします あなたの画面に。
ステップ 5: 録画を開始する前に、 マイク or ウェブカメラ 必要に応じてクリックしてください。 録音を開始3秒間のカウントダウンの後、開始されます。
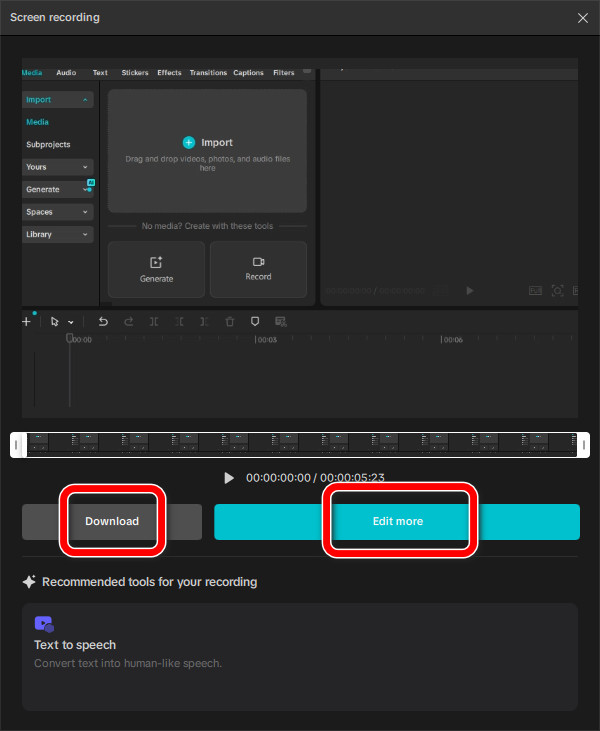
ステップ 6: 録音を終了したい場合は、 赤の広場そうすれば、 ダウンロード すぐに、または さらに編集 保存および共有する前に。
パート2:Windows/Mac向けのCapCutの最適な代替アプリ
Apeaksoftスクリーンレコーダー(最高かつ高度な機能)
Apeaksoft スクリーンレコーダー は、高品質かつ多様なフォーマットで画面を録画できるプロフェッショナルツールです。ユーザーのニーズを的確に把握し、先を見越して動作します。カスタマイズ可能なレコーダー、スクリーンショット機能、編集ツールボックス、自動録画スケジュールなど、必要な機能がすべて揃っています。

100万人以上がダウンロードしました 1,000,000 users
- 使いやすいインターフェースで、画面、カメラ、音声をスムーズに録画できます。
- 画面録画のサイズと範囲をカスタマイズします。
- CapCutのような動画編集ツールを内蔵する。
- コース、リアクション、ゲームプレイなど、あらゆるシナリオに対応する様々な録画モード。
ステップ 1: ソフトウェアをインストールして起動します。
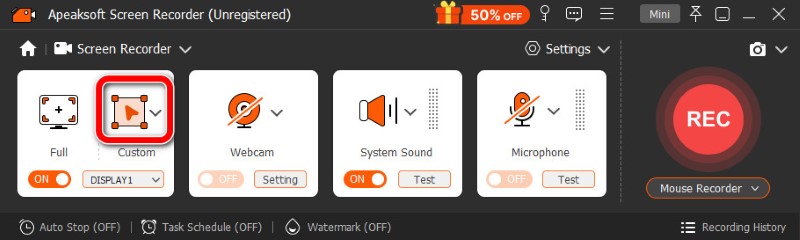
ステップ 2: ソフトウェアを初めて起動すると、デフォルト設定では画面全体が録画されます。画面の一部のみを録画したい場合は、クリックしてください。 カスタム額装 マウスをドラッグして範囲を選択します。または、クリックすることもできます。 下向き矢印 「カスタム」の横にあるドロップダウンメニューから、あらかじめ設定されたアスペクト比を選択します。
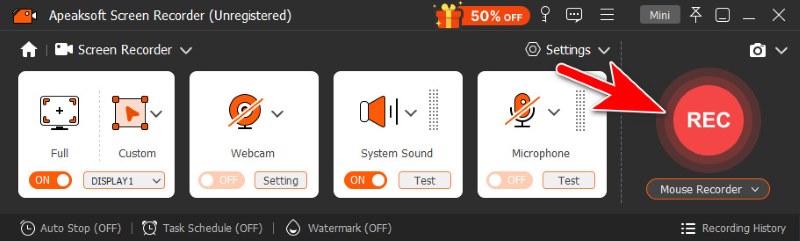
ステップ 3: 範囲を設定したら、クリックします REC 録音を開始します。
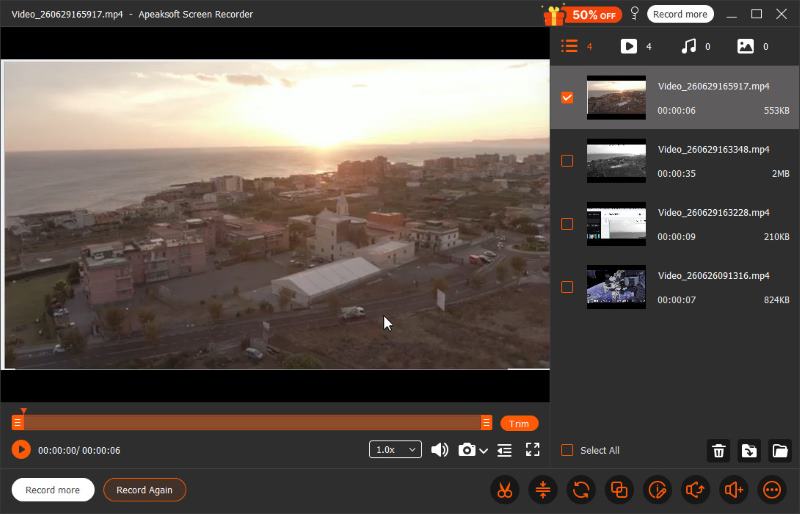
ステップ 4: クリック 赤の広場 録画を終了するには、フローティングバーをクリックします。ビデオファイルは編集ウィンドウが表示される前にすぐに保存され、そこでトリミング、結合、音量変更などの基本的な編集を行うことができます。
Xboxゲームバー(Windows内蔵)
自由な録画範囲や高度な編集機能にそれほどこだわらないのであれば、Xbox Game Barは手軽で、カジュアルな使用には十分です。
ステップ 1: メディア掲載 Windows + Alt + R画面の右上隅にフローティングバーが表示されます。これは録画が開始されたことを意味します。
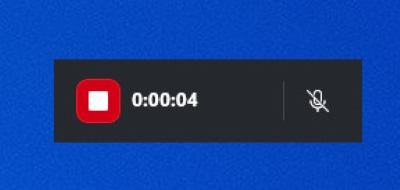
ステップ 2: 完了したら、 赤の広場 フローティングバーで仕上げる。
スクリーンショットツールバー(Mac内蔵)
内蔵されています Macのスクリーンレコーダー 録音エリアをカスタマイズでき、素早く簡単に録音できる。
ステップ 1: Macのスクリーンショットツールバーのショートカットキーを押してください。 コマンド+ + 5シフトすると、画面下部にスクリーンショットツールバーが表示されます。
ステップ 2: 録音範囲モードは2種類から選択できます。 画面全体を記録 or 選択部分を記録.
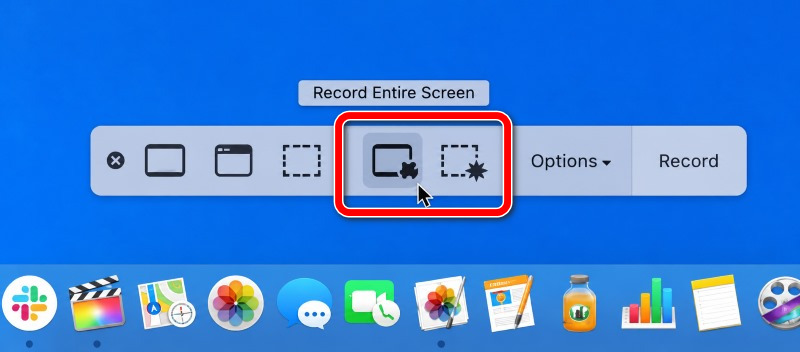
ステップ 3: 詳しくはこちら 録画 始めること。
ステップ 4: 録画を停止するには、 Force Stop メニューバーのボタンをクリックするか、 コマンド+コントロール+ Esc.
VEED.io スクリーンレコーダー(ウェブベース)
VEED.ioは完全オンラインで動作し、インストールは不要。手軽に素早く録画できます。必要なのはブラウザ搭載のデバイスと安定したインターネット接続だけ。VEED.ioでは、画面、ウェブカメラ、システムオーディオ、マイクの音声をスムーズに録画できます。
ステップ 1: ブラウザでveed.io/record/にアクセスしてください。どのブラウザでも問題なく動作しますが、Chromeが最も安定しています。
ステップ 2: 詳しくはこちら 画面のみ 画面録画モードに入るには、またはクリックします。 スクリーンとカメラ画面と一緒に自分自身を録画したい場合は、
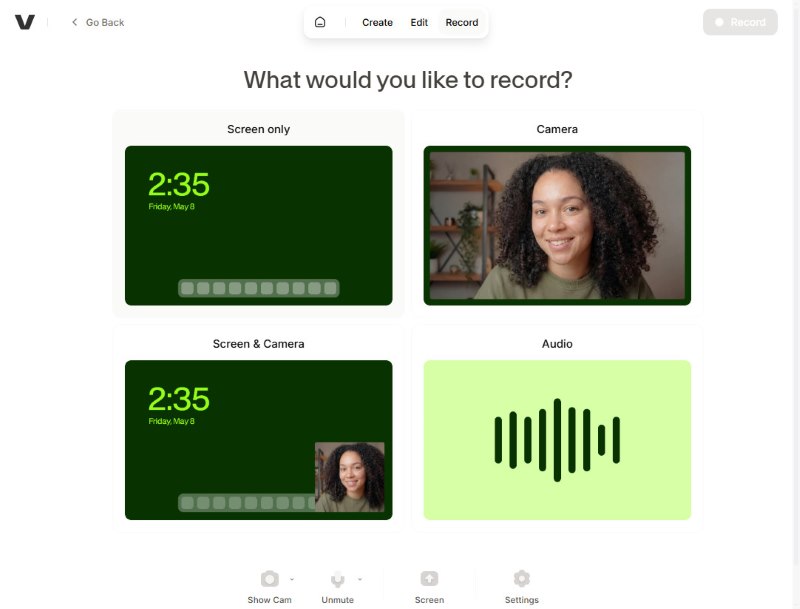
ステップ 3: 録画するコンテンツを選択してください。 ブラウザタブ, ウィンドウまたは フルスクリーン.
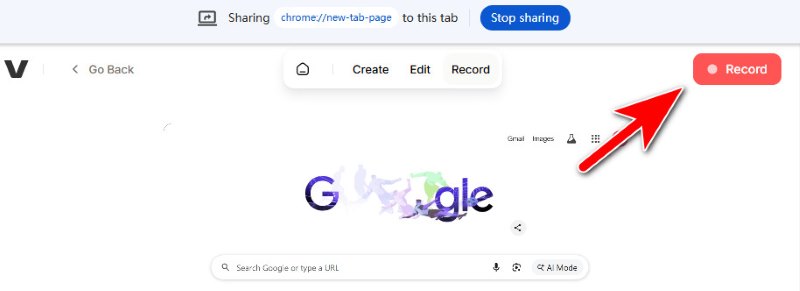
ステップ 4: 詳しくはこちら 録画 右上をクリックして開始します。完了したら、クリックします。 Force Stop.
ステップ 5: 詳しくはこちら クリックします エクスポートするには、無料版では出力ビデオにウォーターマークが入ります。
パート3:iPhone/Androidで画面録画する方法
iPhoneの画面記録
ステップ 1: 店は開いています コントロールセンター.
iPhoneのコントロールセンターはどこにありますか?
- iPhoneで フェイス ID右上隅から下にスワイプして呼び出します。
- iPhoneで ホームボタン画面下部から上にスワイプすると表示されます。
ステップ 2: をタップ スクリーンレコーディング
ステップ 3: 3秒のカウントダウンの後、録音が開始されます。画面とともに音声を録音するには、録音ボタンを長押ししてから、 マイクロフォン に。
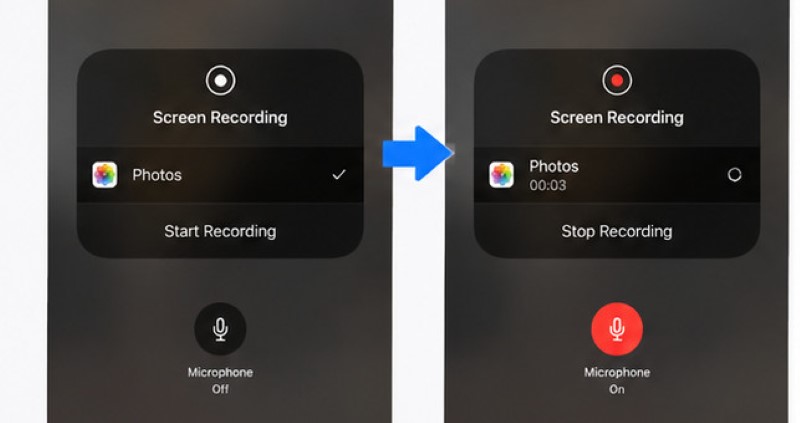
ステップ 4: 録音が終了したら、 赤いステータスバー iPhone画面の一番上にある Force Stop.
より高度な録音には、iPhone の内蔵ツールでは不十分な場合があります。 iPhoneスクリーンレコーダー より高品質な画像とカスタマイズ設定を提供するアプリ。
Android での画面録画
ステップ 1: 画面を下にスワイプしてアクセスします クイック設定そこから、 スクリーンレコーディング ツールを選択して開きます。
ステップ 2: 浮遊バーでタップして 赤丸 録音を開始します。
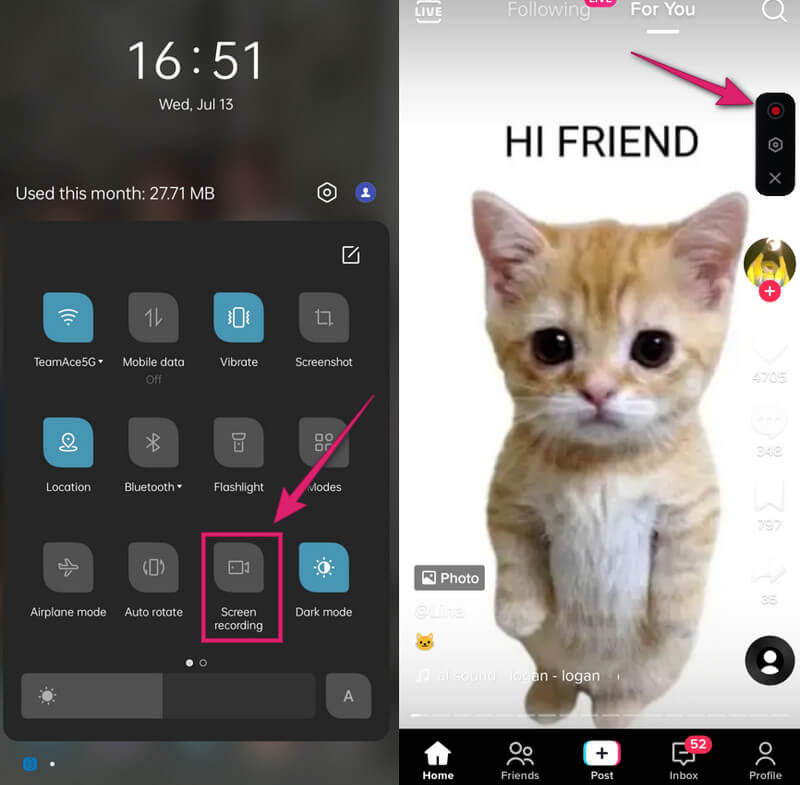
ステップ 3: 同じものをタップ 赤丸 録画を終了するには、ボタンを押してください。その後、録画した動画はフォトギャラリーで確認できます。
パート4:CapCutスクリーン録画に関するよくある質問
CapCutは音声を録音できますか?
はい、可能です。CapCutで音声を録音する方法を簡単に説明します。
音声のみを録音するには、プロジェクトを開き、クリックします。 音楽、次に ナレーション マイクの形をしたボタンをタップします。 赤い丸いボタン タップすると録画が開始され、もう一度タップすると停止します。
CapCutでは、画面録画中に音声録音も可能です。簡単です。 マイク 画面録画を開始する前にオンにしてください。
CapCutで録画した画面データはどこに保存されますか?
Windowsの場合: Videos\CapCut または Documents\CapCut フォルダ。
Macの場合: 映画/CapCut
これらはデフォルトの保存場所です。いつでも変更できます。
CapCutに気づかれずに画面録画する方法は?
CapCutのウィンドウを他のレコーダーで検出されずにキャプチャしたい場合は、Apeaksoft Screen Recorderがおすすめです。Apeaksoftで録画している間は、CapCutがフリーズしたり画面が真っ暗になったりすることはありません。
結論
これで、 画面録画 CapCut そして、素晴らしいビデオを作成できます。CapCutでの音声録音方法や、モバイルとブラウザでの画面録画方法もマスターしました。CapCutがなくても、最高のデスクトップ代替ソフトでコンピュータ画面を録画できます。 Apeaksoft スクリーンレコーダー少し練習すれば、すぐに素晴らしい動画を作れるようになりますよ。
関連記事