Как быстро восстановить заводские настройки MacBook Pro
Восстановление заводских настроек MacBook Pro Это означает приведение вашего ноутбука в состояние, близкое к заводскому. Существует несколько причин, по которым вам может потребоваться выполнить сброс настроек до заводских. Например, перед продажей MacBook Pro необходимо выполнить сброс до заводских настроек и удалить все данные, чтобы защитить вашу информацию. Это также важный шаг в устранении неполадок, когда вы не можете получить доступ к своему ноутбуку, экран зависает или не реагирует, и так далее.
СОДЕРЖАНИЕ СТРАНИЦЫ:
Часть 1: Перед началом восстановления MacBook Pro
Поскольку восстановление заводских настроек на MacBook Pro приведет к удалению всех данных с вашего ноутбука, лучше всего сделать резервную копию устройства с помощью Time Machine. Кроме того, вам необходимо выйти из служб и учетных записей на вашем устройстве.
Создайте резервную копию MacBook Pro с помощью Time Machine.
Шаг 1. Вставьте устройство резервного копирования в свой ноутбук.
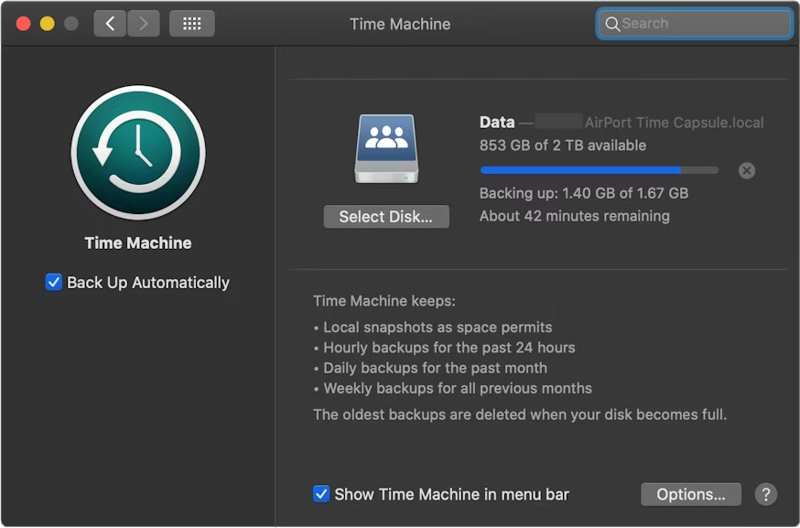
Шаг 2. Нажмите Apple меню и выберите Настройки системы or Системные настройки.
Шаг 3. Нажмите Общие на боковой панели и выберите Time Machine.
Шаг 4. Удар Добавить резервный диск или ударил Добавить .
Шаг 5. Далее выберите устройство хранения резервных копий и нажмите Настроить диск.
Шаг 6. Следуйте инструкциям на экране, чтобы настроить устройство резервного копирования.
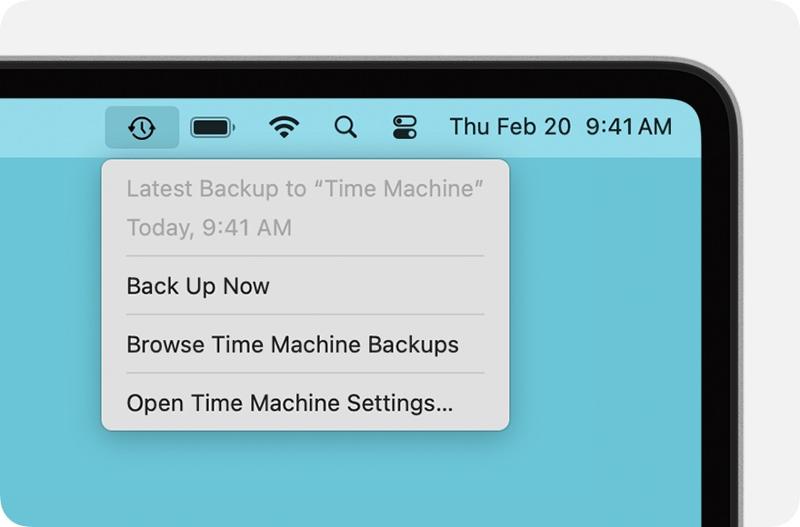
Шаг 7. После настройки нажмите Time Machine меню на верхней ленте и выберите Создать копию Перед сбросом настроек до заводских настройте резервную копию вашего MacBook Pro.
Выйти из учетных записей
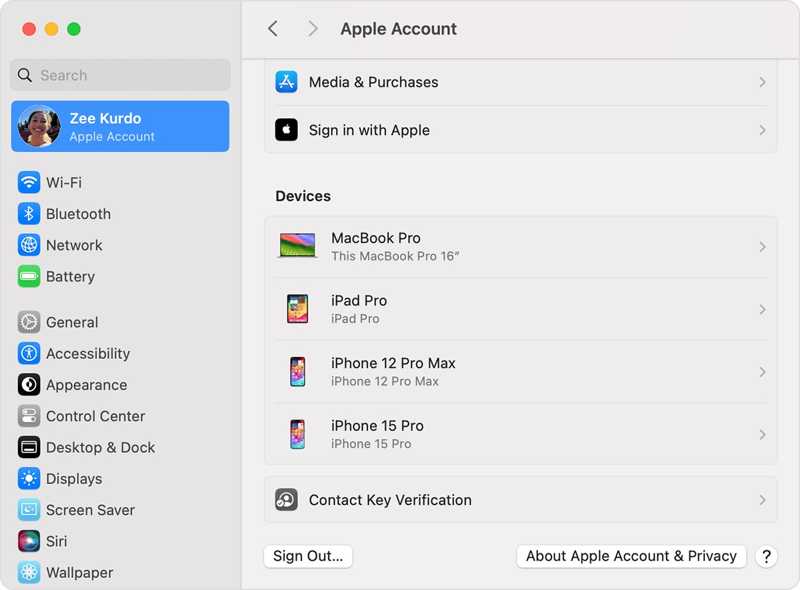
Для полного восстановления заводских настроек MacBook Pro необходимо выйти из всех учетных записей, добавленных на ваш компьютер.
В macOS Catalina или более поздних версиях выберите Настройки системы or Системные настройки и на Вашем Apple меню. Отключить. Find My Mac, Затем нажмите В учетной записи Apple прокрутите вниз и нажмите Выход из системы.
В macOS Mojave или более ранних версиях выберите Системные настройки в Apple меню. Нажмите ICloudи ударил Выход из системы.
Кроме того, вам лучше выйти из iMessage, FaceTime и других сервисов.
Часть 2: Как восстановить MacBook Pro из настроек
Если на вашем компьютере установлена macOS Ventura или более поздняя версия, самый простой способ восстановить заводские настройки MacBook Pro — это использовать встроенную функцию в системных настройках. Этот метод позволяет выполнить задачу в обычном режиме.
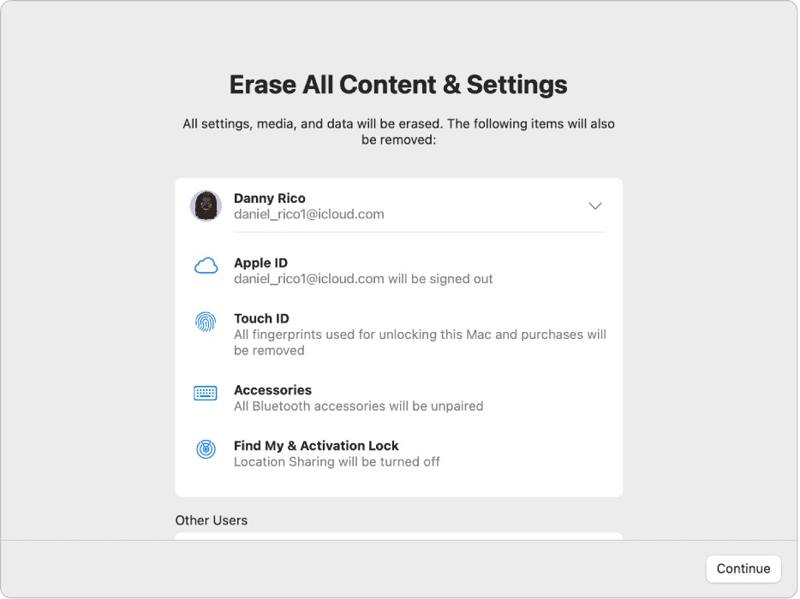
Шаг 1. Нажмите Apple меню на любом экране.
Шаг 2. Перейдите на Системные настройки, выберите Общиеи нажмите Перенос или сброс.
Шаг 3. Нажмите Стереть контент и настройки опцию.
Шаг 4. При появлении запроса введите пароль от вашей учетной записи Apple ID или пароль администратора.
Шаг 5. Прочитайте оповещение и нажмите Продолжить чтобы начать восстановление вашего MacBook Pro.
Часть 3: Как восстановить заводские настройки MacBook Pro с помощью Дисковой утилиты
Если вам не удаётся восстановить заводские настройки на MacBook Pro из системных настроек или вы используете macOS Monterey или более раннюю версию, вам необходимо перевести ноутбук в режим восстановления и выполнить сброс с помощью Дисковой утилиты.
Примечание: Вам лучше убедиться, что вы Создала резервную копию MacBook в iCloud. или другое место для хранения заранее.
Шаг 1. Перейдите на сайт Apple меню и выберите Завершение работы Чтобы выключить ноутбук. Если экран не реагирует, нажмите и удерживайте кнопку. Power Нажимайте кнопку, пока она не почернеет.
Шаг 2. Удерживайте кнопку Power нажмите кнопку, чтобы включить ваш Mac, и сразу же нажмите ее. Command-R кнопку, пока не появится логотип Apple.
Советы: Если ваш MacBook Pro оснащен процессором Apple Silicon или чипом безопасности Apple T2, удерживайте кнопку... Power кнопка после включения ноутбука.
Шаг 3. При появлении запроса введите пароль администратора. Затем вам будут предложены два варианта:
Вариант 1:
Шаг 4. Выберите Дисковая утилита вариант после Утилиты macOS появится окно.

Шаг 5. Нажмите Продолжить чтобы продолжить.
Шаг 6. Теперь вы должны увидеть свой загрузочный диск. Если у вас есть диск с данными, выберите его и нажмите. Редактировать, выберите Удалить том APFSи ударил Удалить.
Шаг 7. Далее выберите загрузочный диск. По умолчанию это... Macintosh HD.
Шаг 8. Нажмите Стереть .
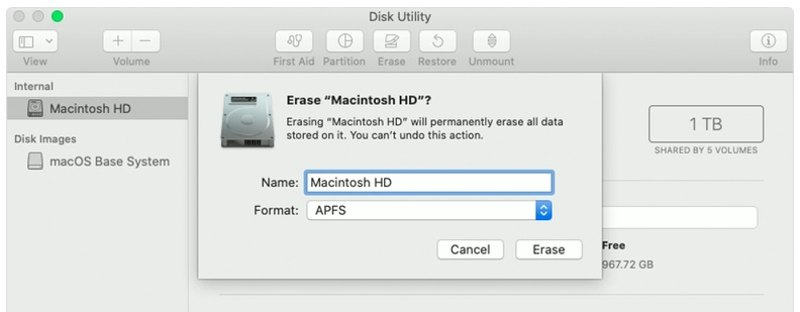
Шаг 9. Тип Macintosh HD В качестве имени выберите формат.
Шаг 10. Нажмите Стереть снова.
Шаг 11. При появлении запроса введите пароль от вашей учетной записи Apple ID или пароль администратора.
Шаг 12. Дождитесь завершения процесса восстановления заводских настроек MacBook Pro.
Шаг 13. Когда это закончится, вас отведут в... Утилиты macOS экран.
Шаг 14. Выберите Переустановить macOS и следуйте инструкциям на экране, чтобы настроить свой ноутбук.
Вариант 2:
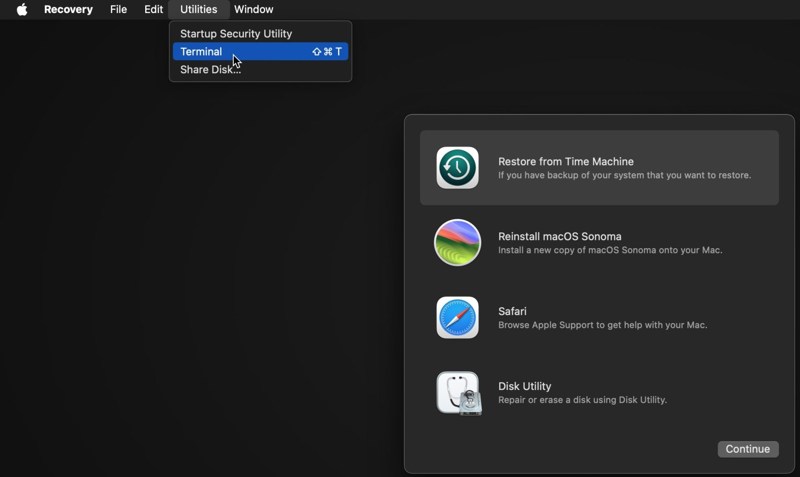
Шаг 4. Нажмите Утилиты меню и выберите Терминал.
Шаг 5. Тип Список дискаут и нажмите ВОЗВРАТ Нажмите клавишу на клавиатуре, чтобы определить загрузочный диск.
Шаг 6. Далее выполните команду:
diskutil eraseDisk APFS "Macintosh HD" disk0
Советы: Если ваш Mac оснащен жестким диском вместо SSD, выполните следующую команду: diskutil eraseDisk HFS+J "Macintosh HD" disk0.
diskutil eraseDisk HFS+J "Macintosh HD" disk0.
Шаг 7. Затем загрузите последнюю версию macOS с помощью приведенной ниже команды:
softwareupdate --fetch-full-installer --full-installer-version [number].
Шаг 8. вход sudo /Applications/Install macOS Sequoia.app/Contents/Resources/startosinstall --eraseinstall --newvolumename "Macintosh HD"и ударил ВОЗВРАТ переустановить macOS.
Шаг 9. После перезагрузки вашего MacBook Pro выполните его настройку.
Часть 4: Как восстановить данные после восстановления MacBook Pro
После восстановления MacBook Pro все ваши данные будут удалены. К счастью, Apeaksoft Восстановление данных Эта программа может помочь вам решить эту проблему. Она может просканировать ваш жесткий диск и восстановить потерянные данные, даже если резервная копия отсутствует.
Доступ к удаленным видео YouTube одним щелчком мыши
- Восстановите потерянные данные на MacBook Pro одним щелчком мыши.
- Подходит для различных ситуаций, таких как сброс к заводским настройкам, случайное удаление и многое другое.
- Поддержка широкого спектра типов данных.
- Предварительный просмотр потерянных файлов для выборочного восстановления.
- Совместимо с macOS 10.7 и выше.

Как восстановить данные на MacBook Pro после восстановления
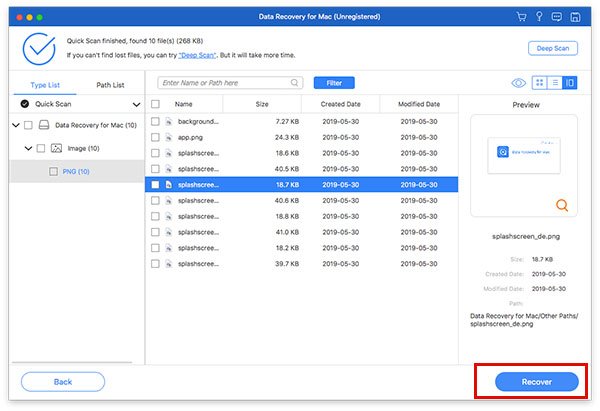
Шаг 1. Выберите типы данных
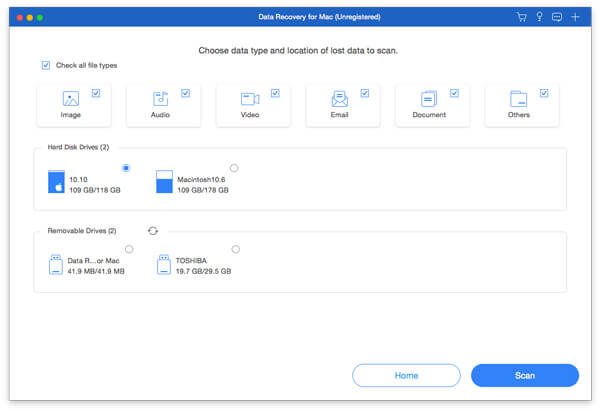
Запустите лучшую программу для восстановления данных на Mac после установки на ваш MacBook Pro. Выберите типы данных, которые вы хотите восстановить, например: Изображение, аудио, видеои многое другое. Затем выберите диск, на котором находятся потерянные файлы. Щелкните Сканировать Нажмите кнопку, чтобы начать сканирование Mac.
Шаг 2. Предварительный просмотр потерянных файлов
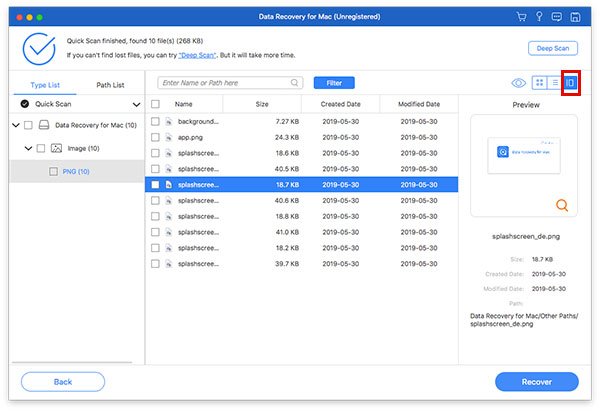
После завершения сканирования перейдите в Тип Список Вкладка позволяет просмотреть потерянные данные по типу. Также можно найти конкретное местоположение в Список путей вкладка. Если вы не можете найти нужные файлы, нажмите на кнопку. Глубокий анализ кнопка, чтобы выполнить глубокое сканирование.
Шаг 3. Восстановление файлов на MacBook Pro
Обязательно выберите все файлы и элементы, которые хотите восстановить, и нажмите кнопку. Recover кнопка. Укажите папку для сохранения и снова нажмите «Восстановить». Эта программа может даже восстановить удаленные сообщения на Mac.
Заключение
Теперь вы должны понять как восстановить MacBook Pro до заводских настроекДля более новых версий сброс к заводским настройкам можно выполнить в приложении «Системные настройки». Для более старых версий это можно сделать в режиме восстановления. Apeaksoft Восстановление данных Эта программа способна восстанавливать потерянные данные после сброса до заводских настроек на MacBook Pro. Для этого не требуется резервная копия.
Статьи по теме
Случайно удалили понравившиеся фотографии на Mac? Не волнуйтесь. Эта статья поможет вам восстановить удалённые фотографии на Mac.
Режим восстановления на Mac — это встроенный режим, предназначенный для восстановления Mac и устранения проблем с диском. Здесь вы узнаете, как войти в режим восстановления и использовать его на Mac.
Какая программа для восстановления данных на Mac лучшая? Представляем список из 10 лучших программ с обзорами, которые помогут вам выбрать лучшую для безопасного и быстрого восстановления данных на Mac.
В этой статье приведена подробная информация о том, что такое Internet Recovery на Mac, как войти в режим Mac Internet Recovery и как решить не работающие проблемы.
