How to Screen Mirror iPhone to Mac - Hassle Free
Feeling that the screen of your phone is too small and want to display the content on your phone on a larger screen for presentations, watching videos, or playing games? Can you mirror iPhone to Mac? Come and mirror iPhone to Mac ! Easily enjoy a larger visual experience.
PAGE CONTENT:
Part 1. How to Mirror iPhone Screen on Mac Using iPhone Mirroring on Mac
There is a built-in iPhone Mirroring feature on Mac on macOS Sequoia and iOS 18 or above. It provides great convenience for iPhone Mirroring to Mac and enables users to take control of the iPhone on Mac with ease. This deep integration not only improves efficiency but also brings much flexibility to life.
Preparations:
• Your Mac should run macOS Sequoia 15 or above.
• Your iPhone should run iOS 18 and above.
• Both your iPhone and Mac should log in to the same Apple ID. The two-factor authentication should be enabled.
• Keep Wi-Fi and Bluetooth on. Keep two devices next to each other.
• The iPhone is in a locked status.
Follow the steps below to grasp how to use iPhone Mirroring on Mac:
Step 1. Go to find the iPhone Mirroring app on your Mac at the dock.
Step 2. Enter your iPhone password on your Mac to confirm it's you to perform this operation.
Step 3. An iPhone window will appear on your Mac screen. Now, you can get iPhone mirroring on Mac and control your iPhone on your Mac freely.
Tips: To stop the mirroring process, you can just close the iPhone Mirroring app on your Mac or unlock your iPhone.
Part 2. How to Mirror iPhone to Mac via AirPlay on iPhone
For mirroring an iPhone to a Mac computer, Apple also provides an official method - AirPlay, which is a wireless streaming technology launched by Apple. This method is especially suitable when you want to watch photos, videos, PPTs, etc., on a large screen. This method has similar limitations and requirements as mentioned in Part 1:
• Your Mac needs to run macOS Monterey (version 12.0) or a later version.
• Your iPhone needs to run iOS 15 or a later version.
• You must sign in to the same Apple ID on both devices.
• Both devices should be connected to the same Wi-Fi network, and Bluetooth on both devices must be enabled.
If you meet all the requirements, you can follow the steps below to start mirroring an iPhone to a Mac:
Step 1. Open your iPhone and swipe down from the top-right corner to launch the control center.
Step 2. Click the Screen Mirroring option and choose the Mac device on the next window.

Step 3. There will be an AirPlay Passcode on your Mac. Enter it on your iPhone.

Step 4. After accepting the request, you will see your iPhone screen on the Mac.
Part 3. How to Use QuickTime Player to Screen Mirror iPhone to Mac
How to enable new iPhone mirroring on Mac Sequoia? You can ask QuickTime for help! QuickTime Player is a multimedia playback and recording software developed by Apple. Meanwhile, it is also a powerful built-in app on Mac. It provides an easy wired way to mirror your iPhone to the Mac. Also, you need to ensure that your Mac runs macOS X Yosemite or newer, and your iPhone runs iOS 8 or later.
Step 1. Launch QuickTime Player on your Mac.
Step 2. Connect your iPhone to your Mac using a Lightning cable.
Step 3. Click the File option in the top menu bar, and select New Movie Recording.
Step 4. Click the down-arrow next to the red button, and choose your iPhone as the source.
Step 5. Click the Recording (red) button

Tips: If you want to play the recording on Windows, you need to convert QuickTime videos to MP4.
More Tips. Universal Way to Mirror an iPhone to Windows
If you want to mirror an iPhone or Android to Windows, the best and the easiest way is to use a dedicated mirroring tool. After our comprehensive consideration, we recommend Apeaksoft Phone Mirror.
Reliable Tool for Mirroring Phones to Windows
- Mirror the iPhone screen on Windows seamlessly.
- Take control of your iPhone with the computer mouse.
- Mirror iPhone to Mac using WiFi/QR code/USB cable.
- Easy and intuitive instructions.
- Support the latest iPhone model and versions.
Secure Download

Step 1. Press the button above to download this tailored iPhone mirroring tool for free.
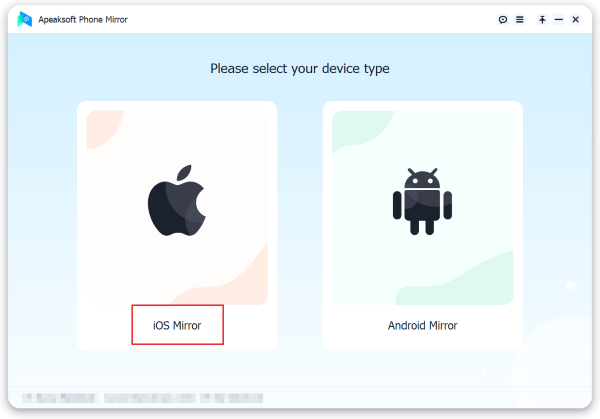
Step 2. Launch the software and select the iOS Mirror option.
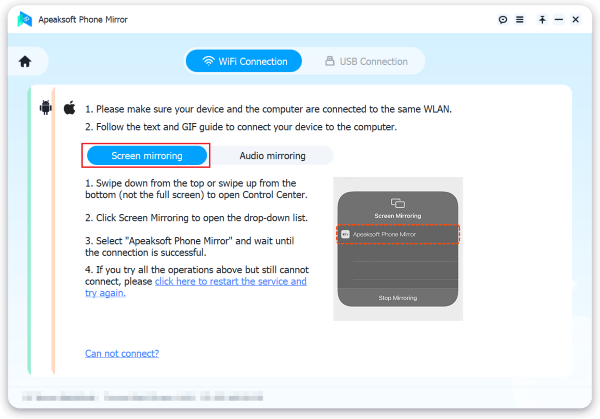
Step 3. Connect your iPhone to your computer. You can choose whether to build a Wi-Fi Connection or a USB Connection.
Tips: The Wi-Fi Connection requires you to ensure that both your iPhone and computer are connected to the same Wi-Fi.
Step 4. Click Screen mirroring on the program interface. Swipe down from the top right corner of your iPhone to open the Control Center. Tap on Screen Mirroring, and then choose Apeaksoft Phone Mirror.
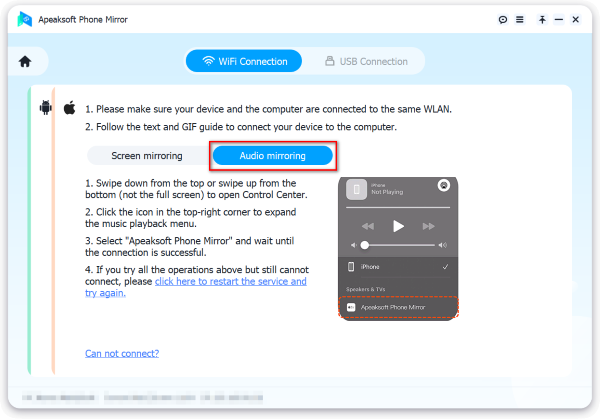
If you only want to play iPhone audio on your computer, you can choose the Audio mirroring option and follow the on-screen instructions to make it step by step.
Tips: If you cannot find the software name on your iPhone list, you can press click here to restart the service and try again for help.
Moreover, this software also enables you to mirror iPhone to Android.
Conclusion
Above all, we’ve introduced how to screen mirror iPhone to Mac in 3 proven and reliable ways. You can use the built-in iPhone Mirroring feature effectively, or you can make use of AirPlay. If your iPhone or Mac doesn’t meet the requirements, you can also use QuickTime to easily do iPhone mirroring on Mac. What’s more, we’ve also introduced a universal way to mirror iPhone to Windows for your reference. Go and free download it for a free trial if needed!
