Filters are a quick way to add a creative touch to your photos and make them more visually appealing. As an iPhone user, you can use its camera to easily get excellent image quality. Besides, one of the most exciting features of the iPhone camera is the ability to use filters. In this article, we’ll explore the inbuilt iPhone camera filters and how to add filters to your photos.

- Part 1. iPhone Camera Filters
- Part 2. How to Use Filters on iPhone
- Part 3. FAQs of iPhone Camera Filters
Part 1. What Are iPhone Camera Filters
Since the iOS 11 update in 2017, you could directly use filters on your iPhone camera. While there were initially only a few built-in filters, iPhones have gotten even more advanced in their photo editing systems.
Traditionally, a camera filter is a device you attach to the front of your camera’s lens to alter the light exposed to the sensor. It can change the way your camera sees the scene. The result is a change in your pictures’ mood, color, or style. Digital filters like the iPhone camera filters can customize the photos you are taking by applying effects and adjustments over the initial exposure.
The native iPhone Camera app has a small selection of standard color and exposure filters. It has nine filters to apply while taking a picture or during editing. New iPhone models like iPhone 17 also offer Photographic Styles.
Built-in filters for iPhone camera
Besides Standard, iPhone currently has nine filters in the Camera and Photos apps. You can handily apply these camera filters to your iPhone photos. This part will guide you to know the inbuilt iPhone camera filters.
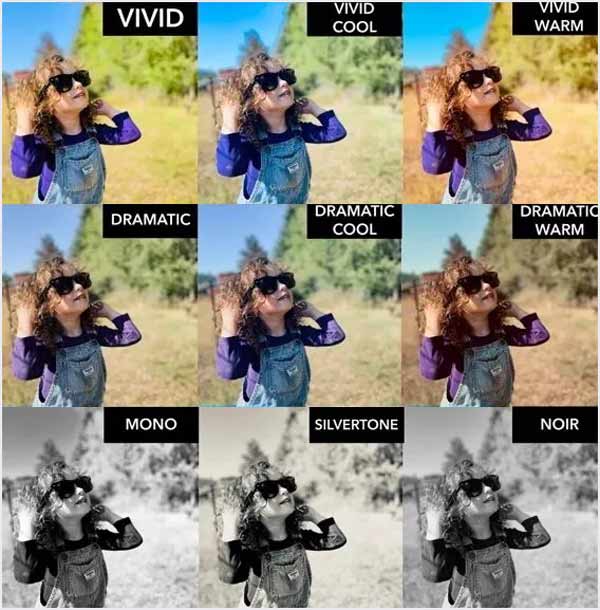
Vivid: This iPhone camera filter can increase the image contrast. You can apply it when you capture sunsets and other natural landscapes.
Vivid Warm: It can increase the contrast of your iPhone photos. You can use this vivid warm filter to add warm tones.
Vivid Cool: Similar to the Vivid Warm filter, it can increase the image contrast. But this camera filter will overlay cool tones.
Dramatic: This camera filter can crush blacks and dull highlights. You can apply it to capture high contrast and slightly less saturated pictures.
Dramatic Warm will add shadows to your iPhone photos and decrease the highlights. It applies the same settings as Dramatic but overlays a warmer color temperature.
Dramatic Cool will decrease the photo’s highlights and increase shadows. It applies cool tones to iPhone pictures.
Mono: This iPhone camera filter creates a black-and-white image, giving your photos a classic, timeless look.
Silvertone: It can increase the shadows of your iPhone photo, making it black and white.
Noir: It is a similar filter to Mono and makes your iPhone photo black and white. But it creates a more stylized black-and-white image.
Part 2. How to Use Filters on iPhone
Apple gives you a simple way to add filters to your iPhone photos using the Camera app. This part tells how to use filters on iPhone camera. Moreover, you can learn to add filters to your captured iPhone photos.
Access and use iPhone camera filters
Step 1Open the Camera app and tap the arrow icon at the top center of your iPhone screen. That will display some adjustment options above the capture button. Locate and tap the Filters button that looks like a 3-circle Venn diagram.
Step 2You can get ten options to take photos. Besides Standard, you are presented with nine camera filters. You can swipe from the left to the right and select your desired one.
Step 3When you switch to your preferred camera filter, you can start to capture photos on your iPhone with the filter applied.
Add filters to photos on iPhone
Step 1Open Photos and select the photo you want to edit. Tap the Edit button to find more options.
Step 2Tap the Filters icon on the bottom screen to view the built-in filters you can apply. When you switch among these filters, related effects will be added to your picture. You can choose a suitable filter and adjust the intensity of the effects using a slider.
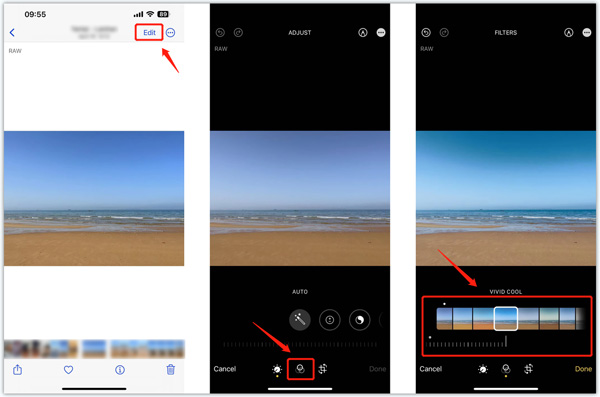
Step 3 After adding a filter to your photo, tap Done in the bottom-right corner to save your changes. This iPhone picture will be saved in Camera Roll automatically.
Add filters to iPhone videos
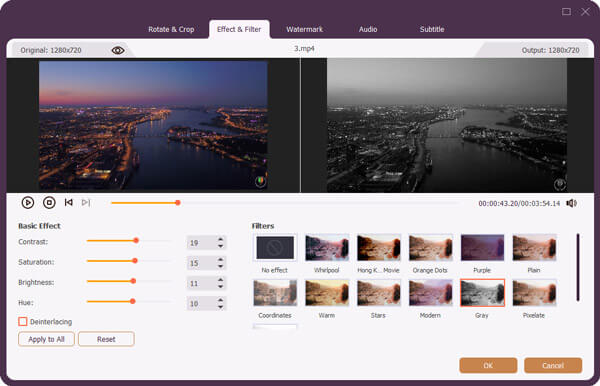
You can apply inbuilt filters to your iPhone videos using the above method. Besides, you can try the all-featured Apeaksoft Video Converter Ultimate to edit your videos and adjust their effects.
4,000,000+ Downloads
Offer over 40 filters to apply to your iPhone videos.
Customize contrast, saturation, brightness, hue, etc., to adjust video effects.
Offer various video editing, adjusting, and enhancement features.
Offer a Toolbox of Video Enhancer, Color Correction, 3D Maker, and more.
 Related to:
 Part 3. FAQs of iPhone Camera Filters
How to get face filters on iPhone camera?
iPhone does not offer specific beauty filters to make your selfies more beautiful. You should go to App Store and find some third-party apps to get face filters for your iPhone camera.
How to change the colors of iPhone photos?
Open the picture in the Photos app, tap Edit, then use offered options to change the image color. You can freely adjust exposure, brightness, highlights, shadows, saturation, warmth, and more.
Are there helpful tips for using iPhone camera filters?
You can easily add filters to iPhone photos. But you should not overdo it. After applying a filter, you should adjust the intensity according to your need. Also, try different filters and select the one that can convey a specific mood or atmosphere you need.
Conclusion
Photos and videos can be captured with a variety of filters. This post guides you to know iPhone camera filters. You can also learn to apply filters to your pictures. For more questions about iPhone filters, please message us in the comments.