"I just updated to Windows 11, but when I open my computer today, it says operating system not found, what can I do now?" It is true that Windows is still the dominant operating system.

In addition to errors, glitches and problems people might encounter while using Windows computer, the message operating system not found generate more fear, partly because visions of losing your entire media collection flash. Fortunately, your data is still there and you can fix it. All you need to do is to try the guides and suggestions one by one until you find the one works for you.
- Part 1: Operating System Not Found? Why?
- Part 2: Check If Hard Drive Is Detected by BIOS
- Part 3: Test the Hard Disk
- Part 4: Reset BIOS
- Part 5: Rebuild Master Boot Record
- Part 6: Set Correct Partition Active
- Part 7: Recover Lost Files from a Missing Operating System
Part 1: Operating System Not Found? Why?
Once you press the Power button on your computer, the BIOS searches a system on your hard disk and start it. If there is no operating system on your hard disk, the boot process will stop and display operating system not found. Of course, sometimes this message pops up due to a variety of reasons, such as:
- Your basic input/output system, BIOS, does not discover the hard disk drive as usual.
- The hard disk storing the operating system is damaged or corrupted.
- Some third party programs or disk operations make Windows Master Boot Record (MBR) broken.
- Boot files loading fails because of improper BIOS settings.
- The partition that stores Windows boot files is not active or you set a wrong partition active.
The good news is that the corresponding solution for each issue is easy to perform, even for non-tech savvy.
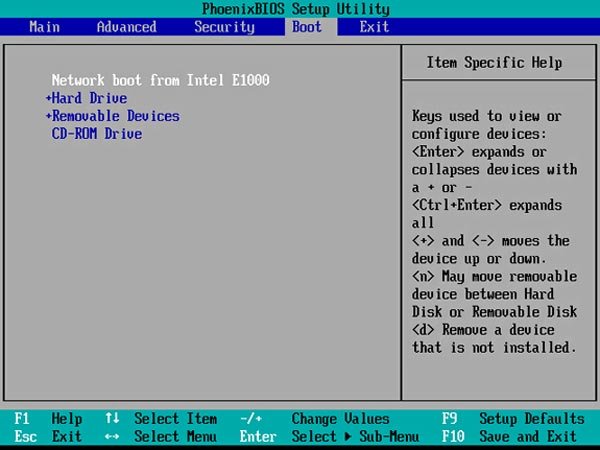
Part 2: Check If Hard Drive Is Detected by BIOS
There are two things you need to check in the BIOS, hard drive is detected by BIOS, and the hard drive contains Windows is listed as the boot drive.
Step 1. Reboot your computer and press the function key, which is usually F2, F12 or Del, to enter BIOS Setup. There is an onscreen message prompts the correct key.
Step 2. Select the "Boot" tab on the screen, highlight "Hard Drive" using Upward and Downward keys and press "Enter".
Step 3. Make sure Hard Drive is listed above other options.
Note: BIOS menu is the starting point to fix the problem that operating system not found. If the settings in your BIOS menu are fine and you encounter the error message, skip to part 5 to fix it. On the other hand, if hard drive is missing on BIOS menu, you should go try the solution in part 4 after testing your hard drive.
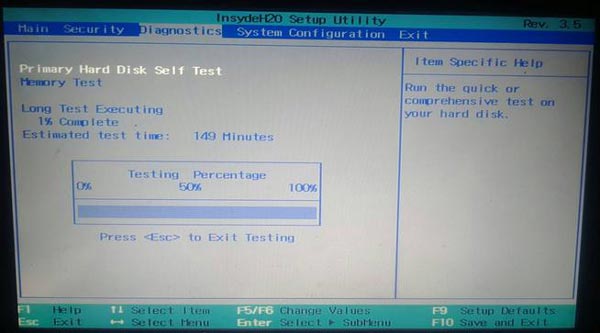
Part 3: Test the Hard Disk
If not sure, you can test and diagnose if the hard disk is fine. In most computers, the diagnosis tool has pre-installed in the BIOS system.
Step 1. Enter the BIOS menu and go to the "Diagnostics" tab.
Step 2. Perform the command "Primary Hard Disk Self Test". The diagnostic tool may be different on computers from various brands; you can get the information on manufacturer's website.
Step 3. Once the testing process is done, you can decide to replace the damaged disk or keep on troubleshooting according to the result.
Note: Generally speaking, there are damaged sectors on hard drives due to incorrect operations, virus or other factors. But it does not mean that the entire hard disk is dead. You can mark the damage sectors with third party programs and using your hard disk without problems. If you prepare to replace the damaged hard disk, you'd better back up data first.
Part 4: Reset BIOS
If your hard disk is fine and the operating system not found due to BIOS not recognizing your hard drive, you can try resetting the entire BIOS menu to default values, following the steps below.
Step 1. Reboot your computer and boot into the BIOS menu.
Step 2. Press "F9" to perform the command "Setup Defaults".
Tip: You can see the correct key related to Setup Defaults on the BIOS menu.
Step 3. When prompted and restart your device, press the "Load Optimal Defaults" option to confirm the operation.
In most cases, your computer should boot into the operating system correctly now.

Part 5: Rebuild Master Boot Record
Windows is booted depending on three records, Master Boot Record (MBR), DOS Boot Record (DBR), and the Boot Configuration Database (BCD). If any of them is damaged or corrupted, you will see operating system not found on your screen. Fortunately, it is simple to fix this problem by rebuilding Master Boot Record.
Step 1. Insert Windows Installation disk or Windows repair disk into your computer and reboot it.
Step 2. When Windows Setup screen appears, fill out the preference settings and click "Next". Then select "Repair your computer" to move on.
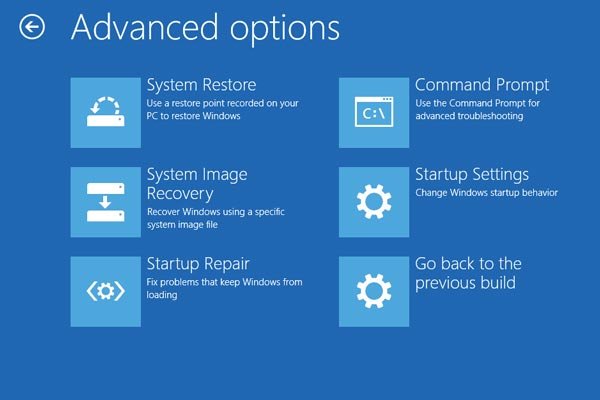
Step 3. Next, head to "Troubleshoot" > "Advanced Options" > "Command Prompt".
Step 4. Input the commands below and hit the Enter key after each of them:
bootrec.exe /fixmbr
bootrec.exe /fixboot
bootrec.exe /rebuildbcd
Step 5. Finally, reboot your PC and check if your operating system works now.
Note: On Windows 7 and earlier, the system recovery options window will pop up after click "Repair your computer", and then you can select Command Prompt to open it directly.
Part 6: Set Correct Partition Active
As said before, it is possible that the partition that contains Windows boot files is no longer active, and trigger the error message operating system not found. To set the correct partition active, you also need to open the Command Prompt using the Windows installation or repair disk.
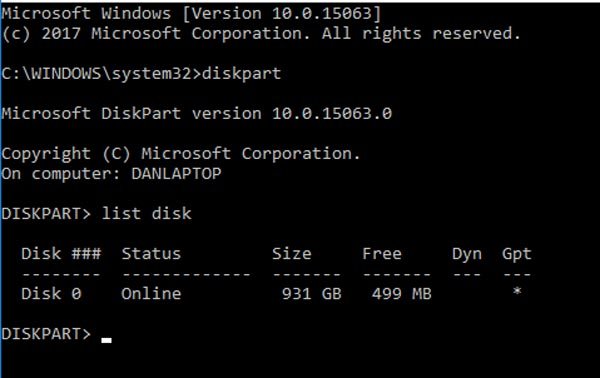
Step 1. Input "diskpart" and press "Enter" key, then type in "list disk" and hit "Enter". Now, you can see all disks in your PC. Write down the disk number contains Windows partition, usually the latest one.
Step 2. Type in "select disk [number]" and press "Enter" key.
Tip: Use your disk number to replace [number].
Step 3. This time, input list volume and hit "Enter" to display all the partitions on the hard disk. Remember the partition that Windows is installed on.
Step 4. Type in "select volume [number]", also replace [number] with the partition number.
Step 5. Finally, input "active" and hit Enter to correct the partition active.
Now, reboot your PC and boot into Windows normally.
Part 7: Recover Lost Files from a Missing Operating System
After trying all the methods above, you might not fix the “Operating System Not Found” error. Well, the data recovery software is needed in case important data get lost during the fixing process. Apeaksoft Data Recovery is such a powerful program to recover lost images, documents, emails, audio, video and more from USB flash drive, recycle bin, hard drive and memory card.
4,000,000+ Downloads
Recover lost photos, videos, audio, emails, documents from computer.
Recover from computer, hard drive, flash drive, memory card, digital camera.
Provide Deep Scan and Quick Scan modes for operating system not found error.
Compatible with Windows 11/10/8.1/8/7/Vista/XP, macOS 10.7 and above.
Step 1. Launch Data Recovery
Free download Data Recovery, install and launch it on your computer. Check the data type you want to recover and select the hard disk drive where you want to recover data from. Click “Scan” button to scan the lost data caused by the missing operating system.
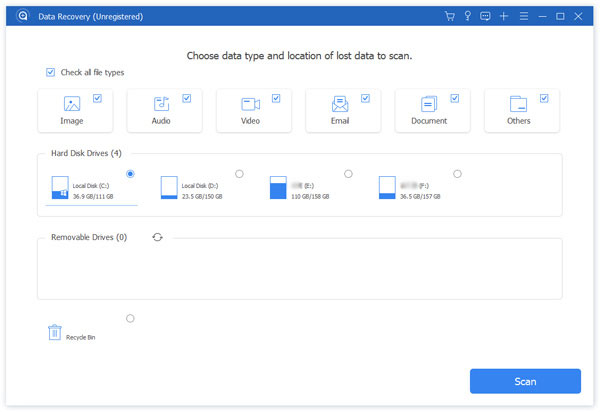
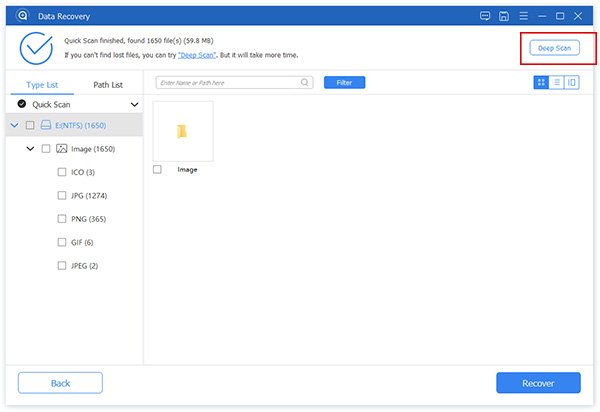
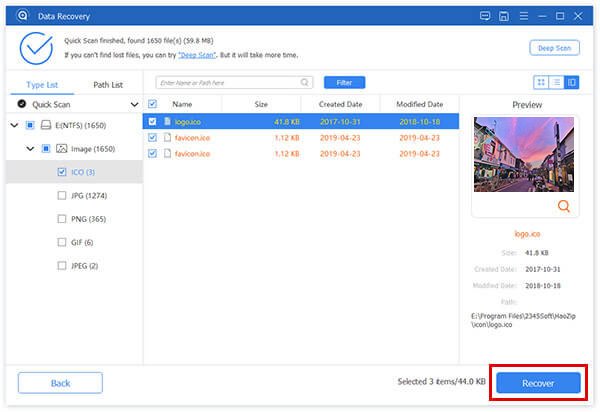
Step 2. Select and preview lost data
Wait for a while and the program will finish the scanning. All the scanned data will be presented. You can check the data type folder for further details. If you didn’t find the lost data you want, you can try “Deep Scan” mode at the top right of the interface.
Step 3. Recover lost files
Check the lost files you want to recover, and click “Recover” button to retrieve the files to your computer.
Conclusion
Much like other operating systems, we confront a variety of problems and issues on Windows. Among these issues, the error message operating system not found may be one of the most annoying ones. When it happens on your device, you can diagnose what cause this problem and fix it in a few minutes following the guides and suggestions above in our article.