Everything You Should Know about System Restore on PC
As a built-in feature on Windows, System Restore is useful. However, many people don’t understand this feature, such as what exactly System Restore does, whether there are any notable differences between Windows XP and Windows 11 System Restore, and more. This article will share a comprehensive guide about this feature and tell you how to perform it. Thus, you can fix and repair your Windows on your own.
PAGE CONTENT:
Part 1: What Does System Restore Do
According to Wikipedia, System Restore is a feature on Microsoft Windows. It allows users to revert their PCs’ state to a previous point in time, including system files, installed apps, and system settings. It can be used to recover from system malfunctions or other problems.
It was first introduced in Windows Me. On Windows 11/10, System Restore is turned off by default and must be manually turned on in order to function. Bear in mind that System Restore doesn’t affect personal files, like your documents, music, pictures, and videos stored on user disks.
When should you perform System Restore?
1. Your PC is infected with viruses or malware.
2. Your PC cannot start.
3. You cannot enter Windows.
4. Your Windows works abnormally.
Of course, System Restore is not a perfect technology. It is old and outmoded. Before Windows Vista, System Restore was restricted to select locations and file types. It could not fully revert unwanted software installations, especially software upgrades. Moreover, all restore points will be deleted after a specific time.
How long does System Restore take? The process usually completes within 30 minutes to 2 hours under normal circumstances.
Part 2: How to Perform System Restore on Windows
How to Enable System Restore on Windows 11/10
As mentioned previously, System Restore is disabled on Windows 11/10 by default. If you want to use this feature, you need to manually turn it on. For Windows 8 and earlier, skip creating a System Restore point directly.
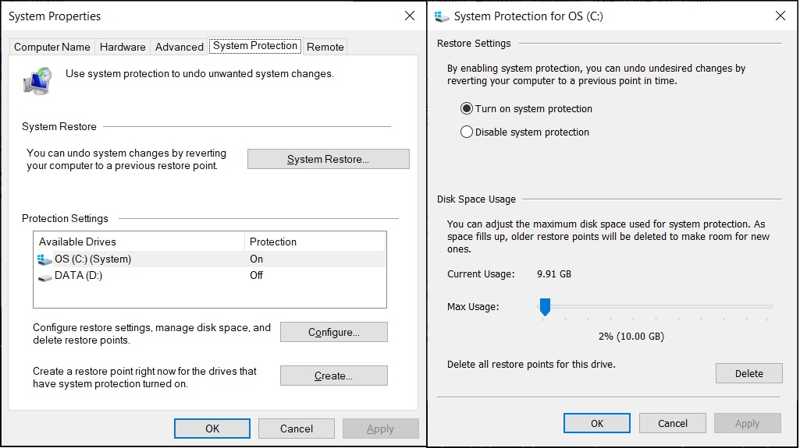
Step 1. Go to the Start menu.
Step 2. Search for Create a restore point, and open System Properties.
Step 3. Switch to the System Protection tab on the System Properties dialog.
Step 4. If the system drive is on under the Protection Settings section, System Restore is enabled. If not, click the Configure button.
Step 5. Select Turn on system protection, click Apply, and hit OK.
How to Create a System Restore Point
To perform a System Restore, you need to create a restore point. Plus, Windows creates restore points when installing software using an installer, installing new updates by Windows Update, or installing a driver.
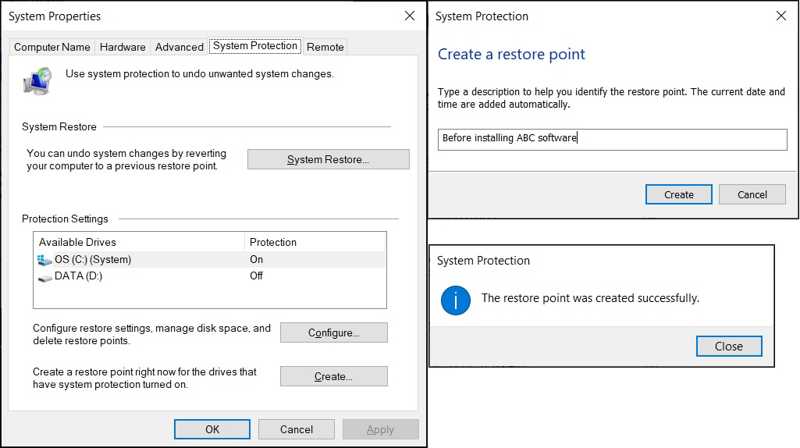
Step 1. Click the Start menu and open the System Properties dialog.
Step 2. Head to the System Protection tab and click the Create button.
Step 3. Enter a name for the restore point, and hit Create again.
Step 4. Click the Close button and hit OK.
How to Recover a PC Using System Restore
If your PC is still accessible, you can recover your machine using System Restore on the System Properties dialog directly. If your PC is inaccessible, use the method in the next part. Here are the steps below:
Step 1. Click the System Restore button on the System Properties dialog.
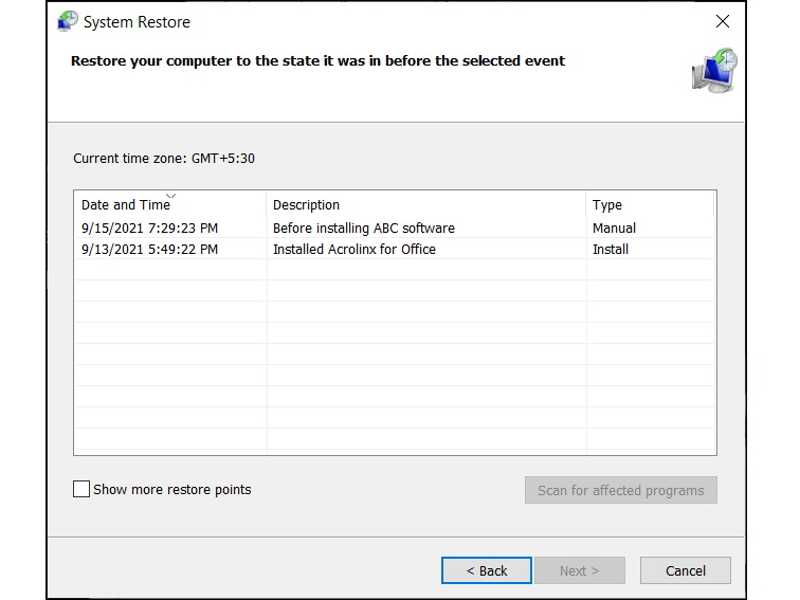
Step 2. Hit Next and select a restore point.
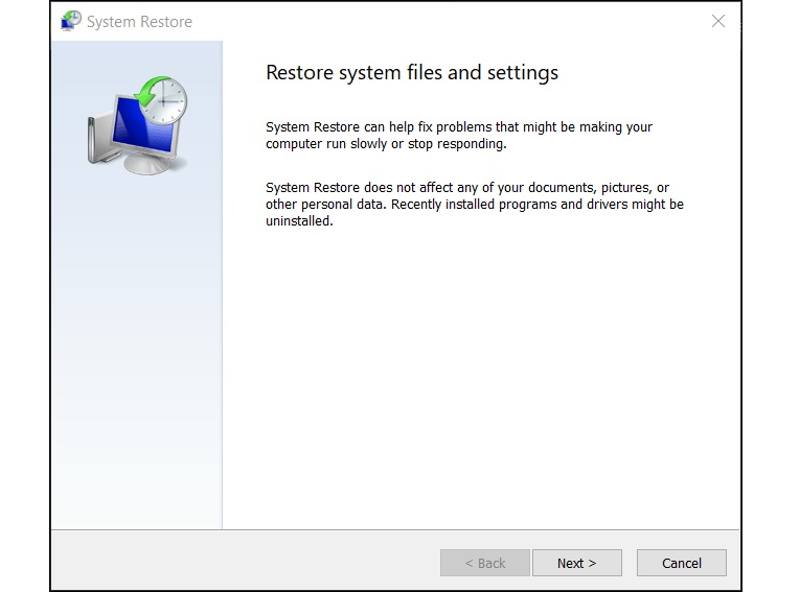
Tips: To check which apps or drivers will be removed, click Scan for affected programs.
Step 3. Click the Next button to start restoring the system.
Step 4. When it is done, click the Finish button.
Further Reading
How to Perform System Restore If Windows Cannot Start
If your Windows cannot start normally, you can also perform a system restore. The workflow is a little difference. You need to enter the boot menu screen and restore your system from a point.
Step 1. Turn off your PC, and power it back on.
Step 2. Repeatedly press the F11 key once your PC turns on until the loading screen appears.
Tips: The key may be different, depending on your PC brand.
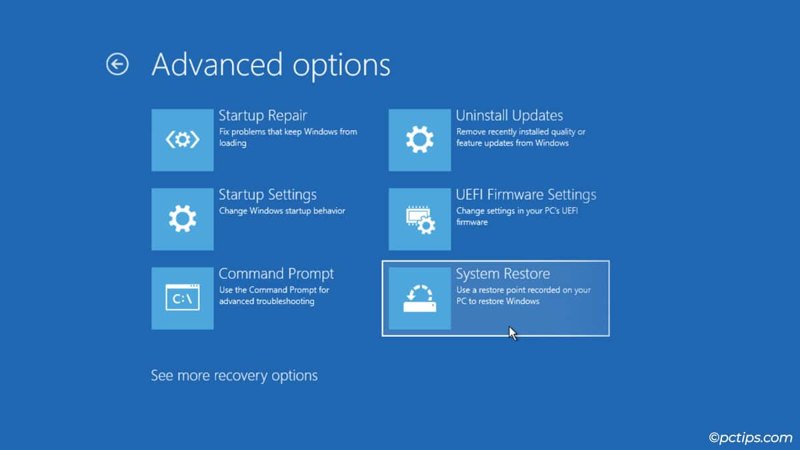
Step 3. Choose Advanced options, click Troubleshoot, and pick Advanced options.
Step 4. Click System Restore to open the System Restore dialog.
Step 5. Then, select a point, and restore your system.
Part 3: How to Recover Data After System Restore
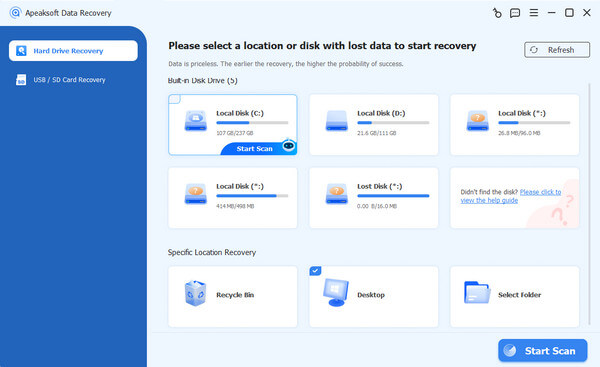
Does System Restore delete files? It won’t interrupt your files on other drives. If you save data in the startup drive, it will be removed when performing System Restore. Fortunately, Apeaksoft Data Recovery can help you resolve this problem. It can retrieve your lost files without a backup.
A Quick Way to Recover Data After System Restore
- Retrieve data after System Restore quickly.
- Preview lost files for selectively recovering.
- Support a wide range of file types.
- Work on Windows 11/10/8/7/XP/Vista.
- Protect your data quality during recovery.
Secure Download
Secure Download

How to Recover Data After System Restore
Step 1. Install data recovery software
Launch the data recovery software after you install it on your PC. Go to the Hard Drive Recovery tab on the sidebar and select where your lost files are stored. If you are ready, click on the Start Scan button to begin scanning lost files on your drive.
Step 2. Preview lost files
Once the quickly scanning finishes, the software will perform a deep scan automatically. When it is done, you can view the lost files by type or path. The Filter option allows you to quickly locate specific files.

Step 3. Recover files
Next, select the lost files you want to retrieve and click the Recover button at the bottom right corner. Set an output folder and confirm data recovery. You’d better set another location rather than the original destination. Then, you can navigate to the output folder and check the files.

Conclusion
This guide discussed what System Restore does, how it works, and how to perform it. You can follow our steps to turn on this feature on Windows 11/10 and create a restore point manually. Moreover, you can perform System Restore in various situations. Apeaksoft Data Recovery enables you to recover data after System Restore.
Related Articles
Apart from repairing your computer with a system recovery CD, you can also choose to create Windows 7 recovery USB.
Windows continuously reboots after system update? Don't worry! This article will guide you to fix the problem that Windows keeps restarting.
Forgot Windows Password? Want to recover and reset Windows password? You can get detailed steps from this Windows Password Key review.
Blue Screen of Death, also called BSOD, appears when your Windows system malfunctions. You can follow this post to fix this problem step by step.
