MacBook Pro'yu Fabrika Ayarlarına Hızlıca Nasıl Geri Yükleyebilirsiniz?
MacBook Pro'yu fabrika ayarlarına geri yükleme Bu, dizüstü bilgisayarınızı kutudan çıktığı haline getirmek anlamına gelir. Cihazınızda fabrika ayarlarına sıfırlama yapmanız gereken birkaç neden vardır. Örneğin, MacBook Pro'nuzu satmadan önce, bilgilerinizi korumak için fabrika ayarlarına sıfırlamanız ve tüm verileri silmeniz gerekir. Ayrıca, dizüstü bilgisayarınıza erişiminiz engellendiğinde, ekran donduğunda veya yanıt vermediğinde ve daha birçok durumda önemli bir sorun giderme adımıdır.
SAYFA İÇERİĞİ:
Bölüm 1: MacBook Pro'yu Geri Yüklemeye Başlamadan Önce
MacBook Pro'da fabrika ayarlarına geri döndürmek dizüstü bilgisayarınızdaki tüm verileri sileceği için, Time Machine kullanarak cihazınızın yedeğini almanız daha iyi olur. Ayrıca, cihazınızdaki hizmetlerden ve hesaplardan çıkış yapmanız gerekmektedir.
MacBook Pro'nuzu Time Machine ile yedekleyin.
1 Adım. Yedekleme depolama aygıtını dizüstü bilgisayarınıza takın.
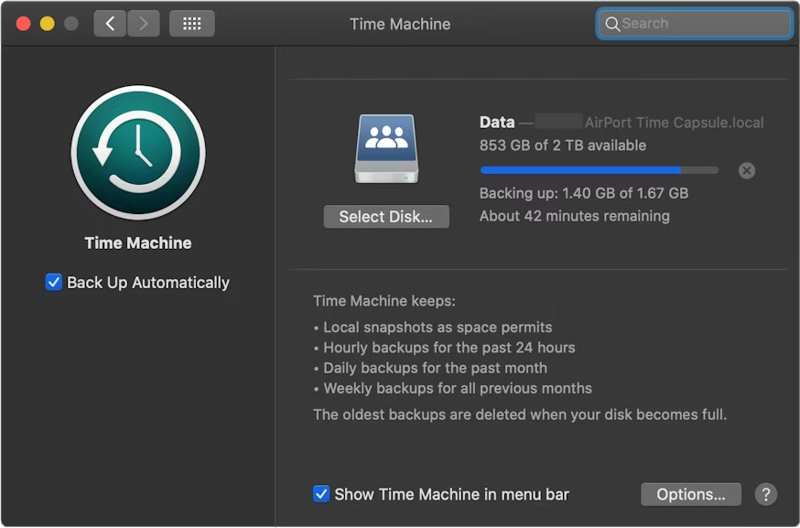
2 Adım. Tıkla Apple menü ve seçim Sistem Ayarları or sistem Tercihleri.
3 Adım. Tıkla Genel kenar çubuğundan seçin zaman Makinesi.
4 Adım. vurmak Yedekleme Diski Ekle veya Ekle düğmesine basın.
5 Adım. Ardından, yedekleme depolama aygıtınızı seçin ve tıklayın. Diski Kur.
6 Adım. Yedekleme depolama aygıtını kurmak için ekrandaki yönergeleri izleyin.
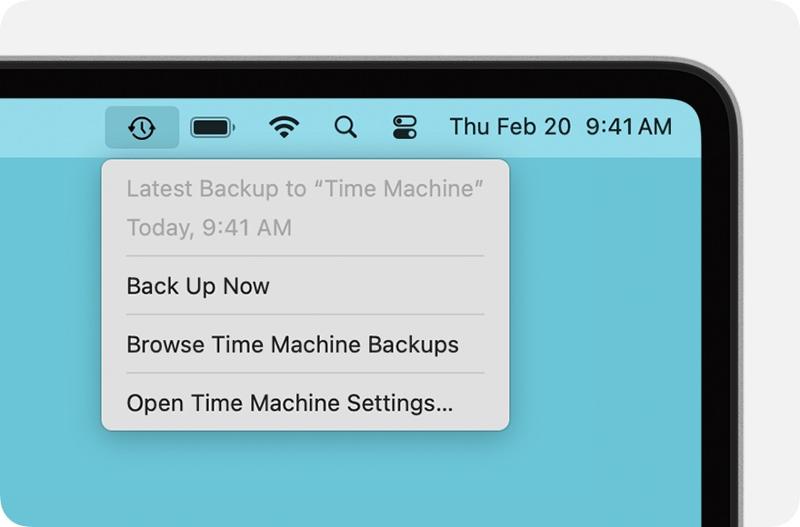
7 Adım. Kurulumdan sonra, zaman Makinesi Üst şeritte menü ve Şimdi yedekle MacBook Pro'nuzu fabrika ayarlarına sıfırlamadan önce yedeklemeniz gerekir.
Hesaplardan Çıkış Yap
MacBook Pro'nuzu fabrika ayarlarına tamamen geri yüklemek için, makinenize eklenmiş tüm hesaplardan çıkış yapmanız gerekir.
macOS Catalina veya sonraki sürümlerde, şunu seçin: Sistem Ayarları or sistem Tercihleri Cihazınızda Apple Menü. Kapatma düğmesini açın. Benim Mac bul. Daha sonra, Apple Hesabı'na gidin, aşağı kaydırın ve tıklayın. Oturumu Kapat.
macOS Mojave veya önceki sürümlerde, şunu seçin: sistem Tercihleri içinde Apple Menü. Click iCloud, ve vur Oturumu Kapat.
Ayrıca, iMessage, FaceTime ve diğer servislerden çıkış yapmanızda fayda var.
Bölüm 2: MacBook Pro'yu Ayarlardan Nasıl Geri Yükleyebilirsiniz?
Eğer cihazınız macOS Ventura veya daha yeni bir sürüme güncellendiyse, MacBook Pro'da fabrika ayarlarına geri dönmenin en kolay yolu Sistem Ayarları'ndaki yerleşik özelliği kullanmaktır. Bu yöntem, işlemi normal modda tamamlayabilir.
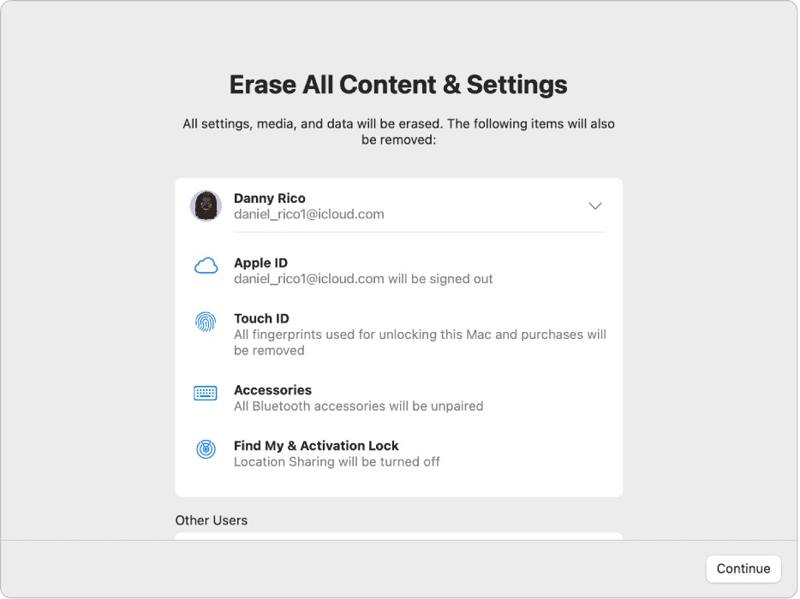
1 Adım. Tıkla Apple Herhangi bir ekrandaki menü.
2 Adım. MyCAD'de yazılım Güncelleme ye git Sistem Ayarları'nı seçin. GenelVe tıklama Aktar veya Sıfırla.
3 Adım. Tıkla Tüm İçeriği ve Ayarları Sil seçeneği.
4 Adım. İstenirse, Apple ID parolanızı veya yönetici parolanızı girin.
5 Adım. Uyarıyı okuyun ve tıklayın Devam et MacBook Pro'nuzu geri yüklemeye başlamak için.
Bölüm 3: Disk Yardımcı Programı ile MacBook Pro'yu Fabrika Ayarlarına Nasıl Geri Yükleyebilirsiniz?
MacBook Pro'nuzda Sistem Ayarları'ndan fabrika ayarlarına geri döndüremiyorsanız veya macOS Monterey veya daha eski bir sürüm kullanıyorsanız, dizüstü bilgisayarınızı Kurtarma Modu'na almanız ve Disk Yardımcı Programı'nı kullanarak sıfırlamanız gerekir.
Not: Şunlara sahip olduğunuzdan emin olsanız iyi olur. MacBook'un yedeğini iCloud'a aldım. veya önceden başka bir şekilde depolanabilir.
1 Adım. Git Apple menü ve seçim kapatmak Dizüstü bilgisayarınızı kapatmak için. Ekranınız yanıt vermiyorsa, uzun süre basılı tutun. Power Siyahlaşana kadar düğmeye basın.
2 Adım. Tutun Power Mac'inizi açmak için düğmeye basın ve hemen ardından Komut-R Apple logosu görünene kadar tuşuna basın.
İpuçları: MacBook Pro'nuzda Apple Silicon veya Apple T2 Güvenlik Çipi varsa, aşağıdaki cihazı basılı tutun. Power Dizüstü bilgisayarınız açıldıktan sonra düğmeye basın.
3 Adım. İstenildiğinde yönetici parolanızı girin. Ardından iki seçenekle karşılaşacaksınız:
Seçenek 1:
4 Adım. seçmek Disk Utility seçenek bir kez macOS Yardımcı Programlar pencere açılır.

5 Adım. Tıkla Devam et Devam etmek için
6 Adım. Şimdi başlangıç diskinizi görmelisiniz. Veri diskiniz varsa, onu seçin ve tıklayın. Düzenle, seçmek APFS Birimini Sil, ve vur Sil.
7 Adım. Ardından, başlangıç diskinizi seçin. Varsayılan olarak, bu disktir. Macintosh HD.
8 Adım. Tıkla silmek düğmesine basın.
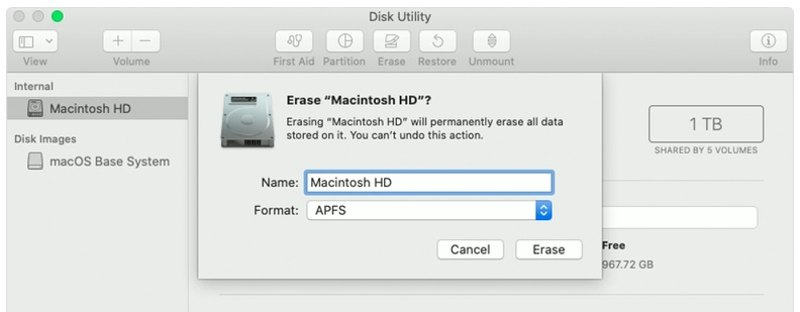
9 Adım. Menşei Macintosh HD Ad olarak bir isim seçin ve bir format belirleyin.
10 Adım. Tıkla silmek düğmesini yeniden tıklayın.
11 Adım. İstenirse, Apple ID parolanızı veya yönetici parolanızı girin.
12 Adım. MacBook Pro'nun fabrika ayarlarına geri yüklenmesinin tamamlanmasını bekleyin.
13 Adım. İşlem tamamlandığında, sizi şuraya götüreceğiz: macOS Yardımcı Programlar ekran.
14 Adım. Klinik MacOS'u tekrar yükle Ekranda beliren yönergeleri izleyerek dizüstü bilgisayarınızın kurulumunu gerçekleştirin.
Seçenek 2:
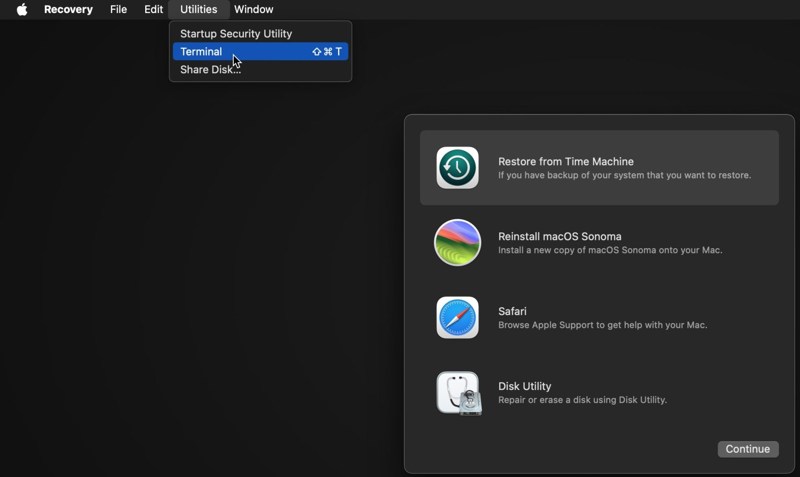
4 Adım. Tıkla kamu hizmetleri menü ve seçim terminal.
5 Adım. Menşei diskutil listesi basın ve Dönüş Başlangıç diskini tanımlamak için klavyenizdeki tuşa basın.
6 Adım. Ardından şu komutu uygulayın:
diskutil eraseDisk APFS "Macintosh HD" disk0
İpuçları: Mac'inizde SSD yerine sabit disk varsa, şu komutu uygulayın: diskutil eraseDisk HFS+J "Macintosh HD" disk0.
diskutil eraseDisk HFS+J "Macintosh HD" disk0.
7 Adım. Ardından, aşağıdaki komutu kullanarak en son macOS sürümünü indirin:
yazılımgüncellemesi --tam-yükleyiciyi-al --tam-yükleyici-sürüm [sayı].
8 Adım. Giriş sudo /Applications/Install macOS Sequoia.app/Contents/Resources/startosinstall --eraseinstall --newvolumename "Macintosh HD", ve vur Dönüş MacOS'u yeniden yüklemek için
9 Adım. MacBook Pro'nuz yeniden başlatıldığında, kurulumunu yapın.
Bölüm 4: MacBook Pro'yu Geri Yükledikten Sonra Verileri Kurtarma Yöntemi
MacBook Pro'yu geri yükledikten sonra tüm verileriniz silinecektir. Neyse ki, Apeaksoft Veri Kurtarma Bu sorunu çözmenize yardımcı olabilir. Sabit diskinizi tarayabilir ve yedekleme olmadan kayıp verileri kurtarabilir.
Silinen YouTube Videolarına Tek Tıkla Erişim
- MacBook Pro'nuzdaki kayıp verileri tek tıklamayla kurtarın.
- Fabrika ayarlarına sıfırlama, yanlışlıkla silme ve benzeri çeşitli durumlar için kullanılabilir.
- Çok çeşitli veri türlerini destekleyin.
- Seçici kurtarma için kayıp dosyaları önizleyin.
- macOS 10.7 ve üzeri sürümlerle uyumludur.
Güvenli indirme
Güvenli indirme

MacBook Pro'da Veri Geri Yükleme Sonrası Veri Kurtarma Yöntemi
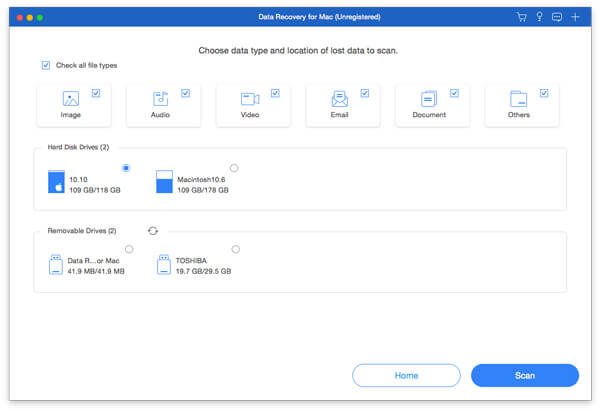
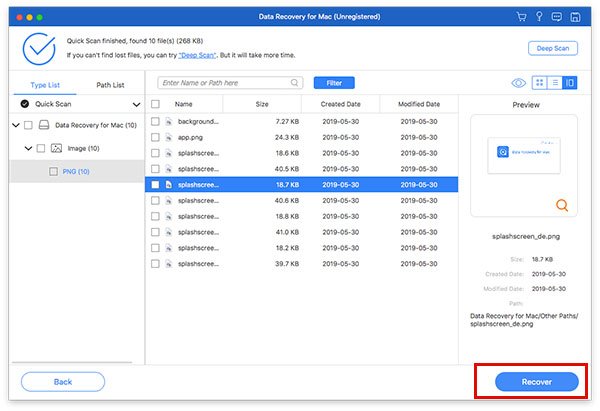
1 Adım. Veri türlerini seçin
MacBook Pro'nuzda en iyi veri kurtarma programını kurduktan sonra başlatın. Kurtarmak istediğiniz veri türlerini seçin, örneğin... Görüntü, Ses, Videove daha fazlası. Ardından, kayıp dosyaların bulunduğu diski seçin. Tıklayın. taramak Mac'i taramaya başlamak için düğmeye tıklayın.
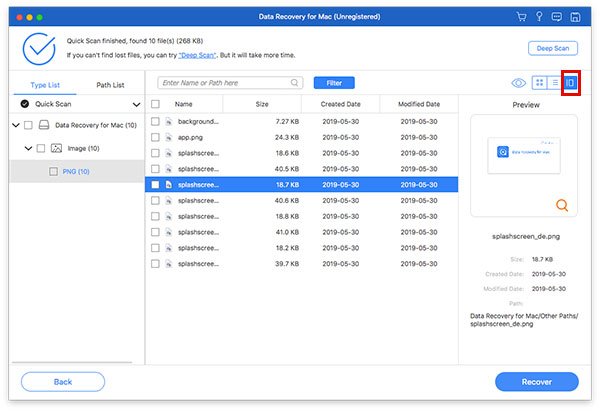
2 Adım. Kayıp dosyaları önizleme
Tarama işlemi tamamlandığında, şuraya gidin: Tip Listesi Sekmede kayıp verileri türüne göre önizleyebilirsiniz. Ayrıca belirli bir konumu da bulabilirsiniz. Yol Listesi Sekme. İstediğiniz dosyaları bulamıyorsanız, tıklayın. Derin tarama düğmesine basın.
3 Adım. MacBook Pro'da dosyaları kurtarma
Geri almak istediğiniz tüm dosyaları ve öğeleri seçtiğinizden emin olun ve ardından tıklayın. Kurtarmak Düğmeye basın. Bir çıktı klasörü belirleyin ve tekrar Kurtar'a basın. Bu program hatta... Mac'te silinen mesajları kurtarma.
Sonuç
Şimdi, anlamalısın MacBook Pro'yu fabrika ayarlarına geri yüklemeDaha yeni sürümler için, Sistem Ayarları uygulamasından fabrika ayarlarına sıfırlama işlemi gerçekleştirebilirsiniz. Daha eski sürümler için ise Kurtarma Modu'ndan bu işlemi yapabilirsiniz. Apeaksoft Veri Kurtarma MacBook Pro'da fabrika ayarlarına sıfırlama sonrasında kaybolan verileri geri yükleyebilir. Yedekleme gerektirmez.
İlgili Makaleler
Mac'inizde beğendiğiniz fotoğrafları yanlışlıkla mı sildiniz? Endişelenmeyin. Bu makale, Mac'inizde silinen fotoğrafları kurtarmanıza yardımcı olacak.
Mac'te Kurtarma Modu, Mac'i kurtarmak ve disk sorununu onarmak için tasarlanmış yerleşik bir moddur. Burada Mac'te Kurtarma Moduna nasıl girileceğini ve kullanılacağını öğreneceksiniz.
Mac için en iyi veri kurtarma yazılımı hangisi? İşte Mac'inizde verileri güvenli ve hızlı bir şekilde kurtarmanıza yardımcı olacak en iyi yazılımı bulmanıza yardımcı olacak incelemelerle birlikte en iyi 10 yazılım listesi.
Bu makalede, Mac'te Internet Recovery'nin ne olduğu, Mac Internet Recovery moduna nasıl girileceği ve çalışmayan sorunları gidermek için çözümler hakkında ayrıntılı bilgiler verilmektedir.
