To get favorite music from CDs to iPhone, you need to rip it to iTunes library first. Many people prefer to listen to music on iPhone.However, it is difficult to download music to iPhone for free. Apple Music need to subscribe and songs in iTunes Store are expensive as well.

Copying music from CDs is a good idea to get music to iPhone. Generally speaking, this process includes two parts. Firstly, you need to rip music from CD to iTunes. And then transfer music to iPhone. Feel complicated? Don't worry! We are going to show you how to import CD to iPhone and iPod in detail below.
Part 1: How to rip CD with iTunes
As it said before, the first part to put CD to iPhone is to rip music from discs. There are many methods to rip CD music, such as Windows Media Player. Considering WMP is not available to Mac and iTunes is one of the best ways to sync music to iPhone, we suggest you to rip CD with iTunes on Windows or Mac.
Another thing you have to consider is the output format. The iOS devices support two music formats, AAC and MP3. It is widely believed that AAC is the preferred music format of iTunes. According to our lab testing, AAC version is clearer and brighter than MP3 at 128Kbps. As 256Kbps and 192Kbps, they are the same in quality, but MP3 is smaller. You can make a decision based on your situations.
How to rip a CD with iTunes
Step 1. First of all, insert the music CD into your disk driver and then open the latest version of iTunes. After iTunes recognize the CD, the disc button will appears on top ribbon.
Step 2. Click the "disc" button; then you will be asked would you like import the CD into your iTunes library. If you would like to rip entire CD, choose "Yes" and skip to step 4 directly; otherwise select "No" and move on.
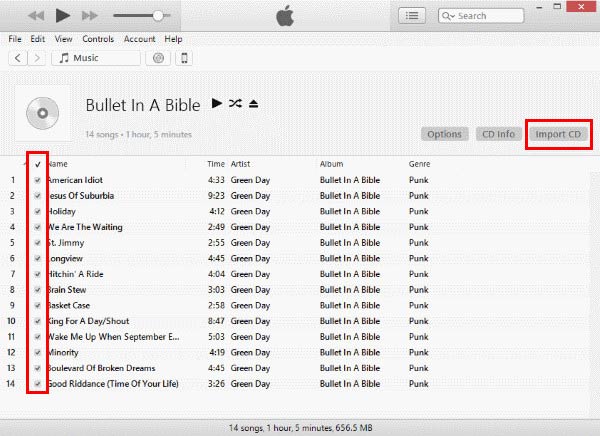
Step 3. Select the music CD and display all songs on it within iTunes. Uncheck the boxes in front of undesired songs, and then click Import CD at upper right corner of the window.
Step 4. When the Import settings dialog pops up, select "AAC Encoder" or "MP3" from the drop-down menu and click "OK" to confirm it and start ripping music from the audio CD to your iTunes library.
Apple introduced serious copy right regulations into iTunes and other services. If the music CD is protected, iTunes cannot rip it. You have to remove the encryption with third-party tools and save the AAC files. Then convert iTunes AAC music to MP3, so that other devices can play it smoothly.
Part 2: How to transfer CD to iPhone
After ripping CD to your computer, the next step is to transfer CD to iPhone. Similarly, there is more than one way to do it. Here we share two best ways on how to put CD on iPhone/iPod.
Method 1: Transfer CD to iPhone with iPhone Transfer
If you do not like to transfer CD to iPhone with iTunes, Apeaksoft iPhone Transfer is a better alternative. Its benefits include:
- Import multiple songs to iPhone in one click.
- Preview and manage multimedia files on iPhone before putting CD to iPhone.
- Back up existing iPhone music to computer simply.
- No interrupt current iPhone songs during transfer.
- Support both AAC and MP3 files, and keep the original quality when transfer CD to iPhone.
- Compatible with iPhone iPhone 17/16/15/14/13/12/11 and iPod touch.
- Available to Windows 11/10/8/8.1/7/XP and macOS.
In a word, it is one of the best options to transfer music to iPhone without iTunes.
How to transfer CD to iPhone with iPhone Transfer
To help you understand how-to, we use an iPhone 7 as the example.
Step 1. Install the best CD to iPhone transfer to computer
There are two versions of iPhone Transfer, one for Windows PCs and the other for Mac.
Download and install the right version to your computer based on the operating system. Then use the Lightning cable to connect your iPhone 7 and your computer. Open iPhone Transfer to let it recognize your device.

Step 2. Preview existing music on iPhone
Click the "Media" option on left sidebar to display all multimedia files on iPhone. To preview songs, go to the "Music" tab from top of the window. If there is no enough space for CD music, you can select unwanted songs and click the "Delete" button to remove them from iPhone 7.
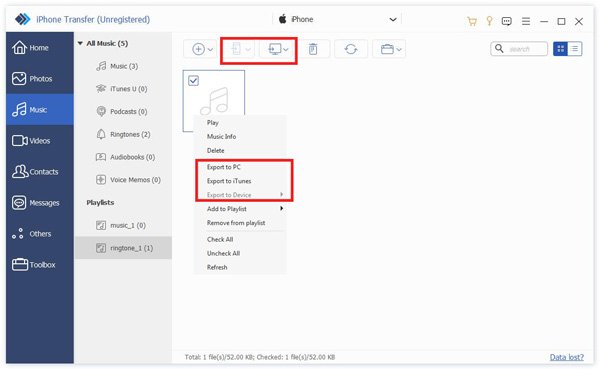
Step 3. Import CD to iPhone in one click
Next, click the "Add" button on top ribbon and navigate to the destination stored music. Select all desired songs and click "Open" to complete it. A few seconds later, disconnect your iPhone 7 from the computer. Now, you can enjoy your favorite music on iPhone at any time.
Method 2: Transfer CD to iPhone with iTunes
Of course, iTunes is another good option on how to put CD on iPod/iPhone. The benefit is that you do not need to use third party applications.
Step 1. Also connect your iPod/iPhone to your computer using the USB cable and run iTunes app. Wait for iTunes to recognize your device, and then click the "device" button at top left corner.
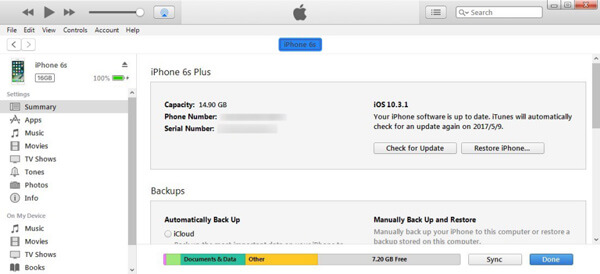
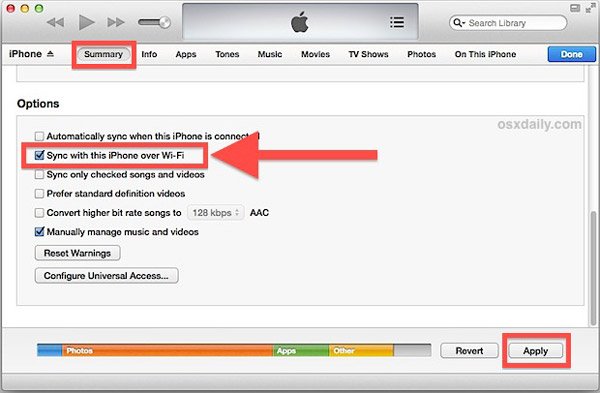
Tip: If you have set up the feature "Sync with this iPhone over Wi-Fi" in iTunes, connect iPod/iPhone and your computer to the same Wi-Fi network and transfer CD to iPhone wirelessly.
Step 2. Go to the "Music" tab under "Summary" from left hand column. Check the "Sync Music" box and select the option titled "Selected playlists, artists, albums, and genres".
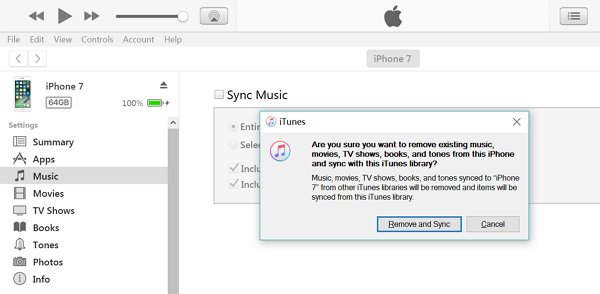
Step 3. Then select the album that contains the music ripped from the audio CD. Then click the "Sync" button at bottom to download CD to iPod/iPhone.
This way will cover the existing songs on your iPod/iPhone. In other word, there are only CD songs on your iPhone when it is done.
Conclusion:
In this tutorial, we have shared how to transfer music from CD to iPhone/iPod. To help you understand the process, we divided it into two parts, rip music from CD to iTunes library and transfer music to iPhone.
Now, you should understand the procedure to enjoy favorite songs without purchasing them from iTunes Store and subscribing Apple Music. In order to avoid damaging existing music on iPhone, we suggest you to transfer CD to iPhone with Apeaksoft iPhone Transfer. If you have more questions about put CD on iPod/iPhone, please leave a message below.

