How to Effectively Sync Messages from iPhone to iPad
This guide will explain how to sync messages from iPhone to iPad. Sharing messages between iOS devices is a significant skill for multi-device users. With the right setup, any messages that you send and receive on one iOS device will automatically appear on the other, and vice versa. That makes seamless communication across iOS devices possible. So that you won’t miss any information, messages, and attachments when switching between iPhone and iPad.
PAGE CONTENT:
Part 1: How to Sync iPhone Text Message to iPad
Text messages are sent and received through your network provider. However, you can sync iPhone messages to an iPad via an internet connection. Here are the steps to set up for text message syncing.
Step 1. Make sure to sign in to the same Apple ID on both iOS devices. If not, go to the Settings app, tap on your profile, press Sign Out, and hit Sign Out again. Next, tap Sign in to your iPhone, and enter the matched Apple ID and password.

Step 2. Next, go back to the Settings screen, choose the Messages option, and tap Text Messages Forwarding.
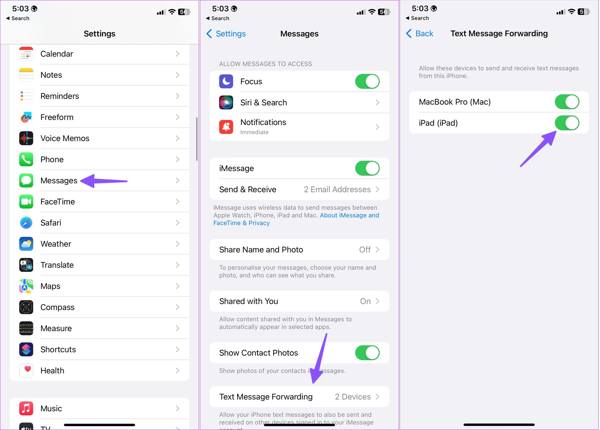
Step 3. Toggle on the switch next to your iPad. Once your iPhone and iPad are online, iPhone and iPad messages will begin syncing.
Part 2: How to Sync iMessage from iPhone to iPad
Unlike text messages, iMessage is a free messaging service released by Apple for customers. You can send and receive iMessage to other iOS devices on your iPhone or iPad. Moreover, you can sync iMessage from iPhone to iPad too, which can be a way to back up iMessages.
Step 1. Make sure two devices sign in to the same Apple ID and password.
Step 2. Go to the Settings app, tap on your profile, and choose iCloud on your iPhone.
Step 3. Pick Messages on the list. If you cannot find it, tap Show All to display the entire app list.
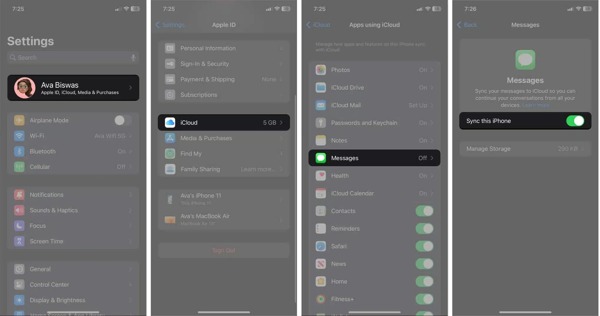
Step 4. Toggle on the switch of Sync this iPhone, and wait for iMessages to sync to iCloud.
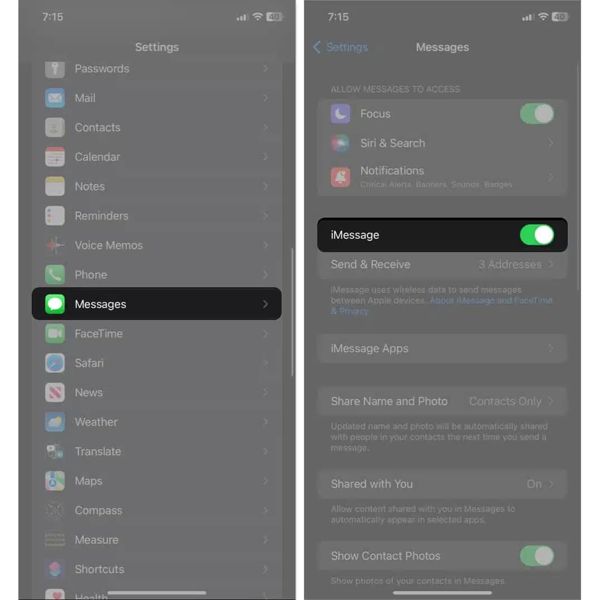
Step 5. Go back to the Settings app, choose Messages, and toggle on the iMessage option.
Step 6. Turn to your iPad, and repeat the steps above to sync iPad and iPhone iMessages.
Tips: If there is something wrong with your internet or the device storage is not enough, you may encounter iMessage syncing paused.
Part 3: How to Fix iPhone Message Not Syncing to iPad
If you have set up message syncing but iPad and iPhone not syncing text messages, you should double-check whether you are using the same Apple ID on both iOS devices. Then perform the solutions below to fix it.
Solution 1: Reset Network Settings
The main reason why your iPad and iPhone are not syncing text messages is the internet connection. Resetting the network settings on both iOS devices can help you fix this problem efficiently.
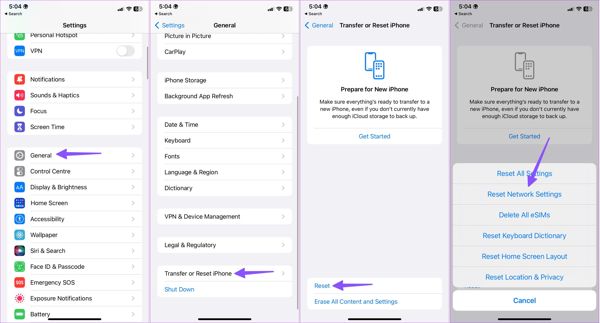
Step 1. Open the Settings app, choose the General tab, and tap Transfer or Reset iPhone.
Step 2. Press Reset, and choose Reset Network Settings.
Step 3. When prompted, confirm it.
Step 4. Repeat the steps above on the other iOS device. Then connect your devices to a Wi-Fi network, and wait for the messages to sync.
Solution 2: Check Your Phone Number
If iMessages are not syncing on iPad, you need to check your phone numbers and email address too. Although iMessage is not the same as SMS, it relies on your phone numbers and email addresses. You need to match them on the two iOS devices.
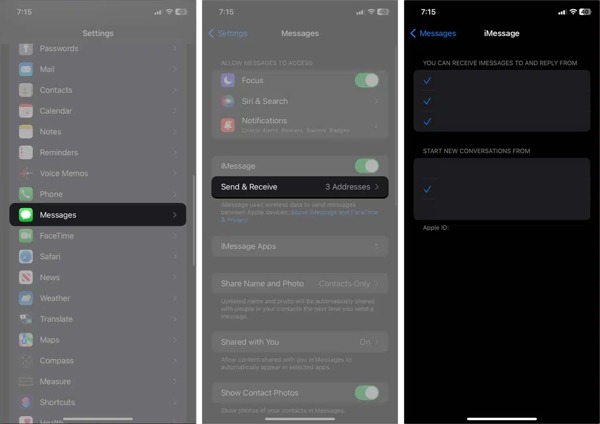
Step 1. Run your Settings app on one device.
Step 2. Choose Messages, and tap Send & Receive.
Step 3. Select the available phone numbers and email addresses under the YOU CAN RECEIVE IMESSAGES TO AND REPLY FROM section. Then select the main phone number or email address under START NEW CONVERSATIONS FROM.
Step 4. Turn to the other iOS device, and select the phone numbers and email addresses accordingly.
Solution 3: Check Apple Server Status
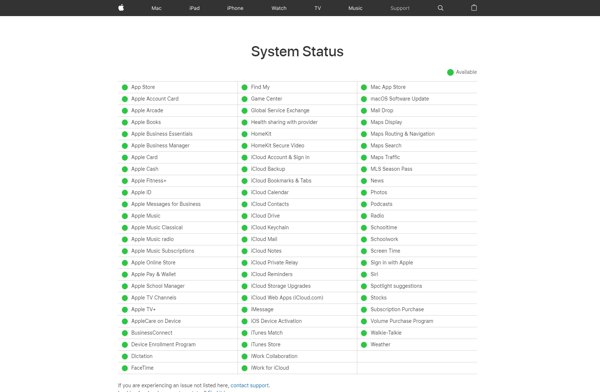
The crashed Apple servers may be responsible for iPad messages not syncing. You can access www.apple.com/support/systemstatus/in your browser, and check the status. If the servers of iMessage or iCloud are down, you need to wait for them to work again.
Bonus Tip: Best Way to Sync iPhone Messages to PC
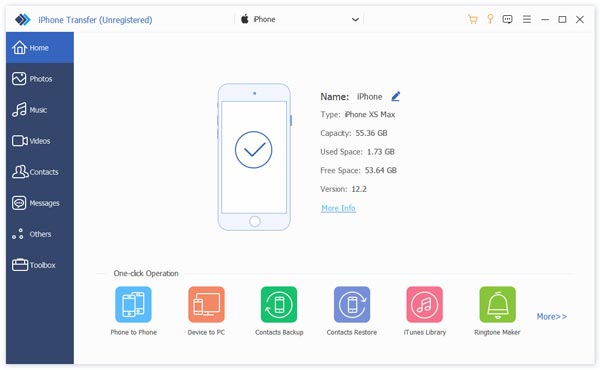
If you want to sync your iPhone or iPad messages to your PC, Apeaksoft iPhone Transfer is the best option. It enables you to preview your iPhone messages and transfer all or specific chats to your hard drive.
- Transfer iPhone messages to a computer easily.
- Sync all or specific messages on iPhone to PC.
- Support video, audio, and image attachments.
- Compatible with the latest versions of iPhone.
Secure Download
Secure Download

Here are the steps to Sync iPhone Messages to a PC:
Step 1. Launch the best message syncing software after installing it on your computer. The software is available on Windows 11/10/8/7/XP/Vista and Mac OS X 10.7 or above. Connect your iPhone to the computer with a Lightning cable.
Step 2. Go to the Messages tab once your iPhone is detected. Then choose a contact, and preview the relevant chats, messages, and attachments.
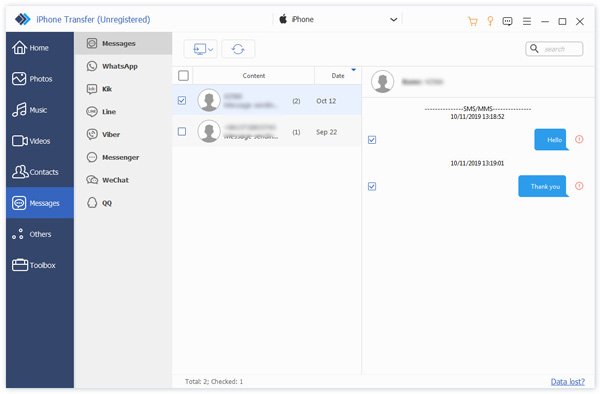
Tips: If you want to sync iMessage or text messages on your iPhone, go to the Messages folder. To sync WhatsApp messages or other apps, select the corresponding folder. You can also transfer photos from iPhone to PC using this software.
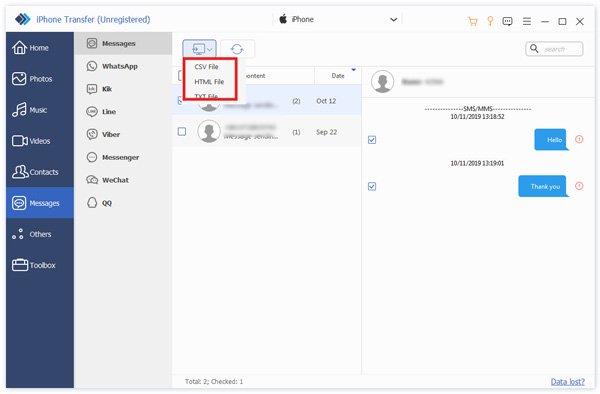
Step 3. When you are ready, select all messages and attachments that you want to sync, and click the PC button on the top ribbon. Then select a proper output format, such as CSV File, HTML File, or TXT File. Next, select a directory to save the file, and confirm it. When it is done, disconnect your iPhone. This program can also help you transfer photos from iPhone to Mac.
Conclusion
Following our concrete guide, you should understand how to sync iPhone messages to iPad including text messages and iMessage. Since the connection is not stable, we also told you how to fix it when messages are not syncing across iOS devices. Apeaksoft iPhone Transfer is the best option to sync iPhone messages to a PC or Mac for average people. If you have other questions about this topic, please feel free to leave a message below this post and we will reply to it quickly.
Related Articles
Accidently delete or lose photos is very usual, but actually, extract photos from iPhone backup should be a convenient way for you to recover them.
In this article, we will illustrate how to bypass iPhone or iPad remote management using four free methods supporting the latest iOS 26
When you are looking for the best method to transfer video files from iPhone to iPad, you can find the right answer here from 5 optional ways.
There are five effective methods to transfer photos from iPhone to Android using Google Photos, email, a computer, and more.
