How to Sync Calendar on Your iPhone with Mac Computer
The Calendar app on iOS and macOS is crucial for efficiently managing schedules and events. The ability of calendar syncing lets users seamlessly access events across all their Apple devices. However, some users reported that their calendars were lost due to improper settings. This concrete tutorial shares multiple ways to sync all or specific calendars from your iPhone to a Mac computer or laptop efficiently.
PAGE CONTENT:
Part 1: How to Sync Calendar from iPhone to Mac via iCloud
To link the calendar on your iPhone and Mac, using the same iCloud account is an easy option. It not only allows you to manage the previous events but also lets you access the new calendars across your devices.
- Sync calendars wirelessly.
- Don’t require extra hardware or software.
- Work for all calendars.
- Require a stable Wi-Fi.
Set up iCloud for Calendar on iPhone
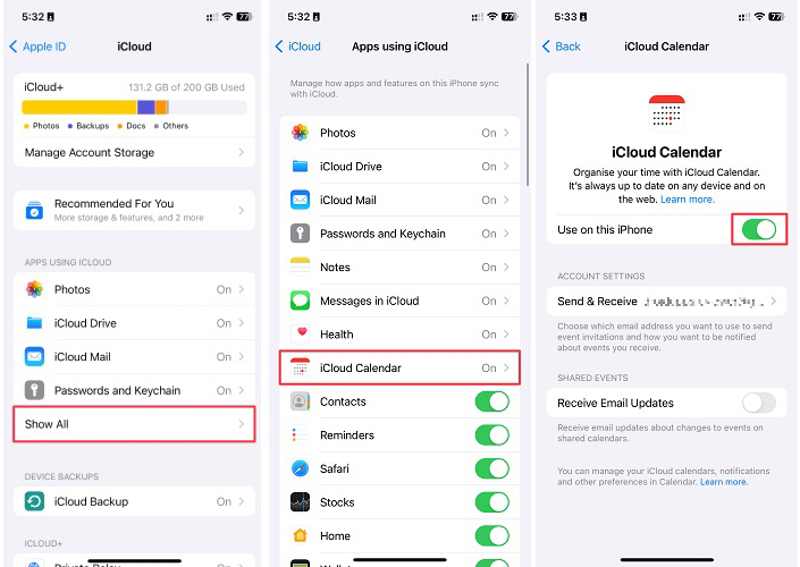
Step 1. Run the Settings app on your iPhone.
Step 2. Tap on your profile and choose iCloud.
Step 3. Tap Show All, and pick iCloud Calendar.
Step 4. Toggle on Use on this iPhone.
Step 5. If prompted, choose Keep on My iPhone.
Set up iCloud for Calendar on Mac
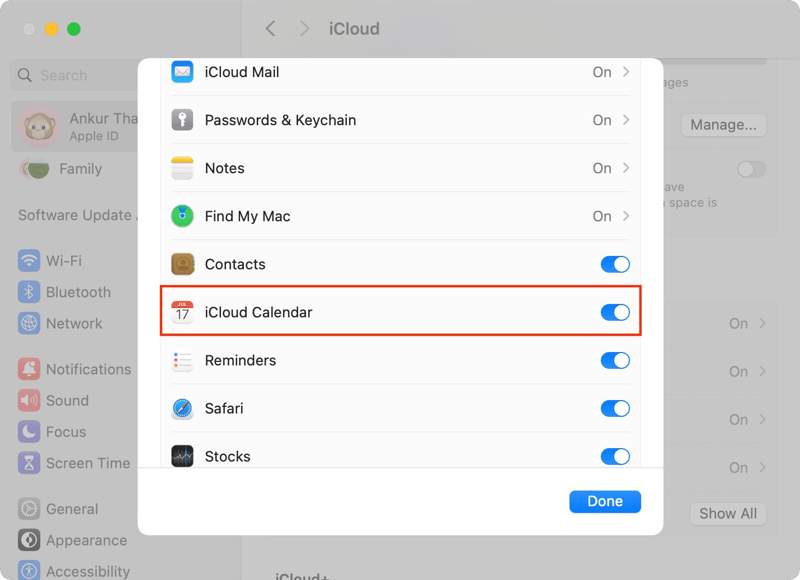
Step 1. Click the Apple menu on a Mac.
Step 2. Choose System Settings or System Preferences.
Step 3. Check the Apple ID and make sure it is the same as the account on your iPhone.
Step 4. Click See All next to Saved to iCloud.
Step 5. Turn on Calendars.
Step 6. Now, go to the Calendar app and view the synced calendars.
Note: iPhone Calendar not syncing with Mac? Click Apple Account in System Settings on Mac. Click Sign Out and follow the onscreen instructions to sign out of the account. Then, sign in with the Apple ID and password associated with your iPhone.
Part 2: How to Sync iPhone Calendar with Mac by Outlook
If you want to log in with different Apple IDs on your iPhone and Mac, you can sync the iPhone Calendar with Mac using an Outlook, CalDAV, or Google account. We demonstrate the workflow with an Outlook account.
- Sync iPhone Calendar wirelessly.
- Work with an Outlook account.
- Easy to use.
- Must work with Wi-Fi.
Set up Outlook for Calendar on iPhone
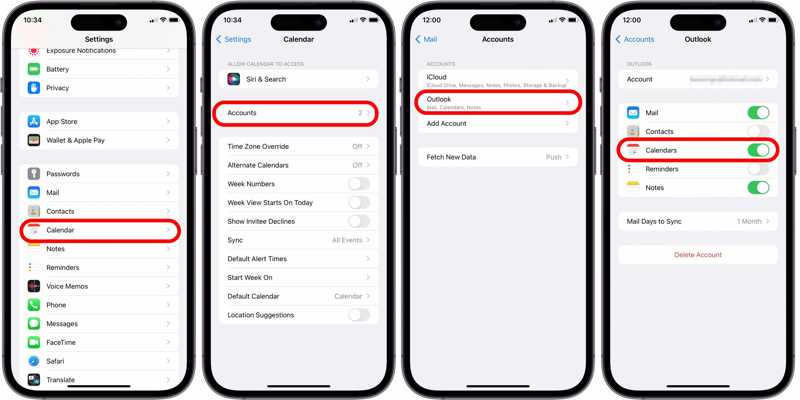
Step 1. Run your Settings app.
Step 2. Go to Calendar, and choose Accounts.
Step 3. Tap Add Account, and pick Outlook.
Step 4. Enter your Outlook account and password.
Step 5. Toggle on Calendars.
Set up Outlook for Calendar on Mac
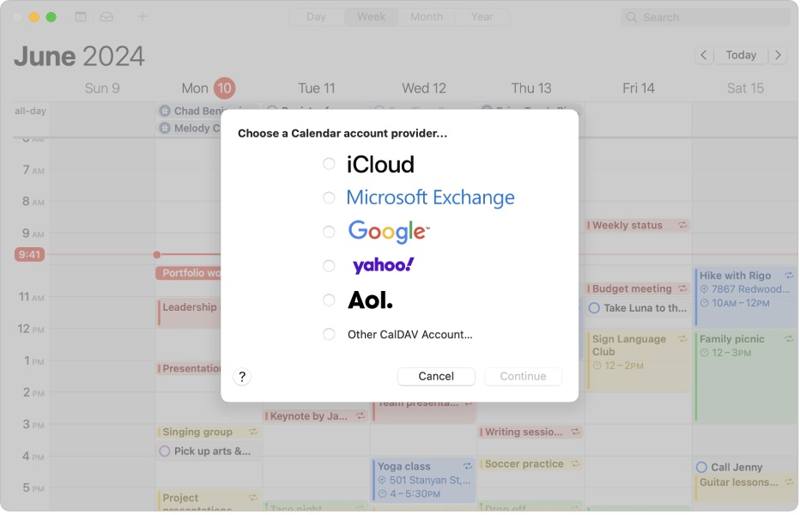
Step 1. Open the Calendar app.
Step 2. Click the Calendar menu and choose Add Account.
Step 3. Choose Outlook or Microsoft Exchange.
Step 4. Log in with the same Outlook account.
Further Reading
Part 3: How to Sync iPhone Calendar to Mac with Finder
Without an internet connection, you can synchronize the Calendar on Mac and iPhone with a USB cable. This method requires a compatible cable and the latest version of iTunes or Finder, depending on your OS.
- Sync Calendar without a network.
- Import all or specific calendars.
- Fast and smooth.
- Requires a compatible cable.
Step 1. Connect your iPhone to your Mac with a USB cable.
Step 2. Open the Finder app.
Tips: On macOS Mojave or earlier, run iTunes.
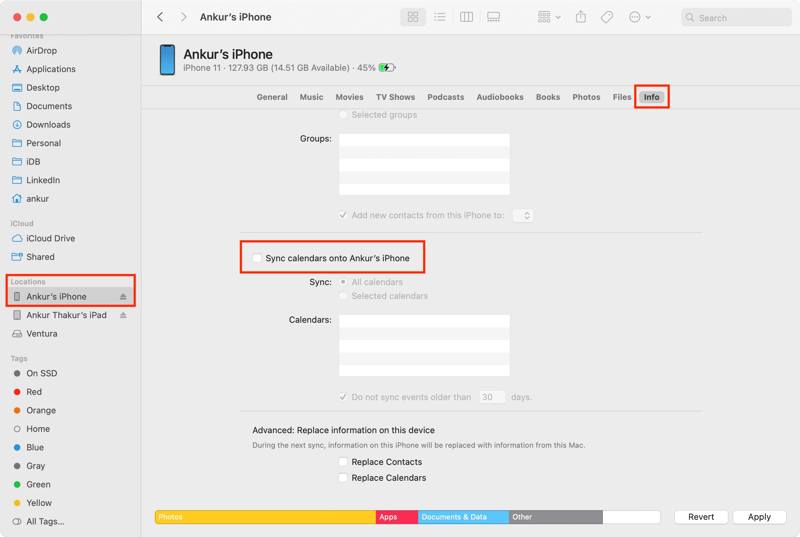
Step 3. Click your iPhone name, and go to the Info tab.
Step 4. Check Sync calendars onto [name]’s iPhone.
Step 5. Pick All calendars or Selected calendars.
Step 6. Finally, click the Apply button to initiate syncing the Calendar.
Part 4: A Quick Way to Sync Calendar from iPhone to Mac
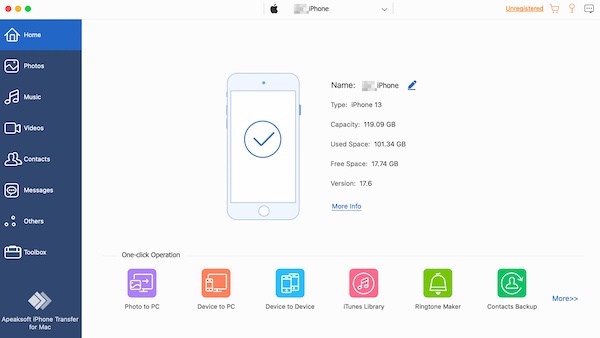
Apeaksoft iPhone Transfer is a quick way to sync the Calendar on iPhone to Mac with no technical skills. It works on both calendars and attachments. Moreover, the intuitive interface makes it easy to use for beginners.
A Quick Way to Sync Calendar from iPhone to Mac
- Sync iPhone Calendar with Mac quickly.
- Compatible with a wide range of data types.
- Preview and manage iPhone Calendar on Mac.
- Support the latest editions of iOS.
Secure Download
Secure Download

How to Sync iPhone Calendar with Mac Quickly
Step 1. Scan iPhone Calendar
Launch the iPhone transferring software after installing it on your computer. It works on macOS 10.7 or above and Windows 11/10/8/7/Vista/XP. Plug your iPhone into your Mac with a Lightning cable.
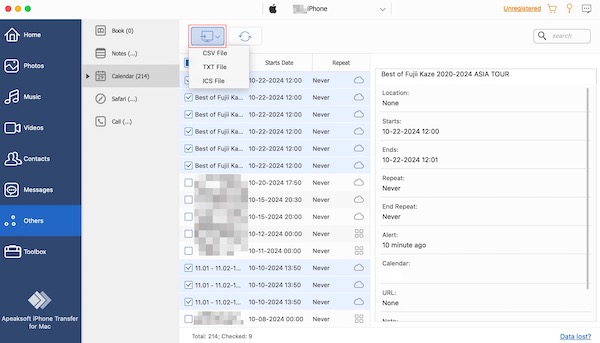
Step 2. Preview calendars
Go to the Others tab and pick Calendar on the sidebar. Now, you can view all calendars on your iPhone.
Step 3. Sync Calendar
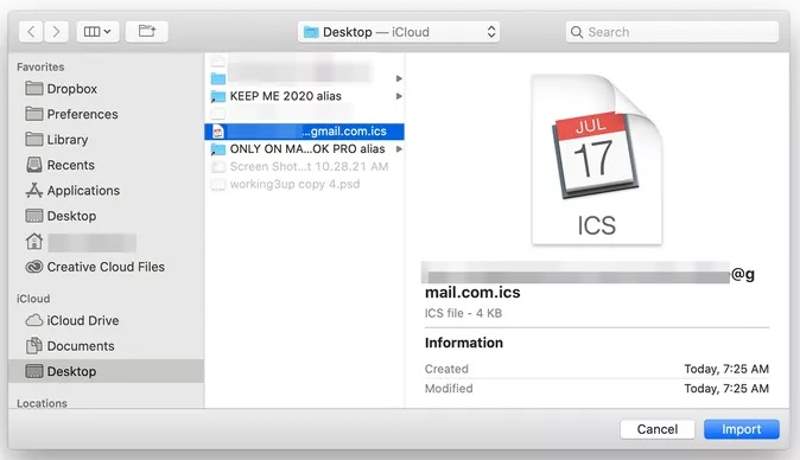
Finally, select the desired calendars, click the Export button at the top ribbon, and choose ICS File. Set an output folder and confirm it. Run the Apple Calendar app, go to the File menu, and choose Import. Find the ICS file, click Import, and follow the onscreen instructions to sync iPhone calendars to Mac.
Conclusion
Now, you should understand how to link Calendar on iPhone and Mac. If you are using the same iCloud account on your iPhone and Mac, iCloud Calendar is a simple way to access events across your devices. Plus, you can use the same Outlook, Google, or CalDAV account to sync your calendars. Finder provides a weird way to sync your calendars across Apple devices on macOS Catalina or later. Apeaksoft iPhone Transfer is a quick way to access your calendars on both iPhone and Mac.
