Have too many videos stored on your iPad? If you want to speed up and free up iPad storage space, you can transfer videos from iPad to PC . Well, you can also move important videos to the hard drive for backup.
At present, there are 3 solutions for iPad transferring. You can use Windows Explorer, iTunes or the third-party iPad transfer software. Each method has its pros and cons. This article will show the details.

- Part 1: Transfer Recorded Videos from iPad Camera Roll to PC with Windows Explorer
- Part 2: Transfer Purchased Videos from iPad to PC with iTunes
- Part 3: Transfer All Videos from iPhone/iPad to PC Safely and Selectively
Part 1: Transfer Recorded Videos from iPad Camera Roll to PC with Windows Explorer
Windows Explorer (or you can call it as File Explorer in Windows 10/8) is the default file manager for all Windows users. You can manage all stored files and folders, as well as videos, photos and documents.
Step 1. Connect iPad to PC
Plug your iPad into the Windows computer through a lightning USB cable. Sooner, you can see a popping-up notification on your iPad saying “Allow this device to access photos and videos?”. Choose “Allow” to move on. (iPad iPhone not showing on computer?)
Step 2. Ask for file detecting
Since you confirm the permission, Windows will recognize the iPad hard drive. Then the AutoPlay window appears with device options. You can choose “Open device to view files”. Otherwise, you can select “Find the iPad in Windows Explorer”.
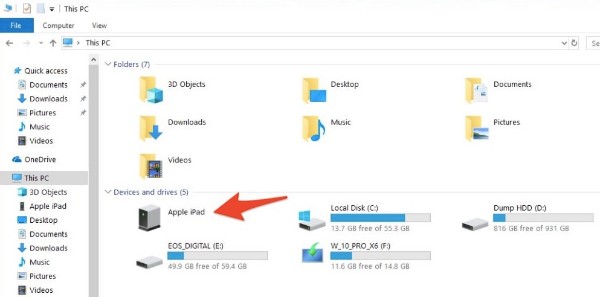
Step 3. Transfer videos from iPad to PC
Double click your iPad’s icon in the submenu of “This PC”. Open the “DCIM” folder from “Internal Storage”. Find the folder that contains your iPad videos. Later, you can copy and paste videos to any destination folder on your PC.
Note: You can use the Windows Import Pictures and Videos feature to transfer iPad videos, too. Just choose “Import Pictures and Videos” when AutoPlay is searching your iDevice. Later, you can transfer iPad videos to PC for free with Windows Explorer.
Pros:
- There is no need to install the third-party application.
- Totally free to use.
Cons:
- You can transfer videos recorded and stored in iPad Camera Roll to PC only.
- Many users report that iPhone/iPad photos and videos disappeared after running Windows Explorer.
Part 2: Transfer Purchased Videos from iPad to PC with iTunes
iTunes is another good friend of iOS devices. You can search and download videos, movies or TV shows from iTunes Store. You can also convert DVDs to the iTunes compatible video formats. Well, it supports to transfer videos from iPad to PC with iTunes, too.
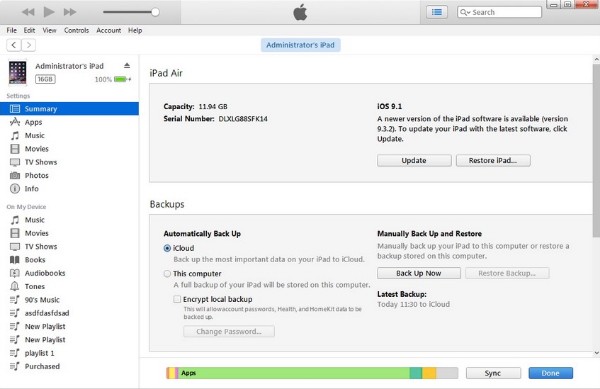
Step 1. Connect iPad to iTunes
Check if you have updated to the latest iTunes version firstly. Then connect your iPad to PC. If it is the first time you connect iPad to this computer, you need to unlock your iPad and confirm the “Trust This Computer” operation.
Step 2. Transfer purchased videos from iPad to PC using iTunes
Choose “Device” from the “File” drop-down menu on the top. From its submenu, select “Transfer Purchases from ‘iPad’”. As a result, iTunes will start transferring purchased videos and movies from iPad to PC automatically.
Videos on iTunes are removed? Just restore iTunes purchases now.
Step 3.
Note:
- 1. You can stop iPad from auto-syncing by choosing “Edit”, “Preferences” and “Devices”.
- 2. If you have synced photos and videos from PC to iPad with iTunes before, you are not allowed to transfer those videos back to the computer using iTunes again.
Pros:
- Transfer purchased videos from iPad to iTunes library on PC quickly.
- Re-download purchased iTunes movies.
Cons:
- You can transfer the entire purchased iTunes files only.
- iTunes errors occur occasionally.
- iTunes transferring does not work for non-iTunes videos.
Part 3: Transfer All Videos from iPhone/iPad to PC Safely and Selectively
Apeaksoft MobieTrans enables you to transfer all kinds of files from iPad to PC safely and quickly. The powerful file transfer software allows iPad users to transfer videos from iPad to PC or iTunes library selectively. Of course, you can transfer files stored on your computer to iPad, too.
- Transfer videos from iPad to Windows/Mac.
- Manage iPad videos on PC, like import, add, edit, delete, etc.
- Put movies into iPad and convert video to iPad video formats automatically.
- Support iPad Pro, iPad mini, iPad Air, running iOS 26/18/17/16.
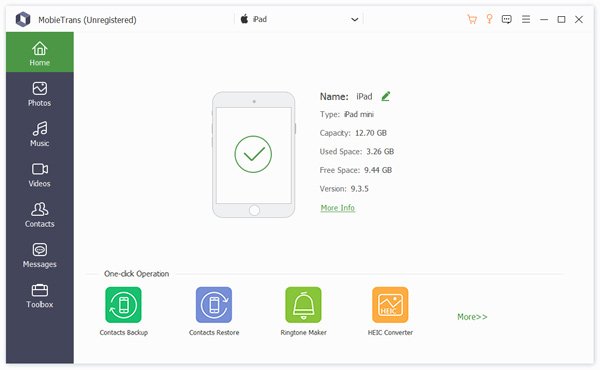
Step 1. Connect iPad to PC
Free download and install the iPad video transfer on PC. Use a lightning USB cable to connect iPad to PC. The program will detect the connected iOS device quickly. Later, you can see the main information about your iDevice in the main interface.
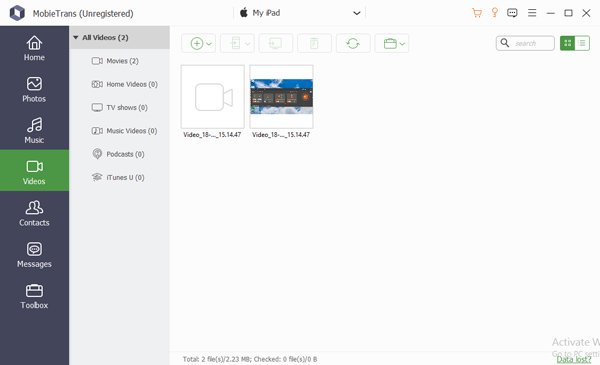
Step 2. Access all stored videos in iPad
You can find all available file types display in categories in the left panel. To move iPad movies to PC, you should choose “Video” in the first place. In addition, you can search the title or author of the video in the search bar to find this file quickly.
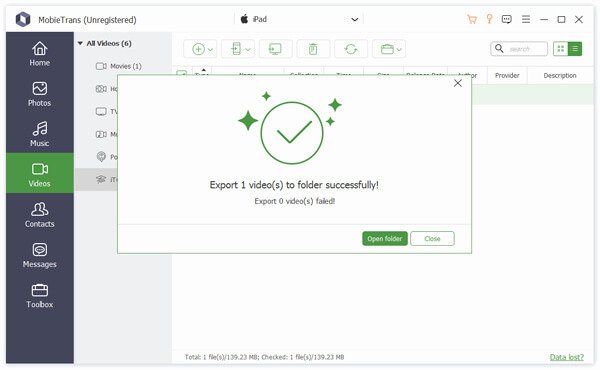
Step 3. Transfer videos from iPad to PC without iTunes
Click the small checkbox before the video you want to transfer. You can see the name, time, size, genre, year, rating, description and status of each video directly. If you are not sure, you can preview the video. After choosing your target videos, you can click the computer button on the top. Select which format your iPad videos will be saved as. Set the destination folder. At last, you can transfer iPad videos to PC effortlessly.
Note: You can also delete unwanted videos from iPad through Apeaksoft MobieTrans directly. Once you delete the selected videos, the related files will be removed from your iPad as well.
Actually, you can regard MobieTrans as the best iTunes alternative. Because the program can break all iTunes limits while transfer iPad videos and other files. What’s more, it can beat Windows Explorer due to the wide support of video sources. Now, let’s see why MobieTrans is the best replacement to iTunes.
Surely, MobieTrans is not the only tool that can help you transfer videso from iPad to PC. More programs, like iCopyBot, SynciOS Manager, CopyTrans, Leawo iTransfer, etc., can also do a great job.
MobieTrans VS iTunes
To be honest, iTunes has lots of disadvantages. For instance, you cannot manage and preview videos before transferring. You should also know that iTunes will erase data while syncing by default.
If you want to transfer several videos instead of the entire iTunes library, you can free download the lightweight MobieTrans for a try. No data loss, authorization or other iTunes restrictions are required.
Conclusion
Generally speaking, Windows Explorer can transfer iPad Camera Roll videos from iPad to PC. As for iTunes, you can transfer purchased iTunes files from iPad to your computer entirely. If you want to get more customizable choices, then Apeaksoft MobieTrans is your first and last choice. You can transfer all videos and movies from iPad to PC without data overwrite. If you have any question about how to transfer videos from iPad to PC, you can feel free and write down in the comments below.
For more topics about iPad transfer, visit here.