How to transfer all the files from iTunes library to your new Mac? If you need to move all files from PC iTunes Library to Mac, you might take it for granted that you only need to install iTunes to get the files. However, moving the iTunes library along with playlists and ratings from the old PC to the new Mac is not just a matter of transferring a music file.

If you don't know how to make a migration of your iTunes music, you come to the right place. This passage is going to share you the best and easiest solutions to transfer the iTunes library from computer to Mac. Please keep on reading if you are interested with this topic.
- Part 1: How to transfer iTunes library from PC to Mac via external hard drive
- Part 2: How to sync iTunes library with Library.xml file between PC and Mac
- Part 3: How to move iTunes library from PC to Mac through home sharing method
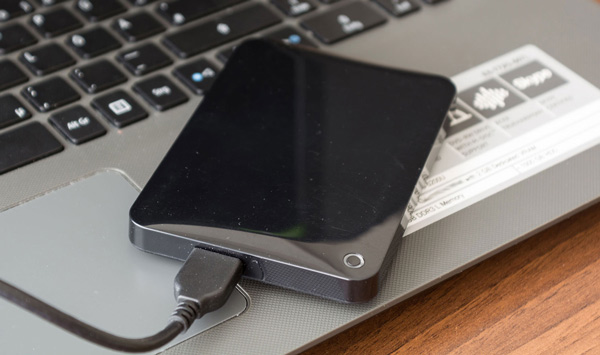
Part 1: How to transfer iTunes library from PC to Mac via external hard drive
If you are going to transfer your purchased iTunes music from the local folders of computer to the new Mac, using an external transfer drive should be the most convenient way for you to take into account.
In addition, you are able to use this method even without a network connection. But you also need to know that it will not work for the Apple music. How to transfer iTunes music from PC to Mac:
Step 1: Save iTunes music to PC
Launch iTunes on your old computer, tap on Preferences, choose Advance to save your iTunes music on the local folder of PC.
Step 2: Export iTunes to external drive
Next inset your external hard drive into your computer, then drop and drag the iTunes folder into the external drive directly.
Step 3: Export iTunes to Mac
Eject the hard drive after the importing process, and get it into your Mac. Find and locate the iTunes media folder on Mac, and try to transfer the entire iTunes library from PC to Mac.
Step 4: Restart iTunes
Once the transferring is over, your iTunes will reboot and all the iTunes playlists, ratings, and songs will be reloaded.
Part 2: How to sync iTunes library with Library.xml file between PC and Mac
To be honest, it will be a little bit complex to transfer iTunes library by converting Library.xml file from PC to Mac format. But if you were familiar with iTunes, you can handle it without too much effort.
In addition, except songs, playlists and ratings, this solution does not support transferring other metadata, such as Last Played, Play Count and so on. Follow the detailed steps to learn how to convert iTunes Library.xml file from PC to Mac format:
Step 1: Check iTunes settings on PC
To make sure both your 2 computers keep the same folder structure, tap iTunes Preferences, choose Advance tap to tick vKeep iTunes folder organized" and "Copy files to iTunes Music folder when adding to library" on your PC.
Step 2: Export iTunes library
Next hit "Export Library" option form File menu, and then save the Library.xml file on the local folder of your PC.
Step 3: Check iTunes settings on Mac
Then go to create a new iTunes library on your Mac, and confirm "Keep iTunes folder organized" and "Copy files to iTunes Music folder when adding to library" options are chosen. Then quit iTunes on your Mac.
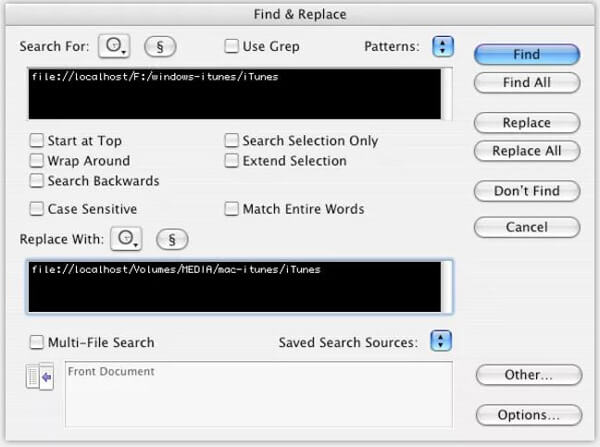
Step 4: Convert the Library.xml file from PC to Mac format
To enable the Library.xml file compatible with your Mac system, access the Library.xml file in a text editor, and change the plain text XML notations to the destination path using Mac format.
Step 5: Import Library.xml file
Finally, launch iTunes on your Mac again, select "Import" option form the File menu import the Library.xml file. Then iTunes will keep track with all the playlists, ratings, and songs and restart.

It is done! Now you have transferred iTunes library from your PC to Mac. And you are able to play these music files on the new system!
Part 3: How to move iTunes library from PC to Mac through home sharing method
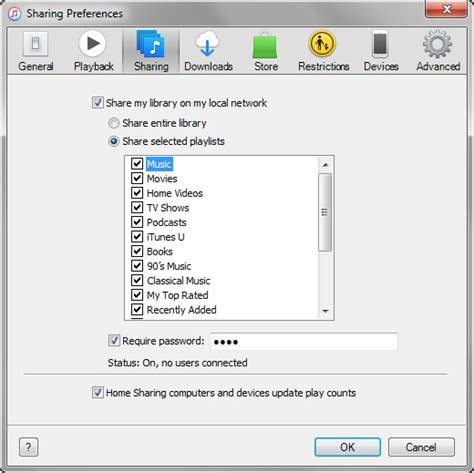
If you are a royal iTunes user, you must get familiar with iTunes Home Sharing. When it comes to sharing iTunes media library between PC and Mac, Home Sharing is an easy and efficient way. What’s more, you can also use Home Sharing to extend playback to other Apple products through home Wi-Fi network.
Here is a general guide about how to use Home Sharing to transfer iTunes library from computer to Mac:
Step 1: Connect computers to same Wi-Fi
Make sure both your PC and Mac are connected to the same network, and then log the same account to log iTunes on these two different systems.
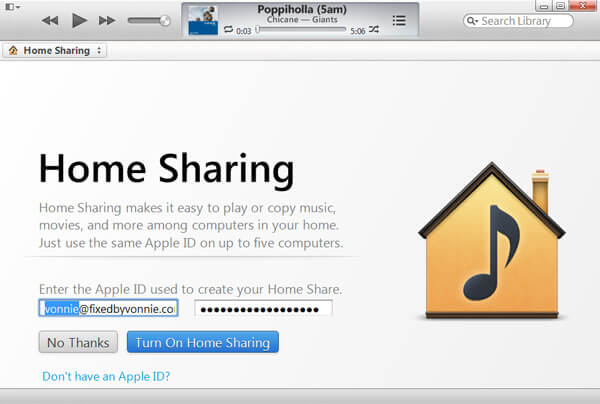
Step 2: Start Home Sharing in iTunes
On your old PC, launch Home Sharing by tapping its icon on the left menu of iTunes. You are capable to enter your Apple ID together with password to create the Home Sharing icon.
Step 3: Assign permissions to Mac
Next, hit on the "Authorize Computer" option on the Store Menu to allow your PC to send iTunes library to the Mac.
You need to de-authorzie from iTunes, and then authorize this computer, if the maximum number of iTunes authorization is up.
Step 4: Import iTunes library to Mac
Select songs from your iTunes library in the Home Sharing section from left sidebar, tap the Import button to start the transferring process.
Just wait for a few minutes, you can manage to transfer iTunes library from PC to Mac successfully!
Do not forget to follow this way to share iTunes music, if you want to share songs among iOS devices.
Conclusion
This tutorial is an ultimate guidance about how to transfer iTunes library from PC to Mac. All the methods mentioned above have their own pros and cons. Base on your requirements to choose the one you are most interested, and start migrating your iTunes music from PC to Mac! If you like this post, please share it to your friends on the social website. You can share your questions or suggestions in the following comments!