We can see Apple users wandering in forums to search for how can I transfer photos from iPhone to iPad. However, things could be messed up if inappropriate methods are used.
This article introduces five ways to do this and offers tips and limitations. Whether you need to tackle hundreds of photos or you want to sync several photos, there will be your solution.

- Part 1. The Best Way to Transfer Photos from iPhone to iPad
- Part 2. Transfer Photos from iPhone to iPad with Officially iTunes
- Part 3. How Can We Transfer Photos From iPhone to iPad with Airdrop
- Part 4. Transfer Photos From iPhone to iPad Automatically Using iCloud
- Tips: An Ingenious Way to Transfer Photos from iPhone to iPad Directly
Part 1: The Best Way to Transfer Photos from iPhone to iPad
Apeaksoft iPhone Transfer is an intuitive and effective transfer that is compatible with Windows and Mac. It transfers photos, videos, music, eBooks and many other types of data between iPhone, iPad, Android and computers with easy dumb operations and 60× fast speed. You can transfer and back up all photos or selected photos of your iPhone to your iPad or computer.

4,000,000+ Downloads
Transfer photos from iPhone to iPad in bulk within seconds.
User-friendly interface and visualized transfer process.
Transfer, manage, and backup photos, music, videos, and messages.
HEIC converter and ringtone maker built in.
Step 1 Connect the iPhone and iPad to your computer via USB cables. Then, launch the program, and it will automatically detect the devices.
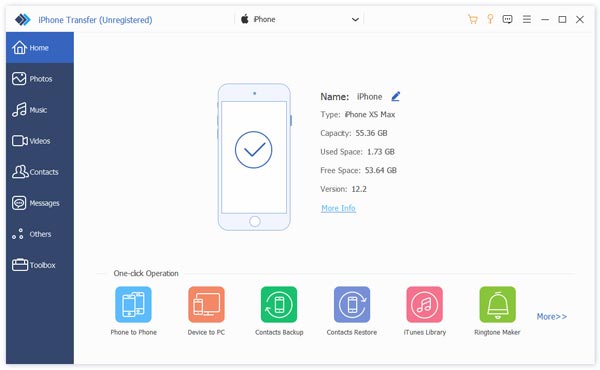
Step 2 Click Photos on the left bar and select the photos you want to transfer. You can also select all and transfer them in bulk. After that, click the top device button and choose your device name. Now, the transfer starts.

Following similar instructions, you can also transfer photos from computer to iPhone.
Part 2: Transfer Photos from iPhone to iPad Officially with iTunes
iTunes is Apple's official way for users to transfer photos, and you don't have to subscribe to iTunes. But there are two things we have to make it clear before we dive into the steps:
1. Transferring photos with iTunes will erase data from your iPad and replace it with iTunes Library files.
2. If your computer is a Mac and is later than macOS Catalina, you need to use Finder to transfer and backup data to your computer. iTunes is available if your computer is Windows or lower than macOS Catalina.
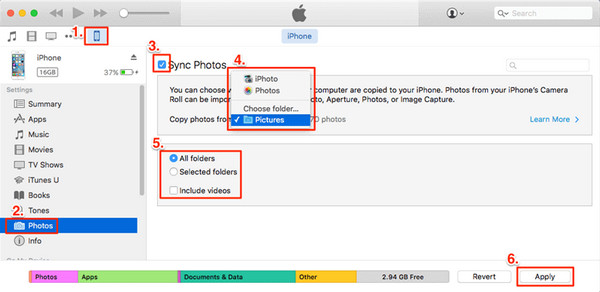
Step 1 Open iTunes on your Windows or Mac and make sure it is the latest version.
Step 2 Connect your iPhone to your computer using a USB-C cable > choose your iPhone from the device button in iTunes > click Photos at the left menu > check the Sync Photos option and hit Apply to sync your iPhone.
Step 3 Unplug your iPhone and connect your iPad to your computer > repeat the same steps of syncing your iPhone to sync photos to your iPad.
Part 3: How Can We Transfer Photos From iPhone to iPad with Airdrop
Airdrop is a file transmission method between iDevices. It is an instant and concise transfer tool with high celerity and efficiency. It is suitable for users who just want to one-time transfer their photos.
Wi-Fi is unnecessary for Airdrop, but you must turn it on. Besides, it only allows face-to-face transfer; generally, the distance between the iPad and iPhone is no more than 10 meters.
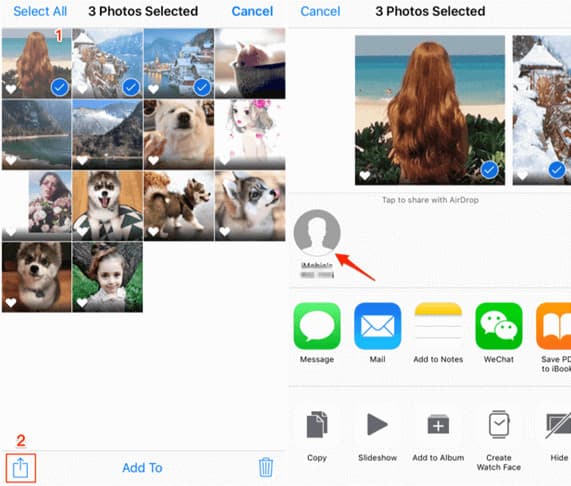
Step 1 Turn on Airdrop and Bluetooth in the Control Center for both devices.
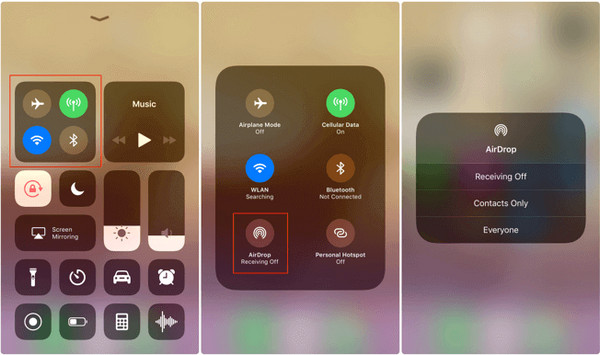
Step 2 Turn on Open the Photos app > select photos you want to send to your iPad.
Step 3 Tab the share button and choose Airdrop. Click your iPad name, and photos will be transferred to it.
Part 4: Transfer Photos From iPhone to iPad Automatically Using iCloud
iCloud is a sync tool of the Apple ecosystem. If you are seeking how to sync photos from iPhone to iPad automatically, you can turn on iCloud Photo Library in iCloud. Again, let's check its restrictions and see if you are really endeavoring in the right way.
1. If you are not an iCloud subscriber, you can sync up to 5GB of data for free.
2. iCloud is not a technical cloud drive but a sync application. More specifically, if you delete any photo from any device locally, the photo in any other iDevices will be deleted simultaneously.
3. Ensure your iPad and iPhone sign in with the same Apple ID.
Step 1 Go to Settings app > tap your iPhone name on the top.
Step 2 Click iCloud > choose Photos.
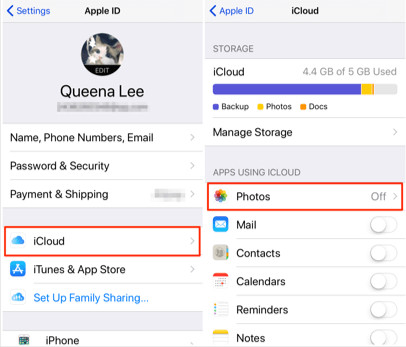
Step 3 Tap to switch iCloud Photo Library > repeat the same steps on your iPad. Now iCloud will sync photos from iPhone to iPad.

Tips for iCloud sync:
1. With iCloud, you can also sync your calendar between your iPhone and iPad to check your to-do list anywhere.
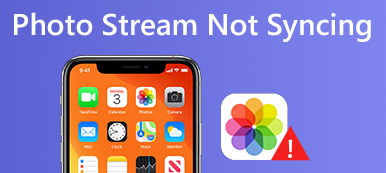
2. Many users in forums wonder why are my photos not syncing between iPhone and iPad. Well, iCloud sync is not instant and requires a stable network. If your photos are not synced, try reconnecting Wi-Fi and rebooting iCloud and waiting for it to sync.
3. If you wonder how to stop photos from syncing to iPad and you have already turned off the iCloud Photo Library, check if you turned off My Photo Stream on the same setting page.
Tips: An Ingenious Way to Transfer Photos from iPhone to iPad Directly
If your iPad is running iPadOS rather than iOS, there is an ingenious way to transfer photos from iPhone to iPad directly. This method also allows you to import photos from an SD card or a camera to your iPad.
Step 1 Connect your iPhone to your iPad via a Lightning adapter or a USB-C cable.
Step 2 On your iPhone, input your password to Trust the Computer > open the Photos app on your iPad > tap Import.
This method is similar to Airdrop but faster and more stable as long as your iPad version meets its restrictions.
Conclusion
How can photos be transferred from iPhone to iPad? This article illustrates five ways: Apeaksoft iPhone Transfer, iTunes, iCloud, Airdrops and an ingenious way. As you can see, Apeaksoft iPhone Transfer is the most straightforward and effective because it is a one-stop transfer for all iDevices, Android and PC. The last way is practical, direct, and effective, but you have to meet the limitations. What do you think of these methods? Have you tried the last way?