How to Delete a Content or Multiple Contacts on iPhone
Generally speaking, an iPhone is able to save about 50,000 contacts. That is enough for most people. However, it is inconvenient to find specific contacts if you have hundreds of items in your phone book. Therefore, you’d better remove useless or outdated contacts. The actual workflow for deleting contacts on an iPhone can vary, depending on whether the items are actually stored or available on your device. You can follow our concrete tutorial to remove contacts.
PAGE CONTENT:
- Part 1: How to Delete All Contacts on iPhone Without Recovery
- Part 2: How to Delete Multiple Contacts on iPhone
- Part 3: How to Delete a Contact on iPhone
- Part 4: How to Delete Duplicate Contacts on iPhone
- Part 5: How to Delete iPhone Contacts on iCloud
- Part 6: How to Delete Contacts on iPhone from an Account
Part 1: How to Delete All Contacts on iPhone Without Recovery
If you need to delete contacts on your iPhone before selling, Apeaksoft iPhone Eraser is the best option. It is able to erase all your contacts using advanced technology. That makes sure no one can recover your phone book. More importantly, the intuitive interface allows users to navigate easily.
The Best Way to Delete All Contacts on Your iPhone Without Recovery
- Delete all contacts in three steps.
- Integrate advanced technology to erase your contacts.
- Offer three erasing levels for different situations.
- Support the latest versions of iOS and iPadOS.
Secure Download
Secure Download

How to Delete All Contacts on Your iPhone Without Recovery
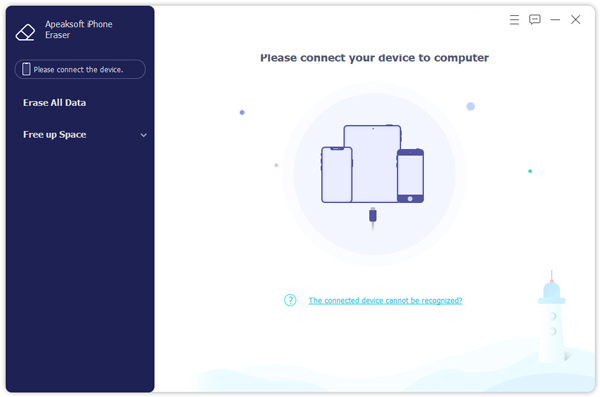
Step 1. Detect your iPhone
Launch the best iPhone erasing software after you install it on your PC. There is another version for Mac users. Connect your iPhone to your PC with a Lightning cable. If you connect the two devices for the first time, tap Trust on your screen to trust this PC. Then, the software will detect your iPhone automatically.
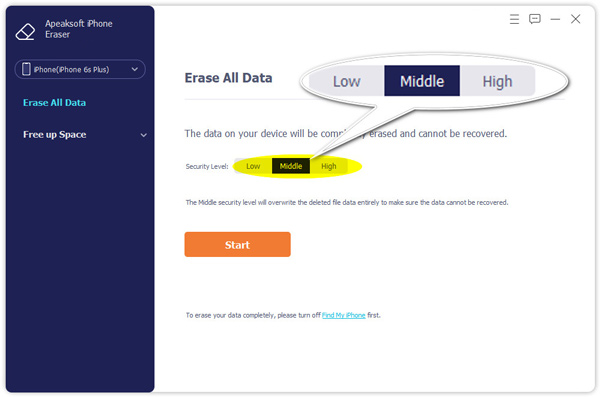
Step 2. Select a level
Go to the Erase All Data tab on the sidebar and choose a proper erasing level:
The Low level quickly erases all data on your iPhone.
If you choose the Middle level, your data will be overwritten to make sure it cannot be recovered.
The High level adopts the DoD 5220.22-M standard to wipe your contacts.
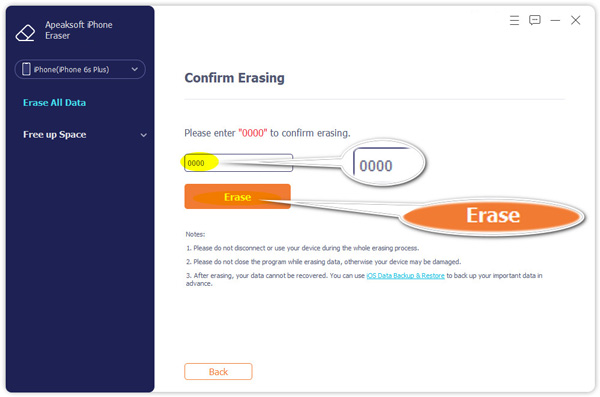
Step 3. Delete iPhone contacts
Next, click the Start button to confirm the selection. Type 0000 in the field and click the Erase button to begin deleting iPhone contacts. During the process, keep your iPhone connected to your PC.
Part 2: How to Delete Multiple Contacts on iPhone
Deleting multiple contacts on an iPhone is indispensable if you have lots of useless contacts. There are two ways to remove multiple contacts on your iPhone and thin your phone book. We demonstrate the workflows respectively.

How to Delete Continuous Contacts on iPhone
Step 1. Open your Contacts app. Or open the Phone app and go to Contacts.
Step 2. Tap the first unwanted contact with two fingers and drag down to select the adjacent contacts.
Once contacts are highlighted in gray, it means they are selected.
Step 3. Release your finger and long-press a selected contact.
Step 4. Tap Delete [number] Contacts on the context menu.
Step 5. Finally, tap the Delete Contacts button on the warning box.
How to Delete Discontinuous Contacts on iPhone
Step 1. Run the Contacts app from your home screen.
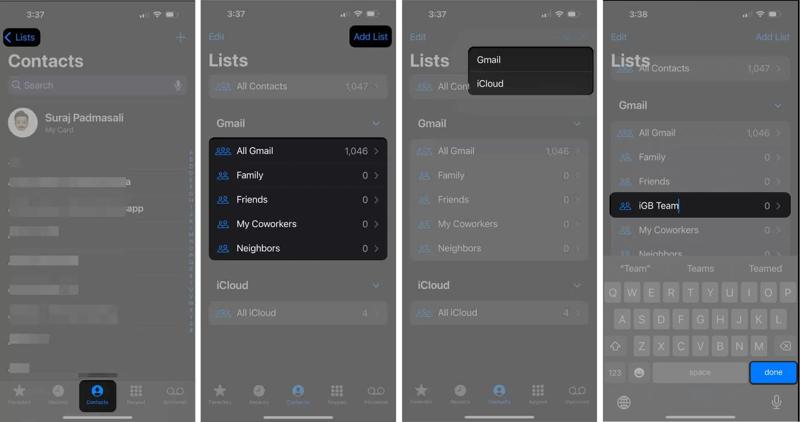
Step 2. Tap Lists in the upper left corner
Step 3. Press Add List, choose your account, add a name, and tap done.
Step 4. Enter the group, tap the Add button, and select the unwanted contacts.
Step 5. Tap Done to confirm it.
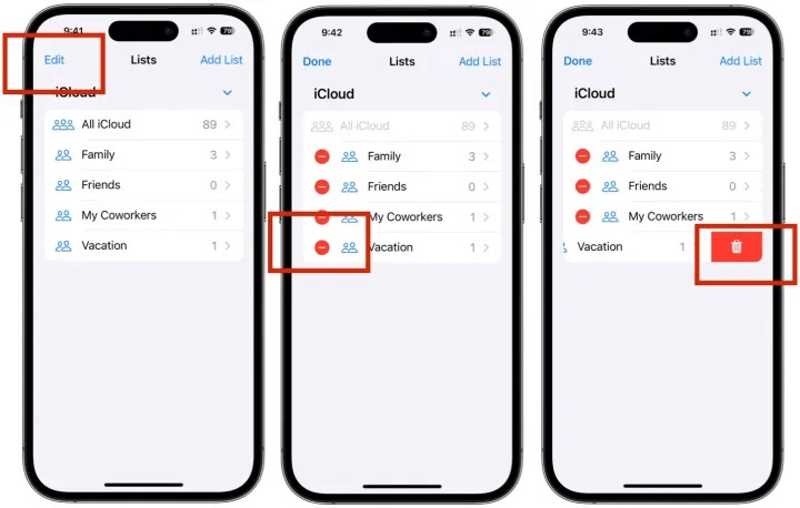
Step 6. Next, tap the Edit button in your Contacts app.
Step 7. Tap the – button on the new group and tap the Delete button.
Part 3: How to Delete a Contact on iPhone
Of course, you can delete a contact on your iPhone if the contact is useless. The process is different from the workflow to delete multiple contacts on your iPhone. You can follow the steps below:

Step 1. Find the contact you want to delete in your Contacts app.
Step 2. Tap the contact to enter the contact info screen.
Step 3. Tap the Edit button, and hit Delete Contact at the bottom.
Step 4. Finally, tap the Delete Contact button on the confirmation dialog.
Part 4: How to Delete Duplicate Contacts on iPhone
How to Delete Duplicate Contacts on iPhone With the Same Name
If you have lots of contact copies, you can shorten your phone book by deleting duplicate contacts on your iPhone. Apple allows you to find duplicate contacts and merge or delete the copies.
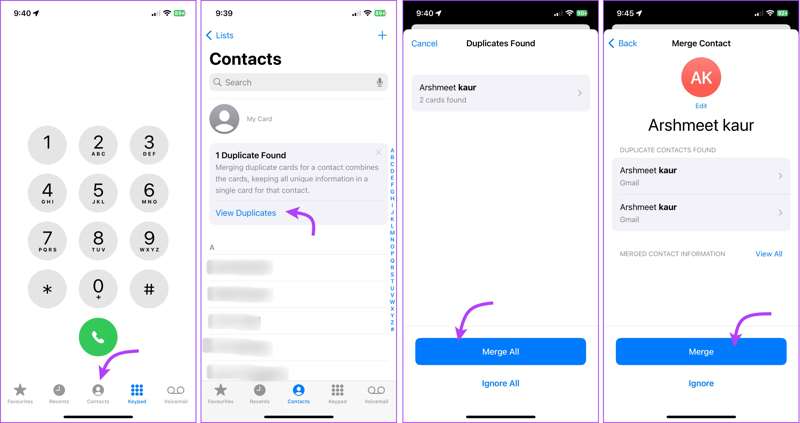
Step 1. Open your Contacts app.
Step 2. Tap the View Duplicates button if you have duplicate contacts.
Step 3. Now, you will get a list of all duplicate contacts.
Step 4. Tap the Merge All button to delete duplicate contacts at once.
Step 5. Finally, tap Merge on the alert dialog to verify your action.
How to Delete Duplicate Contacts on iPhone Without the Same Name
iOS recognizes duplicate contacts via the name. If your duplicate contacts have different names, iPhone cannot detect them, and you have to manually search and delete them following the steps below.
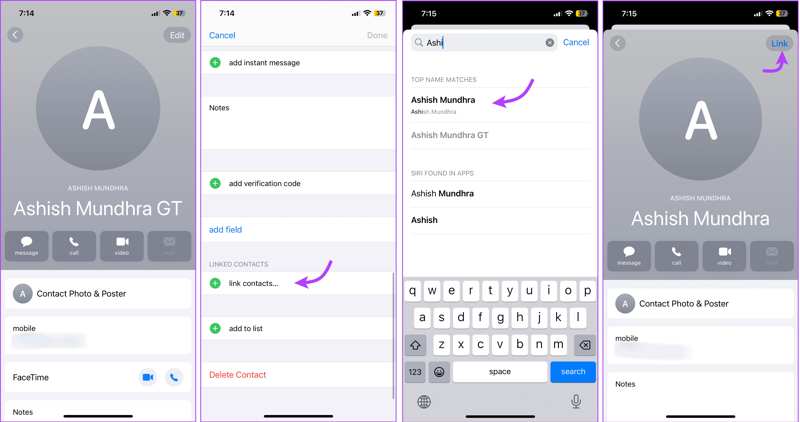
Step 1. Tap a contact in your Contacts app.
Step 2. Press the Edit button.
Step 3. Scroll down and tap link contacts.
Step 4. Then, find the copy you want to delete.
Step 5. Check the information, tap Link, and hit Done to confirm it
Part 5: How to Delete iPhone Contacts on iCloud
All your contacts are synced to iCloud. If your iPhone is not in your hand or inaccessible, you can delete iPhone contacts with a web browser. Moreover, you can delete one, multiple, or duplicate contacts online.
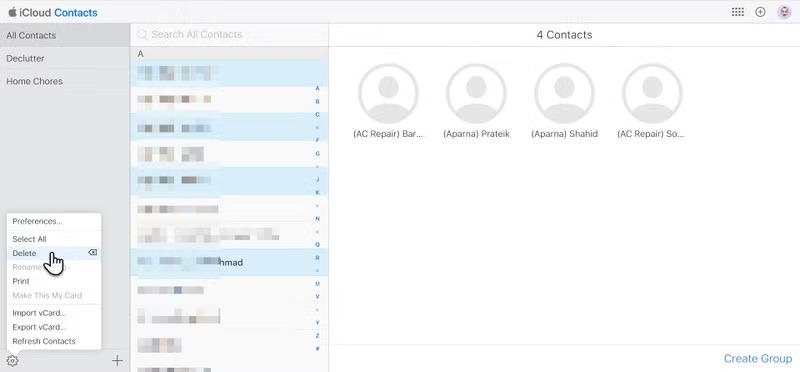
Step 1. Go to www.icloud.com in a browser and sign in with your Apple ID and password.
Tip: If two-factor authentication is enabled, enter the verification code to access iCloud.
Step 2. Click the Contacts option to enter the iCloud Contacts page.
Step 3. Go to the All Contacts tab on the sidebar, and select the unwanted contact on the list.
Tip: If you want to delete multiple contacts, press the Ctrl or Cmd key on your keyboard, and click each unwanted item.
Step 4. Click the Settings button at the bottom left side and choose Delete.
Step 5. On the alert dialog, click the Delete button to confirm your action.
Note: If you turn on sync iCloud Contacts, the changes will be synced to your iPhone immediately.
Part 6: How to Delete Contacts on iPhone from an Account
Besides, Apple allows you to delete all contacts of a specific account on your iPhone. When you add an account, such as Google, Yahoo, and more, to your iPhone, you can sync contacts to your device. To delete them, you can disable contact sync.
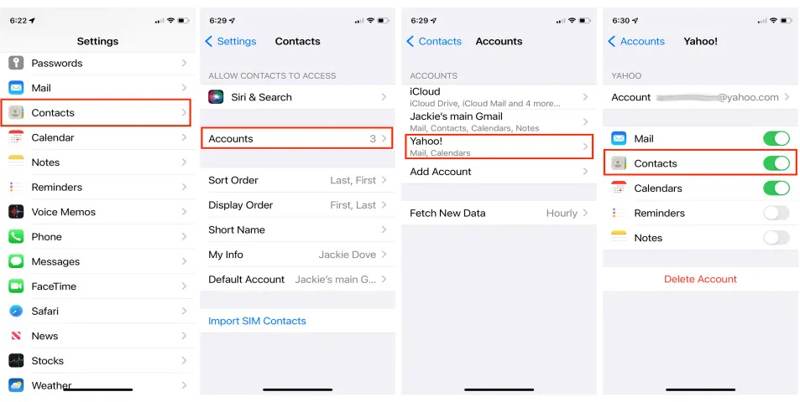
Step 1. Open the Settings app on your iPhone.
Step 2. Scroll down and tap Contacts.
Step 3. Choose the Accounts option and pick the desired account.
Step 4. Toggle off the switch for Contacts.
Step 5. When prompted, tap Delete from My iPhone. Then, you will find these contacts have disappeared in your Contacts app.
Conclusion
This article demonstrated six methods to delete a contact or contacts on your iPhone. You can delete a single item, multiple contacts, a group, or duplicate items from your phone book. Moreover, you can complete the job on iCloud. Apeaksoft iPhone Eraser is the best option to delete iPhone contacts without recovery. If you have other questions about this topic, please write them down below this post.
