How to Delete Emails and Email Account on an iPhone
According to our research, the majority of iPhone users check, send, and receive emails on their devices. As time goes by, you may have lots of emails in your inbox. That may cause you to miss important messages. Moreover, it is inconvenient to browse emails if your inbox is full of messages. The best solution is to delete all emails at once after reading them. This guide explains how to do it in various situations.
PAGE CONTENT:
Part 1: How to Delete Unread Emails on iPhone
When you enter the Inbox, you can check the senders and subjects. Therefore, you can ignore the marketing and unimportant emails directly. To clear your Inbox, you can delete unread emails in bulk on your iPhone.
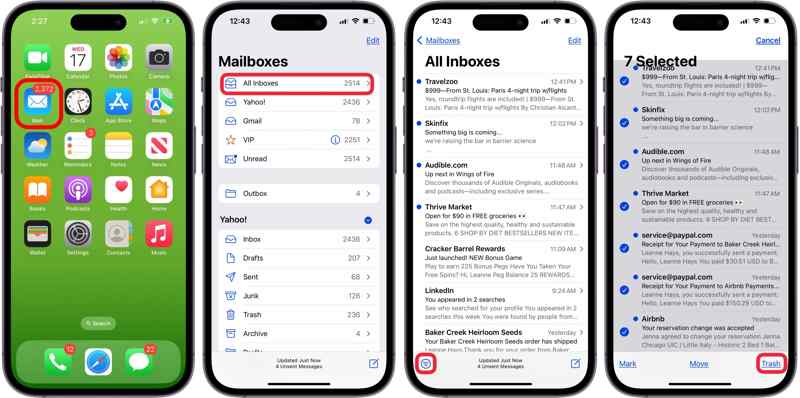
Step 1. Open the built-in Mail app from your home screen.
Step 2. Go to the All Inboxes folder. If you have added multiple email accounts, locate the desired email provider, and head to the Inbox folder.
Step 3. Tap the Filter button at the bottom left corner. Unread is the default filter. Therefore, all unread emails are selected by default.
If the unread emails are unselected, tap the Edit button at the upper right side, start at the empty circle to the left of the first unread email, and swipe down to the bottom of the list with your finger to select all of them.
Step 4. Next, tap the Trash button to delete unread emails.
Part 2: How to Delete All Emails on iPhone
After you read the messages in your Inbox, you may want to delete all emails at once on your iPhone. iOS enables you to do the job with several taps. Once you delete emails, they are moved to the Trash folder. You need to empty Trash to permanently remove your emails.
How to Delete All Emails on iPhone Manually
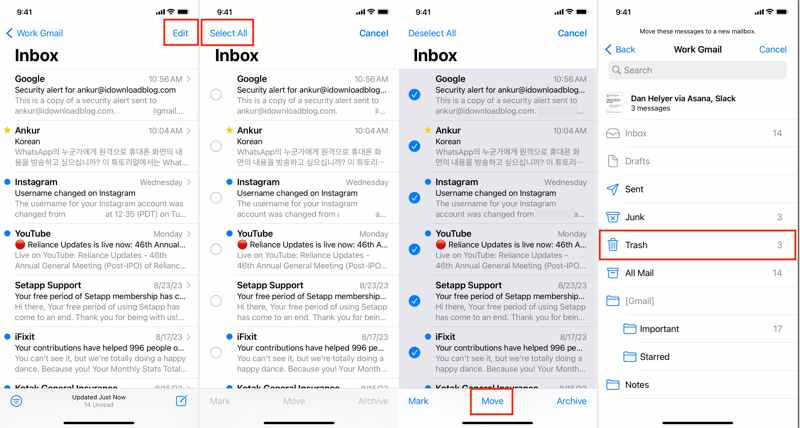
Step 1. Go to the All Inboxes folder in the Apple Mail app or the Inbox folder for your main email account.
Step 2. Tap the Edit button at the upper right side, and press the Select All button. Then all your emails should be selected.
Step 3. Press the Move button at the bottom, and choose Trash. In a few seconds, your inbox should become empty.
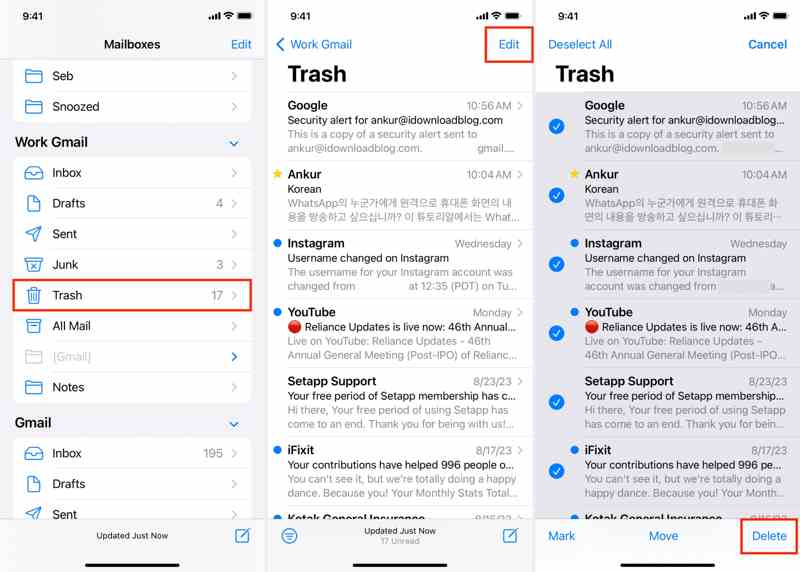
Step 4. Next, go back to the previous screen, and navigate to the Trash folder.
Step 5. Press the Edit button, and tap Select All. At last, press the Delete button to permanently delete emails in bulk on your iPhone.
Note: If you need to recover deleted emails, don’t empty the Trash folder.
How to Delete All Emails on iPhone Automatically
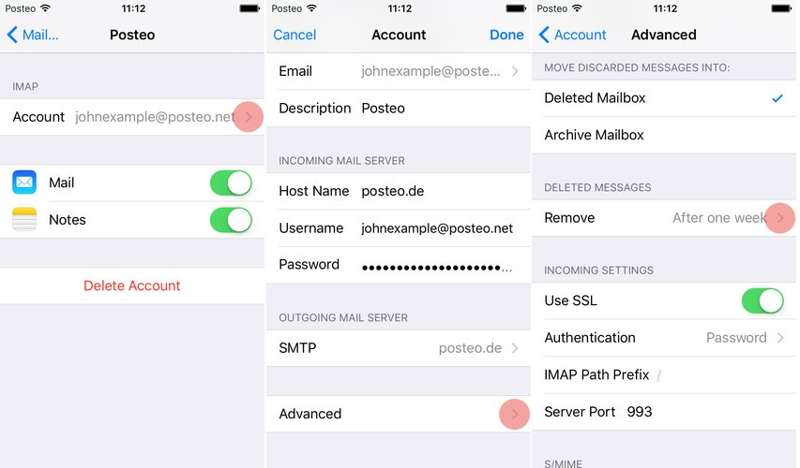
Step 1. Open the Settings app.
Step 2. Go to Mail, press Accounts, tap the desired email account, and press your account.
Step 3. Make sure to select Deleted Mailbox under the Move Discarded Messages Into heading. Press Advanced, tap Remove under the Deleted Messages head and choose a proper period.
Step 4. Now, go to the Apple Mails app, and delete all emails in the All Inboxes folder. The Trash folder will be emptied automatically.
Part 3: How to Delete Email Account on iPhone
By default, all emails that you receive on your iPhone are stored in the All Inboxes folder. If you have added multiple email accounts on your device, your All Inboxes will be full of new emails. The solution is simple: delete minor email accounts from your iPhone. After that, you cannot retrieve emails on iPhone.
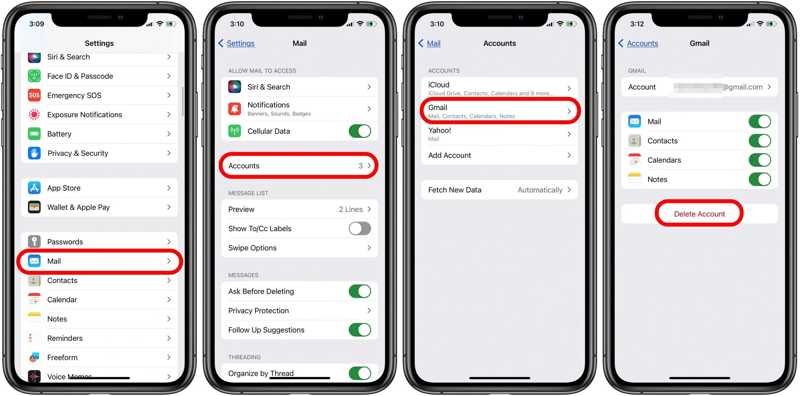
Step 1. Run your Settings app. Scroll down to find the Mail option, and tap it.
Step 2. Press Accounts and you will see all accounts that are added to your iPhone.
Step 3. Tap the account that you want to delete. If you just want to delete the email account, toggle off the switch next to Mail. If you wish to completely remove the account, tap Delete Account.
Step 4. When prompted, press Delete from My iPhone or Delete Account on the confirmation dialog.
Part 4: How to Delete Spam Emails on iPhone
The spam email refers to unsolicited email messages. They are usually sent in bulk to a large list of recipients from brands and organizations. Some spam emails also include phishing links and viruses. While the Apple Mail app includes the Junk folder, which stores the spam emails on your iPhone, it cannot identify most spam emails. As a result, you need a powerful email eraser application, such as Apeaksoft iPhone Eraser. It can help you to get rid of spam emails on your iPhone.
The Best Way to Delete Spam Emails on Your iPhone
- Erase all spam emails on your iPhone with a single click.
- Uninstall apps on iPhone without factory reset.
- Offer three erasing levels for different purposes.
- Support the latest versions of iPhones.
Secure Download
Secure Download

How to Delete Spam Emails on Your iPhone
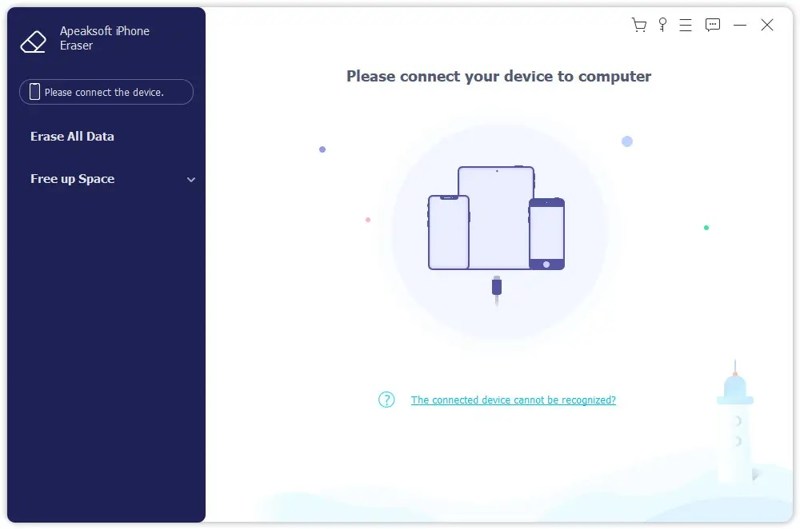
Step 1. Connect to your iPhone
Download and install the best email-erasing software on your computer, and open it. Next, connect your iPhone to your computer with a Lightning cable. Then the software will recognize your device immediately.
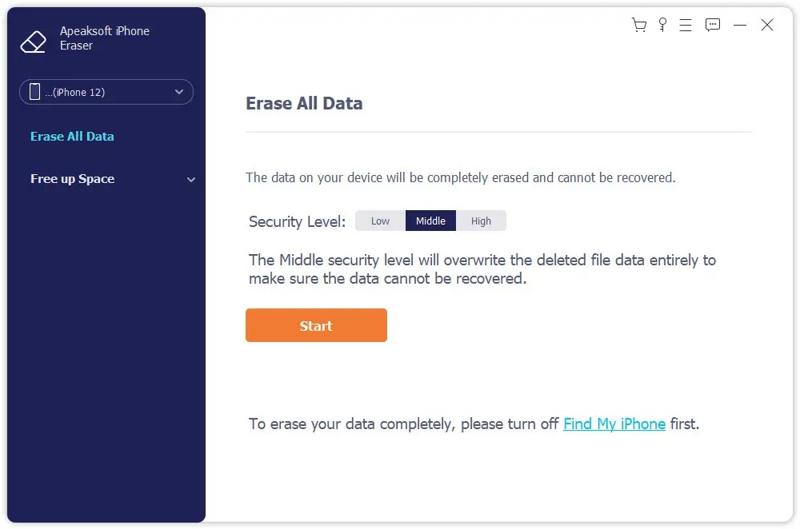
Step 2. Choose a level
There are three erasing levels:
Low level overwrites your spam emails once with higher speed.
Middle level overwrites your spam emails twice to make sure they are unrecoverable.
High level overwrites your emails thrice to completely get rid of spam emails.
Choose an appropriate erasing level depending on your condition.
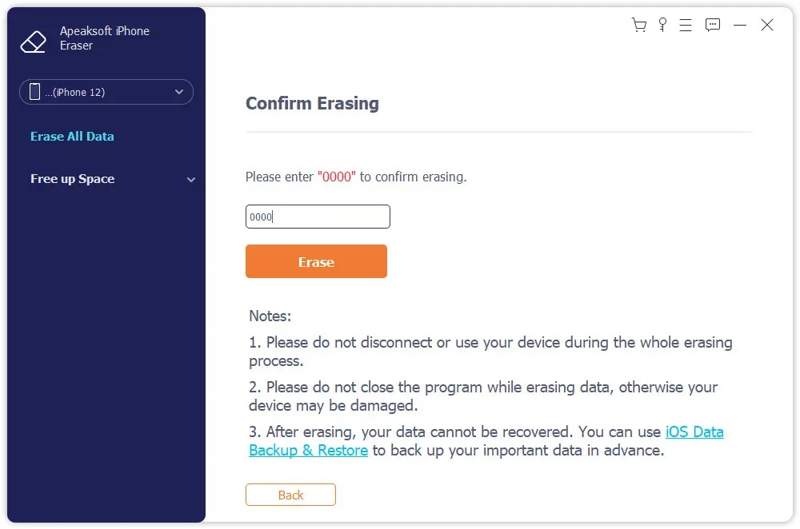
Step 3. Delete spam emails
Once you are ready, click the Start button. Then input 0000 into the field, and click on the Erase button to begin erasing all emails on your iPhone along with other data and settings.
Conclusion
Now, you should understand how to delete emails on your iPhone in various situations. You can delete a single email, unread emails, or all emails from your handset with the proper steps. Moreover, you can stop receiving emails from a specific account by removing it from your iPhone. Apeaksoft iPhone Eraser enables you to remove all emails without recovery. If you have other questions about this topic, please feel free to leave your message below this post.
Related Articles
Want to delete music from iPhone, iPad or iPod? Just follow this article to remove songs/albums/all music/playlists from iPhone with 3 simple solutions.
In this comprehensive guide, you can learn how to permanently delete photos from your iPhone and free up space effectively.
If you cannot delete iOS update, you should not miss this article. It shows how to delete iOS update and software update on iPhone and iPad in easy ways.
Can't delete photos from iPhone or can't find the trash bin icon in the Photos app? Here are multiple ways to fix this problem and delete photos from iPhone.
