How to Permanently Delete Pictures from Your iPhone
There are a few reasons why you need to delete all photos from an iPhone. The most common cause is you want to clear storage and free up space. As time goes by, you may accumulate hundreds of high-quality photos in your memory. As a result, you will run out of space and your iPhone will slow down. Moreover, that can protect your privacy. This tutorial shows you the how-to with steps.
PAGE CONTENT:
Part 1: Before Deleting Photos from iPhone
Erasing all photos from your iPhone means that you cannot access them anymore. Therefore, you’d better back up your photos before deleting them. For iPhone users, the easiest way to back up photos is iCloud. Plus, you can use a third-party service, like Google Photos.
Sync Photos from iPhone to iCloud
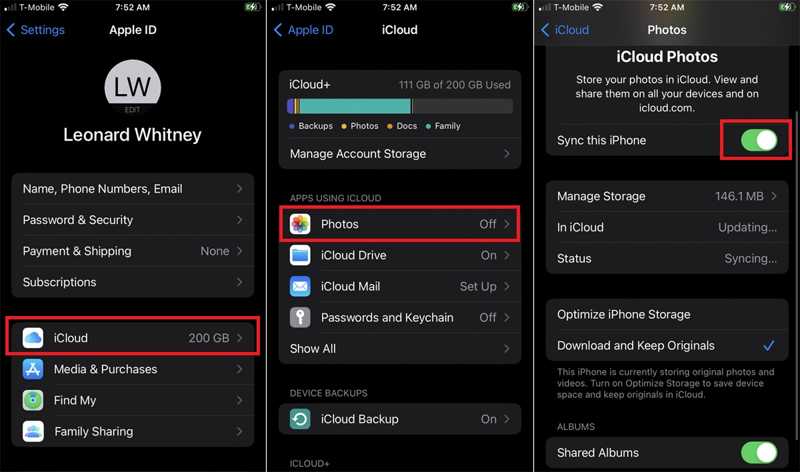
Step 1. Run the Settings app from your home screen.
Step 2. Tap on your profile, choose iCloud, and press Photos.
Step 3. Toggle on the switch next to Sync this iPhone. Select Download and Keep Originals. If your iPhone is connected to the internet, photos will go to your iCloud account immediately.
Back up Photos from iPhone to Google Photos
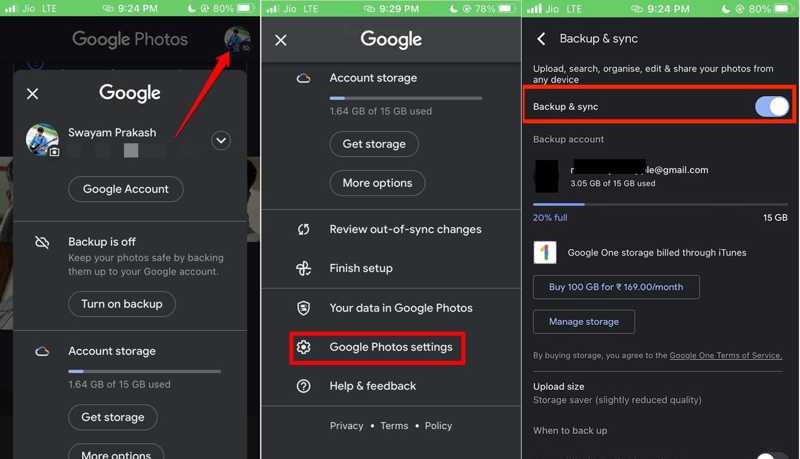
Step 1. Open your Google Photos app on your iPhone. Tap on your profile, scroll down, and choose Google Photos settings on the menu list.
Step 2. Choose Backup & Sync, and toggle on Backup & Sync to enable it.
Step 3. Next, tap on Upload Size, and choose Original quality to upload high-quality photos before deleting them.
Part 2: How to Delete Photos on iPhone
All photos and videos that you took on your iPhone are saved in the Photos app. In other words, you can erase pics from your iPhone within the app. Here you can delete a single photo, several pictures, or all photos.
How to Delete One Photo on an iPhone

Step 1. Open the built-in Photos app on your device.
Step 2. Go to the Library tab from the bottom, or go to the Albums tab, and choose the desired album.
Step 3. Browse and find the picture that you intend to erase, and tap it. Next, press the Trash button, and choose Delete Photo.
How to Delete Multiple Photos on iPhone
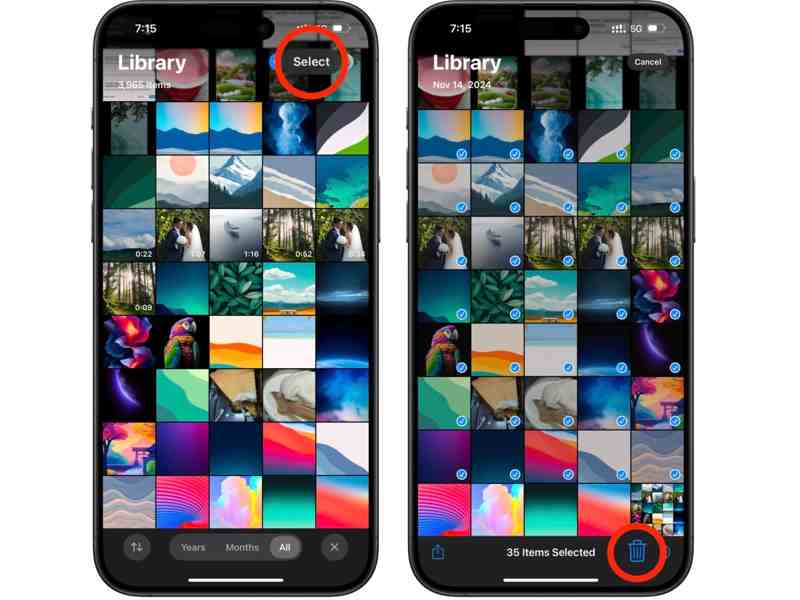
Step 1. Head to the Library tab in your Photos app.
Step 2. Here you can view all photos on your device. Tap the Select button at the top of your screen. Then touch each unwanted photo.
Step 3. Next, hit the Trash button, and tap Delete [number] Photos to confirm it.
Note: You can also create a new album, move all unwanted photos to the album, deeply press it, and delete the album.
How to Delete All Photos on iPhone
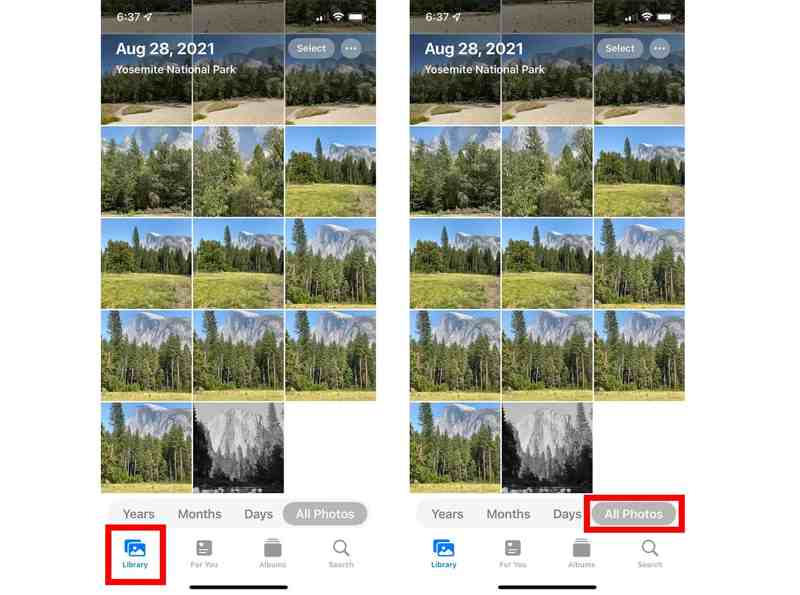
Step 1. Go to the Library in the Photos app.
Step 2. Tap the All Photos button at the bottom to select all pictures on your device.
Step 3. Press the Trash button, and confirm your action.
How to Delete Photos from iPhone But Not iCloud
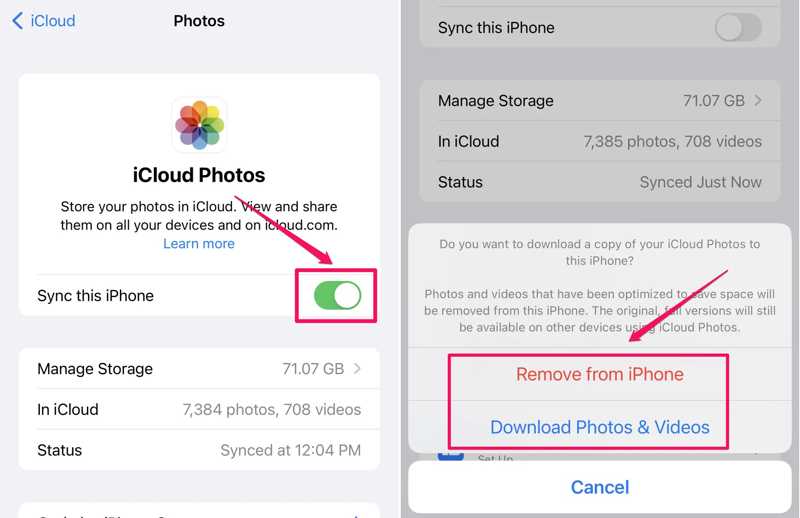
Step 1. Run the Settings app, tap on your name, and choose iCloud.
Step 2. Press the Photos option, and toggle off Sync this iPhone to stop syncing iCloud photos.
Step 3. If you have selected Optimize iPhone Storage, you will be asked if you wish to keep a copy of iCloud Photos. Choose either Remove from iPhone or Download Photos & Videos to delete photos from iPhone but not iCloud.
Part 3: How to Permanently Delete Photos from iPhone
The photos wiped from your iPhone will be moved to the Recently Deleted album and stored here for 30 days. During the period, you can recover your photos directly. After the expiration, these photos will be permanently deleted. Of course, you can manually remove photos from the Recently Deleted album.
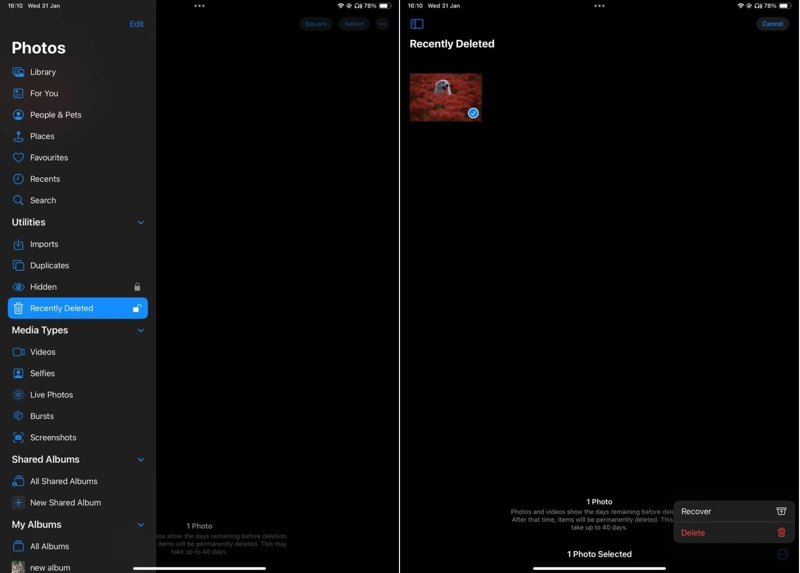
Step 1. Launch your Photos app, and go to the Albums tab at the bottom.
Step 2. Scroll down, and choose the Recently Deleted album under the Utilities heading.
Step 3. If you hope to remove all photos from your iPhone, tap Delete All, and hit Delete [number] Items. To permanently erase several photos, tap Select, press the photos, and delete them. Note that you cannot recover deleted videos and photos from your iPhone.
Part 4: One-stop Solution to Delete Photos on iPhone
Deleting pictures from an iPhone is not an intuitive process. You have to remove them from the original albums and then erase them from the Recently Deleted album. In fact, a powerful image eraser application, like Apeaksoft iPhone Eraser, is able to streamline the workflow. More importantly, it utilizes advanced technology to permanently erase your photos with one click.
The Easy Way to Delete Photos from Your iPhone
- Clean photos on iPhone with a single click.
- Sort and preview iPhone photos by date.
- Export iPhone photos to a hard disk before deleting them.
- Permanently wipe iPhone photos without recovering.
- Support the latest versions of iOS.
Secure Download
Secure Download

How to Delete Photos on iPhone without One Click
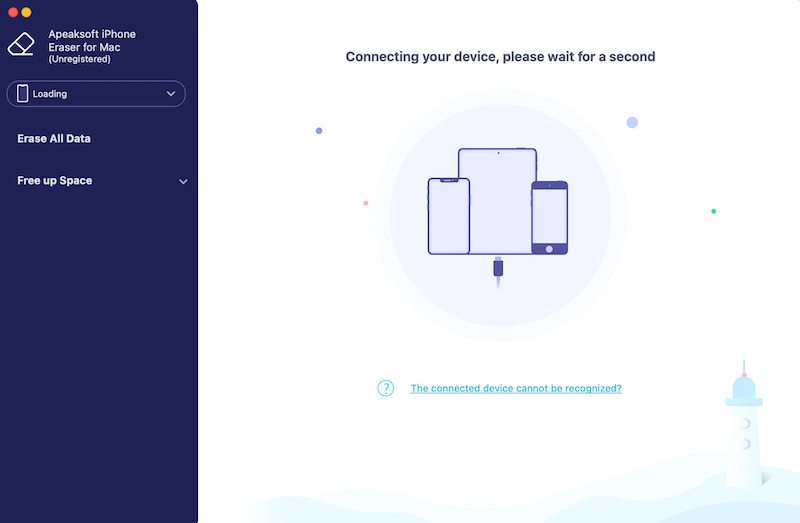
Step 1. Connect to your iPhone
Launch the best image eraser after you install it on your computer. Link your iPhone to your computer with a Lightning cable. Then your device will be recognized automatically.
Step 2. Preview photos
Click and expand the Free up Space heading on the left side, and choose Clean up Photos. Next, click the Export & Delete button to view all photos on your iPhone.

Step 3. Erase photos on the iPhone
If you have not backed up your photos, select the desired photos or check Select All, and click Export. Then choose an output folder and save the photos. At last, click on the Delete button to permanently remove photos on your iPhone. This program can also help you erase iPhone.

Conclusion
This guide demonstrated how to delete photos from your iPhone in various conditions. You can erase a single photo, a few pictures, or all photos from your iOS device. To completely remove iPhone photos, you also delete them from the Recently Deleted folder. Apeaksoft iPhone Eraser is a one-stop solution to get rid of photos and free up iPhone space. If you have other questions about this topic, please write them down below this post.
Related Articles
Want to delete music from iPhone, iPad or iPod? Just follow this article to remove songs/albums/all music/playlists from iPhone with 3 simple solutions.
You may feel your iPhone is less smooth after long-term use, for all the history will be stored. It's important to clear the history on your iPhone.
This post is focusing on how to delete all emails or a certain email account on your iPhone, iPad or iPod Touch. Keep reading and learn how to make it.
Time to organize contacts! Here are six ways to delete contacts. If you want to delete multiple contacts at one time on your iPhone, don't miss this post.
