Uninstall iTunes Safely: A Step-by-Step Guide for Mac & PC
Is iTunes taking up too much space or causing issues on your computer? Old media files, caches, and backups can slow down system performance and cause sync problems. Maybe you need to uninstall and reinstall iTunes to fix these issues. In this guide, we will show you how to uninstall iTunes safely and remove related files on both Mac and Windows, so you can get your system running smoothly again.
PAGE CONTENT:
Part 1: How to Uninstall iTunes on Windows
If you want to uninstall iTunes from your Windows PC, simply deleting its shortcut or folder won't get rid of it completely. Leftover files and components can take up space or cause glitches on your computer. Below are two reliable methods to remove iTunes thoroughly:
Uninstall iTunes Using Settings - For Windows 10/11
Windows 10 and 11 users can uninstall apps directly through Settings. It's the quickest and most modern way to remove iTunes.
Step 1. Open the Start Menu and select Settings.
Step 2. Click Apps on the Settings window.
Step 3. Type iTunes in the search bar. When iTunes appears, hit it and click Uninstall.
Step 4. Click Uninstall to confirm again. Then the software will be removed soon. Repeat the steps to delete iTunes-related software. At last, restart your computer to finish.

Use Control Panel - For All Windows Versions
The Control Panel works on all Windows versions. Regardless of which Windows version you're using, you can uninstall iTunes completely with this reliable method.
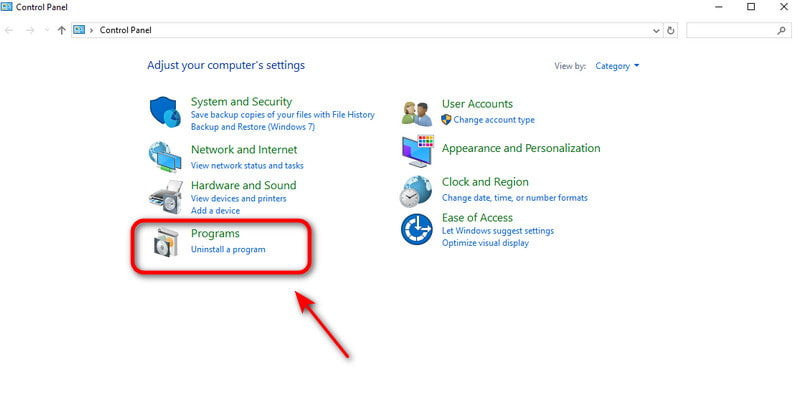
Step 1. Open the Start Menu and type "Control Panel", then click it.
Step 2. Choose Uninstall a program under the Programs section.
Step 3. Type "iTunes" in the search bar. When iTunes appears, hit it and click Uninstall.
Step 4. Tap Uninstall to confirm again. Then the software will be removed soon. Repeat the steps to delete iTunes-related software. At last, restart your computer to finish.
Part 2: How to Uninstall iTunes on Mac
How to remove iTunes from a Mac depends on your macOS version. Since Catalina, iTunes has been replaced by dedicated apps: Apple Music, Apple TV, Apple Books and Apple Podcasts, which means users on newer systems don't need to uninstall iTunes. But on macOS Mojave or older versions, iTunes is still a core system app, so you can remove iTunes by following a few technical steps.
Best Way to Uninstall iTunes for All Mac Models
Uninstalling iTunes is a complicated task, but Apeaksoft Mac Cleaner makes it simple. It works on all Mac models and can easily and completely delete unused apps and their leftover files on Mac. What's more, Mac Cleaner can monitor system performance, free up storage space on Mac and boost your Mac's speed.
Your Smart Assistant for Monitoring Mac Health
- Uninstall apps and related files completely on Mac.
- Disable unnecessary settings to boost system performance.
- Remove junk files/Cache/Duplicates/iTunes backups from your Mac.
- Monitor your Mac status and health in real time.
Secure Download

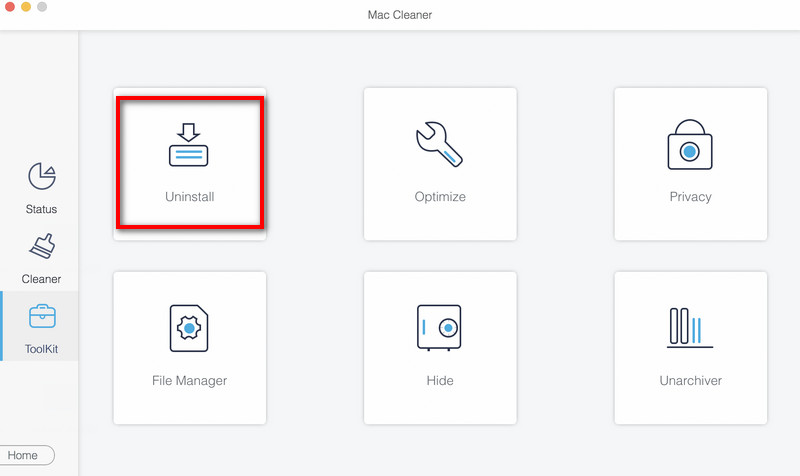
Step 1. Launch Mac Cleaner, choose Toolkit on the interface, and select Uninstall.
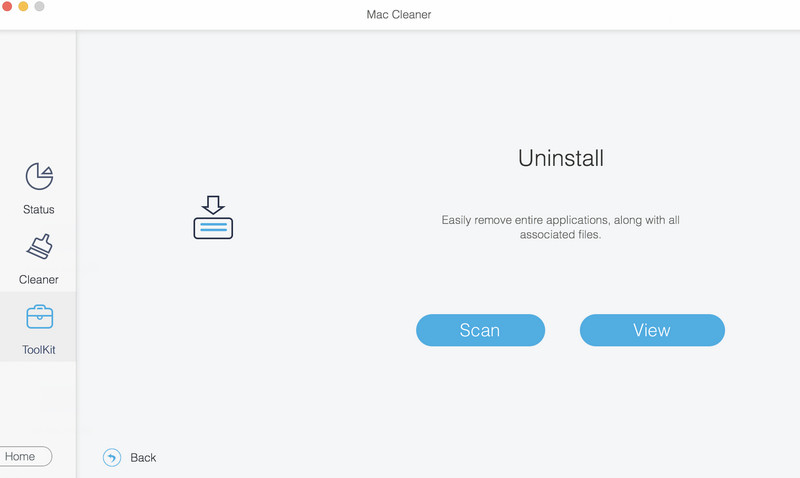
Step 2. Click Scan to scan all the apps on your Mac quickly. Click View to check the useless apps on your Mac.
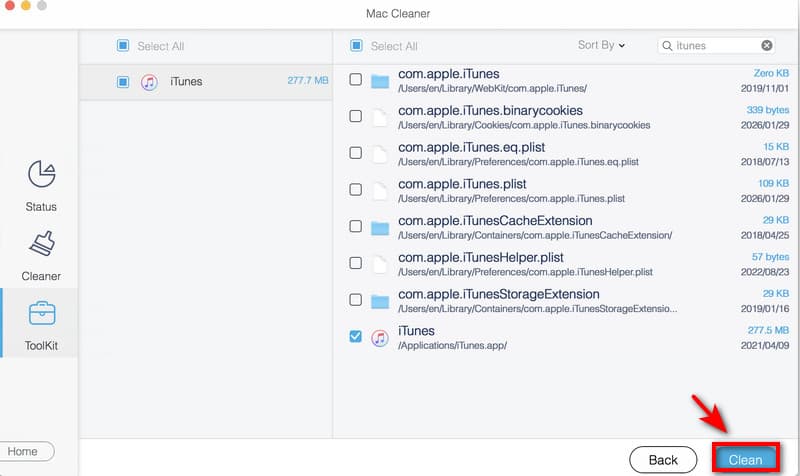
Step 3. Select iTunes and click Clean to remove it from your Mac.
Use Terminal - For macOS Mojave or Older
On macOS Mojave 10.14 or older, you can use Terminal commands to uninstall iTunes completely. Before uninstalling, you need to disable SIP first. Follow the steps below and operate carefully.
Step 1. Press the Command + Space buttons together. Type Activity Monitor in the search bar. If iTunes is open, double-click on iTunes and click Quit. Make sure your iTunes is not running.
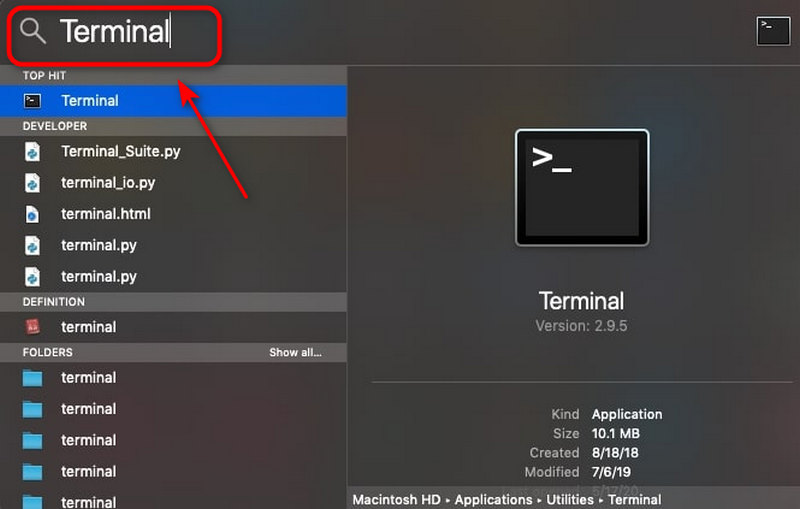
Step 2. Press the Command + Space buttons again, type Terminal in the search window, and press Enter.
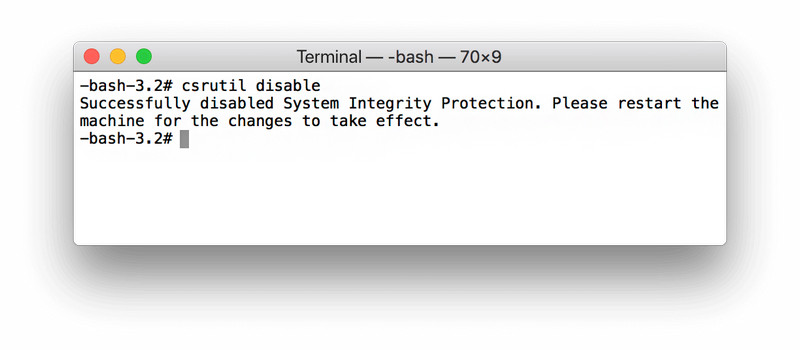
Step 3. Type csrutil disable to disable the Apple System Integrity Protection.
Step 4. Enter cd /Applications/ and press Return to open the Application folder from the Terminal.
Step 5. Enter sudo rm -rf iTunes.app/ in the window and press Return. Type your Mac administrator passcode to allow the removing process. Then, iTunes will be uninstalled from your computer soon.
Step 6. Don't forget to remove the iTunes-related files to clear system data on Mac. Type the following commands in Terminal:
- rm -rf ~/Library/Preferences/com.apple.iTunes.plist
- rm -rf ~/Library/Preferences/com.apple.iTunesHelper.plist
- rm -rf ~/Library/Caches/com.apple.iTunes
- rm -rf ~/Library/Application Support/iTunes
Note: After you remove iTunes from your Mac, don't forget to enable the System Integrity Protection again. This step will protect your system files and applications from being modified or deleted by mistake. Follow the steps: Reboot your Mac > Open Terminal and type csrutil enable in the command window > Press Return.
Use Finder - For macOS Catalina or Later
On macOS Catalina 10.15 and later, Apple removed iTunes and replaced it with Music, TV, Books and Podcast apps. These apps are built into the system and cannot be uninstalled, but you can delete unnecessary data via Finder.
Step 1. Open Finder and select Go to Folder.
Step 2. Enter one path below at a time and click Go.
- Music downloads: ~/Music/
- TV shows and movies: ~/Movies/TV/
- Podcast downloads: ~/Music/Podcasts/
Step 3. Drag unwanted files or folders to the Trash.
Step 4. Click Go to Folder and type the following path, and click Go.
- ~/Library/Containers/com.apple.Music/
- ~/Library/Containers/com.apple.TV/
- ~/Library/Containers/com.apple.Podcasts/
Step 5. Delete all files inside each folder.
Part 3: FAQs About Uninstalling iTunes
Why can't I find iTunes on my Mac?
If your Mac is running macOS Catalina or later, iTunes no longer exists as a system app. Apple split it into dedicated apps: Music, TV and Podcasts.
How to delete apps on Mac that I can't uninstall?
The easiest way to uninstall apps on Mac is to use a third-party uninstaller, like Apeaksoft Mac Cleaner. You can also use Terminal to delete apps by typing the following commands: cd /Applications and sudo rm -rf AppName.app.
Why is iTunes still taking up space after uninstalling it?
Media downloads, cache files, backup folders or other related files may remain after uninstallation. You can remove these files manually using Finder and empty the Trash.
Conclusion
To sum up, we've explored various ways to uninstall iTunes on Mac or Windows. Remember to back up your important files first and proceed carefully to avoid deleting important files by mistake. If you want an easier and safer cleanup, try using Apeaksoft Mac Cleaner to uninstall unused apps or free up your storage space!
