Wi-Fi can be the most convenient way to connect to the Internet. You can connect your Mac to Wi-Fi in a public place, workplace or at home. However, there are heating complaints that Wi-Fi connection is not available on Mac.
“My MacBook Pro 16” won’t connect to Wi-Fi but my other device, iPhone X will”
“My MacBook Air stays connected to Wi-Fi, but no Internet access”
“My Mac Pro won’t connect to Wi-Fi for an invalid password at home”
“My MacBook Air cannot connect to such public Wi-Fi as Starbucks, but others can. Why?”

The reasons why Mac is not connecting to Wi-Fi can be summarized as follows:
- There is a problem with your router.
- The broadband provider’s network is down.
- There is something wrong with your won Wi-Fi network settings.
Not sure which one reason causes the problem?
Just try the following 12 solutions one by one to fix the problem.
- 1. Check and Close to the Router Location
- 2. Reboot Mac and Router
- 3. Check Wireless Diagnostics on Mac
- 4. Forget Your Wi-Fi Network
- 5. Update Mac OS X/11
- 6. Check Your Physical Hardware
- 7. Check Your TCP/IP Settings
- 8. Check Your Proxies Settings
- 9. Change Your DNS settings
- 10. Reset NVRAM/PRAM
- 11. Reset SMC
- 12. Change Your Wi-Fi Router’s Channel
- 13. Contact Broadband Provider
- 14. Test Wi-Fi Speed and Related Information
1. Check and Close to the Router Location
When connecting Wi-Fi to Mac, you find it is connected, but you cannot access the Internet, especially when you are trying to connect Mac to a public Wi-Fi. The reason may be the location. Wi-Fi has the distance limit. The farther the distance, the weaker the Wi-Fi signal.
You should check where is the router location and get closer to it.
Then you can see if your Mac will connect to Wi-Fi.

2. Reboot Mac and Router
Another way to fix the disconnection Wi-Fi with Mac is trying to restart the Mac and the router.
To save all the data on Mac, and turn off Mac. After seconds, reboot Mac directly.
For the router, you just need to unplug it from the jack and plug it after 30 seconds. Then connect your Mac to Wi-Fi to see if the problem is resolved.

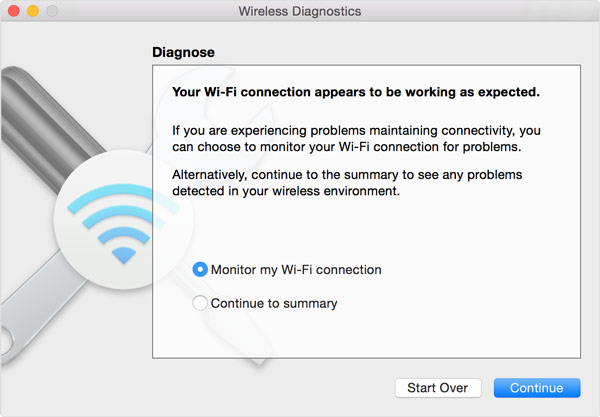
3. Check Wireless Diagnostics on Mac
After checking the above solution, you still cannot connect Mac to Wi-Fi? Check Wireless Diagnostics from Apple.
Wireless Diagnostics is the built-in wireless feature from Mac, which can analyze your wireless environment and monitor your Wi-Fi connection.
1. Press and hold the Option (Alt) key and click your Wi-Fi on the top menu bar.
2. Select Open Wireless Diagnostics and enter your admin name and password when prompted.
3. Follow the on-screen instructions to click Continue to get your Wi-Fi diagnostics report.
4. If there is an intermittent issue, you can choose to “Monitor My Wi-Fi connection, and it will stop monitoring if it finds an issue.
You can find the diagnostics report by choosing Go > Go to Folder from the Finder menu bar, then enter /var/tmp.
It will saves the report to your desktop on macOS X El Capitan or earlier.
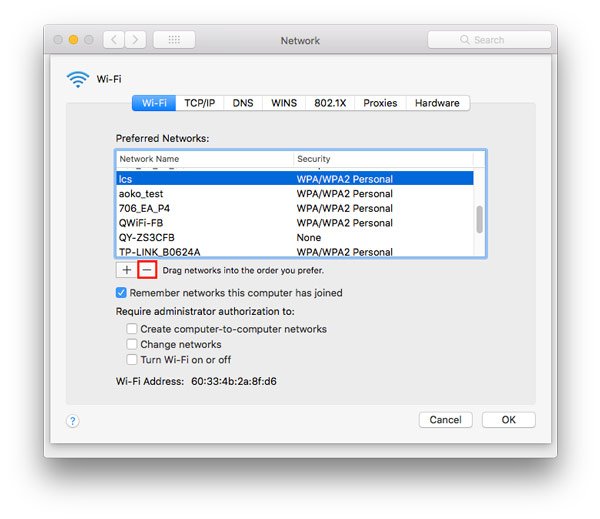
4. Forget Your Wi-Fi Network
Another tip you can try is to forget your Mac Wi-Fi connection and connect it again manually.
1. Click the Apple logo in the top-left corner and choose System Preferences.
2. Select Wi-Fi from the left side, then click Advanced inside its panel.
3. Choose the Wi-Fi that does not work and hit the minus button to drag networks into the order you prefer.
4. Click OK, and then Apply to forget the Wi-Fi.
After that, you have to reconnect the Wi-Fi manually by selecting the Wi-Fi and enter its password.
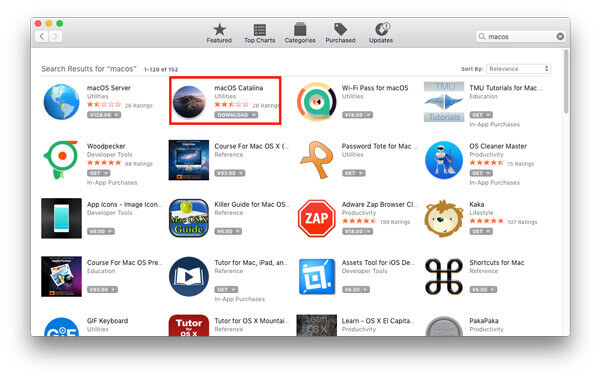
5. Update Mac OS X/11
Every macOS release comes with the new features and improvements. If you are still using a MacBook running in OS X 10.11 El Capitan, just do not hesitate to upgrade to the latest macOS Sequoia.
There is nothing secretive but to upgrade your macOS from App Store now.
Before upgrading Mac, do not forget to backup Mac first.
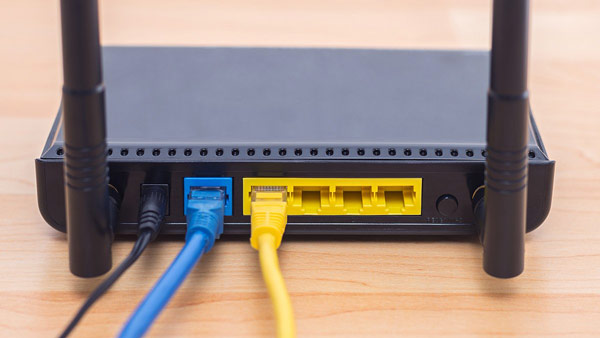
6. Check Your Physical Hardware
Wi-Fi connection on Mac needs the hardware support. Checking your Wi-Fi hardware to fix the problem is also one of the solutions.
Unplug your cable modem and wireless router, and wait for about 30 seconds. After that, plug your cable modem back and then the wireless router.
If you cannot make sure if the wireless hardware is problematic, you should contact AppleCare or the nearest Apple Service Provider and ask them for help.
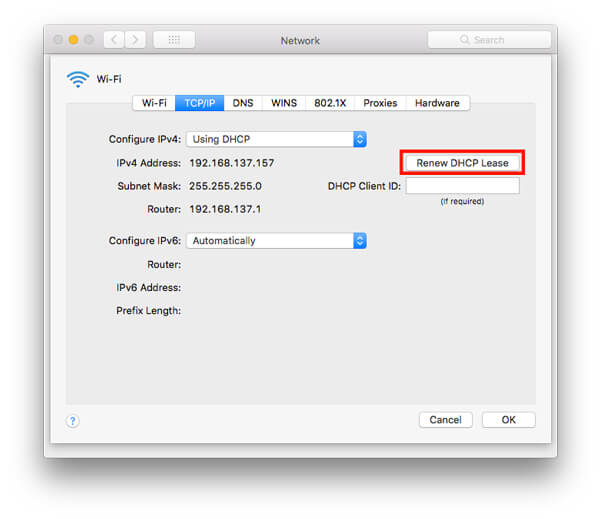
7. Check Your TCP/IP Settings
TCP/IP settings define how your Mac communicate with other devices. It deserves your free trial to check them when Mac will not connect to Wi-Fi.
1. Click the Apple logo in the top-left corner and choose System Preferences.
2. Select Network and choose Wi-Fi from the left side, then click Advanced inside its panel.
3. Switch to TCP/IP tab and click Renew DHCP Lease.
Considering the DHCP (Dynamic Host Configuration Protocol) is responsible for assigning IP address to your Mac, it can get your Wi-Fi connection working well again.
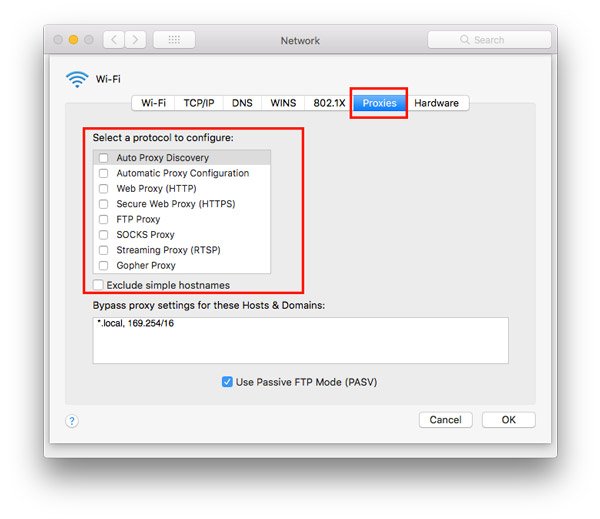
8. Check Your Proxies Settings
Proxies settings should be enabled when your Mac is connected to a network that requires a proxy server to access the internet. While connecting to Proxy server, your router will be disconnected to Mac. So, when you are connecting Wi-Fi to your Mac, you should make sure the Proxies settings are unchecked.
1. Repeat the steps above to enter Wi-Fi settings under “Advanced”.
2. Switch to the Proxies tab and make sure all the protocols are unchecked.
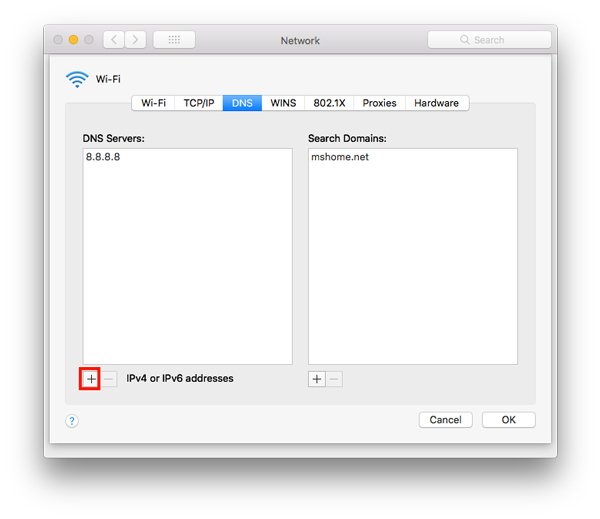
9. Change Your DNS settings
DNS is the system that is used to match the website domain names with the IP addresses. When your Mac is not connecting to Wi-Fi, you can change the DNS servers to connect to the web.
3. Again, repeat the steps above to enter Wi-Fi settings under “Advanced”.
4. Switch to the DNS tab and click the plus sign under DNS Servers.
5. Enter the IP address you could use, e.g. 8.8.8.8, for Google’s public DNS.
6. Click OK, then Apply.
Here are other public DNS you can use:
Google: 8.8.8.8 and 8.8.8.4
Cloudflare: 1.1.1.1 and 1.0.0.1
OpenDNS: 208.67.220.220 and 208.67.222.222
Comodo Secure DNS: 8.26.56.26 and 8.20.247.20
DNS Advantage: 156.154.70.1 and 156.154.71.1
10. Reset NVRAM/PRAM
NVRAM (Non-Volatile Random-Access-Memory) and PRAM (Parameter Random-Access-Memory) are two internal Mac components that store certain settings even when your Mac is turned off.
Resetting PRAM/NVRAM can clear out the virtual cobwebs and get your Wi-Fi working again.
This is used in places like your computer's internal clock and resetting the PRAM/NVRAM can be an effective way to clear out the virtual cobwebs and get your Wi-Fi up and running again.
The Steps of resetting the NVRAM and PRAM are the same.
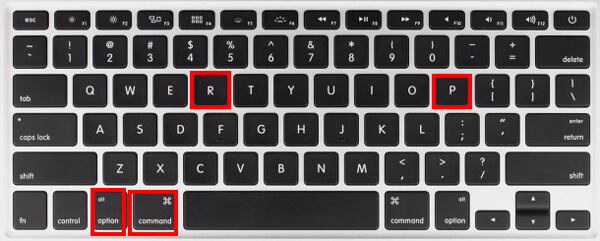
1. Start or restart Mac, press and hold Option + Command + P + R keys together immediately.
2. Release the keys after about 20 seconds. (For Mac that plays a startup sound, you can release the keys after the second startup sound.)
Note: You should turn off the firmware password, otherwise, the key combination does nothing.
11. Reset SMC
SMC (System Management Controller) is responsible for the low-lever functions on Intel-based Mac computer. When you find you can connect the Wi-Fi, but the Internet too slow to access on Mac, you can reset SMS settings.
Moreover, when your Mac performs unusually slowly, even though its CPU isn't under an abnormally heavy load, you can also reset the SMC to fix it.
The settings of resetting SMC depend on the removable battery.
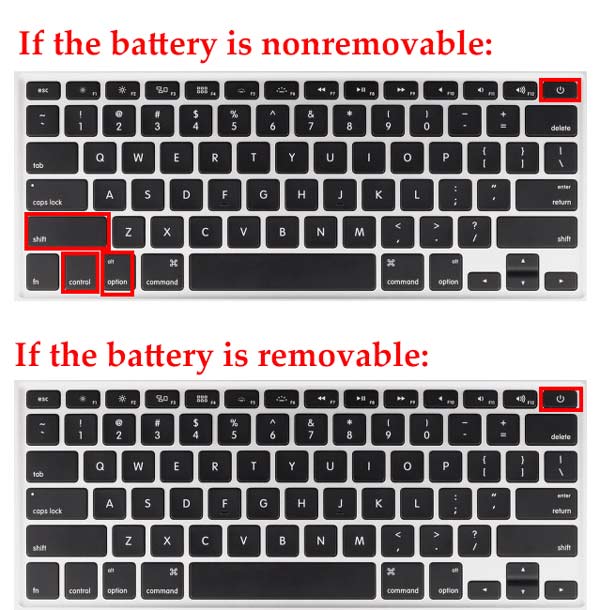
If the battery is nonremovable:
1. Shut down your Mac, press Shift + Control + Option and hold the power button (Or the Touch ID on a MacBook Pro) meanwhile for 10 seconds.
2. Release all the keys and press the power button again to turn on your Mac.
If the battery is removable:
1. Shut down your Mac. Remove the battery.
2. Press and hold the power button for 5 seconds.
3. Reinstall the battery.
4. Press the power button again to turn on your Mac.
After that, you can connect your Wi-Fi on Mac to see if the Internet is available.
12. Change Your Wi-Fi Router’s Channel
Some countries or regions have regulations that will affect wireless signal strength and the use of Wi-Fi channels. For example, when you go abroad to other countries, you should make sure your Mac has enabled Location Services, which lets you connect to Wi-Fi in that country.
1. Choose Apple menu > System Preferences, then click Security & Privacy.
2. Click the lock sign in the bottom-left corner of the window, then enter your password to unlock it.
3. Navigate the Privacy tab, select Location Services, then select the checkbox of Enable Location Services.
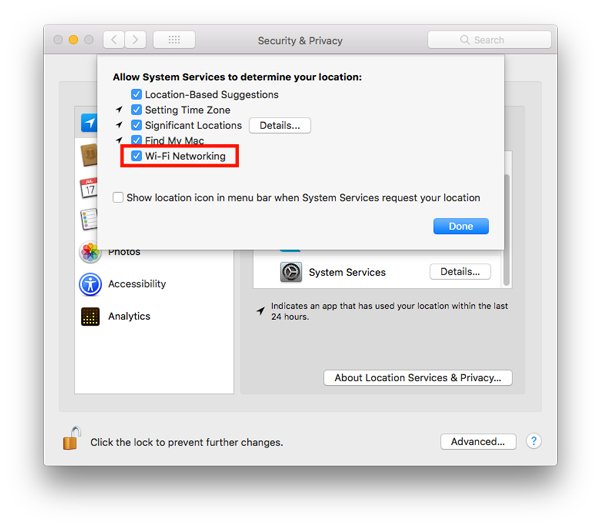
4. Scroll to the bottom of the list of apps and services to click the Details button next to System Services.
5. Select the checkbox of Wi-Fi Networking, and click “Done”.
Then you should connect the Wi-Fi easily on Mac even if you are at abroad
13. Contact Broadband Provider
If none of the above solutions work, you should contact your Internet service provider (ISP). If the issue of Wi-Fi not working is not from your sides, you can turn to them for help and ask them to check the broadband for you.

14. Test Wi-Fi Speed and Related Information
While you find Mac won’t connect to Wi-Fi, but other devices like iPhone, iPad, will, or the Wi-Fi connection is connected, but cannot access the Internet, you should check the Wi-Fi speed and its related information.
How to test its speed or check the related information?
Apeaksoft Mac Cleaner is the Wi-Fi analyzer on Mac that can help you exactly. Though its name, you may regard it as the data cleaner program on Mac. However, it is the all-in-one Mac manager to monitor Mac system (CPU, memory, disk, etc.), clean unwanted files (old, large, junk, duplicated files) and the toolkit, including checking Wi-Fi status, shred data, uninstall apps, hide the files, etc.

4,000,000+ Downloads
Test Wi-Fi download speed, upload speed, network delay, etc.
Test the Wi-Fi signal, subnet mask, the connecting devices, etc.
Show the Mac address, and gateway of the Wi-Fi.
Compatible with macOS 15 Sequoia and before.
Free download this Wi-Fi checker on your Mac. This software is compatible with iMac, iMac Pro, MacBook, MacBook Air, MacBook Pro, etc. You can free download it on your any Mac that is getting the Wi-Fi issue.
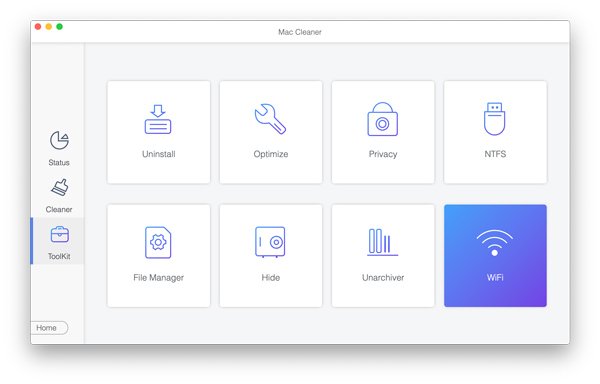
In the main interface, there are 3 types of features left for you, Status, Cleaner and Toolkit.
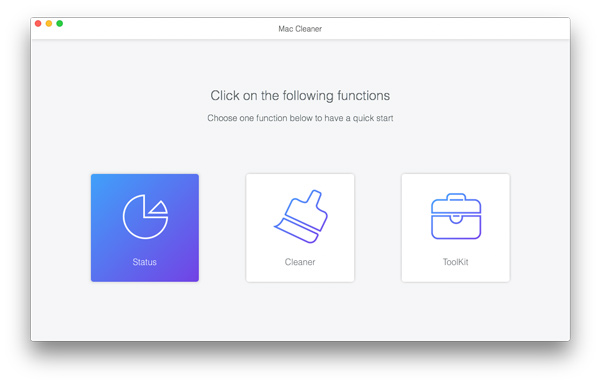
Here we select WiFi under ToolKit.
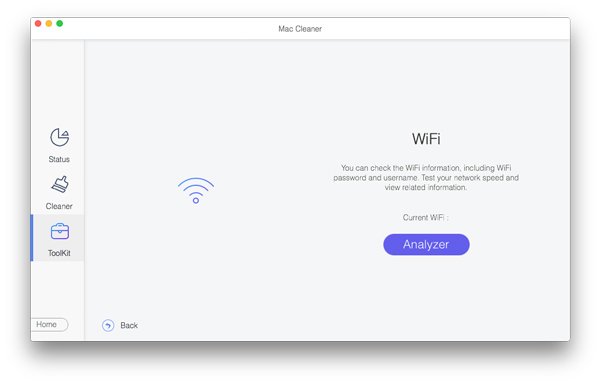
In the pop-up window, select “Analyzer” and this software will detect the Wi-Fi connection on this Mac.
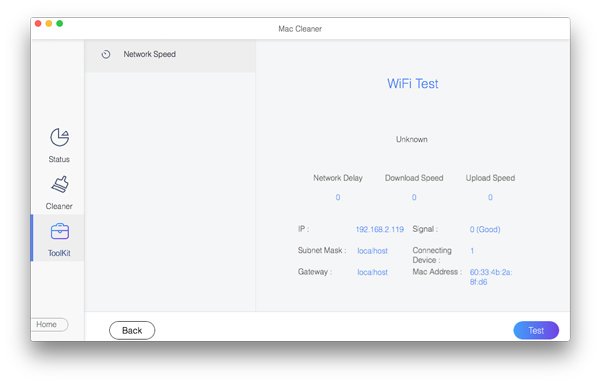
Then in the popup window, you should click Test and this software will start testing the Wi-Fi connection.
Then you can see the Wi-Fi testing result, like uploading speed, download speed, Mac address, etc.
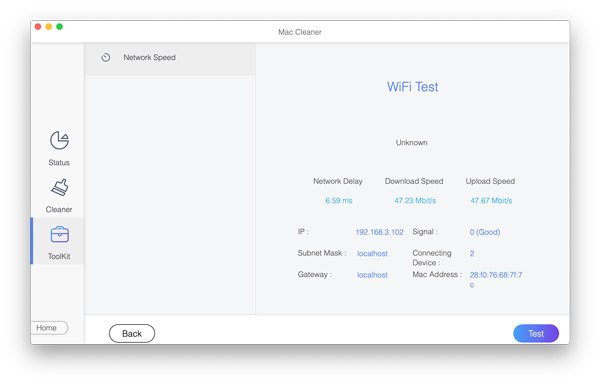
That’s all there is to it.
Conclusion
Wi-Fi is the most direct way to surf the Internet on Mac. However, when Mac is not connecting to Wi-Fi, you could find the solutions via the router, Mac Wi-Fi settings and the broadband. This post lists the top 14 solutions to help to fix the problem.
All the solutions can be done by yourself without any skills.
If this post is helpful, do not hesitate to share it with more friends.
Any questions can be left in the comments below.