"I have a Dell laptop and recently upgrade to Windows 10, everything was fine at first, but when I log into my laptop after it was in sleep mode, it froze and I had to perform a hard shutdown, then every time I start my computer, the error notification of Scanning and Repairing Drive C: will pops up, how to fix this problem?"

It is annoying that Windows loading process is interrupted by various problems. Scanning and repairing drive is one of the most common error stops Windows access. In this tutorial, we are going to tell you how to fix this problem quickly.
- Part 1: What does scanning and repairing drive mean
- Part 2: How to solve scanning and repairing drive stuck problem
- Part 3: How to recover lost data after Windows System Restore or Refresh
Part 1: What does scanning and repairing drive mean
Scanning and repairing drive stuck is a process of self-test. It means that something wrong on the boot drive and Windows tries to repair it. The principal facts that cause this error include:
1. Shut down the computer incorrectly. Most people reported that they encounter the error after hard shutdown or forcedly turned off.
2. System files are damaged due to bad sector or other problem.
3. The computer is affected by virus, Trojan, or other malicious programs.
4. Incorrectly configured drivers.
5. Unknown reasons.
Part 2: How to solve scanning and repairing drive stuck problem
If your Windows stuck in scanning and repairing drive C, you can fix it and access your PC with the solutions below.
Solution 1: Boot into Safe Mode
Safe Mode is a diagnosis startup mode in Windows 10/8/7. It is used to troubleshoot by gaining limited access to Windows. So, it could fix scanning and repairing drive stuck caused by malicious programs.
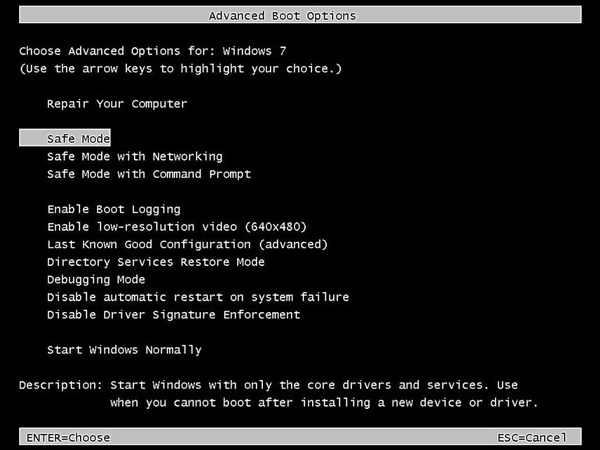
Step 1: Reboot your Windows, and keep hitting "F8" or "Shift + F8" before Windows logo appears.
Step 2: On Windows 10/8/8.1, go to "Troubleshoot" > "Advanced Options" > "Startup Settings" and click the "Restart" button. Then choose "Safe Mode" on Startup Settings screen.
On Windows 7, the Boot Options screen will pop up directly. Click "Safe Mode", you can go into it immediately. If everything is fine, you can try to boot Windows in normal mode.
Solution 2: Check and repair boot drive
Corrupted boot drive is another reason that triggers Windows 10 scanning and repairing drive. So, you need to check and repair your boot drive.
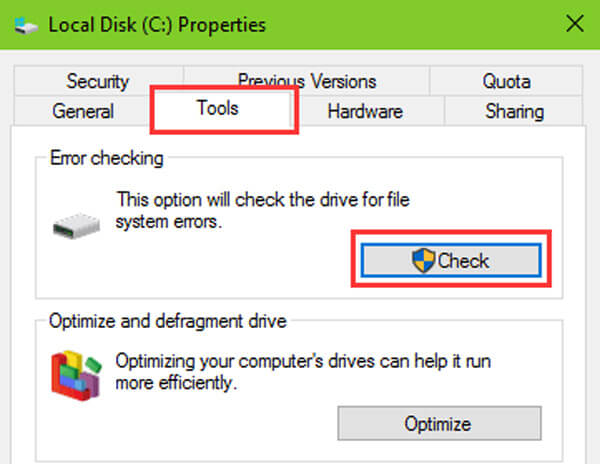
Step 1: Boot into Safe Mode, press "Win + E" to open a File Explorer, right-click on the disk that appears on the alert message.
Step 2: Go to the "Tools" tab and hit the "Check" button under Error checking area.
Step 3: Next, click on "Scan drive" on the popup dialog to start checking errors on boot drive. Finally, click "Scan and repair drive" to fix it if there is an error.
Solution 3: Repair boot drive with PowerShell
Another way to repair boot drive and fix scanning and repairing drive c stuck Windows 10 is the PowerShell.
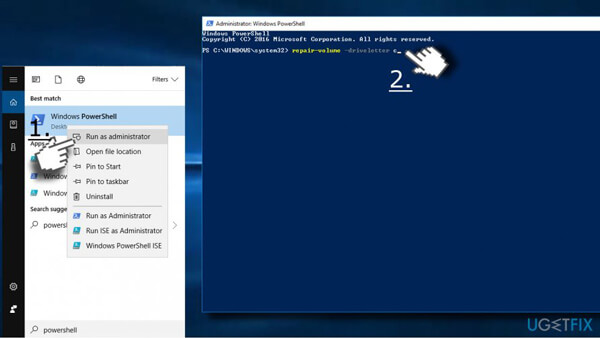
Step 1: Press "Win + Q" after boot into Safe Mode and then search for "Powershell", right-click on it and click "Run as Administrator".
Step 2: Perform the command "repair-volume -driveletter c" to repair your boot drive.
By default, disk c is the boot drive and you can replace it with your boot drive letter.
Step 3: Wait for the process to complete. Next, reboot your Windows 10 and the error should not appear again.
Solution 4: Disable CHKDSK on Booting
If your disk is fine and the scanning and repairing drive stuck at 10 persists, you can disable chkdsk on booting with the steps below.
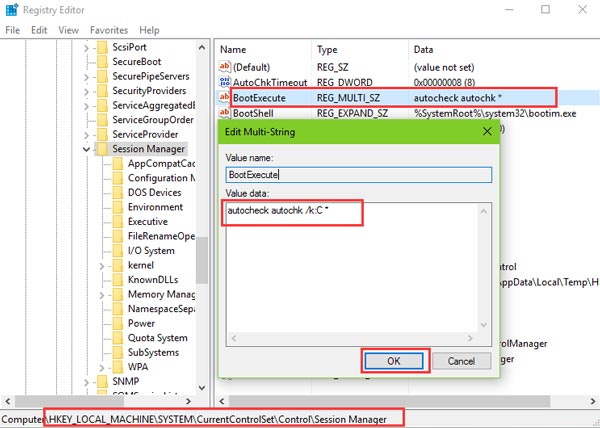
Step 1: Hold "Win + R" to open Run dialog, input "regedit" and hit "Enter" key to start the Registry Editor.
Step 2: Navigate to HKEY_LOCAL_MACHINE\SYSTEM\CurrentControlSet\Control\Session Manager, find and double click BootExecute sub-entity.
Step 3: Replace the default Value data with "autocheck autochk /k:C *", click the OK to confirm it.
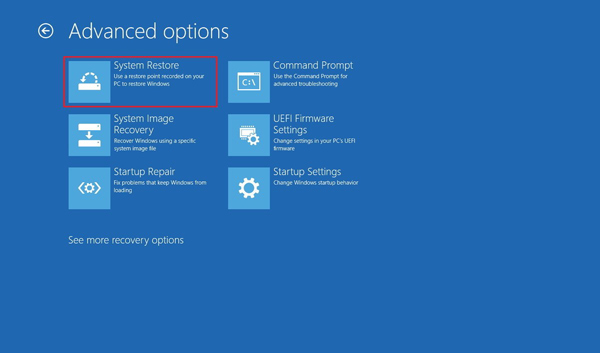
Solution 5: System Restore
As mentioned, incorrect configuration may be responsible for the Windows scanning and repairing drive error. So, you can fix it by system restore.
Step 1: Create a Windows 10 DVD or bootable USB, put it into your PC and reboot it.
Step 2: Follow the onscreen assistant until you see the Windows Installation screen, head to "Repair your computer" > "Troubleshoot" and choose "System Restore".
Step 3: Then complete rest steps and fix Windows boot issue.
Part 3: How to recover lost data after Windows System Restore or Refresh
If you lost some files during Windows system restore, Apeaksoft Data Recovery could help you. Its key features include:
1. Get back lost files from your memory in one click.
2. Recover data in various situations, like system restore, mistake operation, accidental deletion, virus attack, and more.
3. Support a variety of data types and formats.
4. Retrieve deleted files in original conditions.
5. Preview for selectively recovery.
6. Quicker, safer and lightweight.
7. Available to Windows 10/8.1/8/Vista/XP.
How to recover lost data after Windows System Restore or Refresh
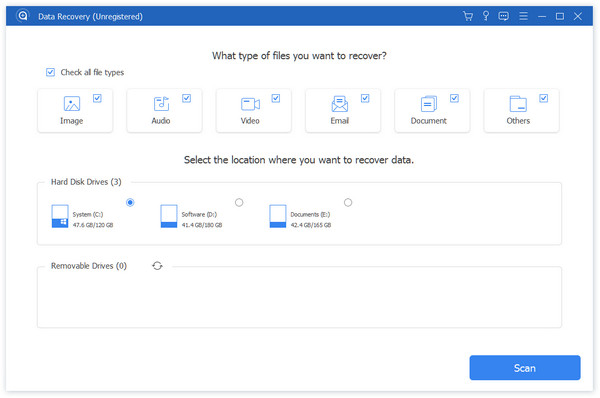
Step 1: Scan entire drive to look for lost data
Download and install Data Recovery on your PC after system restore to fix windows 10 scanning and repairing drive stuck.
Launch the program, select what file types you want to recover in Data Type area and choose where the files stored originally in Location area. Then click on the "Scan" button to start looking for files.
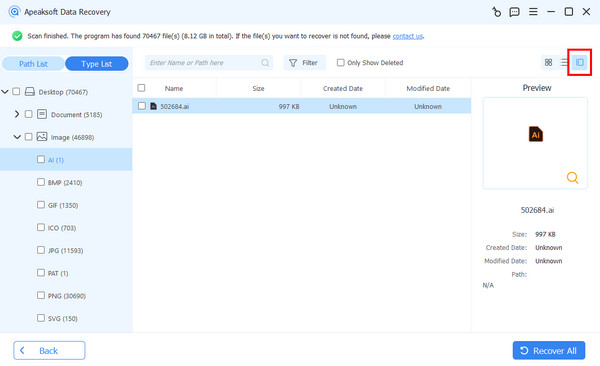
Step 2: Preview before data recovery
After scanning, you will be brought to the result window with all readable files. Click on a data type on left hand column, you can see all files in detail on right pane.
The "Filter" function on top ribbon is able to locate a file quickly. And the “Deep Scan” function could get back more readable content.
Step 3: Recover lost data after fixing scanning and repairing c drive
Select the desired files and click on the "Recover" button to start retrieving lost data to a proper destination.

Conclusion
In this tutorial, we have talked about how to fix scanning and repairing drive error without data loss. Windows boot process is to read the files on your boot drive and load entire operating system. If there is something wrong, Windows will try to scan and repair it. But if you stuck in the process, you can fix it by yourself with our guides.