Reset iPhone should be a hard decision, because such activity may erase all things on your iPhone. But in some cases, we have to do it without any hesitation, such as iPhone freezes, iPhone 6 has been attacked by virus, you want to sell iPhone 5 to others, and more conditions you want to erase personal information on your phone. Apple has developed two features, hard reset iPhone and soft reset iPhone. They are used in different situations and produce various results. In this tutorial, we are going to talk about how to reset iPhone 17/16/15/14/13/12/11 in detail.

- 1. Backup your iPhone at first
- 2. How to hard reset iPhone to factory settings
- 3. How to soft reset iPhone
- 4. How to reset iPhone without Apple ID
- 5. How to restore iPhone after factory reset
- 6. FAQs about Resetting iPhone
1. Backup your iPhone at first
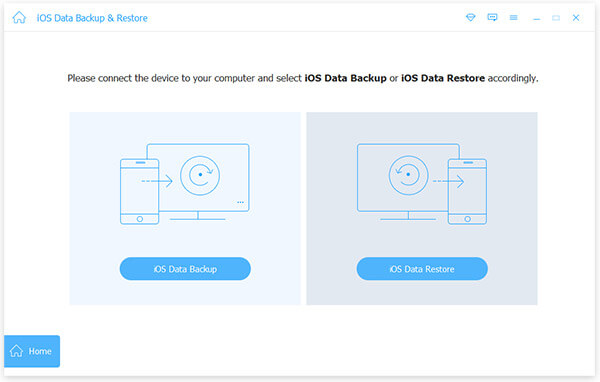
Before resetting iPhone, the most important thing is to create a backup. We recommend Apeaksoft iOS Data Backup & Restore, because it provides many easy-to-use features.
- Back up all data and files from your iPhone to the computer with one click.
- Open and preview iPhone backup files on your computer at any time.
- Extract files from iPhone backup file and save to your computer.
- Restore iPhone backup to your device after factory reset.
Step 1. Open the iPhone backup tool
Start the iPhone toolkit after you installed it on your computer, click "More Tools" on left sidebar and then pick "iOS Data Backup & Restore". Link your iPhone to your computer using the original USB cable.
Step 2. Backup your iPhone in one click
When your iPhone is recognized, click on the "iOS Data Backup" button. Then you will be present to the date type window. Here you can select what data types to backup. Once click on the "Next" button, the backup process will start.
Step 3. View your iPhone backup at any time
After backup is completed, you will be taken to the preview window. If you want to view iPhone data on your computer, you can select a backup file and click "View Now" to open it.
2. How to hard reset iPhone to factory settings
Method 1: Hard reset iPhone directly
If you iPhone is accessible, you can reset iPhone without others' help. It is feasible even you do not have an internet connection.
Step 1. Unlock your iPhone and go to "Settings" > "General". Scroll down and find out the option labeled as "Reset".
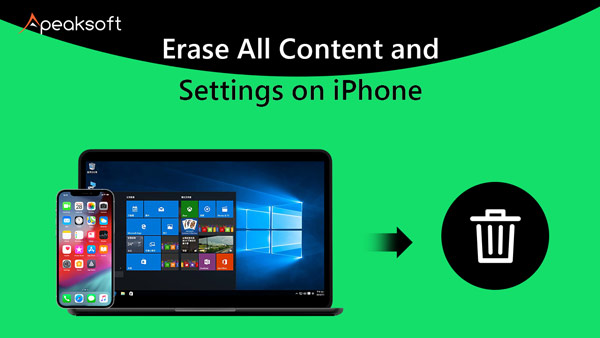
Step 2. Tap "Erase All Content and Settings" on Reset screen and then touch "Erase iPhone" to start hard resetting iPhone immediately.
Step 3. When the process is done, your iPhone will restart and present as a new phone showing the "Slide to set up" screen.
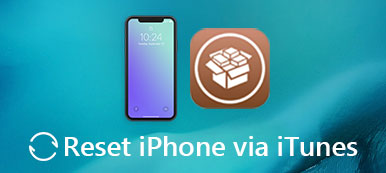
Method 2: Hard reset iPhone using iTunes
If your iPhone is frozen or you cannot reach the Reset screen, iTunes is able to reset iPhone too.
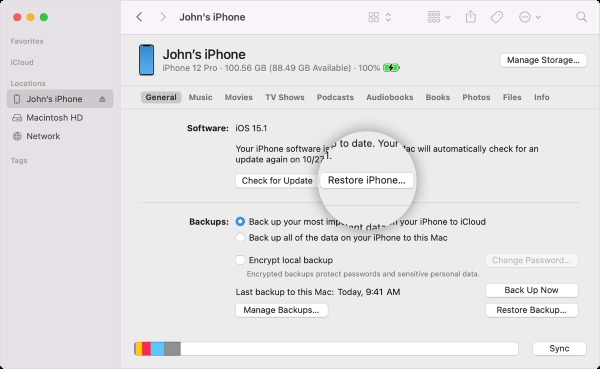
Step 1. Connect your iPhone to your computer and launch the latest version of iTunes.
Step 2. When it recognizes your iPhone, click the "Device" button and click "Restore iPhone" in the "Summary" tab.
Step 3. Click "Restore" option again. iTunes will begin restoring your iPhone to the factory state.
Step 4. After the process finishes, the Apple logo screen will appear on your phone and you can set it up as a new device.
3. How to soft reset iPhone
Soft reset iPhone is helpful when specific functions do not work as usual.
1. Soft reset iPhone 5/5s/5c: Press and hold down the Power key on top of your phone and the round "Home" button at bottom until Apple log appears.
2. Soft reset iPhone 6/6 Plus/6s/6s Plus: Hold down both the "Sleep/Wake" key on right side of the screen and "Home" button for a few seconds. When Apple logo shows up on the screen, release them.
3. Soft reset iPhone 7/7 Plus: the Home button is replaced with 3D Touch pad on iPhone 7/7 Plus. You need to press the "Power" button on the right side and the Volume Down button on the left side at the same time to evoke soft reset.
4. Soft reset iPhone 17/16/15/14/13/12/11 and other models of these series: to soft reset these iPhones, you should press the Volume Up button and release it quickly, press the Volume Down button and release it quickly, then press and hold the button at the right side until the Apple logo shows on the screen and release the button.

4. How to reset iPhone without Apple ID
Third party software is another option to reset iPhone, such as Apeaksoft iPhone Eraser. iPhone Eraser uses advanced technology to erase content and settings on your phone permanently. It is very easy to use, definitely a good choice to protect your information and get rid of various functional problems.
Step 1. Connect your iPhone to the eraser tool
Launch iPhone Eraser after installed it on your PC and plug in your iPhone to the computer via USB cord. If you have another iDevice to do hard reset, just connect both of them to your computer at the same time.
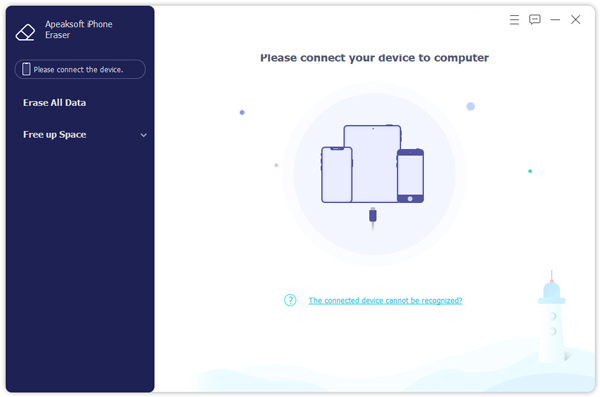
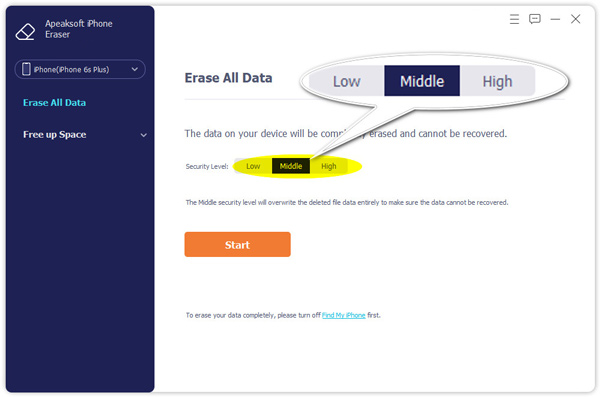
Step 2. Decide an erasing level
After connection is successful, you will be presented with three erasing level options, Low, Medium and High. Read the onscreen notations carefully and select proper one based on your needs.
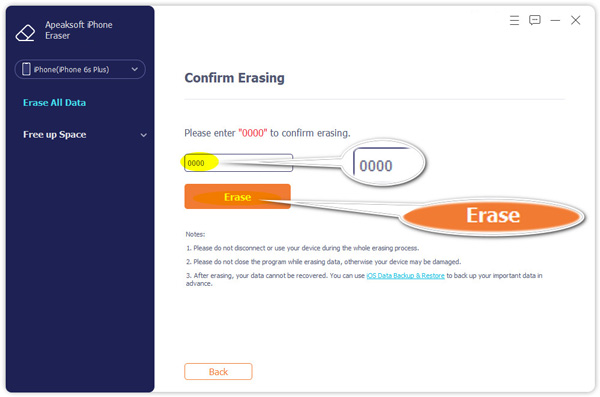
Step 3. Reset iPhone in one click
When you are ready, click on the Start button to start erasing your phone immediately. Then you need to input 0000 to confirm erasing and click the Erase button. Wait for the process to finish. You can restart your phone and check the result. You can also rely on it to reset a stolen iPhone.
You can also check this video tutorial to reset your iPhone:

5. How to restore iPhone after factory reset
After reset iPhone to factory state, you may need to restore some lost files on your iPhone. iPhone Data Recovery tool could help you. Its key features include:
1. Restore deleted data from iPhone devices, iTunes backup or iCloud backup.
2. Retrieve lost iPhone data to computers in original conditions.
3. Use physical connection to recover and restore iPhone faster.
4. Get back lost data on iPhone due to factory reset, accidental deletion, or system errors.
5. Support all iPhone models, including iPhone 17/16/15/14/13/12/11
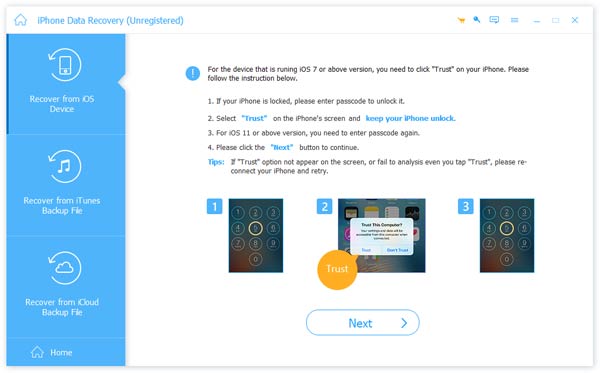
Step 1. Preparations for restoring iPhone
Get the latest version of iPhone Data Recovery installed on your PC. Use a USB cord to link your iPhone and the computer, then start the program and wait until your iPhone is recognized automatically.
Step 2. Preview backup file before restore
Click on the "Start Scan" button on the interface to start looking for lost data on your phone. When it is done, you will be presented with all restorable data organized by categories.
Step 3. Restore iPhone data to your computer
Select what you want to get back and click "Recover" button at bottom right corner to restore iPhone data to your computer.
6. FAQs about Resetting iPhone
Does resetting iPhone delete everything?
Yes. If you reset your iPhone, all data on the device will be erased, including photos, messages, call logs, contacts, apps, etc.
How do I reset my iPhone without losing everything?
You should back up your data to other devices or clouds before resetting your iPhone. You can use Apeaksoft iOS Data Backup & Restore to back up your iPhone data on your Windows or Mac computer.
What does it mean to soft reset?
The soft reset means restarting device, like mobile phones, computers, etc. When you soft reset your device, all applications will be closed and all data will be erased in RAM.
Conclusion
Despite it sounding scary, there will be time when you have to reset iPhone.Our tutorial demystify the processes of both soft reset and hard reset on iPhone 17/16/15/14/13/12/11 Now you should understand that soft reset iPhone is a simple reboot, which is used to free space and remove some software errors; and hard reset is more drastic and erases all information and personal settings on your phone. In additional, we also shared several iPhone utilities, such as iPhone Data Recovery, in this tutorial, to help you backup, reset and restore iPhone easily.