Flushing the DNS cache on the MacBook is not a task for network administrator or system administrator. In order to fix cache poisoning, Internet connection issues and communicate with the host correctly, you have to grasp the skill to clear DNS cache on your Mac.
What should you do if you were not familiar with the command lines of Terminal on Mac? The article shares the details about how to flush the DNS cache in macOS Sequoia and earlier operation systems as well as an easy alternative. Just learn more details from the article now.

- Part 1: The Easy Method to Flush DNS on Mac without Terminal
- Part 2: How to Clear DNS in macOS via Terminal
Part 1: The Easy Method to Flush DNS on Mac without Terminal
When you need to flush the DNS cache on all versions of macOS without command, or clear up all caches about the DNS, Apeaksoft Mac Cleaner is the one-stop Mac cleaner to clean DNS caches as well as other system junk, Photos junk, email junk, iTunes junk, large & old files, duplicated folder, uninstall apps and more others.
- Flush the DNS caches, MDNS, UDNS and other related junk files.
- Monitor the system performance and keep the Mac in a good status.
- Clean the junk files and ensures 100% security to speed up the system.
- Remove any junk files, old and large files, clutter, shred files and more.
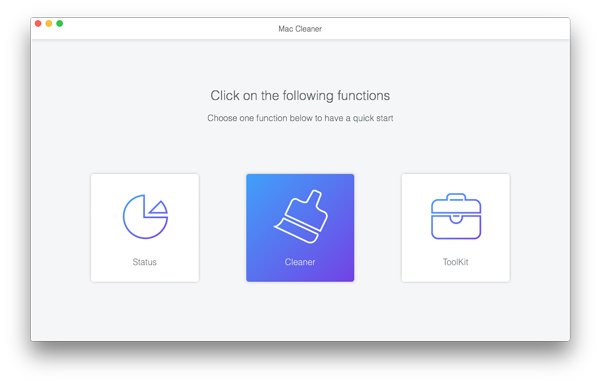
Once you have installed the Mac Cleaner, you can launch the program on your Mac computer. Choose the “Cleaner” option to have a quick start in the clearing process on your Mac.
 Step 2Flush the DNS cache on your Mac
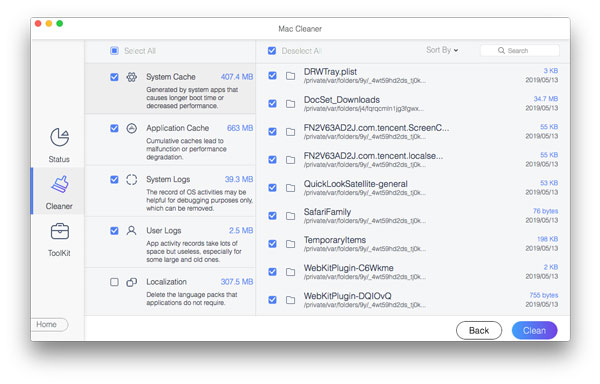
Click the “System Junk” to scan and locate the DNS caches. It includes the system cache, application cache, system logs, user logs, and more other localization files.
 Step 3Scan the DNS cache on your Mac
After that, you can click the “Scan” button, which takes a period of time to scan all the files. You can click the “View” button to check out the scan results to avoid any mistaken deletion.
 Step 4Select the DNS caches to delete
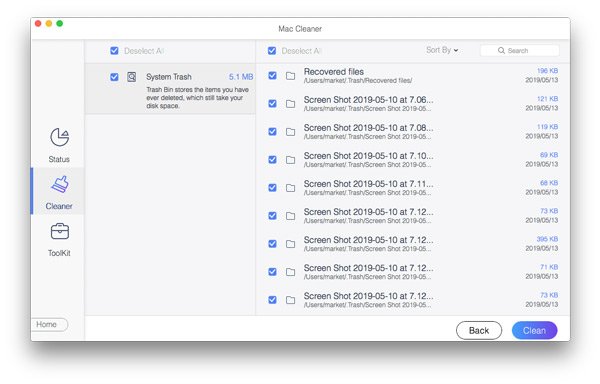
If you cannot get the files, you can click the “Re-scan” to scan the Mac again. Choose the DNS caches you want to clean, and then you can delete them by clicking the “Clean” button.
 Step 5Clear the DNS cache on your Mac
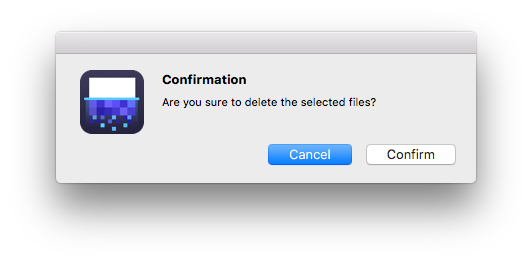
There is a confirmation window to confirm the process of flush DNS on Mac. Make sure you want to clean the DNS caches in the selected system junk, and click the “Confirm” button.
Part 2: How to Clear DNS in macOS via Terminal
How to flush DNS on Mac? Just close the web browser before performing a flush. It might not as difficult as your imagination. You have to pay attention to the macOS you are running.
Flush DNS Cache in macOS Big Sur and later
Step 1Go to “Applications” > “Utilities” > “Terminal”. It is the method to open up your Terminal command line interface application. You can follow the same process to launch the Terminal for other macOS.
Step 2Just type the following command, you can also copy and paste the command in the Terminal from a note.
sudo killall -HUP mDNSResponder
Step 3Type in the administrator password and press enter. The command will process to flush your DNS cache on macOS Big Sur and later.
Note: If you do not want to check the status manually, you can also ask the macOS to popup a message after clearing the DNS on MacBook. Here is the command line for your reference.
sudo killall -HUP mDNSResponder;say DNS cache has been flushed
Clear DNS Cache in macOS Yosemite or Above
Step 1Navigate to “Applications” > “Utilities” > “Terminal”.
Step 2Type the following command and press Enter:
sudo killall -HUP mDNSResponder
Step 3Just make sure you have the administrator account password.
Flush DNS Cache in macOS Yosemite v10.10 through v10.10.3
Step 1Navigate to “Applications” > “Utilities” > “Terminal”.
Step 2Type the following command and press Enter:
sudo discoveryutil mdnsflushcache
Step 3The administrator account password is also required.
Remove DNS Cache in macOS Mavericks/Mountain Lion/Lion
Step 1Navigate to “Applications” > “Utilities” > “Terminal”.
Step 2Type the following command and press Enter:
sudo killall -HUP mDNSResponder
Step 3Enter the password of the administrator account if asked.
Flush DNS Cache in macOS Snow Leopard or Lower
Step 1Navigate to “Applications” > “Utilities” > “Terminal”.
Step 2Type the following command and press Enter:
sudo dscacheutil –flushcache
Step 3It will ask the password for the administrator account.
Flush the MDNS/UDNS Cache
In order to flush all DNS caches on MacBook, you also need to clear both the Multicast DNS (MDNS) and Unicast DNS (UDNS). Just follow the similar method to clear the caches.
Clear the MDNS cache
sudo discoveryutil mdnsflushcache
Clear the UDNS cache
sudo discoveryutil udnsflushcaches
Conclusion
How to flush DNS cache on your Mac? When you want to reset your DNS manually in the different versions of macOS, you can learn more about the methods from the article. Of course, you can use the command line in Terminal to clear the DNS cache in macOS, as well as the Multicast DNS and Unicast DNS. If the solution is still too complicated to you, you can just use the one-stop Mac Cleaner to clear DNS cache and optimize the Mac operation system with ease. More queries about how to flush DNS cache on Mac, you can share more details in the comments.