Android Studio on Mac helps many programmers and software designers to come up with creative apps for Android phones. Although it is great software, you may want to uninstall Android Studio on Mac for many reasons. You may no longer be a programmer or switch to a new Mac device and tend to save some space in the old one. Whatever your reasons are, you can read this article to learn the two best methods of how to uninstall Android Studio on Mac.

- Part 1: Uninstall Android Studio on Mac Manually
- Part 2: Uninstall Android Studio on Mac with Easy Tool
- Part 3: FAQs about Uninstall Android Studio on Mac
Part 1: Uninstall Android Studio on Mac Manually
When it comes to uninstalling Android Studio on Mac, you may directly drag the application to your Trash and empty the Trash. However, this does not completely uninstall Android Studio on Mac since there are still associated files scattered in many folders and sneakily taking up your disk space. Therefore, here you will learn further steps to uninstall Android Studio on Mac completely without other third-party tools.
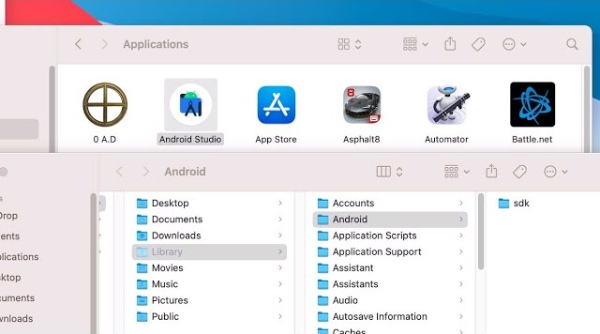
Step 1To let your macOS uninstall Android Studio, firstly, you need to click Finder on the desktop, and then click Applications. Find the Android Studio and right-click on it.
Step 2Afterward, click Move to Trash. Then, to find all the relevant files of Android Studio, you need to press the Command, Option, and Space Bar on your keyboard.
Step 3Type Android Studio in the Search Bar on the prompt window. And click plus button under the Search Bar, and you will see two dropdown menus.
Step 4Click the first one and click Others. Then, search System Files in the pop-up window and click the checkbox behind it. After that, from the second dropdown menu, you need to select Are Include.
Step 5All the files with Android Studio in their names will show up, then just simply choose them all and drag them to the Trash. Right-click the Trash and click Empty Trash.
Step 6 If you want a better effect, you can click the Apple icon on the menu bar and click Restart to complete the operation.
Note: Some associated files of Android Studio on Mac may not have Android Studio in the name. Hence, you can just type Android in Step 3. This method can be quicker than locating all the files in folders one by one. Meanwhile, the steps above are also suitable for uninstalling Android Studio on other Mac models.
Part 2: Uninstall Android Studio on Mac with Easy Tool
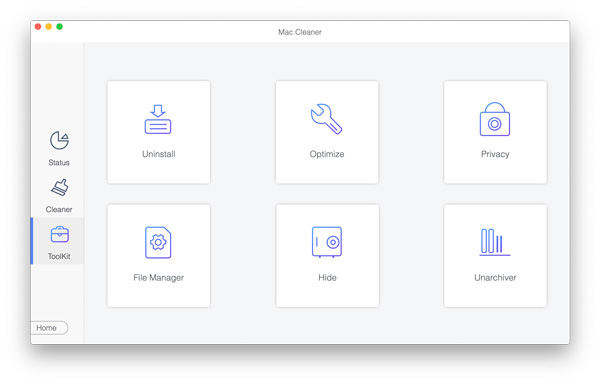
Although the above steps are simplified, you may still find it time-consuming to manually uninstall Android Studio on Mac. And locating those files on Mac folders requires much energy. Hence, why not use an easy tool to help you save more time? You can use the Apeaksoft Mac Cleaner to uninstall Android Studio on Mac completely without any leftover files. With a user-friendly interface and simple operation, you can uninstall any software from your Mac while waiting for a coffee.

4,000,000+ Downloads
Uninstall Android Studio on Mac quickly and entirely.
Ensure complete uninstallation without any leftovers.
Remove any unnecessary files and data from Mac safely.
Maintain a good status while monitoring your Mac system.
Step 1 Get a free download of the latest version of Mac Cleaner. Install and run this Cleaner on your Mac computer. On the main interface, you need to click Toolkit and click Uninstall which can help you uninstall Android Studio on Mac completely.
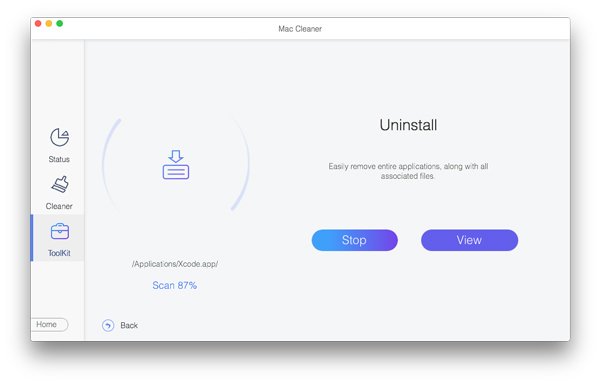
Step 2 Next, click Scan to allow the program to check all the applications on your Mac. You can see the progress percentage on the left side of the window. Once the scanning finishes, you need to click View to find the Android Studio from a list of apps.
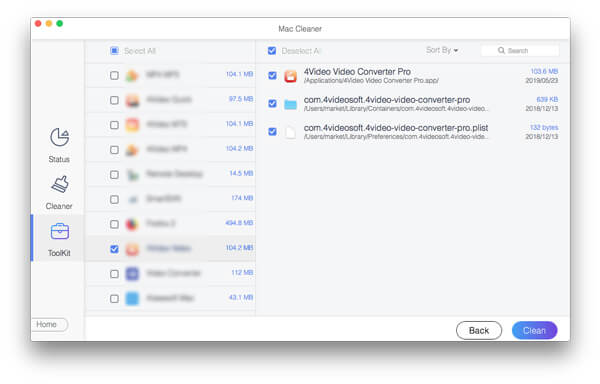
Step 3 Now, after locating the application you want to delete, click the checkbox in front of it and the associated files will show on the right side. In this way, you have selected the Android Studio and relevant files correctly. Simply click Clean to finally uninstall.
Note: You can also restart the Mac to achieve a cleaning effect and speed up your Mac.
Part 3: FAQs about Uninstall Android Studio on Mac
How to uninstall Android Studio on Mac using Terminal?
First, open Terminal on your Mac and execute the following commands: rm -Rf /Applications/Android\ Studio.app rm -Rf ~/Library/Preferences/AndroidStudio* rm -Rf ~/Library/Preferences/com.google.android.* rm -Rf ~/Library/Preferences/com.android.* rm -Rf ~/Library/Application\ Support/AndroidStudio* rm -Rf ~/Library/Logs/AndroidStudio* rm -Rf ~/Library/Caches/AndroidStudio* rm -Rf ~/.AndroidStudio* rm -Rf ~/AndroidStudioProjects rm -Rf ~/.gradle rm -Rf ~/.android rm -Rf ~/Library/Android*
Are there any leftovers after uninstalling Android Studio on Mac?
If you use the manual way to uninstall Android Studio on Mac, some traces will probably be left behind. You can try to execute the commands to do the uninstallation again to make sure there are no missing associated files from Android Studio.
How to find files from Android Studio on Mac?
Whether you use the manual way or use a third-party app to help, you can always manually check the files from Android Studio. Just open Finder and click Go on the menu bar. Then click Go to Folder. Type ~/Library and click Go to search for subfolders. After that, check the following folders: Android, Preferences, Application/Support, Logs, and Caches. And see if there are any associated files.
Conclusion
In brief, this article gives you two useful methods to help you uninstall Android Studio on Mac manually. Theoretically, you can rely on these two solutions to completely get rid of the Android Studio on Mac, and no need to worry about any possible recovery. Now, try it yourself.