Hoe je een MacBook Pro snel terugzet naar de fabrieksinstellingen
MacBook Pro terugzetten naar fabrieksinstellingen Dit betekent dat je je laptop terugzet naar de fabrieksinstellingen. Er zijn verschillende redenen waarom je een fabrieksreset op je apparaat moet uitvoeren. Voordat je bijvoorbeeld je MacBook Pro verkoopt, moet je deze terugzetten naar de fabrieksinstellingen en alle gegevens wissen om je informatie te beschermen. Dit is ook een belangrijke stap bij het oplossen van problemen als je geen toegang meer hebt tot je laptop, het scherm vastloopt of niet reageert, en meer.
PAGINA-INHOUD:
Deel 1: Voordat u begint met het herstellen van uw MacBook Pro
Aangezien het herstellen van de fabrieksinstellingen op een MacBook Pro alle gegevens op je laptop wist, is het raadzaam een back-up van je apparaat te maken met Time Machine. Daarnaast moet je je afmelden bij services en accounts op je apparaat.
Maak een back-up van je MacBook Pro met Time Machine.
Stap 1. Sluit een back-upopslagapparaat aan op uw laptop.
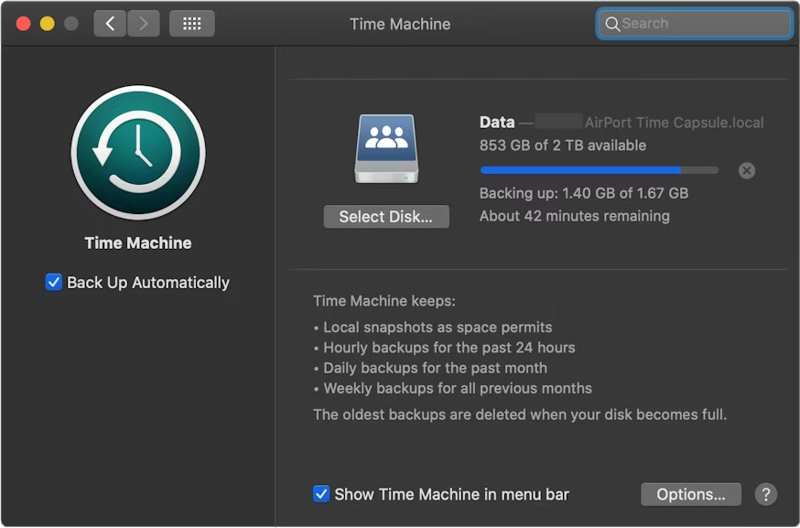
Stap 2. Klik op de Appel menu en kies Systeem instellingen or System Preferences.
Stap 3. Klik Algemeen in de zijbalk en kies tijd Machine.
Stap 4. Hit Back-up schijf toevoegen of druk op de Toevoegen knop.
Stap 5. Selecteer vervolgens uw back-upopslagapparaat en klik. Schijf instellen.
Stap 6. Volg de instructies op het scherm om het back-upopslagapparaat in te stellen.
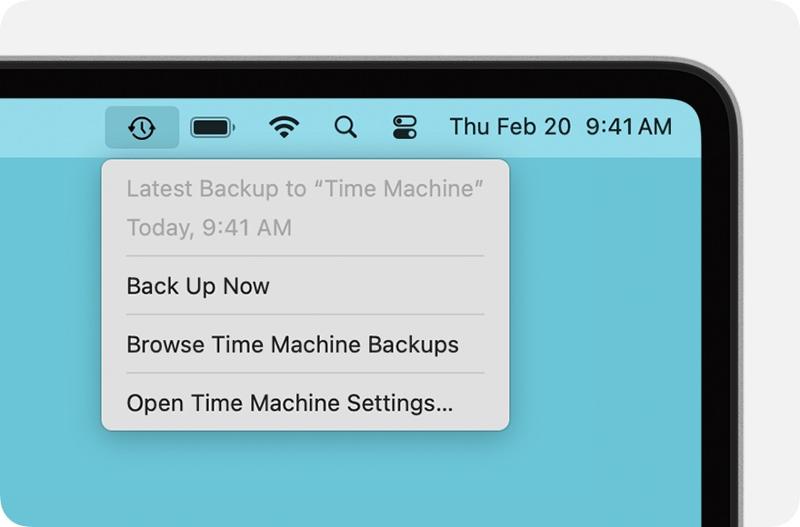
Stap 7. Klik na de installatie op tijd Machine menu op het bovenste lint en kies Nu backuppen Maak een back-up van je MacBook Pro voordat je hem terugzet naar de fabrieksinstellingen.
Uitloggen Accounts
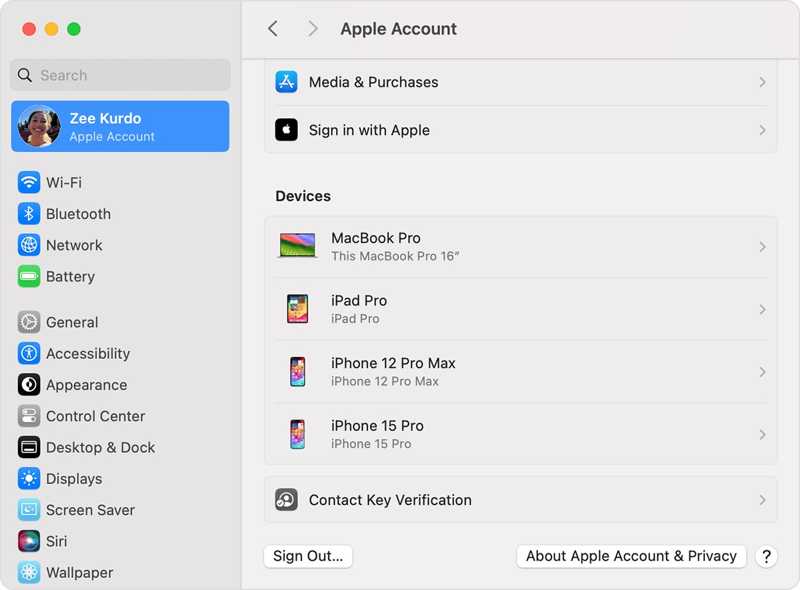
Om je MacBook Pro volledig terug te zetten naar de fabrieksinstellingen, moet je je afmelden bij alle accounts die aan je computer zijn toegevoegd.
Kies op macOS Catalina of later de optie Systeem instellingen or System Preferences in Appel menu. Uitschakelen Find My Mac. Dan klikken Apple-account, scroll naar beneden en tik uitloggen.
Kies op macOS Mojave of ouder de volgende optie: System Preferences in de Appel menu. Klik iClouden druk op uitloggen.
Daarnaast is het verstandig om uit te loggen bij iMessage, FaceTime en andere diensten.
Deel 2: Hoe je een MacBook Pro herstelt via de instellingen
Als uw computer is bijgewerkt naar macOS Ventura of later, is de eenvoudigste manier om de fabrieksinstellingen van een MacBook Pro te herstellen via de ingebouwde functie in de systeeminstellingen. Deze methode kan de klus in de normale modus klaren.
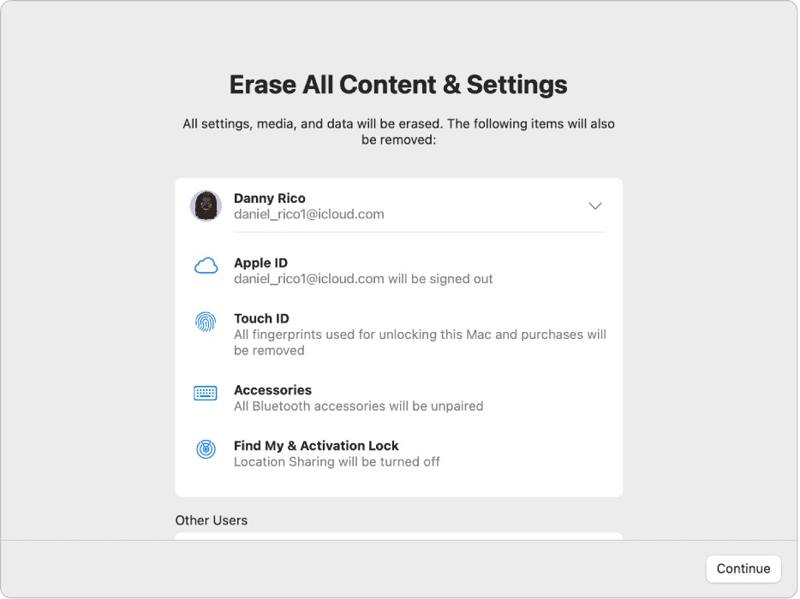
Stap 1. Klik op de Appel menu op elk scherm.
Stap 2. Ga naar Systeeminstellingen, kies Algemeenen klik Overzetten of resetten.
Stap 3. Klik op de Wis alle inhoud en instellingen optie.
Stap 4. Voer desgevraagd uw Apple ID-wachtwoord of beheerderswachtwoord in.
Stap 5. Lees de waarschuwing en klik Doorgaan om te beginnen met het herstellen van uw MacBook Pro.
Deel 3: Hoe u uw MacBook Pro met Schijfhulpprogramma terugzet naar de fabrieksinstellingen
Als je de fabrieksinstellingen van je MacBook Pro niet kunt herstellen via de systeeminstellingen, of als je macOS Monterey of een oudere versie gebruikt, moet je je laptop in de herstelmodus zetten en deze resetten met behulp van Schijfhulpprogramma.
Let op: Je kunt er maar beter voor zorgen dat je... MacBook back-up gemaakt naar iCloud of andere opslagmogelijkheden vooraf.
Stap 1. Ga naar uw Appel menu en kies Afsluiten om je laptop uit te schakelen. Als je scherm niet reageert, houd dan de knop lang ingedrukt. Power druk op de knop totdat deze zwart wordt.
Stap 2. Houd het Power druk op de knop om je Mac aan te zetten en druk direct op de Commando-R toets totdat het Apple-logo verschijnt.
Tips: Als uw MacBook Pro is uitgerust met een Apple Silicon- of Apple T2-beveiligingschip, houd dan de volgende instellingen ingedrukt: Power knop nadat je laptop is ingeschakeld.
Stap 3. Voer, wanneer daarom gevraagd wordt, uw beheerderswachtwoord in. Vervolgens krijgt u twee opties:
Optie 1:
Stap 4. Selecteer het schijfhulpprogramma optie zodra de macOS-hulpprogramma's venster verschijnt.

Stap 5. Klik op de Doorgaan om verder te gaan.
Stap 6. Nu zou je je opstartschijf moeten zien. Als je een gegevensschijf hebt, selecteer deze dan en klik. Edit, kies Verwijder APFS-volumeen druk op Verwijdering .
Stap 7. Selecteer vervolgens uw opstartschijf. Standaard is dit... Macintosh HD.
Stap 8. Klik op de Wissen knop.
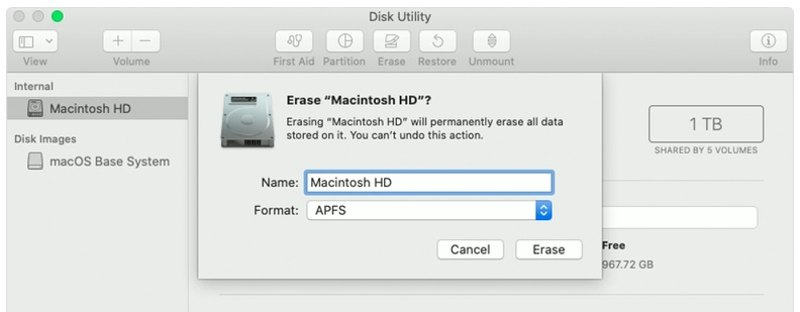
Stap 9. Type Macintosh HD als naam en selecteer een formaat.
Stap 10. Klik op de Wissen knop nogmaals.
Stap 11. Voer desgevraagd uw Apple ID-wachtwoord of beheerderswachtwoord in.
Stap 12. Wacht tot het terugzetten van de MacBook Pro naar de fabrieksinstellingen is voltooid.
Stap 13. Als het klaar is, word je naar de gebracht. macOS-hulpprogramma's scherm.
Stap 14. Kies Installeer macOS opnieuw Volg de instructies op het scherm om uw laptop in te stellen.
Optie 2:
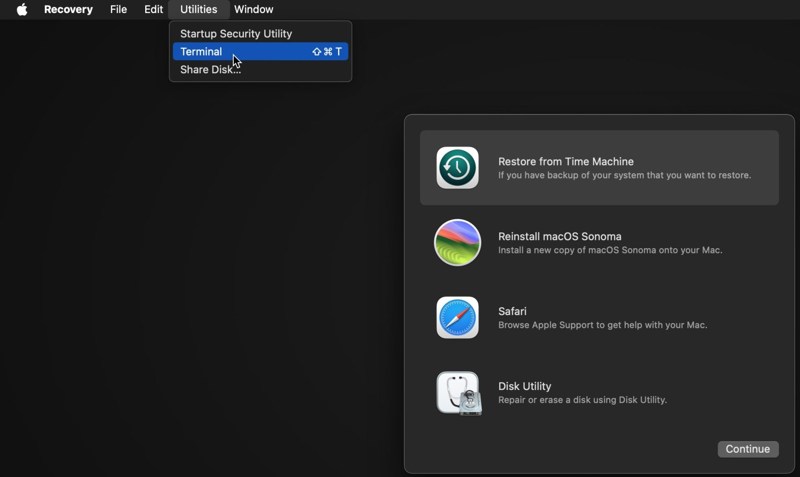
Stap 4. Klik op de Nutsbedrijven menu en kies terminal.
Stap 5. Type diskutil-lijst en druk op de Retourneren Gebruik de toets op uw toetsenbord om de opstartschijf te identificeren.
Stap 6. Voer vervolgens de volgende opdracht uit:
diskutil eraseDisk APFS "Macintosh HD" disk0
Tips: Als uw Mac een harde schijf in plaats van een SSD heeft, voer dan de volgende opdracht uit: diskutil eraseDisk HFS+J "Macintosh HD" disk0.
diskutil eraseDisk HFS+J "Macintosh HD" disk0.
Stap 7. Download vervolgens de nieuwste macOS met het onderstaande commando:
softwareupdate --fetch-full-installer --full-installer-version [nummer].
Stap 8. Invoer sudo /Applications/Install macOS Sequoia.app/Contents/Resources/startosinstall --eraseinstall --newvolumename "Macintosh HD"en druk op Retourneren om macOS opnieuw te installeren.
Stap 9. Stel je MacBook Pro in zodra deze opnieuw is opgestart.
Deel 4: Hoe u gegevens kunt herstellen na het herstellen van uw MacBook Pro
Na het herstellen van de MacBook Pro worden al je gegevens gewist. Gelukkig, Apeaksoft Data Recovery Dit programma kan u helpen dit probleem op te lossen. Het kan uw harde schijf scannen en verloren gegevens herstellen, zelfs zonder back-up.
Met één klik toegang tot verwijderde YouTube-video's
- Herstel verloren gegevens op uw MacBook Pro met één klik.
- Beschikbaar voor diverse situaties, zoals fabrieksreset, per ongeluk verwijderen en meer.
- Ondersteunt een breed scala aan gegevenstypen.
- Bekijk een voorbeeld van verloren bestanden voor selectief herstel.
- Compatibel met macOS 10.7 en hoger.
Veilige download
Veilige download

Hoe herstel ik gegevens op mijn MacBook Pro na een herstelbewerking?
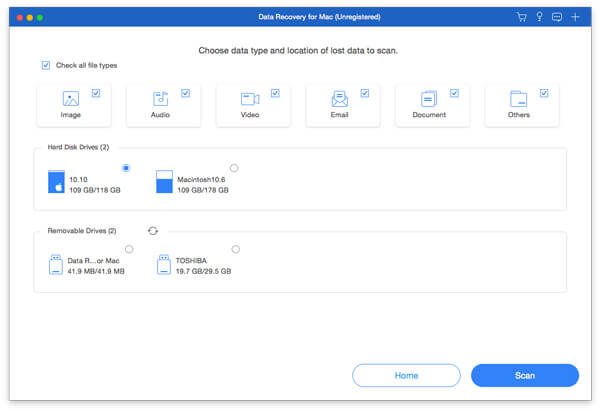
Stap 1. Selecteer gegevenstypen
Start de beste dataherstelsoftware voor Mac nadat je deze op je MacBook Pro hebt geïnstalleerd. Selecteer de gegevenstypen die je wilt herstellen, zoals Afbeelding, audio, videoen meer. Selecteer vervolgens de schijf waarop de verloren bestanden zich bevinden. Klik op de aftasten knop om het scannen van de Mac te starten.
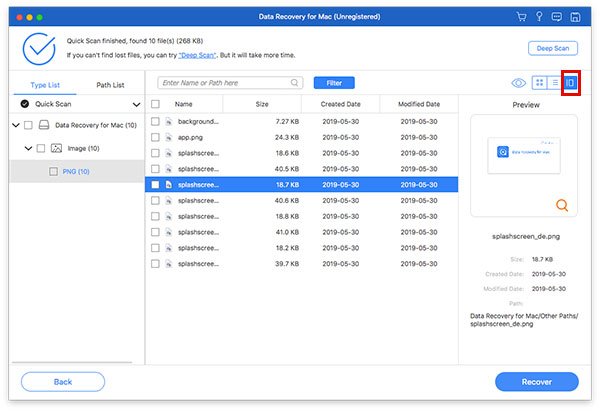
Stap 2. Bekijk een voorbeeld van verloren bestanden
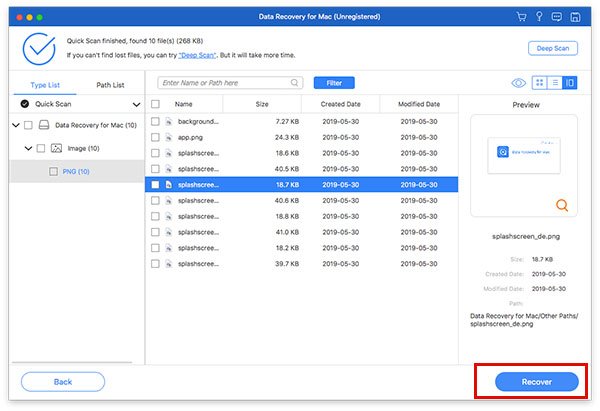
Als het scannen is voltooid, ga dan naar de Type lijst U kunt het tabblad openen en een voorbeeld van verloren gegevens per type bekijken. U kunt ook een specifieke locatie vinden in de Padenlijst tabblad. Als u de gewenste bestanden niet kunt vinden, klik dan op de Diepe scan om een diepe scan uit te voeren.
Stap 3. Bestanden herstellen op MacBook Pro
Zorg ervoor dat u alle bestanden en items selecteert die u wilt terugkrijgen en klik vervolgens op de Herstellen knop. Stel een uitvoermap in en klik nogmaals op Herstellen. Dit programma kan zelfs Verwijderde berichten herstellen op een Mac.
Conclusie
Nu zou je het moeten begrijpen hoe je een MacBook Pro terugzet naar de fabrieksinstellingenVoor nieuwere versies kunt u een fabrieksreset uitvoeren via de app Systeeminstellingen. Voor oudere versies kunt u dit doen in de herstelmodus. Apeaksoft Data Recovery Kan verloren gegevens herstellen na een fabrieksreset op een MacBook Pro. Een back-up is niet nodig.
Gerelateerde artikelen
Heb je per ongeluk de foto's die je leuk vond van je Mac verwijderd? Geen zorgen. Dit artikel helpt je bij het herstellen van verwijderde foto's op een Mac.
Herstelmodus op Mac is een ingebouwde modus die is ontworpen voor het herstellen van de Mac en het repareren van schijfproblemen. Hier leert u hoe u de herstelmodus op Mac opent en gebruikt.
Wat is de beste dataherstelsoftware voor Mac? Hier is een top 10-lijst met reviews om je te helpen de beste software te vinden voor veilig en snel dataherstel op je Mac.
Dit artikel bevat gedetailleerde informatie over wat Internet Recovery op Mac is, hoe u de Mac Internet Recovery-modus kunt gebruiken en oplossingen om niet werkende problemen op te lossen.
