Old photos are as precious as they are fragile; however, they become faded and blurry over time. Can you imagine that these remnants of the past fall victim to time? Fortunately, there are methods to stop the aging process of old photos and even reverse it. In this tutorial, you can learn how to restore old photos online or using Adobe Photoshop. It is available for both digital and paper photos.

- Part 1: The Easiest Way to Restore Old Photos Online
- Part 2: How to Restore Old Photos with Photoshop
- Part 3: Pro Tips for Old Photo Restoration
- Part 4: FAQs about Old Photo Restoration
Part 1: The Easiest Way to Restore Old Photos Online
No matter you intend to do old photo restoration online or with desktop software, the first step is converting your photos to digital files. Then you need a powerful tool, such as Apeaksoft Free Image Upscaler. It is one of the best old photo restoration tools online for free. It is completely working online, so you do not need to install any software on your hard disk. Moreover, the built-in AI technology can enhance the quality of your old photos and remove noise as much as possible. Another advantage is 100% free to use without watermarks or other restrictions.
Step 1 Visit https://www.apeaksoft.com/image-upscaler/ in your browser when you need to restore an old vintage photo. Click the Upload your photo button, and open the old photo from your hard drive. It supports both JPG and PNG.

Step 2 After photo uploading, you will see the main page. Select a proper preset at the top of the page and preview the effect in the Output pane. You can try each preset to produce the best result.
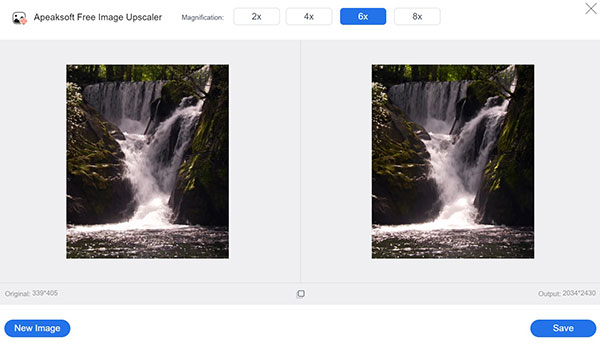
Step 3 Once you are satisfied, click the Save button to download the enhanced old photo to your computer.
Note: Bear in mind that the better the photo quality the larger the file size.
Part 2: How to Restore Old Photos with Photoshop
As a professional photo editor, Photoshop is widely used to retouch images. Of course, it is able to enhance old photos, but the workflow is not intuitive. Therefore, we display the basic procedure below.
Step 1 Open the old photo in your Photoshop. If it is a paper photo, you can scan it in Photoshop directly. By default, the photo will be the background layer in the Layers pane on the right side.
Step 2 Locate the Layers pane and click the New Layer button at the bottom to make an empty layer. So that you can do old photo restoration without destructing the original image but lay adjustments on top of it
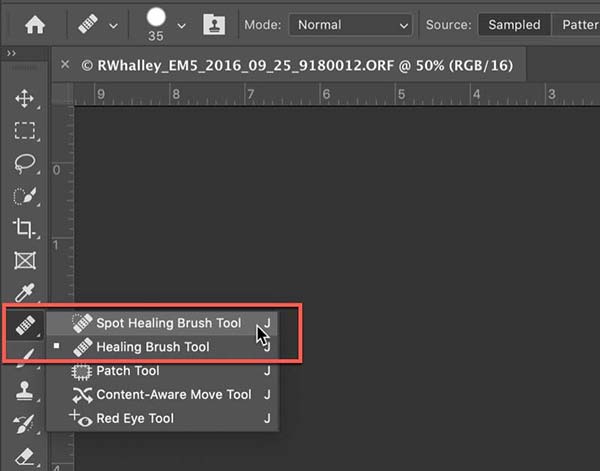
Step 3 Select the Spot Healing Brush on the toolbar on the left side, and draw on the tears and blemishes on the photo to remove them. Make sure to click Sample All Layers and select Content Aware from the available types on the top toolbar before using the Spot Healing Brush.
Step 4 Another important tool in Photoshop is the Clone Stamp, which smooths the details with a lot of texture on the old photo. Select the Clone Stamp tool on the toolbar, and choose Current layers and below. Press the Alt key on Windows or Option on Mac, and click the area that you want to sample. Then click the area where you want to smooth. This step requires a lot of patience and time.
Step 5 Most old photos are black-and-white or sepia. So, you have to colorize them too. Make a new layer that merges all previous layers. Go to the Filter menu, choose Neural Filters, and then Colorize. Make sure to set Color for the blending mode. Now, you can make nondestructive colorizing on the new layer.
Step 6 Finally, export the restored old photo as a PSD file so that you can retouch it at any time.
Part 3: Pro Tips for Old Photo Restoration
In addition to the proper tool and right workflow, there are some expert tips to help you restore old photos and produce the best output:
1. Work with a touch screen, like a tablet or an electronic sketchpad. The digital pen that came with the touch screen makes it easier to do adjustments when using Spot Healing Brush and Clone Stamp.
2. Zoom in your photo. When you fine details, you can enlarge your image until you see the pixels. Plus, you should use a small brush size and make small strokes instead of painting over giant areas. That helps the adjustments look as natural as possible.
3. Do each adjustment on one layer. Don't make all adjustments on a single layer. So that you can change the adjustment separately at any time.
4. Refine color corrections. The Neural Filter does a great job of colorizing old photos. However, you can do more if you have advanced colorization techniques, such as color balance.
Further Reading:Part 4: FAQs about Old Photo Restoration
How much does it cost to have old photos restored online?
Until now, Instagram only supports four aspect ratios. If you upload a photo with a different aspect ratio, Instagram will crop it. To avoid it, you can edit your photo before posting it on the social network app.
Can Walmart restore old photos?
According to Instagram, it uses massive compression algorithms in all uploaded photos. That decreases the size of your pictures and downscales the quality while freeing up a lot of storage space for the server. If you do not want to get poor photos, you can reduce the file size before sharing.
How long does it take to restore a photo?
It is possible to post a full picture on Instagram without borders. All you need to do is to resize your pictures according to the recommended aspect ratio and photo size before uploading.
Conclusion
This guide has talked about how to restore old photos online or using Photoshop. The professional photo editor includes a lot of tools that you can use to remove noise and blemishes, enhance quality, and correct color. For beginners, Apeaksoft Free Image Upscaler is the best choice since the built-in AI technology simplifies the process. More questions? Please write them down below.