


Full Guide: How to Screen Record with CapCut & Best Alternatives 2026

CapCut is a video processing app popular for its rich editing resources, but did you know it also supports screen recording? This article will show you how to screen record on CapCut on Windows/Mac. And now that CapCut doesn't have a built-in screen recorder currently on the web or mobile, I will recommend some great alternatives in case you need them.
PAGE CONTENT:
Part 1: Screen Record with CapCut Desktop
How to record on CapCut? Follow the steps below to record your screen with ease.
Step 1. Install CapCut desktop from its official page.
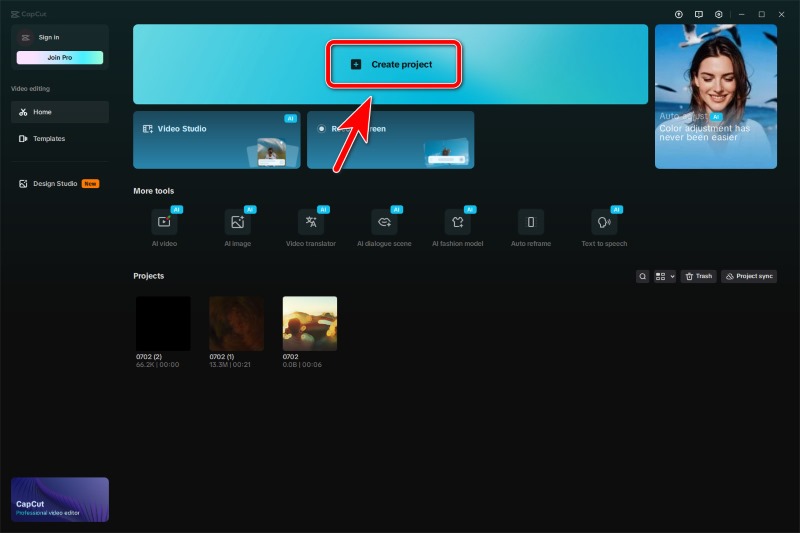
Step 2. Launch CapCut, and click Create Project.
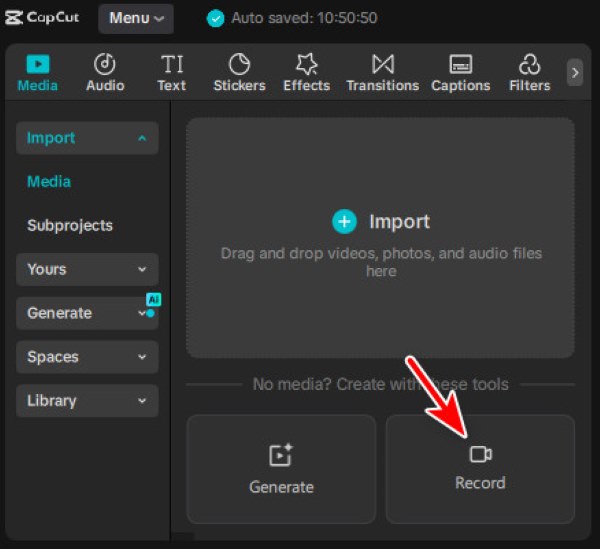
Step 3. Right below the Import area, you can see the Record button. Click on it to activate the CapCut screen recorder.
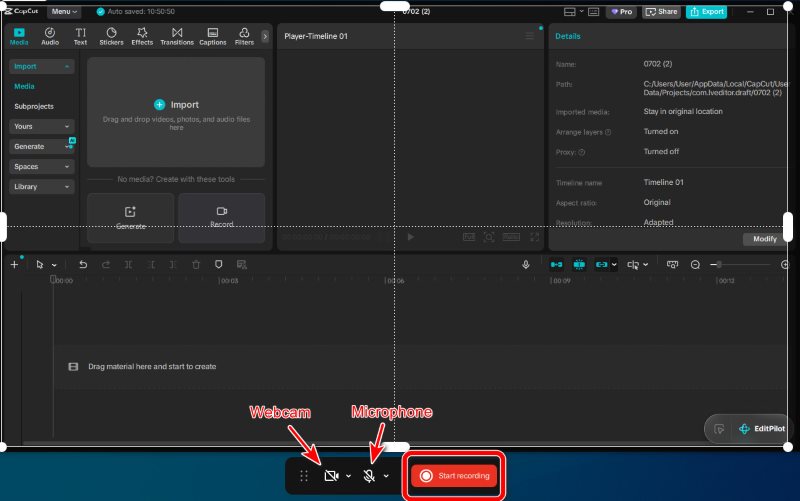
Step 4. CapCut supports customized recording range, but has no graphical buttons for it. You need to activate it with mouse shortcuts.
- If you want to record the full screen, simply left-click anywhere on the screen and it will enter the full-screen mode.
- Want to record just a specific area on your screen? Click and drag your mouse over the region you want to record.
- To record a window, move your mouse over that window, and when there's a blue frame around it, double-click.
After the region is selected, you can still adjust it by dragging its white frame.
Tips: To quit the recording mode, right-click on your screen.
Step 5. Before you start recording, turn on Microphone or Webcam if needed. Then click Start Recording. After a 3-second countdown, it begins.
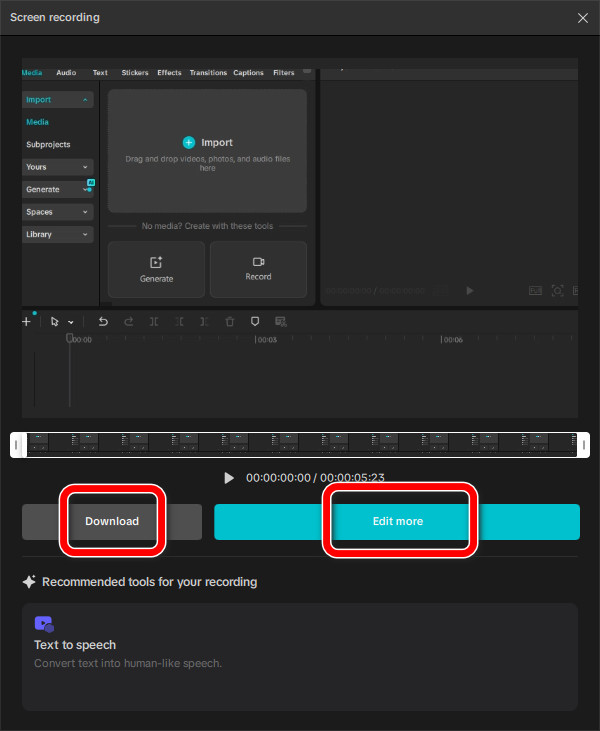
Step 6. When you want to finish recording, click the red square. Then, you can choose to Download it right away or Edit more before saving and sharing.
Part 2: Best CapCut Alternatives on Windows/Mac
Apeaksoft Screen Recorder (Best and Advanced)
Apeaksoft Screen Recorder is a professional tool to record screens in high quality and various formats. It knows exactly what you need and thinks ahead. Customized recorder, screenshot feature, editing toolbox, and auto-recording schedule – all packed up and offered to you.

Downloaded by over 1,000,000 users
- Record screen, camera, and audio smoothly on a friendly interface.
- Customize the screen recording size and range.
- Provide built-in video editing tools like CapCut.
- Various recording modes for all scenarios: courses, reactions, gameplay, and more.
Secure Download
Secure Download
Step 1. Install and launch the software.
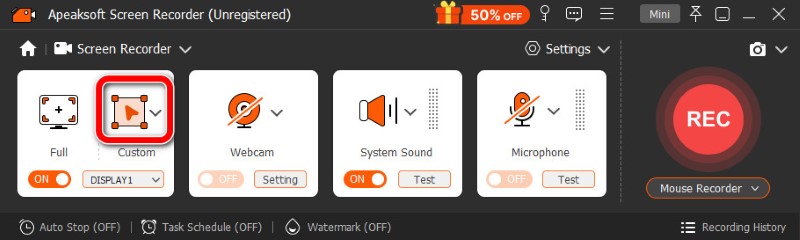
Step 2. When you open the software for the first time, its default setting is to record the entire screen. If you would rather record only a part of your screen, click Custom and drag your mouse to select the range. Or you can also click the downward arrow next to Custom and select a preset aspect ratio from the dropdown.
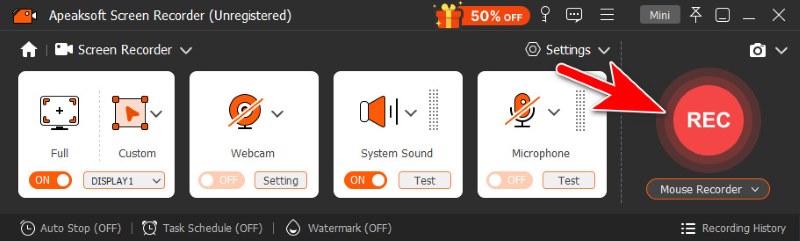
Step 3. After the range is set, click REC to begin recording.
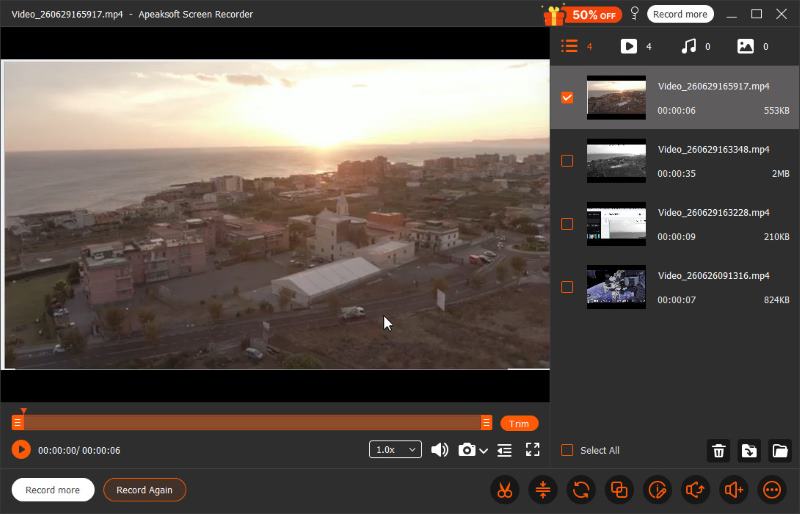
Step 4. Click the red square on the floating bar to end recording. The video file is immediately saved before the editing window pops up, where you can do basic edits such as trimming, merging, and changing volume.
Xbox Game Bar (Windows Built-in)
If you don't care much about free-form recording range or advanced editing, Xbox Game Bar is easy and enough for casual use.
Step 1. Press Windows + Alt + R. You'll see a floating bar pop up on your screen, usually in the top-right corner. This means the recording has started.
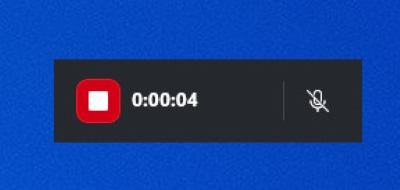
Step 2. When you're done, click the red square on the floating bar to finish.
Screenshot Toolbar (Mac Built-in)
There's a built-in screen recorder on Mac that can customize recording areas, and record fast and easily.
Step 1. Press the hotkeys for the Mac Screenshot Toolbar: Command + Shift + 5. The Screenshot Toolbar will then appear at the bottom of the screen.
Step 2. Choose from 2 recording range modes: Record Entire Screen or Record Selected Portion.
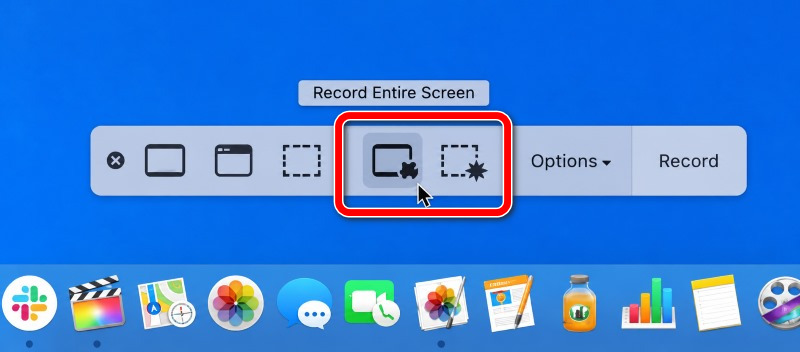
Step 3. Click Record to start.
Step 4. To stop recording, click the Stop button in the menu bar or press Command + Control + Esc.
VEED.io Screen Recorder (Web-based)
VEED.io works totally online with no installation needed, perfect for quick and simple recording. A device with a browser and a stable Internet connection are all you need. On VEED.io, you can record the screen, webcam, system audio, and microphone smoothly.
Step 1. Go to veed.io/record/ on your browser. Any browser works fine, but Chrome is the most stable.
Step 2. Click Screen Only to enter screen-recording mode. Or click Screen & Camera, if you want to record yourself along with the screen.
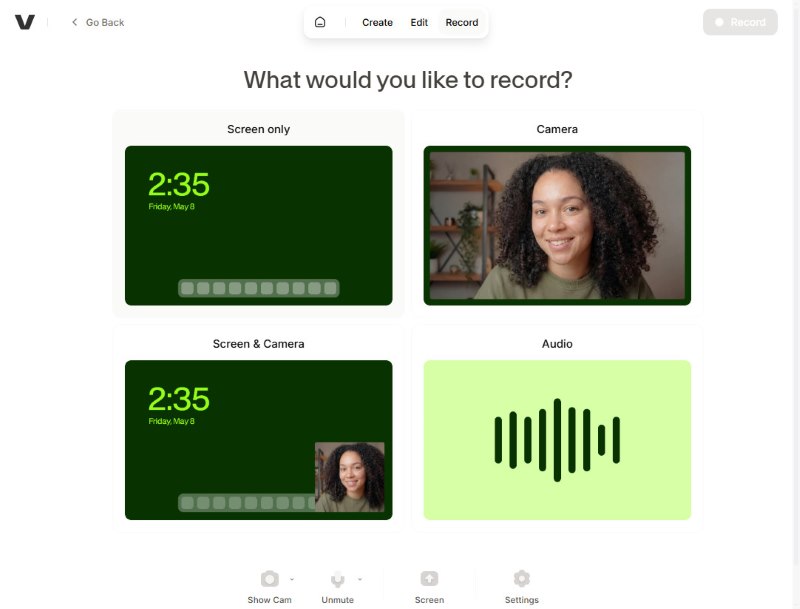
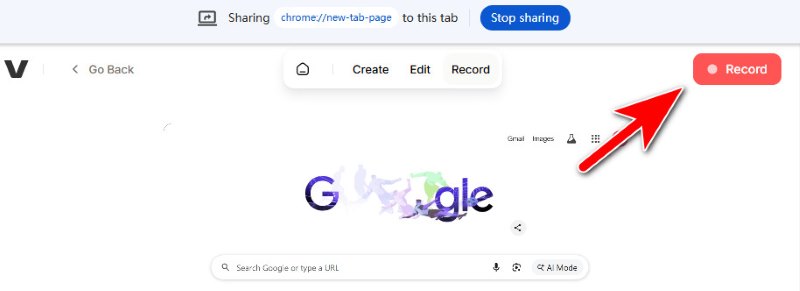
Step 3. Choose the content you are going to record: a browser tab, a window, or the full screen.
Step 4. Click Record at the top-right to begin. When you finish, click Stop.
Step 5. Click Done to export. The free version applies a watermark on the output video.
Part 3: How to Screen Record on iPhone/Android
Screen Record on iPhone
Step 1. Open Control Center.
Where is Control Center on your iPhone?
- On iPhone with Face ID, swipe down from the top-right corner to summon it.
- On iPhone with a Home button, swipe up from the bottom and it will appear.
Step 2. Tap the Screen Recording button.
Step 3. After a 3-second countdown, the recording begins. To record audio along with the screen, touch and hold the record button and then toggle the microphone on.
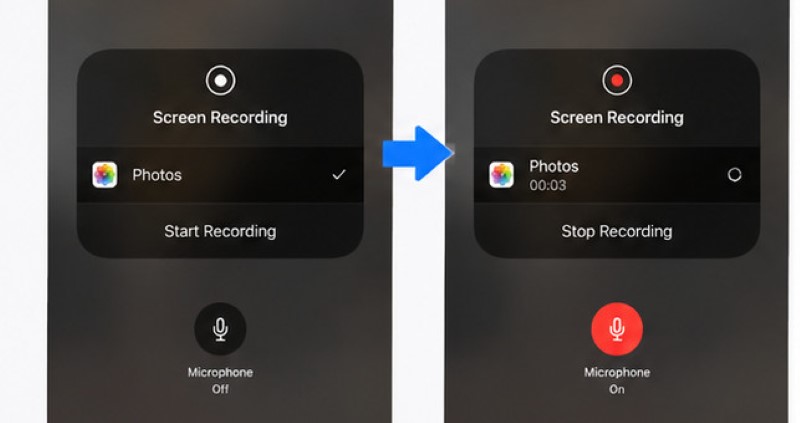
Step 4. When you finish recording, tap the red status bar at the top of your iPhone screen, then tap Stop.
For more advanced recording, iPhone's built-in tool may not be enough. You'll need to install an iPhone screen recorder app for higher quality and customized settings.
Screen Record on Android
Step 1. Swipe down your screen to access the Quick Settings. From there, look for the Screen Recording tool and open it.
Step 2. On the floating bar, tap the red circle to start the recording.
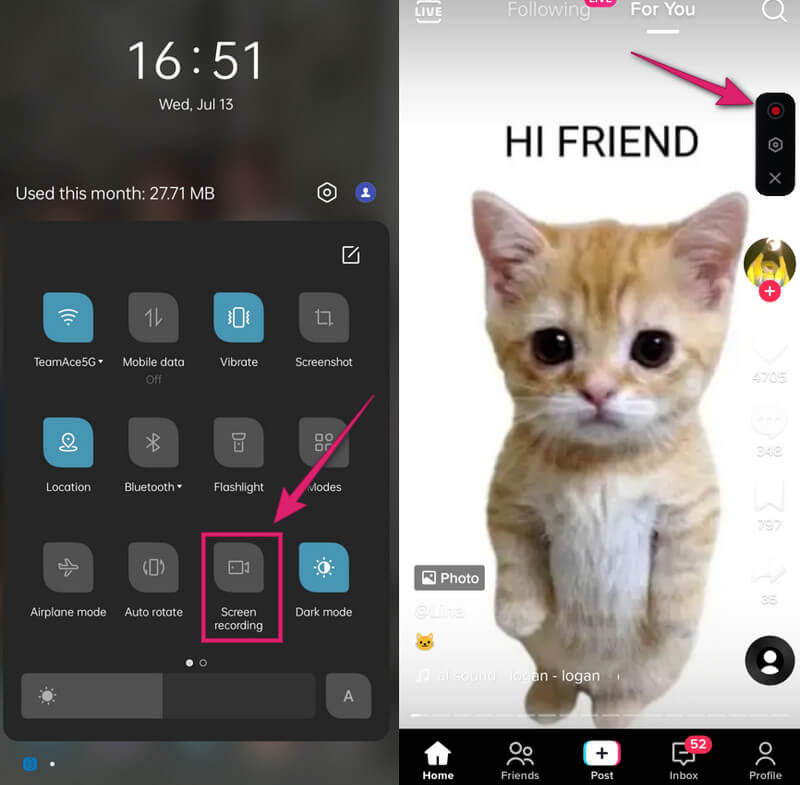
Step 3. Tap the same red circle button to finish recording. After that, you can check your recorded video in your photo gallery.
Part 4: FAQs About CapCut Screen Recording
Can CapCut record audio?
Yes, it can. Here's a brief guide on how to record audio on CapCut:
To record audio alone, open your project, click Audio, and then the Voiceover button in the shape of a microphone. Then tap the red round button to start recording, and tap again to stop.
You can also voice-record on CapCut while recording the screen. It's easy, just toggle the Microphone on before you start screen-recording.
Where do CapCut screen recordings go?
On Windows: Videos\CapCut or Documents\CapCut folder.
On Mac: Movies/CapCut
These are saving locations by default. You can customize them at any time.
How to Screen Record on CapCut without it knowing?
If you want to capture the CapCut window using another recorder without being detected, Apeaksoft Screen Recorder is a good choice. CapCut neither gets stuck nor becomes black when Apeaksoft is recording.
Conclusion
Now you know how easy it is to screen record CapCut and make great videos. You've also mastered how to record audio in CapCut, and how to record your screen on mobile and browser. Without CapCut, you can still record your computer screen with the best desktop alternative Apeaksoft Screen Recorder. With a little practice, you’ll be creating awesome videos in no time.
 Apeaksoft Screen Recorder
 Record any video and audio on phone and computer screen.
Secure Download
Secure Download
Related Articles