We have received a lot of questions asking how to recover the deleted screenshots on Mac, like above. I bet you have faced the same problem. If you want to know how to find your precious screenshots back, then this post will help you with that. There will be 3 solutions for you to find and recover the lost screenshots or any other files.

- Part 1. Best Way to Recover Permanently Deleted Screenshots on Mac
- Part 2. Find & Retrieve Deleted Screenshots on Mac without Software
- Part 3. FAQs of Recovering Deleted Screenshots
Part 1. Best Way to Recover Permanently Deleted Screenshots on Mac
If you find the screenshots have been deleted permanently, you can employ Apeaksoft Data Recovery, the best Mac file recovery software, to get them back. Whether your data loss is due to accidental deletion, hard drive damage, virus attack, or other issues, you can easily retrieve your lost file. Using advanced scan technology, this software can help you find the file you need without wasting time.

4,000,000+ Downloads
Retrieve deleted/lost screenshots and other data with fast speed.
Recovers images in JPG, TIFF/TIF, PNG, BMP, GIF, PSD, CRW, etc.
Provide 2 optional scan modes – deep-scan and quick-scan.
Work on both Mac and Windows computers.
Step 1 Download & Install Apeaksoft Data Recovery
Free Download and install Apeaksoft Data Recovery on your computer. After that, open the software.

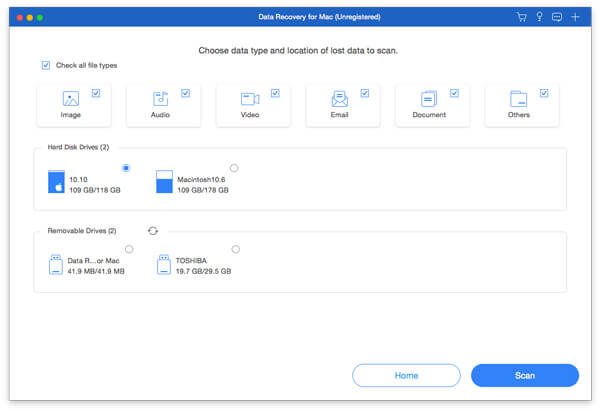
Step 2 Select Data Type & Location
Select Mac Data Recovery in the main interface. Then you need to select the type and location of the file that you want to recover. This will help the program to scan and detect the lost file more precisely.
If you only want to find screenshots, you can just check the Image option. As for the hard disk drive, it depends on the default path that you set to save the screenshots. If you don’t know, you can select both. Click Scan.
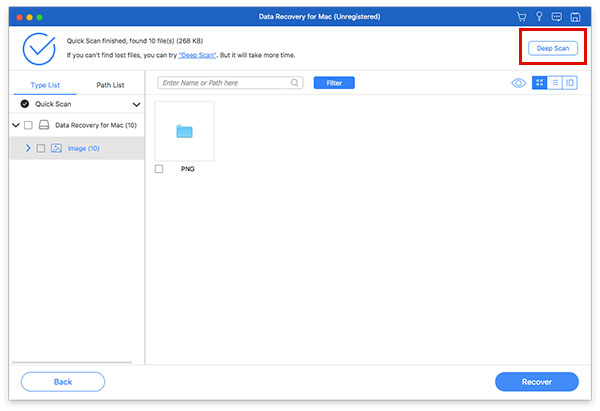
Step 3 Select Scan Mode
First, this recovery tool will initiate quick-scan mode to search for your lost file with fast speed. You can also select Deep Scan to scan the drive comprehensively and thoroughly.
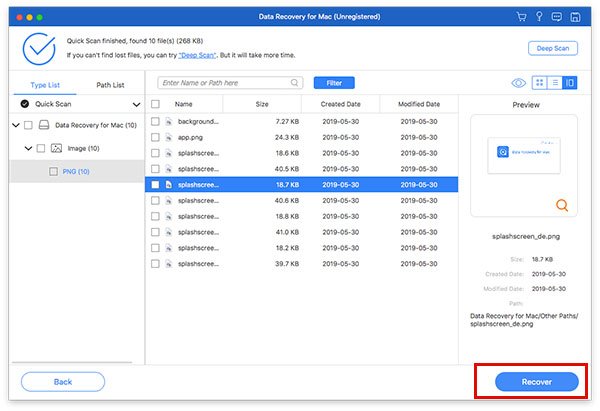
Step 4 Find the Deleted File
After scanning, you will see an Image folder that keeps all the scanned images, including screenshots, in the left list. Open it and find the data you need. Then click Recover to retrieve the deleted file.
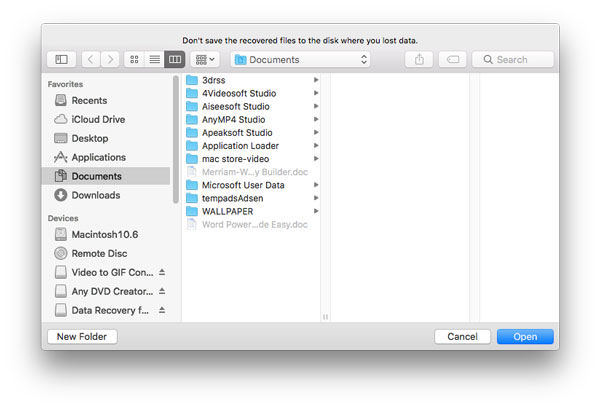
Step 5 Save the Screenshot
Select a saving path in the pop-up window. Then you will get your important screenshot back.
Besides retrieving the deleted screenshots, this software can also help you recover music, photos, videos, documents (Word, Excel, PowerPoint, PDF), emails, and more. So, you don’t have to worry about data loss anymore.
Don't Miss:
How to Crop and Edit Screenshots on Mac
Part 2. Find & Retrieve Deleted Screenshots on Mac without Software
If the screenshot is recently deleted, you actually can try the methods below without installing a third-party program.
Photos
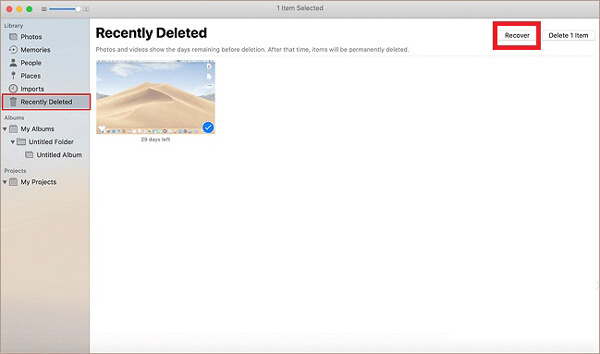
If the screenshot is deleted in the Photos app, you can recover it with ease. Because the Photos app can not only manage your pictures and videos but save the deleted image/video files into the Recently Deleted album for 30 days.
Step 1 Open Photos on your Mac. Select Albums and find the Recently Deleted folder.
Step 2 As long as the screenshot doesn’t expire, you will see it on the list. Select it and click Recover in the upper right corner. It will return to the original album.
Trash
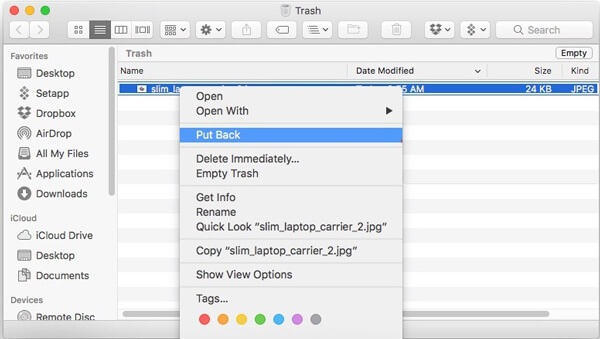
When you remove a file from the desktop or a folder, the deleted file usually will be thrown into the Trash.
Step 1 Click the trash bin in the bottom right corner of the desktop to open Trash.
Step 2 Find the screenshot you want to recover, right-click on the item and select Put Back. The deleted file will go back to where it was saved once.
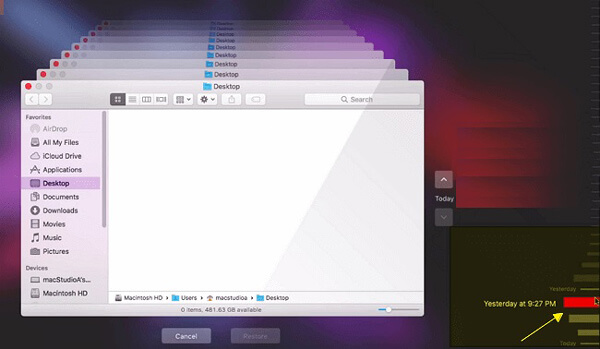
Time Machine
If you have enabled the automatic backup feature in Time Machine, then you can effortlessly restore the old version of your files. By the way, backing up data regularly is really a good habit. It will save you from a lot of unnecessary data loss issues.
Step 1 Click Finder and search for the Time Machine app.
Step 2 In the lower right corner of the Mac screen, you will see a timeline. Scroll it to find the date when the screenshot was still alive. Then select the deleted picture and click Restore.
iCloud
The last method is to check your iCloud Photo Library, which can save the photos or screenshots that you take on any of your iOS devices.
Step 1 Go to the website of iCloud. After signing in, please click Photos first. Then select Albums and find the Recently Deleted album.
Step 2 If you find the screenshot you want to restore, click Recover.
Part 3: FAQs of Recovering Deleted Screenshots
1. How do I get back a deleted iPhone screenshot?
Open the Photos app on your iPhone. Then go to the Recently Deleted album. Look through the list and find the picture you need and recover it.
2. Where are my screenshots saved on Mac?
They will be saved to your desktop by default if you don’t change the default location.
3. Why are my screenshots not saving to desktop on Mac?
You should check the saving settings. Find system preferences on your Mac. Then select Keyboard. Choose Shortcuts. You will see Screenshots. Please check the settings. If you want to save the screenshots to desktop, you can restore the default.
Conclusion
Today you have learned 5 ways to get your screenshots back on Mac. Hope one of them works. If you have emptied your Trash or you cannot find the screenshots everywhere, then you should use Apeaksoft Data Recovery immediately.
If you have any further questions, feel free to contact us.