"Jag har provat Sketch för att ta skärmdumpar på Mac, men inspelningsprocessen verkar vara komplicerad. Finns det ett program som låter mig ta skärmdumpar med bara en eller två tangenttryckningar? Så jag kan göra skärmdumpen mycket enklare."
Om du bara byter från en Windows-dator till en Mac kan du bli obekant med Mac. Du kanske inte vet hur man tar en skärmdump på en Mac. Skärmdumpen är bara en ögonblicksbild på din Mac-skärm. Här, i det här inlägget, kommer vi att dela dig 3 metoder för att ta och redigera skärmdump på Mac.

- Del 1. Hur man fångar skärmdump med tangentbord på Mac
- Del 2. Hur man fångar Mac-skärm med programvara från tredje part
- Del 3. Hur man tar skärmdump med den inbyggda förhandsgranskningen
- Del 4. Hur man tar skärmbilder med hjälp av Grab Utility på Mac
Del 1. Hur man fångar skärmdump med tangentbord på Mac
En snabb metod för att ta skärmdumpar på Mac är att använda kortkommandon. Det borde vara det bekvämaste och snabbaste sättet att ta skärmdumpar. Många kortkommandon listas nedan.
Kommando – Skift – 5
Om du har uppdaterat din Mac-skärm till mac OS Mojave eller senare kan du trycka på Kommando – Skift – 5 för att se skärmkontrollerna. Den här genvägen låter dig fånga hela skärmen, en vald del av skärmen, aktivt fönster och mer.

Klicka på Fånga hela skärmen för att ta hela skärmdumpen. Klicka på Fånga i kontrollerna på skärmen för att fånga ett fönster eller objekt.
Följande kortkommandon passar för alla versioner av macOS.
Kommando – Skift – 3
Om du vill fånga hela Mac-skärmen trycker du bara på Kommando – Skift – 3 kortkommandon. Först måste du trycka på Command och Shift-knappen samtidigt. Tryck sedan på nummer 3-knappen. Skärmdumpen sparas automatiskt på ditt skrivbord.
Kommando – Skift – 4
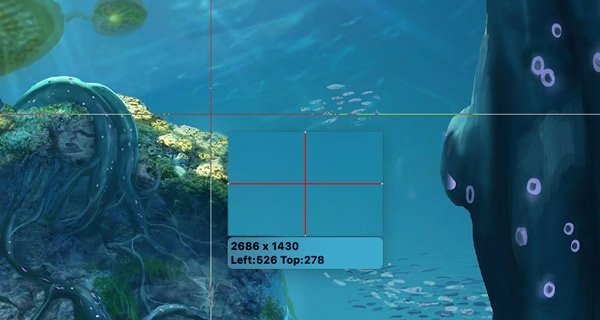
Om du vill fånga en del av skärmen kan du trycka på Kommando – Skift – 4 kortkommandon. När du trycker på kortkommandot förvandlas muspekaren till ett hårkors. Vad du behöver göra är att klicka och dra området du vill fånga och släppa musknappen.
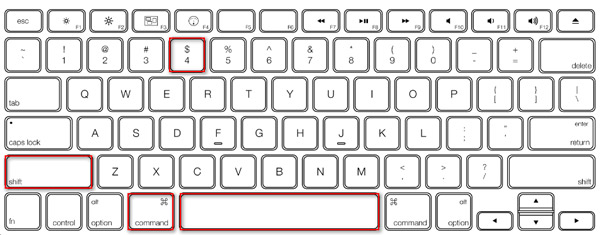
Sedan kan du trycka på mellanslagstangenten för att fånga det aktiva fönstret. Efter det kommer alla skärmdumpar att sparas på ditt Mac-skrivbord. Skärmbilderna kommer att sparas som PNG-filer.
Del 2. Hur man fångar Mac-skärm med programvara från tredje part
Om du är trött på att memorera dessa kortkommandon, hjälper tredjeparts Mac-skärmdumpsprogram dig verkligen mycket. Apeaksoft Mac-skärminspelare bör vara det mest professionella verktyget för att fånga Mac-skärmar, ta spelskärmdumpar, spela in online och strömma video eller ljud.
4,000,000 + Nedladdningar
Ta skärmdumpar på din Mac-skärm, rita och anpassa skärmdumpen.
Gör ritningar, lägg till text, pil, markera och andra effekter på skärmdump.
Spela in FaceTime, Skype, GoToMeeting, Viber-samtal, onlinespel på Mac.
Skicka ut skärmdump / video / ljudinspelning av hög kvalitet till valbart format.
Ta och redigera skärmdump med Apeaksoft Mac Screen Recorder
Efter gratis nedladdning av Apeaksoft Mac Screen Recorder, installera och starta den på din Mac/MacBook Pro/MacBook Air/iMac.
Du kan se funktionerna Video Recorder, Webcam Recorder, Audio Recorder, Screen Capture i huvudgränssnittet. Välj "Skärmdump" för att börja spela in din Mac-skärm.
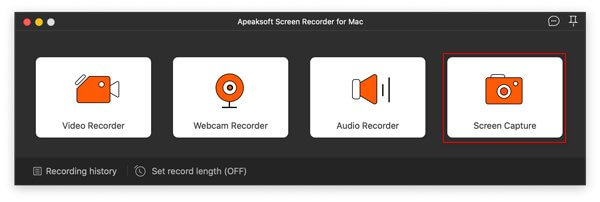
Sedan kommer muspekaren att bli ett hårkors, du kan välja det område du vill ha. Dessutom kan du också välja en helskärm eller en anpassad skärm efter dina behov.
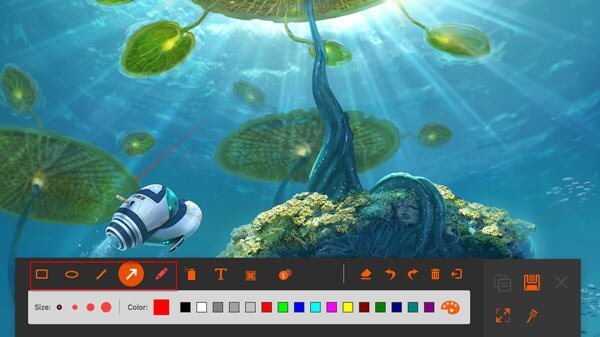
De många redigeringsverktygen i Mac Screen Capture låter dig känna att ett litet photoshop-verktyg har infogats i det här programmet. Här kan du rita gränser, linjer, pilar, etc., redigera med air brush, lägga till text, bildtext, oskärpa verktyg.
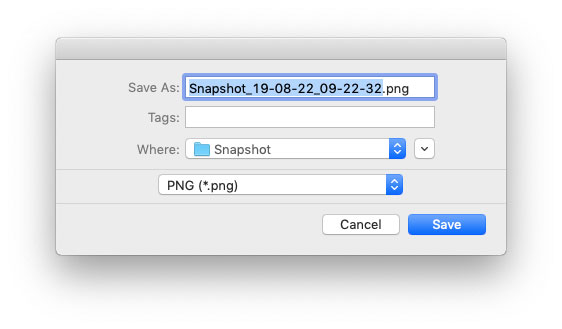
Klicka på knappen Spara för att spara bilderna. Du kan välja utmatningsväg.
Förutom att ta och redigera skärmdumpar kan denna kraftfulla Mac Screen Recorder även spela in onlinevideor, spel, musik och webbkamera på Mac.
Missa inte:
Hur man beskär och redigerar skärmdumpar på Mac
Hur man spelar in Fuze Meeting
Del 3. Hur man tar skärmdump med den inbyggda förhandsgranskningen
Förhandsvisning är bild- och PDF-visningsverktyget på macOS operativsystem. Den kan också användas för att skanna dokument, importera filer från kameror, ta skärmdumpar. Följ de enkla stegen för att ta skärmdumpar med Preview.
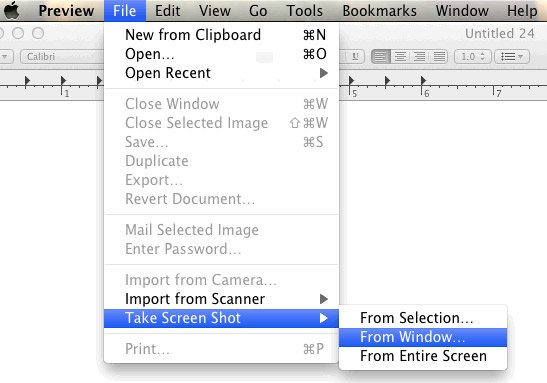
Öppna Preview på din Mac, gå till Arkiv > Ta skärmdump. Här har du 3 alternativ att välja: Från urval, från fönster och från hela skärmen.
Du kan välja att fånga hela skärmen, den valda skärmen eller ett fönster. Efter skärmdumpen kan du redigera bilderna med olika redigeringsfunktioner i Preview. Välj sedan bildformatet som du vill spara på din Mac.
Del 4. Hur man tar skärmbilder med hjälp av Grab Utility på Mac
Grab är ett verktygsprogram för skärmdump i macOS. Med detta användbara verktyg kan du ta hela skärmen, den valda bilden eller den valda skärmen. Följ bara de korta stegen för att börja.
1. Om du vill fånga hela skärmen, kan du navigera till Capture > Screen.
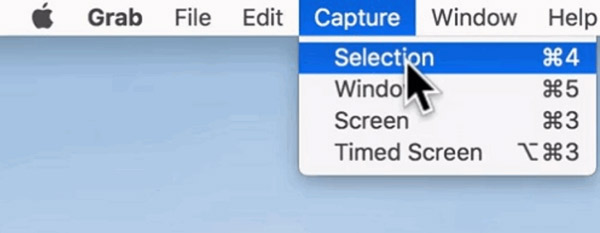
2. Vill fånga en del av skärmen? Välj bara Fånga > Markering och klicka och dra sedan pekaren över området du vill fånga. Släpp musknappen när du är klar.
3. Om du vill fånga ett fönster, du behöver bara trycka på Capture> Window.
4. Av vissa skäl kanske du vill fånga ett aktivt objekt. Du kan välja Capture > Timed Screen och klicka sedan på Start Timer. Så du kan göra objektet aktivt tills dialogrutan Tidsskärm stängs.
Relaterat:
5 enkla sätt att fixa skärmdump på Mac fungerar inte
Slutsats
Med ovanstående 3 snabba lösningar måste du ha svar om hur du tar en skärmdump på Mac. Du kan använda den inbyggda skärmdumpsfunktionen, använda tangentbordsskärmdumpar eller med ett tredjepartsprogram. Apeaksoft Mac Screen Recorder verkar kompetent bland andra skärmfångarprogram. Du kan använda den för att ta en skärmdump, spela in video/ljud, spela in webbkamera på Mac. Om du har några bättre lösningar, tveka inte att lämna en kommentar.