How to Take a Screenshot on Mac Computer and Laptop
A screenshot is an image of everything on your desktop, an active window, or a web page. It can save important information quickly, share your desktop with others, and more. The Mac OS has always made it easy to capture a screenshot. Apple gives you a few options for taking screenshots on Mac, from shortcuts to command lines. This guide lists the proven methods and demonstrates the workflows with details.
PAGE CONTENT:
- Part 1: A Quick Way to Screenshot on Mac
- Part 2: How to Take a Screenshot on Mac with Shortcuts
- Part 3: How to Take a Screenshot on Mac by Touch Bar
- Part 4: How to Create a Screenshot with the Mac Screenshot App
- Part 5: How to Screenshot on Mac with Command Line
- Part 6: How to Capture a Screenshot on Mac via Preview
- Part 7: How to Record a Full-Page Screenshot on Mac
- Part 8: Where to Find Screenshots on Mac
Part 1: A Quick Way to Screenshot on Mac
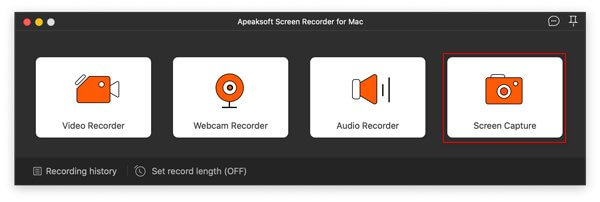
Apeaksoft Screen Recorder is one of the best screenshot tools on Mac. It is able to capture the entire desktop or any area on your desktop with a single click. Moreover, it comes with a wide range of bonus features, like drawing tools.
A Quick Way to Take Screenshots on Mac
- Take a screenshot on a Mac with one click.
- Draw lines and shapes on screenshots directly.
- Add texts and stickers to Mac screenshots.
- Include bonus features, like screen recording.
- Available on macOS 10.13 and above.
Secure Download
Secure Download

How to Do a Screenshot on Mac
Step 1. Install the Mac screenshot tool
Download the screenshot tool for Mac and follow the onscreen instructions to install it on your computer. When you need to screenshot Mac desktop, launch it.
Step 2. Take a screenshot
Put everything you want to capture on your desktop. Click the Screen Capture option in the home interface, and select the desired area with your mouse.

Step 3. Edit and save the Mac screenshot
Then, the tool will capture it automatically. Here, you can draw the border, line, arrows, and other shapes, or add texts with the toolbar. Once you are done, you can copy the screenshot to the clipboard or save it as an image.

Part 2: How to Take a Screenshot on Mac with Shortcuts
One easy way to grab a screenshot on a Mac is with your keyboard. With the right shortcuts, you can capture your entire desktop, an active window, or a portion of your screen. Moreover, you can save screenshots to the Mac’s clipboard or desktop.
| Button Combination | Screenshot |
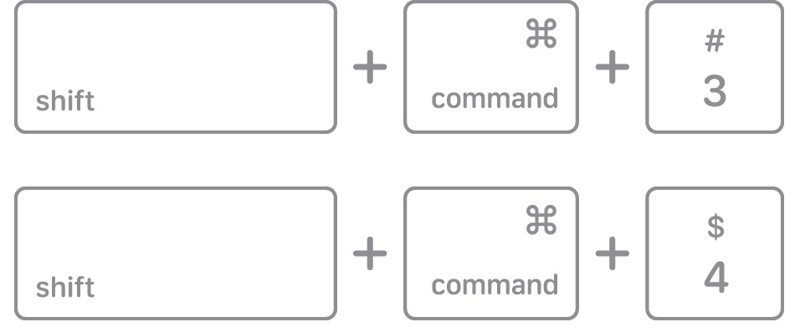
| Shift + Command + 3 | Capture entire screen and save it as a picture on desktop |
| Ctrl + Shift + Command + 3 | Screenshot entire desktop and save to clipboard |
| Shift + Command + 4 | Grab the selected area on your desktop and save as an image |
| Ctrl + Shift + Command + 4 | Screenshot selected area and save to clipboard |
| Shift + Command + 4 + Space bar | Press Shift + Command + 4 together, hit Space bar, and click an active window to screenshot on Mac If you want to screenshot desktop icons without wallpaper, press Command + Shift + 4, and then press the Space bar. After that, place the camera cursor on the files to select them, and click to take the screenshot. |
| Shift + Command + 6 | Screenshot Touch Bar display and save to desktop |
| Ctrl + Shift + Command + 6 | Take screenshots of Touch Bar and save to clipboard |
Step 1. When you need to take a screenshot on a Mac with quick keys, press the proper button combination.
Step 2. Once you are successful, you will hear a camera shutter sound effect through your speaker.
Step 3. By default, the screenshot will be saved to the desktop in a PNG file. If it is saved to your clipboard, open an image editor or document tool, and paste the Mac screenshot.
Part 3: How to Take a Screenshot on Mac by Touch Bar
The Touch Bar provides a convenient way for capturing screenshots on Mac. After setting up, you can capture the entire screen, selected portion, an active window, or Touch Bar, and save the screenshot to your desktop.
Step 1. Click the Apple menu and choose System Settings.
Step 2. Press the Keyboard and click Touch Bar Settings.
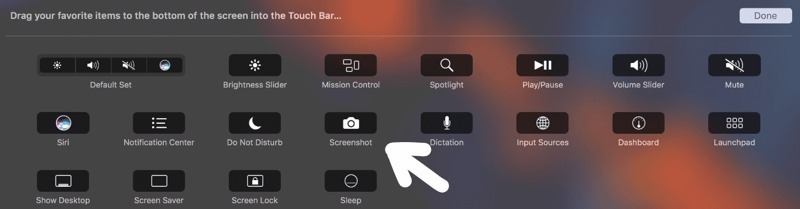
Step 3. Click Customize Control Strip, and expand the Control Strip in the Touch Bar.
Step 4. Add the shortcut for Screenshot on Mac.
Step 5. When you are complete, click Done to confirm it.
Part 4: How to Create a Screenshot with the Mac Screenshot App
On recent versions of macOS, you can create a screenshot on Mac with the built-in Screenshot app. Before macOS Mojave, the app was called the Grab app. You can find it in the Other or Utilities folder or with the shortcut.
Step 1. Navigate to the Other folder and click the Screenshot app. Or press Command + Shift + 5 to open it.
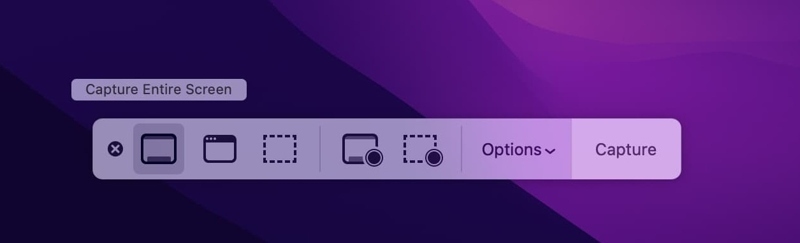
Step 2. Now, you will see a few buttons on the toolbar:
Capture Enter Screen is used to make a screenshot of everything on your monitor.
Capture Selected Windows is used to take a screenshot of a single app or window.
Capture Selected Portion is used to grab the selected part of your screen.
Record Entire Screen is able to create a video recording of your desktop.
Record Selected Portion can record a video of a specific portion.
Note: If you want to customize screenshot settings, click the Options button.
Part 5: How to Screenshot on Mac with Command Line
For tech-savvy users, taking screenshots on a Mac with commands is a good idea. This method is also available if your keyboard is not working. Of course, you must perform the command carefully. Otherwise, the screenshot will fail.
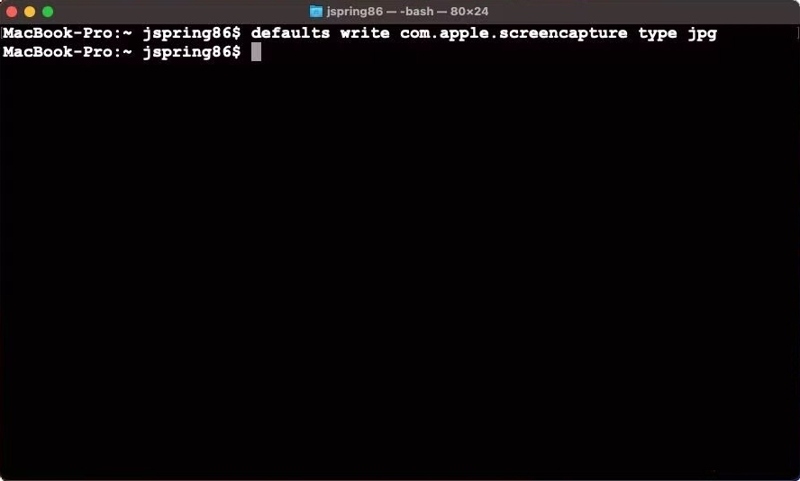
Step 1. Run the Terminal app from the Dock bar or Applications folder.
Step 2. Input screencapture screen.png and hit the Return key on your keyboard.
Step 3. Then, you will find the screenshot on your desktop with the filename screen.jpg.
Part 6: How to Capture a Screenshot on Mac via Preview
The built-in Preview app is the default image editor tool on Mac. In addition to image editing, you can also capture a screenshot on a Mac for the entire desktop, a selected portion, or an active window.

Step 1. Put the screen or window you want to capture.
Step 2. Open the Preview app.
Step 3. Go to the File menu, and click Take Screenshot.
Step 4. Choose an option, like From Selection, From Window, or From Entire Screen, depending on your need.
Step 5. Follow the onscreen instructions to save a screenshot on a Mac.
Step 6. When it is done, you can also edit the screenshot.
Part 7: How to Record a Full-Page Screenshot on Mac
Sometimes, you may want to capture a full-page screenshot on a Mac to save all information. Obviously, the quick keys can only record what is on your screen, but not a scrolling screenshot. Thankfully, the developer tools, browser extensions, and third-party screenshot tools can meet your needs.
How to Record a Full-Page Screenshot on Mac with Developer Tools
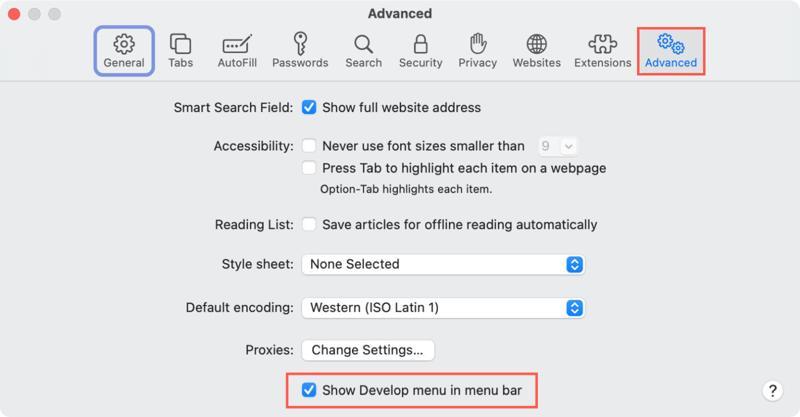
Step 1. Run your Safari app.
Step 2. Go to the Safari menu, choose Settings or Preferences.
Step 3. Go to the Advanced tab, and check the box next to Show Develop menu in menu bar.
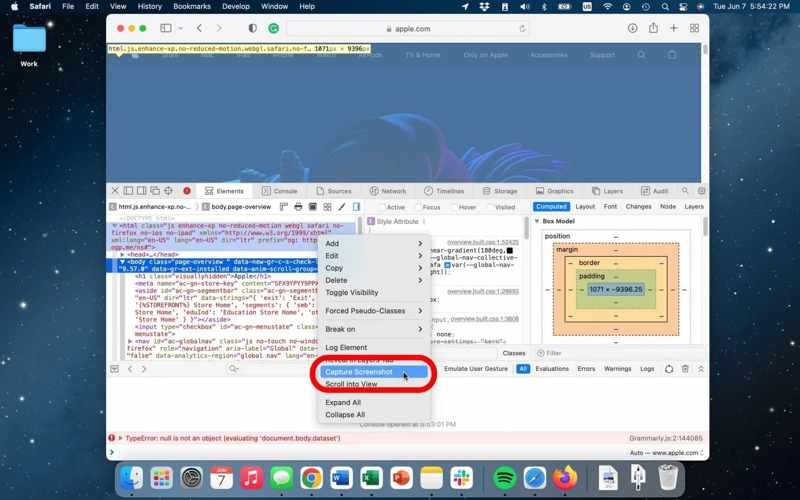
Step 4. Back to the Safari screen and access the web page that you want to save.
Step 5. Click the Develop menu and choose Show Web Inspector from the menu bar.
Step 6. Switch to the Elements tab on the right panel.
Step 7. Right-click on the first line of <html>.
Step 8. Choose Capture Screenshot from the context menu to create a scrolling screenshot on Mac.
Step 9. When it finishes, choose a location to save the screenshot on Mac and leave a filename.
Step 10. Finally, click the Save button.
Step 11. Click the X button in the top left corner to close the Web Inspector.
Note: You can also capture a full page on a Mac using the Developer Tools in Google Chrome.
How to Save a Scrolling Screenshot on Mac by Print
Besides, Safari allows you to save a scrolling screenshot on a Mac with a built-in Print Page feature. It opens a virtual printer, takes a screenshot of the entire web page, and saves it as a PDF file.
Step 1. Visit the web page you want to screenshot in Safari.

Step 2. Right-click a blank area on the page and choose Print Page. Or go to the File menu and choose Print.
Step 3. Choose Save as PDF from the format drop-down list.
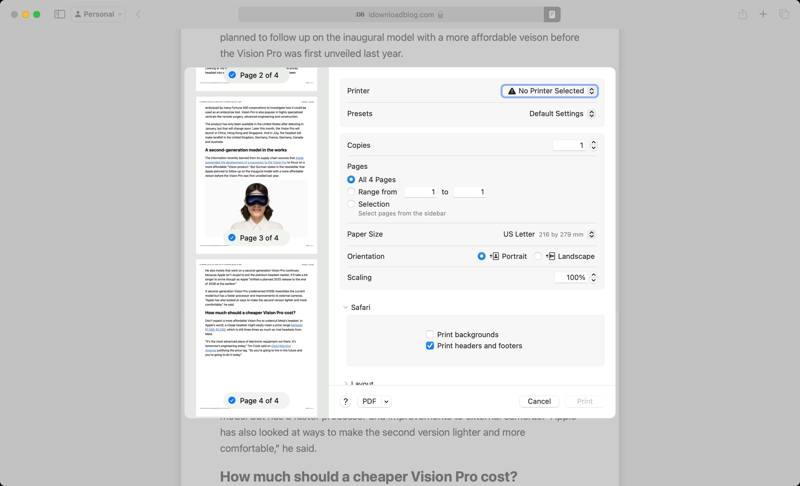
Step 4. Click the Print button.
Step 5. Then, set an output folder, write down a filename, and click Save.
You May Also Like:
Comprehensive Tutorial of Screen Recording on a Mac
Mirror iPhone to TV with AirPlay, USB, and More Ways
How to Create a Scrolling Screenshot on a Mac Using an Extension
Another way to create scrolling screenshots on Mac is to use an extension. FireShot, for example, is a versatile extension to capture the web with no detail omitted. It is able to save entire web pages in PDF, JPG, or PNG.
Step 1. Head to the Mac App Store, search for FireShot, and install it in Safari.
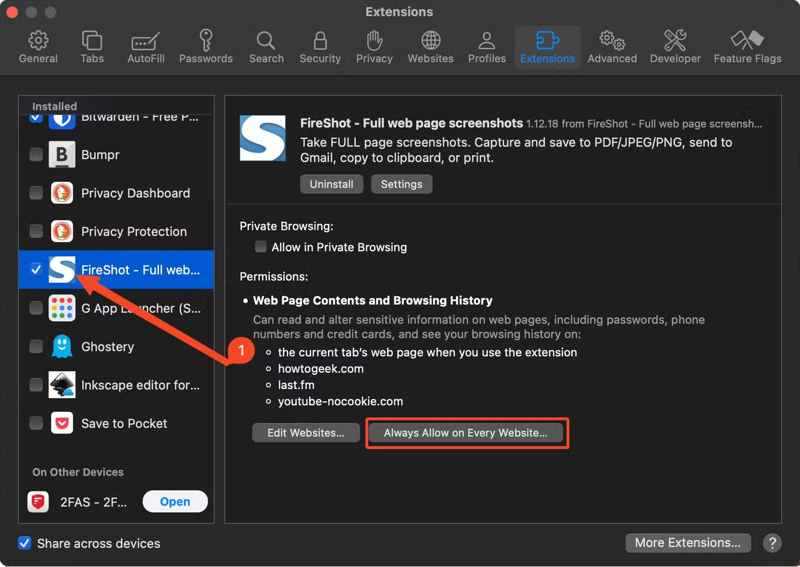
Step 2. Go to the Safari menu, choose Settings, and switch to Extensions.
Step 3. Select FireShot in the Installed panel, and click Always Allow on Every Website.
Step 4. Now, visit the web page in Safari, click the FireShot button, and choose Allow for One Day to permit it.
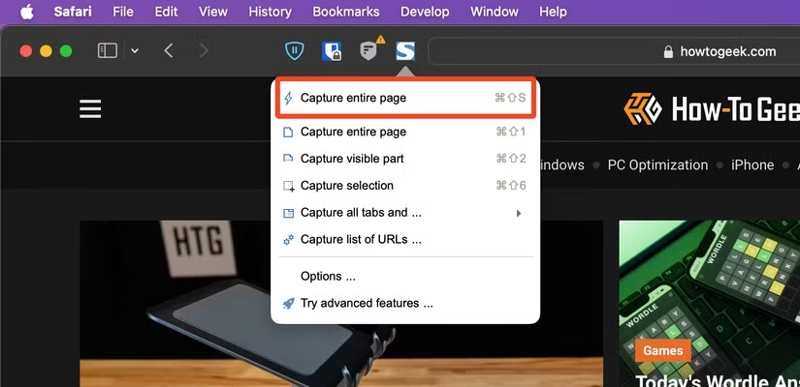
Step 5. Next, click the FireShot button again, and choose Capture entire page or Capture selection.
Step 6. Then, save the screenshot on a Mac.
How to Take a Full-Page Screenshot on Mac via Online Screenshot Tools
Web-based screenshot tools are able to take a full screenshot on a Mac without installing anything. If it is inconvenient in some cases, you can quickly screenshot a full page on Mac using an online tool, such as WebShot.
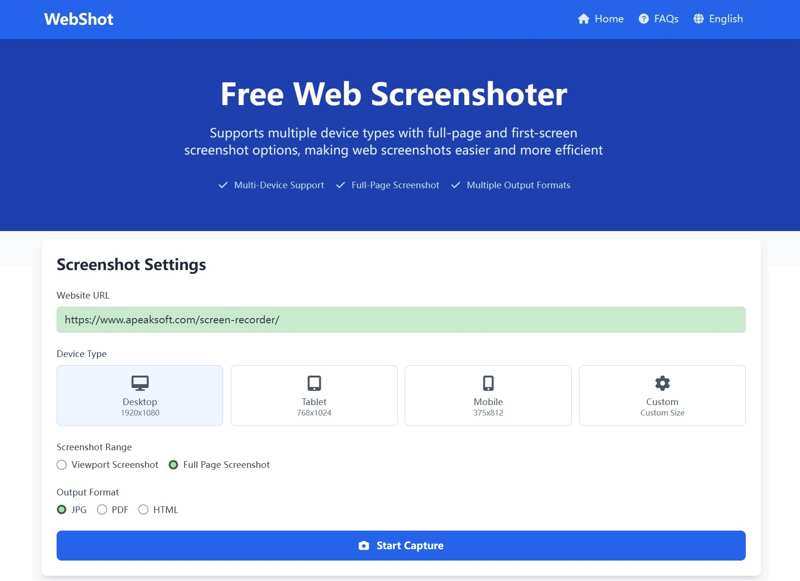
Step 1. When you want to capture a full page on Mac, create a new tab in Safari and visit https://webshot.cc/.
Step 2. Copy and paste the URL into the box.
Step 3. Choose your device type. Here, we choose Desktop.
Step 4. Select Full Page Screenshot, and set an output format.
Step 5. Click the Start Capture button.
Step 6. When it finishes, preview the result.
Step 7. At last, click the Download JPG button to save the screenshot on Mac.
Part 8: Where to Find Screenshots on Mac
Where to find screenshots on Mac? By default, the screenshots are saved to your desktop in PNG automatically. If you cannot find them on your desktop, you might change the default path. You have to find screenshots by Finder.
Open the Finder app from your Dock bar, press Command + F, and enter kMDItemIsScreenCapture:1. Then, you will see all screenshots on your Mac, no matter where they are stored.
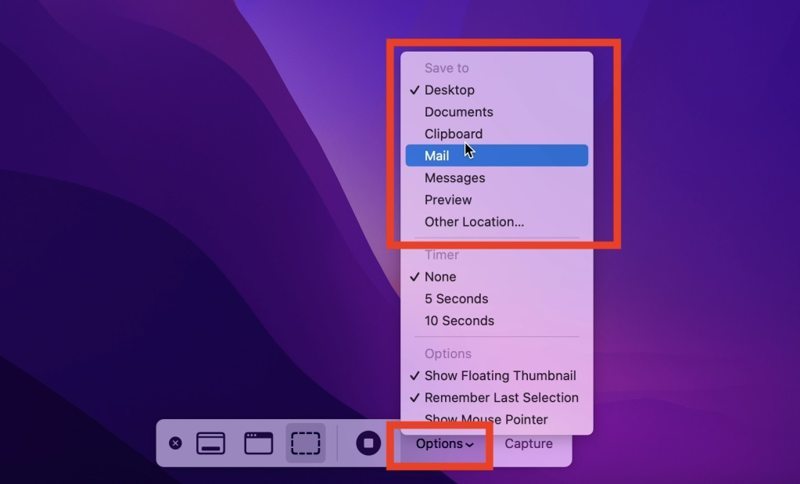
If you want to change the default screenshot path, press Shift + Command + 5 to open the Screenshot app. Click the Options button, and set a new path under Save to.Conclusion
Conclusion
This guide explained how to take a screenshot on a Mac. You can use the quick keys to capture the entire screen, a portion, or a window. Moreover, you can try Touch Bar, Screenshot app, command line, or Preview. We also demonstrated multiple ways to capture a full web page on a Mac. Apeaksoft Screen Recorder is a flexible option for both beginners and advanced users.
Related Articles
You can cast your computer screen to a TV via HDMI cable, Wi-Fi, AirPlay, and Chromecast. Click here to learn the detailed steps.
If you want to watch your Mac screen on a smart TV, we explains how to mirror Mac to Roku with AirPlay, a HDMI cable, and more.
To mirror iPhone to Mac, you can make use of Apple’s built-in feature, AirPlay, or QuickTime Player. We also introduce a powerful third-party tool.
This guide shows you the most intuitive way to enable screen recording on your computer, ensuring a clear picture and synchronized sound.
