How to Effectively Sync Messages between iPhone and Mac
According to a recent survey, iPhone users are more likely to use Mac. In addition to the advanced performance, the excellent syncing ability is the main reason. In fact, with the proper setup, you can seamlessly sync messages from iPhone to Mac including text and iMessage. Besides, you can send and receive messages on both your iPhone and Mac. This guide explains how to set it up on your iOS and Mac devices.
PAGE CONTENT:
Part 1: What You Need to Sync Messages from iPhone to Mac
Of course, you cannot sync messages between iPhone and Mac directly. To learn the premises, you should understand that message syncing is based on your iCloud account. The basic premises include:
1. iCloud Message sync is turned on both your iPhone and Mac.
2. All your devices are using the same Apple ID.
3. Wi-Fi and Bluetooth are enabled on your iPhone and Mac.
4. All the email addresses and phone numbers you use to send and receive messages are enabled on your iPhone and Mac.
Bear in mind that you can sync text messages and iMessage from iPhone to Mac. After setup, you can receive the new messages on both devices. Plus, you can reply to your messages on any device. If you delete a message on one device, it will be cleaned up on the other.
Part 2: How to Sync Messages from iPhone to Mac
Enable Message Sync on iPhone
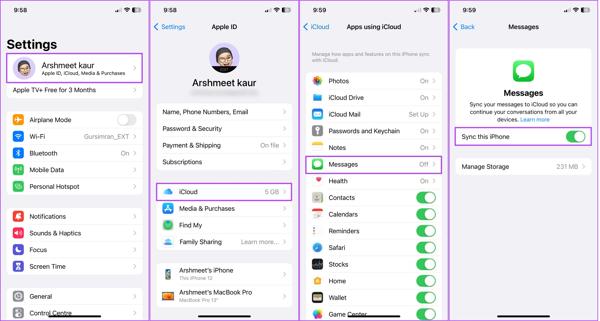
Step 1. Run the Settings app from your home screen, and tap on your profile.
Step 2. Choose iCloud, and tap Messages. If you cannot find Messages, tap Show All to expand the app list.
Step 3. Toggle on the switch of the Sync this iPhone option. Once your iPhone connects to the internet, your message history will be synced immediately.
Tips: If your Mac is out of storage space, you may encounter syncing paused on iMessage.
Enable Mac to Send and Receive iPhone Messages
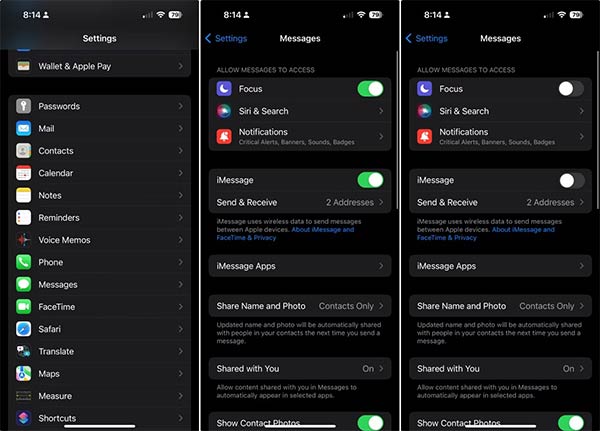
Step 1. Enter your Settings app.
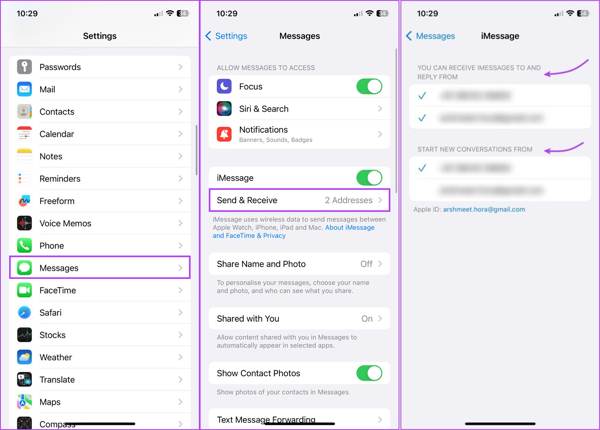
Step 2. Scroll down and choose the Messages option, toggle on the iMessage option, and then tap Send & Receive.
Step 3. Check all phone numbers and email addresses that you are using to send and receive messages. Then check the preferred phone number or email address under Start New Conversation From.
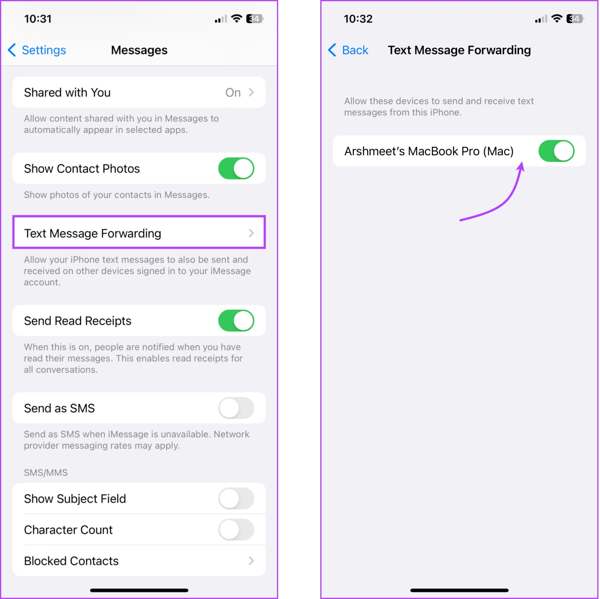
Step 4. If you wish to sync new text messages from iPhone to Mac, tap Text Message Forwarding, and turn on your Mac.
Enable Message Sync on Mac
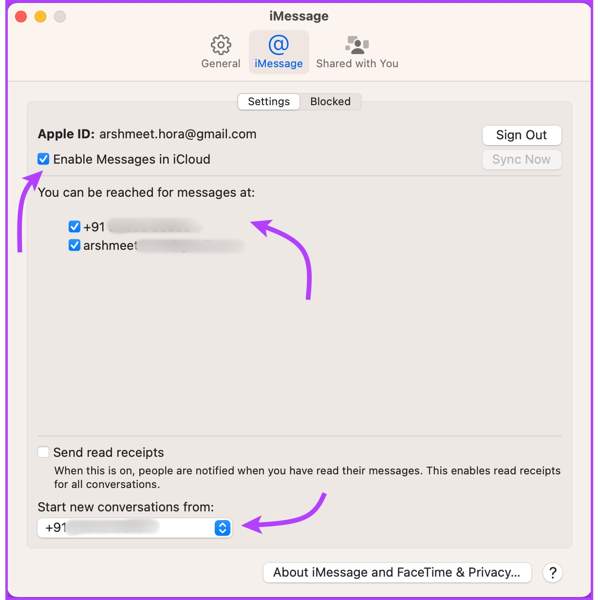
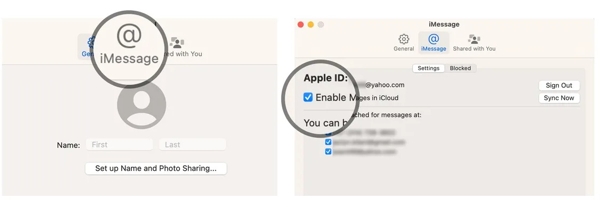
Step 1. To sync Mac messages with iPhone, open the Messages app on your Mac.
Step 2. Go to the Messages menu, choose Settings macOS Ventura or Preferences on macOS Monterey or earlier, and switch to the iMessage tab.
Step 3. Check the box next to Enable Messages in iCloud, and check all phone numbers and email addresses that you are using to send and receive messages.
Step 4. Next, pull down the list under Start new conversations from, and choose the preferred phone number or email address. It must match the setting on your iPhone.
Part 3: What to Do If Messages Not Syncing from iPhone to Mac
Sometimes, iMessages stop syncing on Mac or iPhone. You need to double-check check the Apple ID is the same on both devices. Then you can perform the solutions below one by one to fix it.
Solution 1: Re-enable Messages and iMessage
On iPhone
Step 1. Open the Settings app.
Step 2. Choose Messages, and turn off iMessage.
Step 3. Press the Side button until the shut-down screen appears, and move the slider to the right side. Then hold the Side button until you see the Apple logo.
Step 4. Next, go to Settings, Messages, and toggle on iMessage.
On Mac
Step 1. Run the Messages app on Mac.
Step 2. Choose Settings in the Messages menu, and go to the iMessage tab.
Step 3. Uncheck Enable Messages in iCloud. Then check the box to enable it again.
Solution 2: Manually Sync Messages
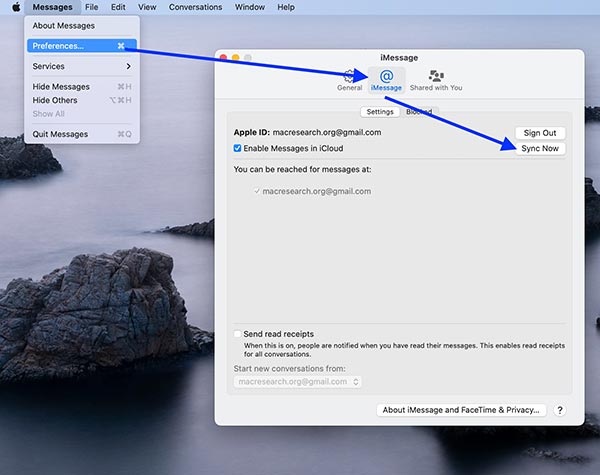
Step 1. Run the Messages app on Mac.
Step 2. Go to the Messages menu, choose Settings, and switch to the iMessage tab.
Step 3. Click the Sync Now button to sync messages between MacBook and iPhone manually.
Solution 3: Sync Message with iPhone Transfer
As mentioned previously, the iPhone syncs messages to the Mac through iCloud wirelessly. Nevertheless, it is not the only way to sync your messages. From this point, we recommend Apeaksoft iPhone Transfer. Moreover, it relies on physical connection and is more stable.
Best Message Sync Tool
- Sync photos between iOS devices fast.
- Add photos from PC or Mac to iPhone.
- Transcode photo files according to target devices.
- Support a wide range of data types.
- Compatible with the latest iPhones and iOS.
Secure Download
Secure Download

Here are the steps to sync iPhone messages to a computer without iCloud:
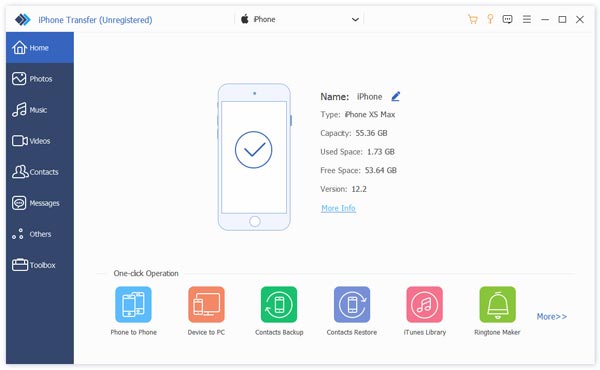
Step 1. Launch the best message syncing tool after you install it on your PC. There is another version for Mac users. Next, connect your iPhone to your computer with a Lightning cable.
Step 2. Once your iPhone is detected, you can preview all data on your device by type. To view conversations, for example, go to the Messages tab on the left sidebar. Choose a messaging app, pick a chat, and preview the text and attachments.
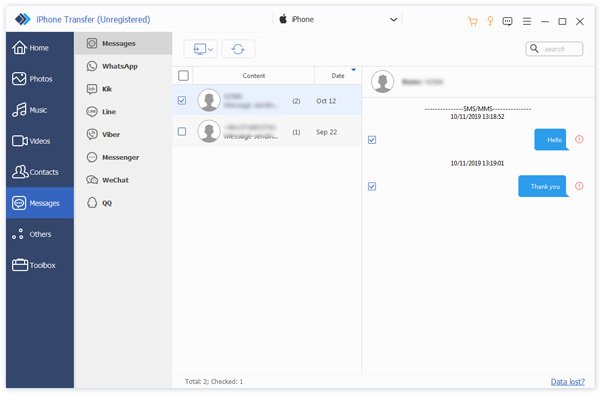
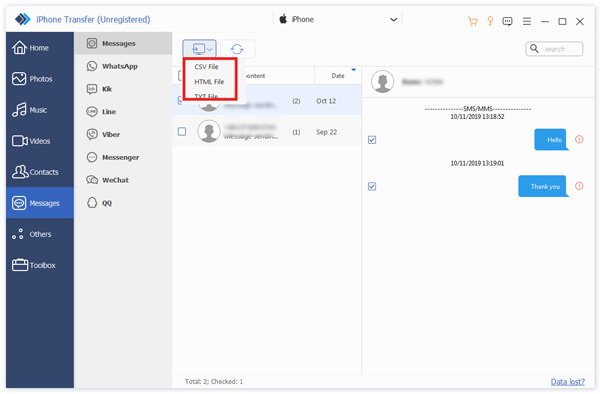
Step 3. Check the messages and attachments that you want to sync. Click the PC button on the top ribbon, and select an appropriate format, like CSV File. When prompted, set a directory to save the file, and confirm it. Wait for the message syncing on your iPhone to finish, and disconnect your iPhone. You can also sync iPhone contacts to Mac with this program.
Conclusion
This guide has talked about how to sync messages from iPhone to MacBook. With your Apple ID, you can sync your SMS and iMessage across your Apple devices. So that you can check your information on any device. Following our setup, you can also send and receive messages on Mac. Apeaksoft iPhone Transfer is an alternative solution to sync and back up your iOS messages. If you have other questions about this topic, please write them down below this post.
