Windows has a default system recovery tool to repair errors and restore system to a previous point. There are many solutions to start Windows System Recovery for Windows 7. Moreover, some of you may choose system recovery CD to repair your device. Creating a Windows 7 repair disc is a simple task that only takes few minutes without using third-party software. This tool can help you resolve all problems during installation. But it can't be used to install or re-install Window 7.

However, if your notebook or other devices do not have an optical (CD/DVD) drive, system recovery DVD is meaningless in such situation. What you need is to create a Windows 7 recovery USB to repair Windows 7 even if your computer fails to boot. As you know, Windows 7 does not allow a USB device to contain repair files. Therefore, we need to create a Windows 7 repair disc first and then transfer all files to a USB drive to make it available. In this article, it will guide you to create a bootable Windows 7 recovery USB, move on to learn the detailed steps.
Part 1. How to Create Windows 7 System Recovery USB
Windows gives you an option to create Windows 7 system repair disc and this process will takes a few clicks. It involves changing some security permissions on a system folder called Recoveryand involves coping some of your files in your memory disk. Before the operation, you need to make some preparations. First of all, prepare a USB and inset in a USB port on your computer.You need to cheek whether there are files you need on USB by opening "Windows Explorer", because all the files in your USB memory stick will be deleted. If you need those files on USB, copy them to your computer. After that, you are able to follow the steps below to start it.
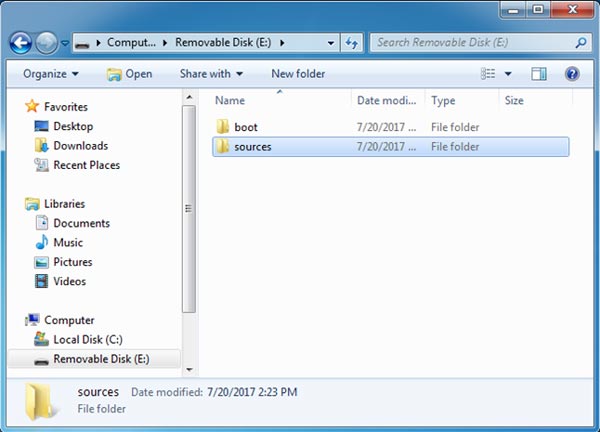
Step 1. Formatted USB stick and create two new folders
Right-click on the drive and choose "Format" option.When you see the "Format Removable Disk" window, choose the "NTFS file system" option. Then click on "Start" button. It is not necessary for you to adjust other configuration options. After you have formatted your USB stick, create two new folders named "boot" and "sources".
Step 2. Get access to the files you need
In this step, you need to find two files on your computer, which is needed in the next step. The first file named "Recovery" is located atC:\Recovery, which is many used for loading System Recovery tools on Windows 7.
Additionally, another file is called "Boot" which you can find in C:\Windows\Boot. The "Boot" file is used for booting the operating system.
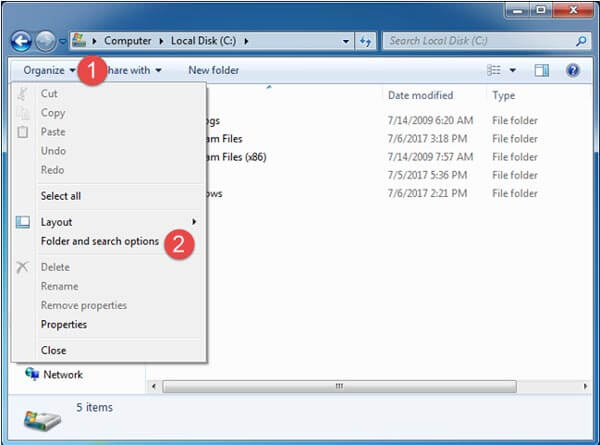
Tip: These two files are hidden on your computer. In order to find them, you need to rely on "Folder and searchoptions" by opening Windows Explorer and then access Folder Options. After that, click on the "Organize" button at the top-left corner of the window and then press on "Folder and search options".In the "Folder Options" windows, click on "View", check "Show hidden files, folders and drive". It is better to uncheck "Hide protected operating system files".Then press "OK" button.
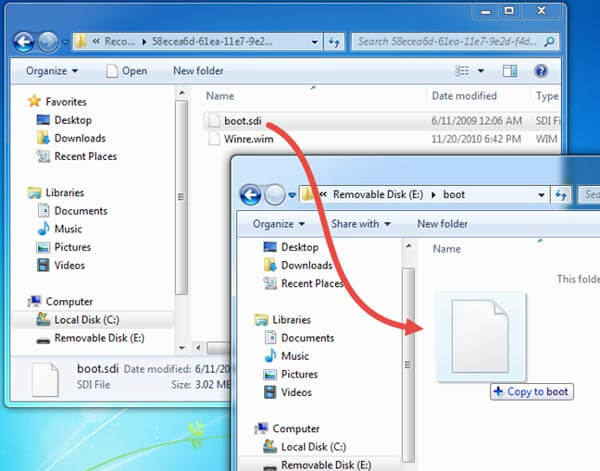
Step 3. Copy "boot.sdi" and "Winre.wim" filesto USB stick
Since you have got all the files needed for Window 7 system recovery, it's time to get your repair tools. Now, move on. Open the "Recovery"folder and you will find a subfolder in a name with series of numbers and letters. Open it, then copy the "boot.sdi" file and paste it to the "boot" folder on the USB. After that, copy the "Winre.wim" file to the "sources" folder on the USB and change the name to "boot.wim".
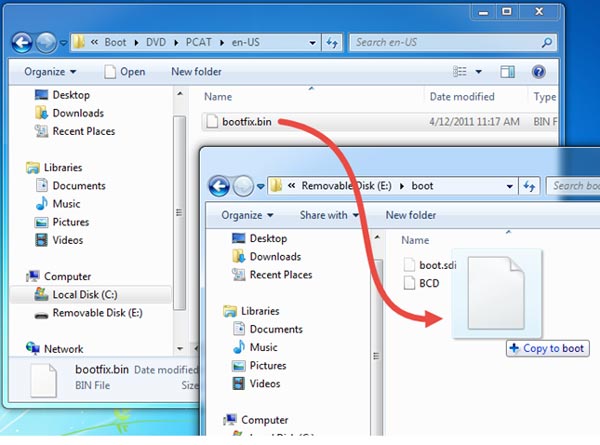
Step 4. Copy "BCD" and "bootfix.bin" file to "boot" file on USB
In "C:\Windows\Boot\DVD\PCAT\en-US", copy the "bootfix.bin" file and paste it to the "boot" folder on the USB memory stick. Then find the "BCD" file in the folder "C:\Windows\Boot\DVD\PCAT" and copy to the "boot"folder on the USB.
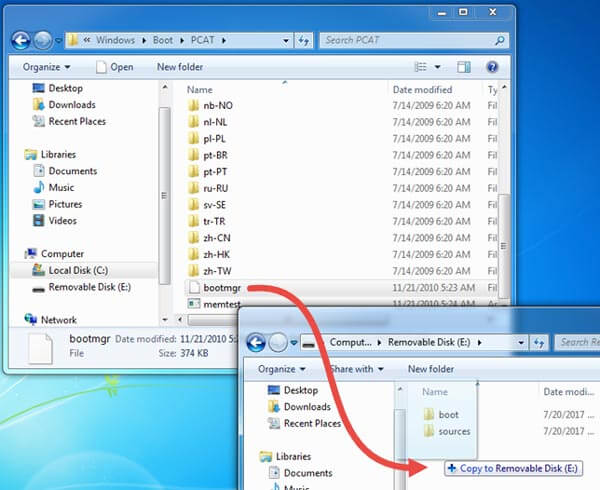
Step 5. Copy "bootmgr" file to the USB stick
Finally, open the folder "C:\Windows\Boot\PCAT" and copy the "bootmgr" file to the rootfile on the USB stick. Be patient to the complex steps, and you are approaching success in building Windows 7 USB recovery USB.
Step 6. Test the USB memory stick
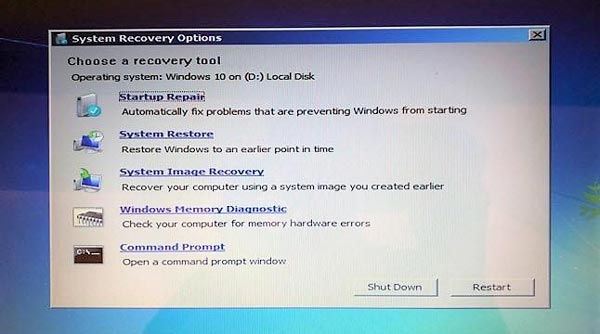
After you have finished all the steps, you are able to ease up for you have done the work by yourself. And this part is to test your USB memory stick whether it really works or not. Insert it to your computer. If it works, you will find "System Recovery Options" window on your screen.
Part 2. iOS System Recovery
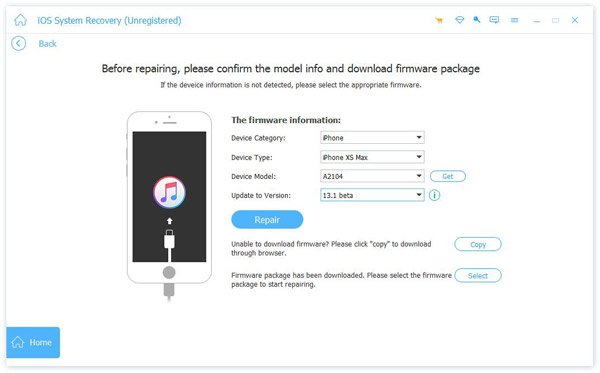
The problem on Windows 7 system can be fixed by the Windows 7 recovery USB or the repair DVD/CD. You may want to ask how fix problems on iOS system? Does it have a recovery tool or some similar software to repair errors?Certainly, it has iOS system recovery that is able to fix iOS to normal. It is Apeaksoft iOS System Recovery, which is one of the best recovery tools for iOS devices. You can find its features below.

4,000,000+ Downloads
Compatible with all iOS devices like iPhone X/8/8 Plus/7 Plus, iPad Pro/Air and more.
Fixing iPhone from DFU mode, recovery mode, Apple logo, black screen, etc. to normal.
It is safe enough that you will not lose data in the process repair.
Conclusion
There are many different ways to achieve the one target. When the repair DVD/CD cannot use in some certain circumstance, you need to find another available methods. And in this article, it is Windows 7 recovery USB. Therefore, if you are looking for a way to create a Windows 7 recovery USB, this article has the comprehensive guides to teach you step-by-step. At the same time, you also have an opportunity to get access to a useful iOS system recovery.