Tutorial to Transfer Photos from iPhone to Windows PC/Mac OS Quickly
"I just got my iPhone 15, and the cameras are so excellent that I cannot help taking a lot of selfies. Now iPhone notifies me that there is not enough space to download and install the new version of iOS, so I have to transfer photos from iPhone to computer and delete them to free up space, but I don't know how to do it. Please help."
How can I transfer photos from iPhone to PC? That's the problem confusing a lot of people. Don't worry! Apple does not constrain users from downloading pictures from iPhone to PC/Mac. There are several methods to complete this task simply. In this tutorial, we are going to show you 5 ways to transfer photos from iPhone to PC.
PAGE CONTENT:
- Part 1: Basic Way to Transfer Photos from iPhone to Computer
- Part 2: Best Way to Transfer Photos from iPhone/iPad to Computer
- Part 3: How to Transfer Photos from iPhone to Computer via iTunes
- Part 4: How to Import Photos from iPhone to PC Using iCloud Photo Library
- Part 5: How to Sync Photos from iPhone to Computer via File/Windows Explorer
Part 1: Basic Way to Transfer Photos from iPhone to Computer
Apple has introduced serious system permissions into iOS. No one can manage files and folders on the iPhone directly except for photos. iPhone can be treated as a digital camera on Windows PC. To transfer photos from iPhone to computer, all you need is a USB cable.
How to Transfer Photos from iPhone to Computer on Windows 7 via AutoPlay
Step 1. Connect your iPhone to the computer with a USB cable.
Step 2. Open the Start Menu, type Autoplay in the search box, and select it.
Step 3. Click Import pictures and videos on the AutoPlay window to open iPhone Camera Roll on PC.
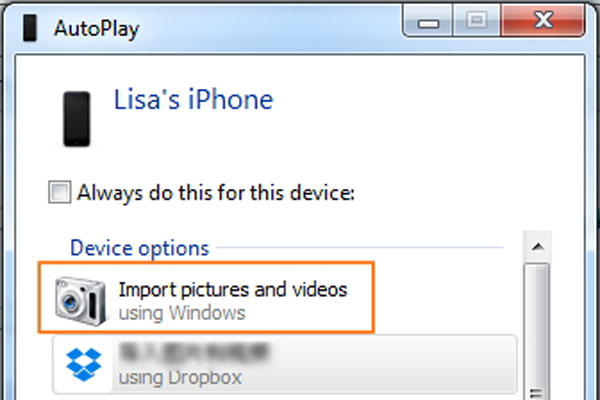
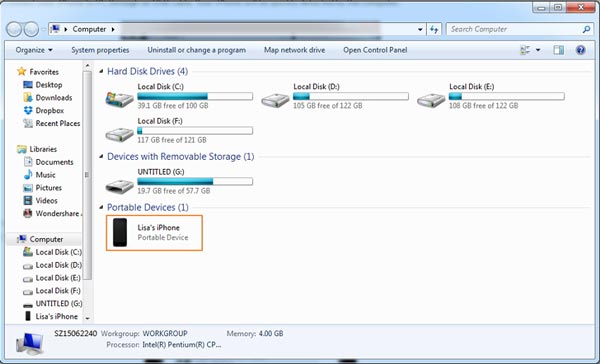
If AutoPlay does not pop up automatically, open My Computer from the desktop, and you will find your iPhone under the Portable Devices section. Right-click on it and choose Import pictures and videos on the menu bar.
Step 4. Hold down the Ctrl key and select all photos that you want to transfer from iPhone to your PC, and then drag and drop them to your desktop to complete transferring photos from iPhone to PC on Windows 7.
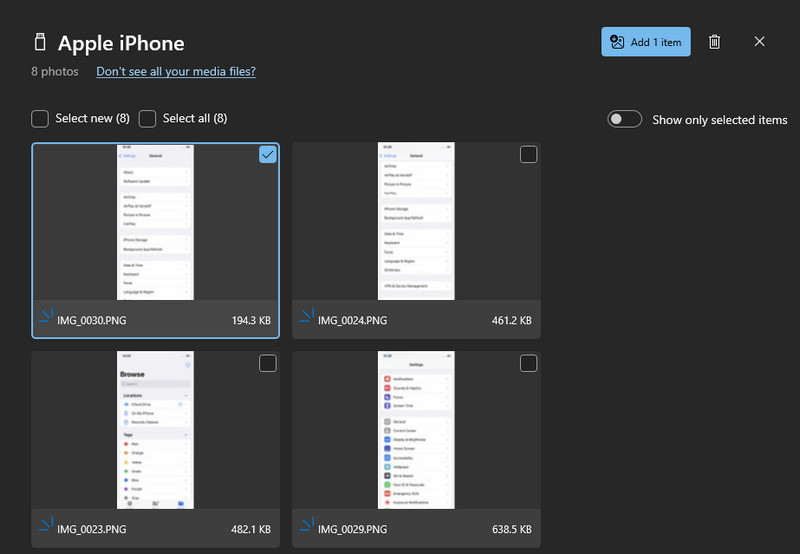
How to Transfer Photos from iPhone to PC on Windows 8/10/11 via the Photo App
Step 1. Launch the Photos app on your computer.
Step 2. Click your device tab in the left navigation bar.

Step 3. Check your desired photos and click the Add button in the top-right corner. You need to choose a saving path for them.
Tips:
As we mentioned before, this is the easiest way to export photos from iPhone to computer; however, there are some tips you should know:
1. It only works on the pictures in iPhone Camera Roll.
2. The original USB cable is necessary.
3. While transferring photos, you have to keep your iPhone unlocked (Check here to tell If Your iPhone Is Unlocked). Otherwise, the photos will not show up in Windows.
4. If you want to use AutoPlay on Windows 10, you have to turn it on in Settings > Devices.
Part 2: Best Way to Transfer Photos from iPhone/iPad to Computer
If you are looking for the best way to transfer photos from iPhone to computer or the best alternative to iExplorer, we recommend Apeaksoft iPhone Transfer, which is an easy-to-use tool with huge compatibility.
Transfer Photos from iPhone to Computer Easily
- Transfer photos from iPhone to laptop in one click.
- You can send photos from iPhone to iPhone, PC to iPhone, and sync photos from iPhone to PC.
- Preview for selectively syncing.
- No damage to existing photos.
- Faster and safer to transfer photos between iPhone and computer.
- Works for iPhone/iPad/iPod touch.
Secure Download
Secure Download

How to transfer photos from iPhone to computer with iPhone Transfer
Step 1. Install the best iPhone transferring application to your computer
Get the Apeaksoft iPhone Transfer downloaded to your computer by clicking the corresponding button above. Follow the onscreen instructions to install it. Plug your iPhone into your PC using a USB cable.
Tips: We suggest you use Apple's Lightning cable. Third-party cords may cause data loss or device damage.
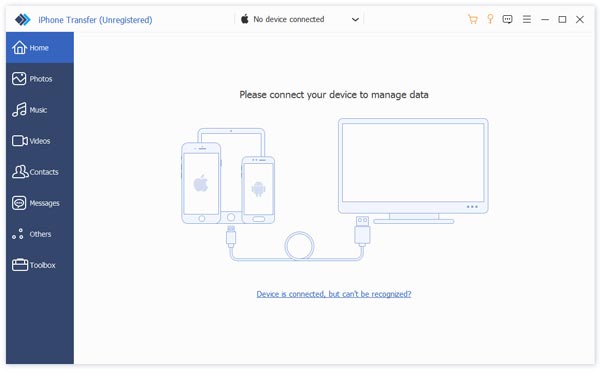
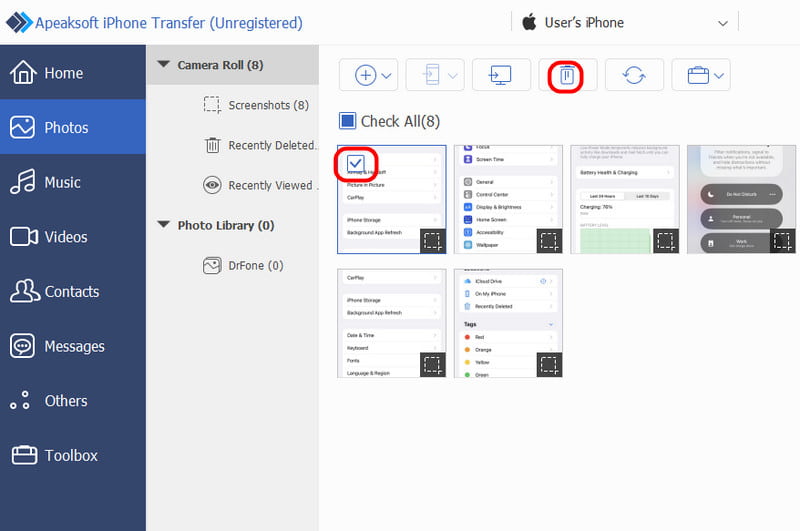
Step 2. Preview iPhone photos before transfer
Locate to the left sidebar and select the Photos tab. All photos on your iDevice will be loaded on the right panel. Here, you can preview the thumbnail of each picture. Double-click the picture to preview the original one.
You can also manage iPhone photos here. For example, you can select unwanted pictures and click the Delete button at the top ribbon to get rid of them.
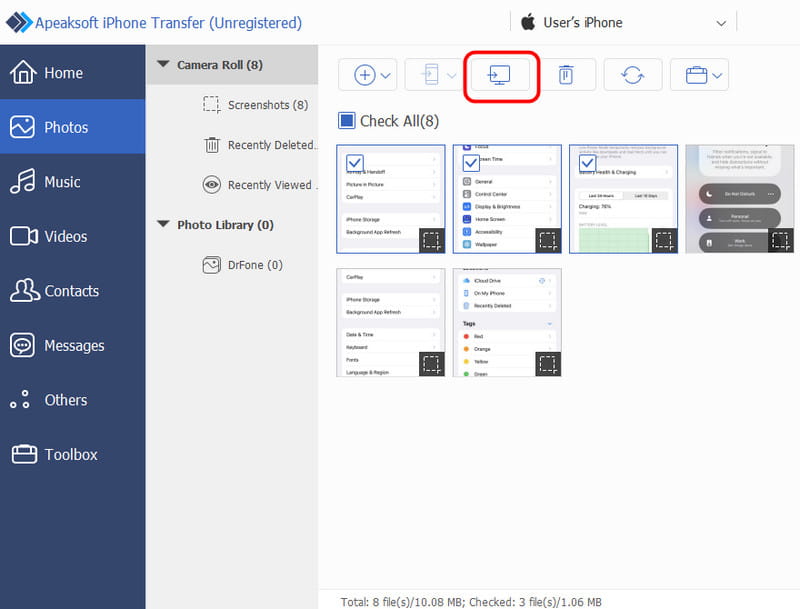
Step 3. Transfer photos from iPhone to PC
Select all pictures that you want to transfer to your computer, and then hit the to PC button at the top. Then, a dialog will pop up, asking you to select a destination to save iPhone photos.
Tips:
Apparently, iPhone Transfer is a better option for transferring photos from iPhone to the external hard drive. First of all, it will not interrupt existing photos on both iPhone and PC like iTunes does.
Plus, iPhone Transfer does not require a Wi-Fi network. It syncs photos between iPhone and computer via USB cables. It is much safer than the Internet. Moreover, it is a two-way transfer approach. You can transfer photos from iPhone to PC Windows 7 and new versions, iPhone to iPhone or PC to iPhone within a single application.
Part 3: How to Transfer Photos from iPhone to Computer via iTunes
iTunes is a useful toolkit for iPhone and iPad to sync photos, music, movies, TV shows and other files to iPhone; however, it is one-way syncing. In other words, users cannot import pictures from iPhone to computer using iTunes's photo syncing feature. The only way to import photos from iPhone to Windows 8 and other Windows PCs is iTunes backup feature.
How to import pictures from iPhone to computer with iTunes
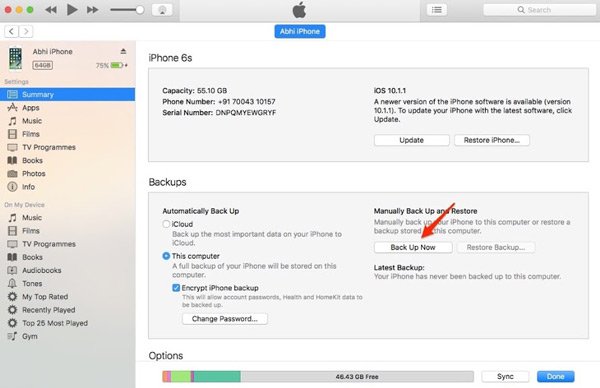
Step 1. Also, connect your iPhone and your PC using a USB cable and open the latest version of iTunes. To get iTunes up to date, go to the Help menu and click Check for Update to get the new version.
Step 2. Wait for iTunes to detect your device, and then click the iPhone button on the top left side and go to the "Summary" tab from the left-hand bar.
Step 3. Scroll down to the Backups area, make sure to select This computer, and click on the Back Up Now button. If prompted whether to encrypt the backup or not, make a decision based on your situation.
Step 4. After confirming the additional options, iTunes will initiate transferring photos from iPhone to iTunes along with other data.
iTunes is another option to transfer all photos from iPhone to PC. The downside is that you cannot open iTunes backup or look at iPhone photos on your computer without third-party tools. And the only way to use iTunes backup is to restore it on your iPhone, but existing data will be covered. According to our research, more and more iPhone users have given up iTunes because it notifies errors frequently.
Part 4: How to Import Photos from iPhone to PC Using iCloud Photo Library
iCloud is a web-based service that backs up and transfers pictures from iPhones to laptops/PCs.
Step 1. First of all, transfer photos from iPhone to iCloud. Turn on your iPhone, head to Settings > iCloud > Photos, and put the switch of iCloud Photo Library to the ON position. Connect your iPhone to a Wi-Fi network to start syncing.
Step 2. Next, open your browser on PC and access iCloud backup. Sign in with your Apple ID and password associated with your iPhone, answer the security questions or enter the verification code to open the home page.
Step 3.

iCloud Photo Library is also available to transfer photos from iPad to computer. But the shortcoming is obvious. iCloud relies on a wireless connection to transfer photos. It may take more than half an hour to transfer pictures from iPhone to iCloud Photo Library depending on the amount of photos and your Wi-Fi network. Though there are many public Wi-Fi networks, it is not a good idea to use them to transfer photos to iCloud. That may leak your privacy and make you a victim of cybercrime.
Part 5: How to Sync Photos from iPhone to Computer via File/Windows Explorer
Another convenient way to transfer photos from iPhone to PC is using File/Windows Explorer. This method doesn't require any third-party software or technical operation. All you need is a USB cable.
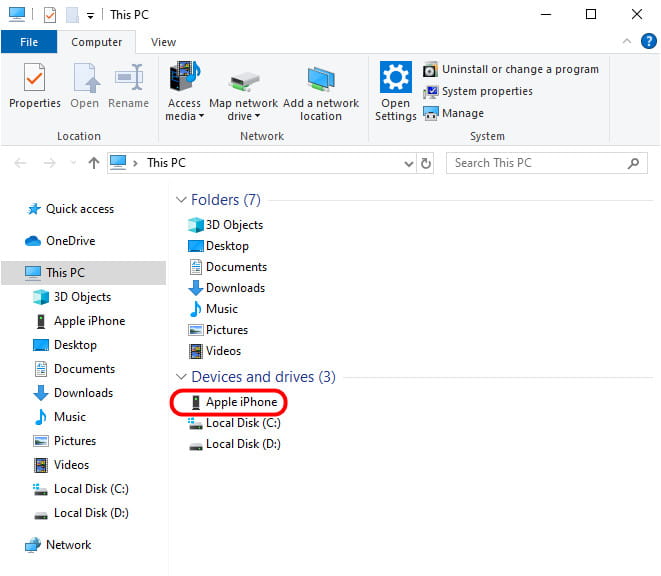
Step 1. Connect your iPhone to your computer with a USB cable.
Step 2. Open This PC on your desktop. And you will see the Apple iPhone.
If you are a Windows 7 user, please open Computer on the desktop to find Apple iPhone.
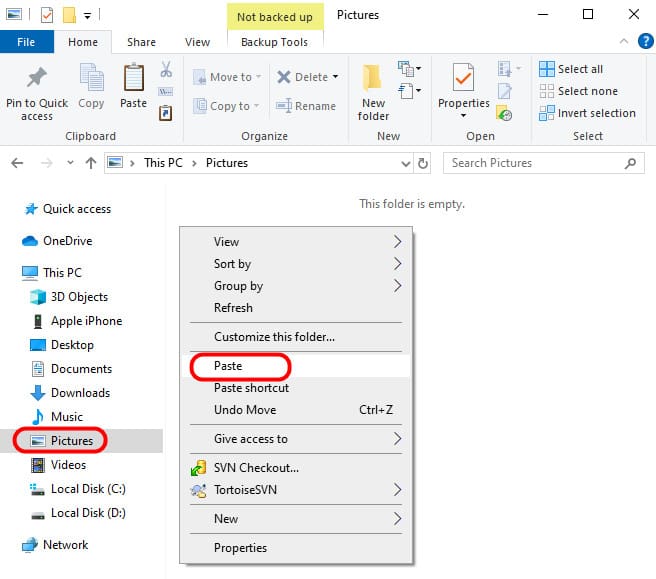
Step 3. Double-click the Internal Storage disk and the DCIM folder. You will see one or more folders here, which include your iPhone photos. You can select all the folders, right-click one of them and choose Copy.

Step 4. Select the Pictures option in the left navigation bar, right-click the space on the right page, and choose Paste. Then, your iPhone photos will be transferred to your computer successfully.
Conclusion
According to a recent survey conducted by Flickr, iPhone users are more likely to capture photos, partly because of excellent lens technology. The problem that comes with it is limited internal storage, and it cannot handle so many pictures on iPhone.
Therefore, we have shared 5 simple ways on how to transfer photos from iPhone to computer. They all have unique benefits and downsides.
For example, a USB cable is the simplest approach to sync photos to PC; however, it does not support all photos on iPhone. iTunes could back up photos to computer, but you cannot look at or use them. Windows Photo Gallery could import photos from iPod to PC Windows 10 through USB cable. And iCloud is the slowest photo transfer. From this point, we have recommended Apeaksoft iPhone Transfer. It simplifies the process and offers smoother photo transfer experiences. Now, you can make a smart decision and get your iPhone photos to computer in a few minutes.
Related Articles
Don't know how to transfer everything from iPhone to iPhone? If you change to a new iPhone or other situations, you must learn it.
Read this guide to learn how to transfer files from Android to iPhone or vice versa using a stable Wi-Fi network or USB cable.
Running out of your Android space? Read this article, move apps to an SD card, and free up your device's internal storage.
If you need to transfer iPhone photos to another iPhone, you are lucky since this guide provides seven effective methods.
